
Web API development in Visual Studio 2022
In Visual Studio 2022 one of the main scenarios for web developers is creating Web APIs with ASP.NET Core. In the latest preview of Visual Studio 2022, 17.6, we have added a number of updates to be more efficient when developing APIs. In this post we will go over a sample scenario of developing a new API from scratch and point out the new features along the way. To get started download the latest preview of Visual Studio 2022 with the link below.
Some of the new features that we will cover in this post include.
- HTTP editor with integrated client
- API Endpoints Explorer
- Scaffolding
- Entity Framework tooling in Visual Studio
In this post we are going to show a full end-to-end for starting with a new project to developing a full Web API. Below is a brief outline of this post.
- Getting started – creating a new API project
- Adding models to your project
- Generating APIs using scaffolding
- Exploring APIs with Endpoints Explorer
- Exercising APIs with the HTTP editor
All of the code is available for you at sayedihashimi/RestaurantService: Sample ASP.NET Core Web API (github.com).
Video overview of new features
Take a look at this video from Mads Kristensen covering some of the new updates that we will cover in this blog post.
Getting Started
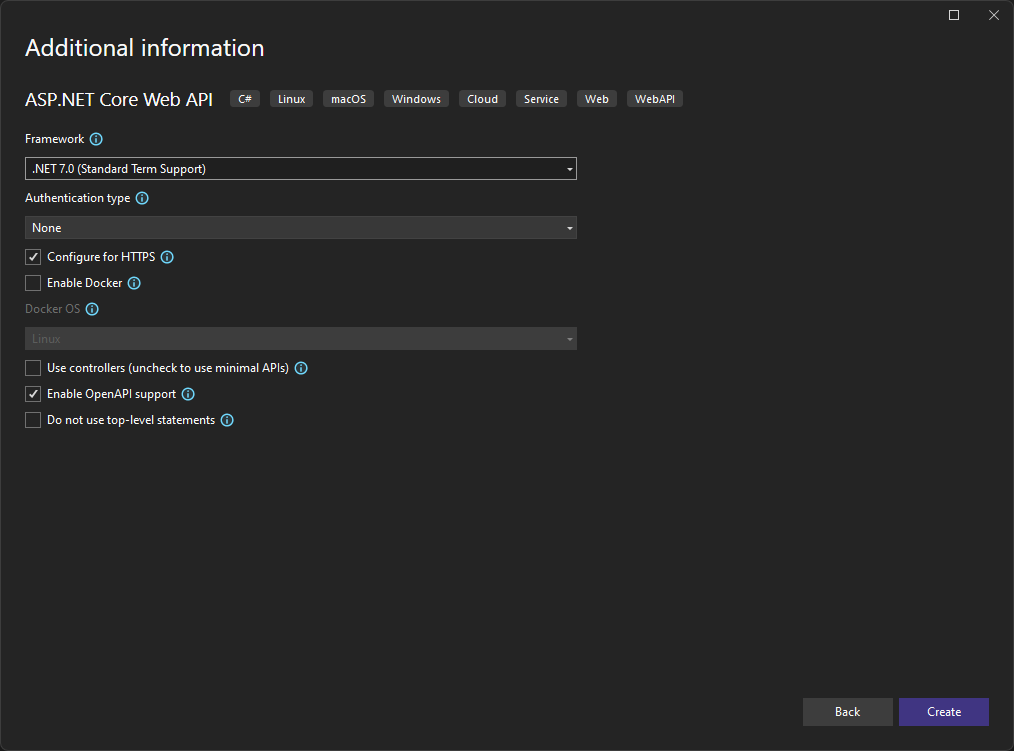
To get started developing a Web API in Visual Studio the first step is to create a new project. In Visual Studio 2022 you can create a new project using the New Project dialog. In this post we will create an ASP.NET Core Web API for a fictitious take-out restaurant. To follow along this tutorial, create a project named MyRestaurantService with the following options selected in the Additional Information page.
In this sample we are using API endpoints instead of Controller based APIs, but you can follow along with Controllers. For more info on the difference between Controller based APIs and Endpoint APIs, see this doc Choose between controller-based APIs and minimal APIs. The steps for API endpoints and Controller based APIs are the same, just chose the Controller options instead of Endpoints when applicable.
Now that the project has been created, the first thing that we want to do is to add some model classes for the objects that we want to expose with our API. We will need to add the following classes/enums to the project. In the table below you’ll see the list of objects to create as well as a link to the source for each file.
| Name | Description and link |
| Contact | This class will capture represent the customer who is placing the order. Source file. |
| MenuItem | Represents a menu item that’s in the restaurant menu. Source file. |
| MenuItemCategory | Enum that represents the category for the menu item. Source file. |
| MenuItemOrdered | Represents an item which has been added a customer order. Source file. |
| OrderStatus | Represents the status of the order submitted. Source file. |
| PaymentMethod | Enum that represents the payment method used for the order. Source file. |
| TogoOrder | Represents an order that has been placed. Source file. |
The files added are either standard POCO classes or enums. For example, below is how the Contact class is defined.
Contact.cs
namespace MyRestaurantApi;
public class Contact {
    public int Id { get; set; }
    public string? Name { get; set; }
    public string? Email { get; set; }
    public string? Phone { get; set; }
}
These objects represent a set of data that can be used to display a menu to end-users as well as submit Togo orders. Now that we have added these model classes the next step is to use scaffolding in Visual Studio to create the API endpoints and connect the Entity Framework DbContext. There are 4 sets of API endpoints that we will need to create.
- Contact
- MenuItem
- MenuItemsOrdered
- TogoOrder
For each model class we will use scaffolding to handle the hard work of generating the initial API endpoints. Let’s get started with that.
Scaffolding in Visual Studio
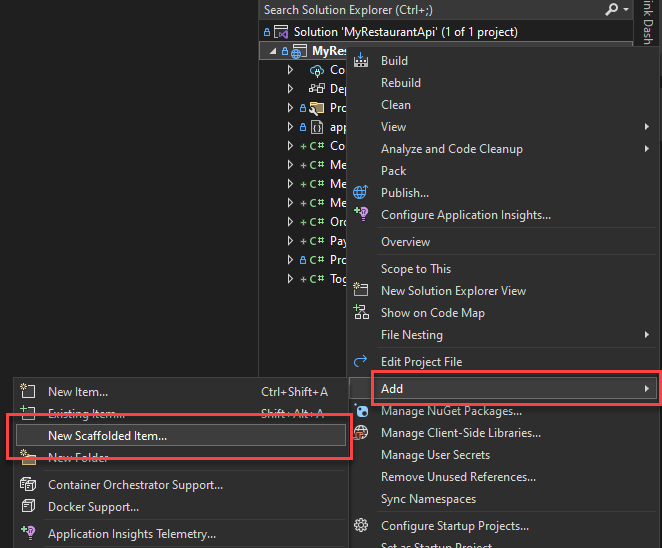
To get started with scaffolding, right click on the ASP.NET Core web project, MyRestaurantApi, and select Add > New Scaffolded Item. See the image below.
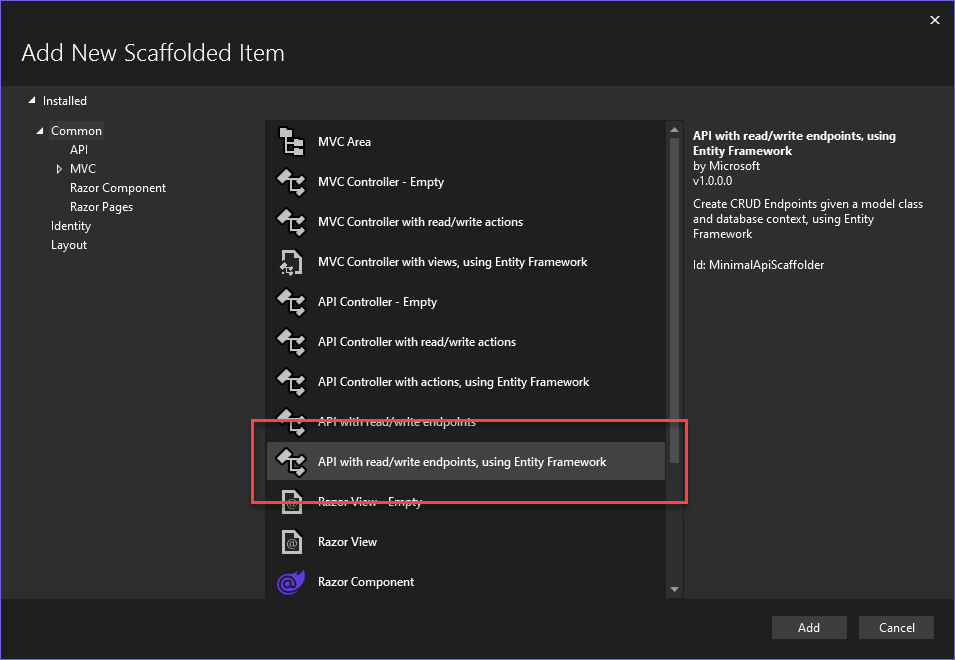
Once you invoke this menu item, the scaffolding dialog will appear. On this dialog we will select the type of scaffolder that we want to run and then configure it. For this project, we will use the API with read/write endpoints, using Entity Framework scaffolder.
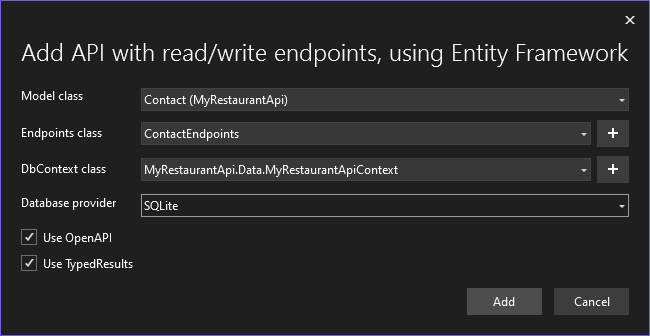
After selecting this option, you will see a new dialog which prompts for you to configure the scaffolding options. The main options are summarized in the table below.
| Option | Description |
| Model class | The model class which will be used for scaffolding. Scaffolding will generate the API to read/write values for the selected model class. |
| Endpoint class | The class where the new endpoints should be written to. If you select an existing class, the endpoints will be added to that class. You can also create a new class with the + button. |
| DbContext class | The Entity Framework DbContext which will manage the read/write operations to the database. You can create a new DbContext with the + button. |
| Database Provider | The database provider to use, this will be determined by the database where you want to store this data. |
We are going to start with scaffolding the Contact model. In this case we will specify the Contact class as the model class, create a new endpoints class as well as a new DbContext. We are going to use Sqlite for this sample, but you can select any of the providers listed based on your needs. Below is the dialog with these options configured.
When this was populated the + button was used to create a new endpoints class as well as the DbContext. You can use the default value that is provided when you click the + button for both of these. The next step is to click the Add button. After clicking Add, the scaffolding tool will be installed using NuGet and then it will be invoked to generate the new files. The files that were added or modified are listed below.
Project file – the project file is modified to add package references needed to support the changes as well as one for the scaffolding tool itself.
Program.cs – the Program.cs file is modified to add the EF DbContext as well as registering the new endpoints class.
appSettings.json – The appSettings.json file is modified to add the connection string.
ContactEndpoints.cs – This is a new class that is added which handles the API request/response.
Below is the code which has been generated to the ContactEndpoints class.
using Microsoft.EntityFrameworkCore;
using Microsoft.AspNetCore.Http.HttpResults;
using Microsoft.AspNetCore.OpenApi;
using MyRestaurantApi.Data;
namespace MyRestaurantApi;

public static class ContactEndpoints
{
    public static void MapContactEndpoints (this IEndpointRouteBuilder routes)
    {
        var group = routes.MapGroup("/api/Contact").WithTags(nameof(Contact));

        group.MapGet("/", async (MyRestaurantApiContext db) =>
        {
            return await db.Contact.ToListAsync();
        })
        .WithName("GetAllContacts")
        .WithOpenApi();

        group.MapGet("/{id}", async Task<Results<Ok<Contact>, NotFound>> (int id, MyRestaurantApiContext db) =>
        {
            return await db.Contact.AsNoTracking()
                .FirstOrDefaultAsync(model => model.Id == id)
                is Contact model
                    ? TypedResults.Ok(model)
                    : TypedResults.NotFound();
        })
        .WithName("GetContactById")
        .WithOpenApi();

        group.MapPut("/{id}", async Task<Results<Ok, NotFound>> (int id, Contact contact, MyRestaurantApiContext db) =>
        {
            var affected = await db.Contact
                .Where(model => model.Id == id)
                .ExecuteUpdateAsync(setters => setters
                  .SetProperty(m => m.Id, contact.Id)
                  .SetProperty(m => m.Name, contact.Name)
                  .SetProperty(m => m.Email, contact.Email)
                  .SetProperty(m => m.Phone, contact.Phone)
                );

            return affected == 1 ? TypedResults.Ok() : TypedResults.NotFound();
        })
        .WithName("UpdateContact")
        .WithOpenApi();

        group.MapPost("/", async (Contact contact, MyRestaurantApiContext db) =>
        {
            db.Contact.Add(contact);
            await db.SaveChangesAsync();
            return TypedResults.Created($"/api/Contact/{contact.Id}",contact);
        })
        .WithName("CreateContact")
        .WithOpenApi();

        group.MapDelete("/{id}", async Task<Results<Ok, NotFound>> (int id, MyRestaurantApiContext db) =>
        {
            var affected = await db.Contact
                .Where(model => model.Id == id)
                .ExecuteDeleteAsync();

            return affected == 1 ? TypedResults.Ok() : TypedResults.NotFound();
        })
        .WithName("DeleteContact")
        .WithOpenApi();
    }
}
This uses the ASP.NET Core minimal API support, as mentioned earlier if you prefer Controller based APIs a new Controller would have been added to the Controllers folder.
Now that we have generated the API endpoints for the Contact class, we need to do the same for the remaining three model classes. We are going to repeat the same steps with one difference. Instead of choosing to create a new DbContext, we will select the DbContext which was created in this step to be reused for the other three. Since you’re going to select the existing DbContext, the Database Provider option will be disabled because it’s already configured in the DbContext. Now you can scaffold the API endpoints for the classes; MenuItem, MenuItemsOrdered and TogoOrder.
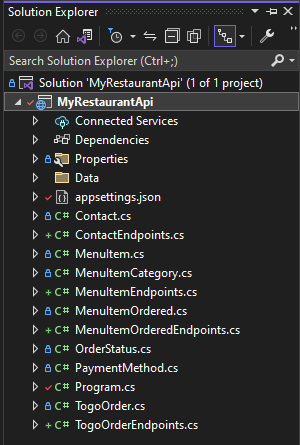
When you have completed scaffolding for those three files, your Solution Explorer should look similar to the image below.
At this point it would be a good idea to build the solution to ensure that there are no issues. In this step we have used Visual Studio scaffolding to create a set of API endpoints that are connected to an Entity Framework database. The next step is to get the database setup.
Now that we have a DbContext, we want to add some initial data to the database, this is commonly referred to as Data Seeding. In our case we need to populate the list of items which customers can order (the MenuItems) as well as the Contact table. We can do this by customizing the DbContext class that was generated during scaffolding. We will add two methods to return the data and we will override the OnModelCreating method to register the data with the database. The methods that we will add to return the initial data are GetSeedDataMenuItems and GetSeedDataContacts. These methods just return an array of MenuItems or Contacts, respectively. Then we call those methods in the OnModelCreating method. The code should look like the following now.
public class MyRestaurantApiContext : DbContext {
    public MyRestaurantApiContext(DbContextOptions<MyRestaurantApiContext> options)
        : base(options) {
    }

    protected override void OnModelCreating(ModelBuilder modelBuilder) {
        modelBuilder.Entity<MenuItem>().HasData(GetSeedDataMenuItems());
        modelBuilder.Entity<Contact>().HasData(GetSeedDataContacts());
    }

    public DbSet<MyRestaurantApi.Contact> Contact { get; set; } = default!;

    public DbSet<MyRestaurantApi.MenuItem> MenuItem { get; set; } = default!;

    public DbSet<MyRestaurantApi.MenuItemOrdered> MenuItemOrdered { get; set; } = default!;

    public DbSet<MyRestaurantApi.TogoOrder> TogoOrder { get; set; } = default!;
    private MenuItem[] GetSeedDataMenuItems() => new MenuItem[] {
        new MenuItem {
            Id = 1,
            Name = "Hamburger",
            Price = (decimal)3.68,
            Description = "It's a cheese burger without the cheese",
            Category = MenuItemCategory.Lunch
        },
        new MenuItem {
            Id = 2,
            Name = "Hamburger - double",
            Price = (decimal)5.70,
            Description = "It's a cheese burger without the cheese, with two beef patties",
            Category = MenuItemCategory.Lunch
        },
        new MenuItem {
            Id = 3,
            Name = "Cheeseburger",
            Price = (decimal)4.09,
            Description = "A hamburger with cheese",
            Category = MenuItemCategory.Lunch
        },
        new MenuItem {
            Id = 4,
            Name = "Cheeseburger - double",
            Price = (decimal)5.09,
            Description = "A hamburger with cheese, with two beef patties",
            Category = MenuItemCategory.Lunch
        },
        new MenuItem {
            Id = 5,
            Name = "Mushroom & Swiss burger",
            Price = (decimal)4.59,
            Description = "Mushroom & Swiss burger",
            Category = MenuItemCategory.Lunch
        },
        new MenuItem {
            Id = 6,
            Name = "Mushroom & Swiss burger - double",
            Price = (decimal)6.09,
            Description = "Mushroom & Swiss burger, with two beef patties",
            Category = MenuItemCategory.Lunch
        }
    };
    private Contact[] GetSeedDataContacts() => new Contact[] {
        new Contact {
            Id = 1,
            Name = "Sayed Hashimi",
            Email = "sayed@example.com",
            Phone = "555-111-2222"
        },
        new Contact {
            Id=2,
            Name = "Mads Kristensen",
            Email = "mads@example.com",
            Phone = "555-111-3333"
        },
        new Contact {
            Id=3,
            Name = "Eline Barstad",
            Email = "elineb@example.com",
            Phone = "555-111-4444"
        },
        new Contact {
            Id=4,
            Name = "Theodore Lamy",
            Email = "theol@example.com",
            Phone = "555-111-5555"
        },
        new Contact {
            Id=5,
            Name = "María Zelaya",
            Email = "mariaz@example.com",
            Phone = "555-111-6666"
        },
        new Contact {
            Id=6,
            Name = "Kubanychbek Sagynbek",
            Email = "kubans@example.com",
            Phone = "555-111-7777"
        },
        new Contact {
            Id=7,
            Name = "Denise Bourgeois",
            Email = "deniseb@example.com",
            Phone = "555-111-8888"
        },
        new Contact {
            Id=8,
            Name = "Robin Danielsen",
            Email = "robind@example.com",
            Phone = "555-111-9999"
        }
    };
}
Now we have done everything that is needed to get the DbContext and the data model to support this application. We can now move on to get the database itself ready, thus far we have just defined some code but not applied any of that to any database. We will use some new support for Entity Framework in Visual Studio to simplify this.
Entity Framework Support in Visual Studio
Before we can exercise the API endpoints, we need to get the database configured. In the scaffolding step, the EF DbContext was defined in the code, but the database still hasn’t been configured to store the data that the DbContext represents. To do this we need to perform two operations.
- Add an EF migration
- Update the database
In the past you would have had to use the dotnet ef command line utility to perform these two steps. In Visual Studio we have added support so that you are not required to use the command line for these operations. The support has been added in the Connected Services tab for ASP.NET Core projects. To get started double click on the Connected Services node in Solution Explorer under the web project MyRestaurantApi. When you enter that page, it will look like the following.
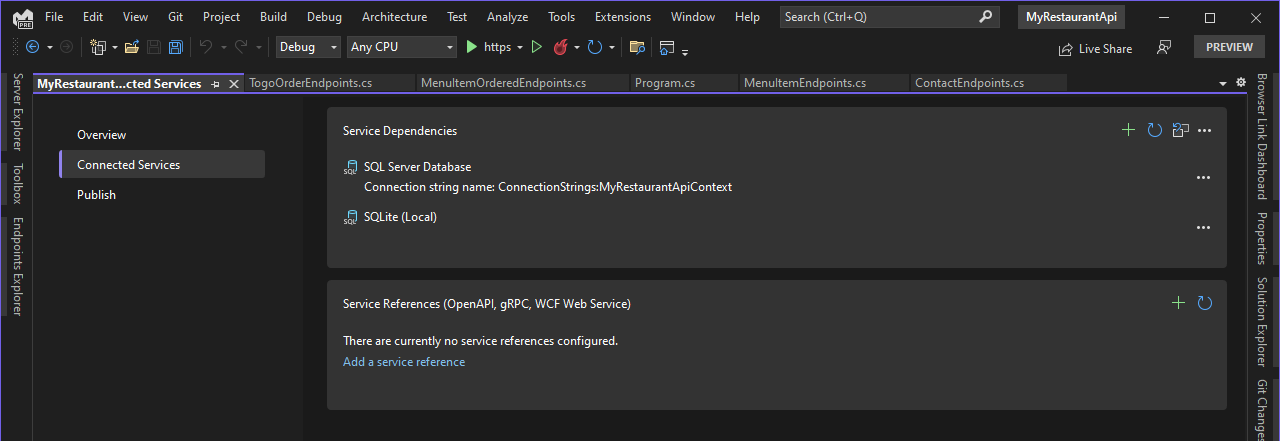
Since we configured scaffolding to use Sqlite, we will be using some options available in the … menu to the right of the Sqlite (local) entry in the Service Dependencies. When you click on that menu, you should see the following options.
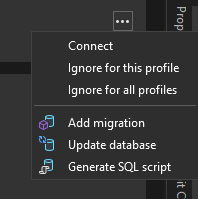
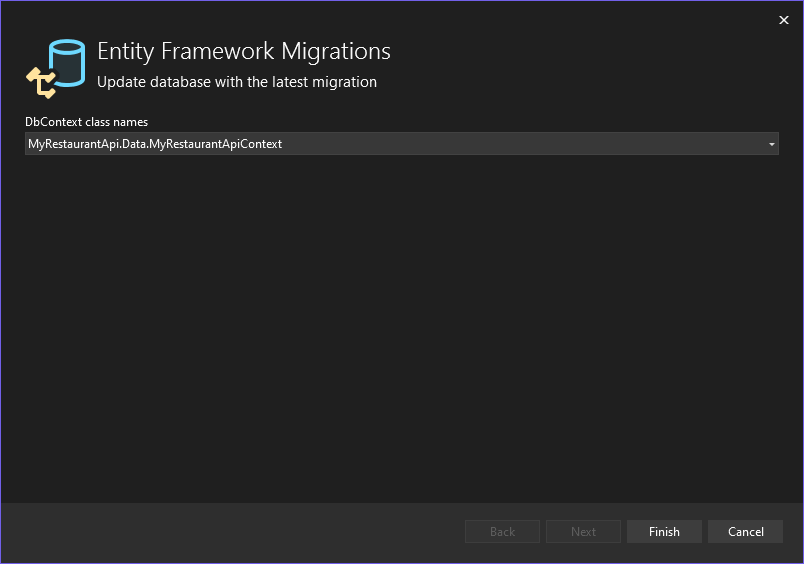
First, we need to create a new Entity Framework migration. We will use the Add migration context menu option shown above. When you click on that option, the Entity Frameworks Migration dialog will appear. Before entering this menu, ensure that the project is not running. The dialog will kick off a build and if the project is running, you’ll receive an error. When you enter this dialog, it should look similar to the following image.
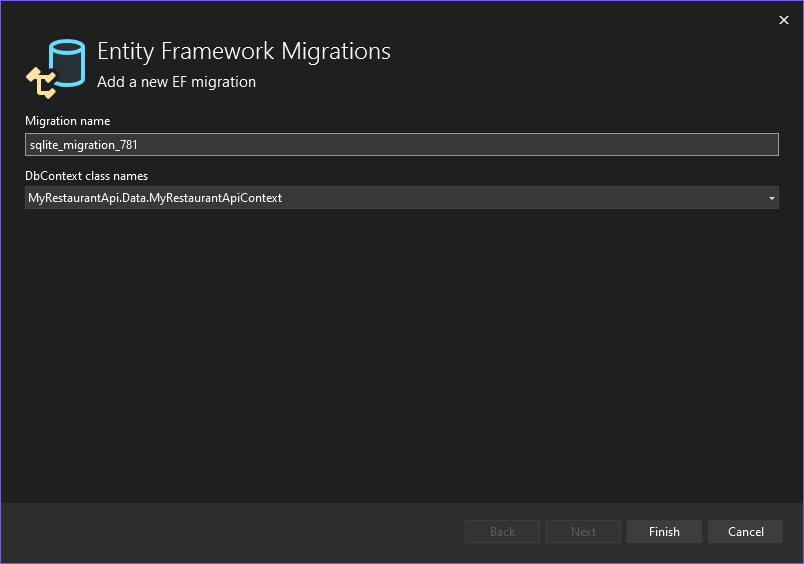
On this page there are two inputs, the name of the migration to create as well as the DbContext class to use. There is always a default name for the migration which you can use, or you can apply a specific name if you prefer. This will be the name of the file that is generated when the migration is added. For the DbContext, it should automatically select the DbContext that was created during the scaffolding step. For projects which contain more than one DbContext, you should select the specific DbContext that you’re targeting. Now we can click Finish to get the migration added. After clicking Finish, the migration will be created and added to the project. The next step is to update the database by running that migration.
To update the database, we are going to use the Update database menu option. When you click on that entry, a dialog will appear where you select the target DbContext. In this sample it should default to the context created in the previous steps. That’s shown in the following image.
From here we simply need to click Finish, which will run the migration in the previous step on the database. After clicking Finish the database has been configured and is ready to use. If you’re using source control, this would be a good time to create a new commit. After making any further changes to the model classes, you should repeat these two steps to get the database updated. Let’s move on to see how we can now use the APIs which were scaffolded. We will use the new Endpoints Explorer to get started.
Endpoints Explorer
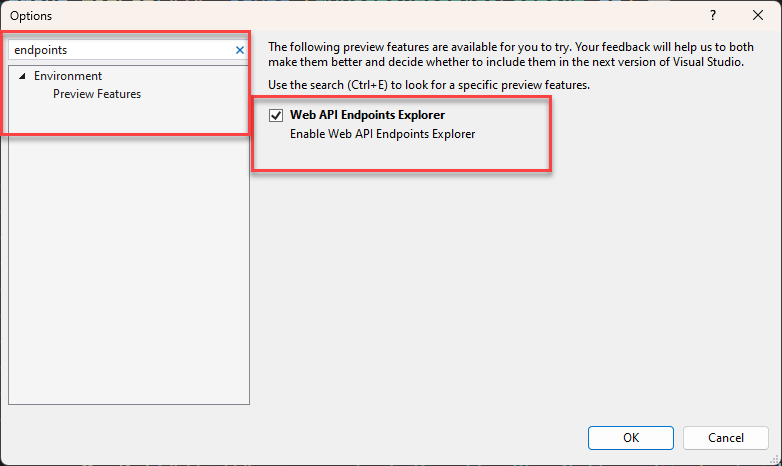
The Endpoints Explorer is a new preview feature that we are working on to enable you to view and interact with the API endpoints defined in the solution. Since this is a Preview Feature, it needs to be enabled so that we can view it. To enable this new Tool Window, go to Tools > Options > Environment > Preview Features and then check the Web API Endpoints Explorer. You can use the search text box in that dialog to limit the choices. See the image below.
Now that you’ve enabled the Endpoints Explorer, you can open it by going to View > Other Windows > Endpoints Explorer. After opening that window, you should see content similar to what’s shown in the following image.

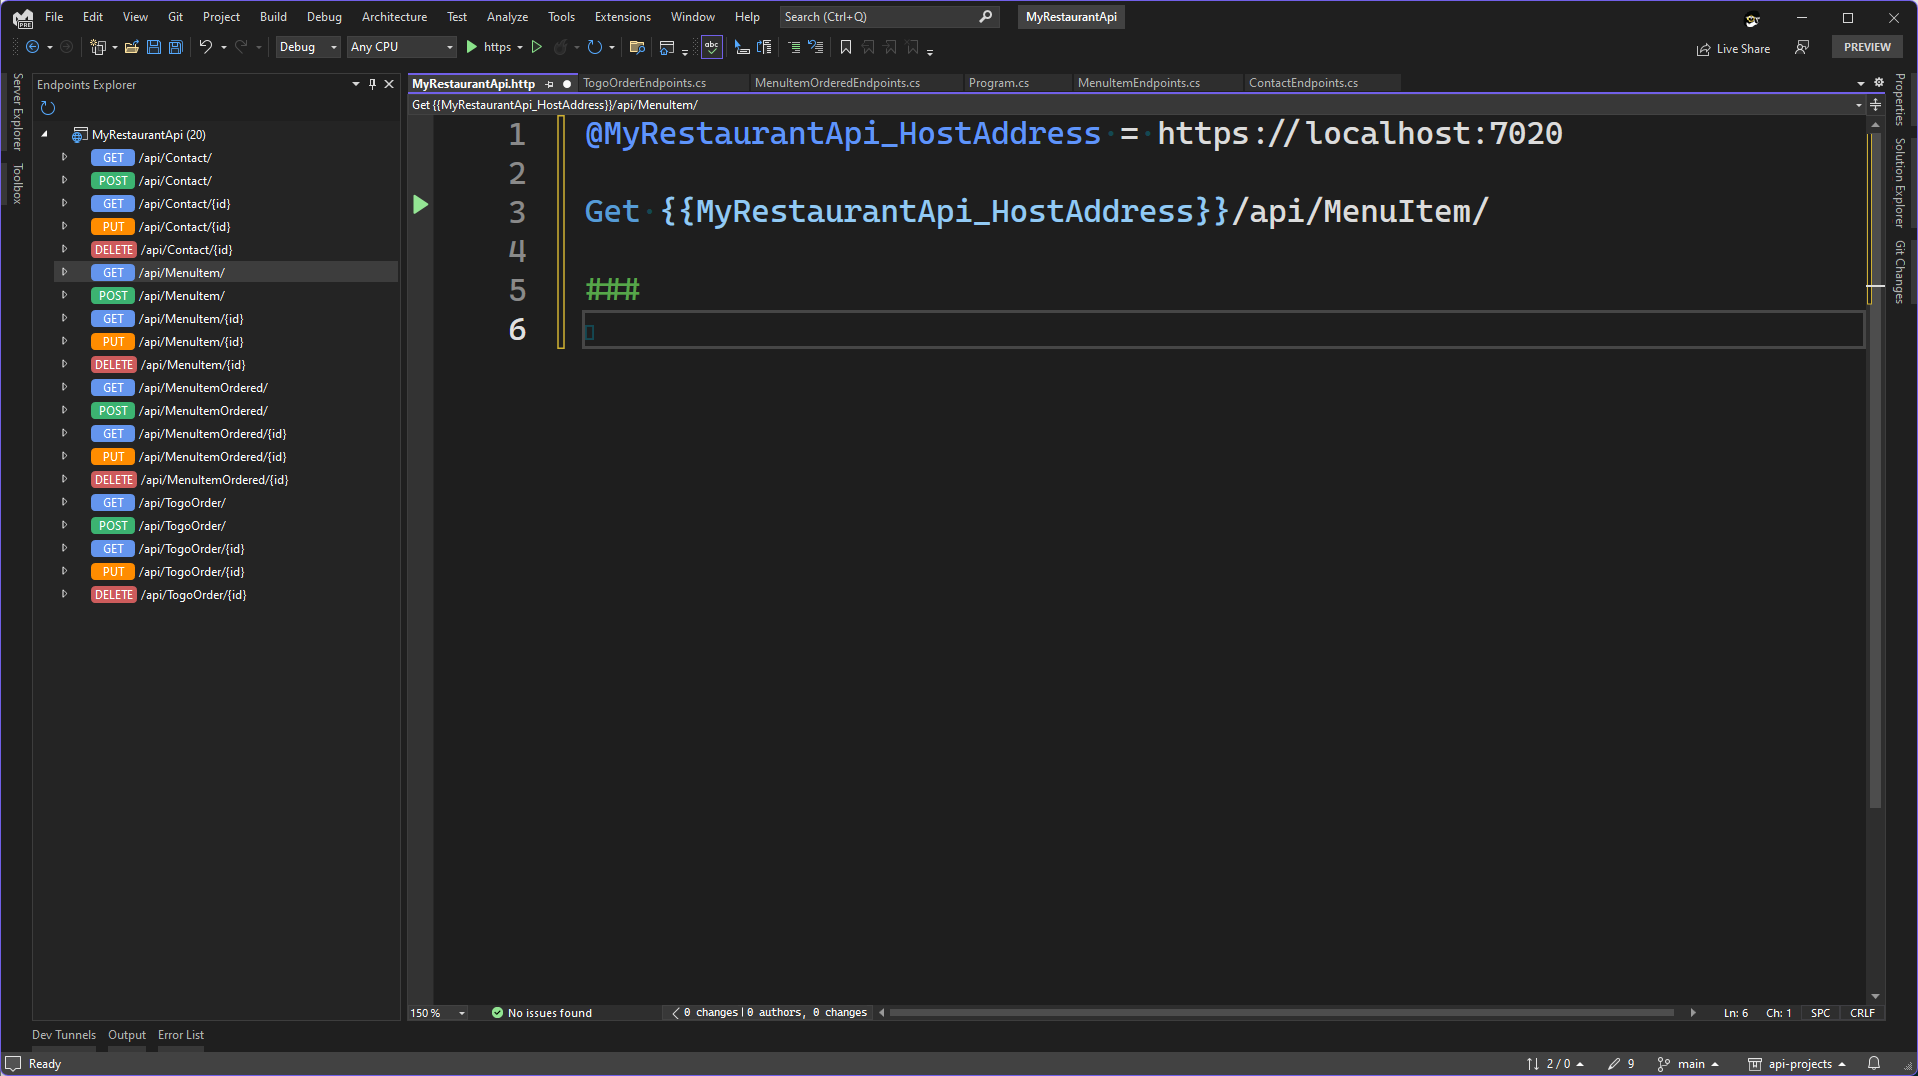
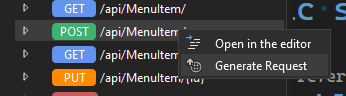
In this window you can see all the API endpoints that were generated using scaffolding in Visual Studio. It has created 5 endpoints (Get/Post/Get specific/Put/Delete) for each model class that we used during scaffolding. In this view, you can view all the endpoints that your solution contains. If you add API endpoints to your project you may need to use the Refresh button at the top of the Endpoints Explorer to refresh the view. On each request you can view the code that handles the request as well as generating a new request to that endpoint. You can see these options in the context menu when you click on an entry. This is shown in the next screenshot.
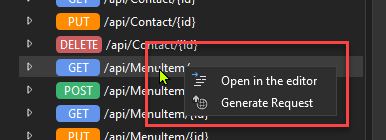
Here if you invoke Generate Request and HTTP file will be generated with the request. For the /api/MenuItem/ request here is the result after invoking that context menu.
After clicking that the following has occurred:
- Create an HTTP file and add it to the project (if an HTTP file was open when the request was generated it would be added to that file instead).
- Add a variable to the HTTP file that contains the web address to the web project.
- Add the request to the file
The Endpoints Explorer is currently a preview feature so it will not be included in the final public build of Visual Studio 2022 17.6, but it will be in the preview builds of 17.6 and 17.7. We are hoping to make this to the GA build soon.
The HTTP file is a new file type that has been added to Visual Studio. Let’s go over the support for HTTP files now.
HTTP Editor
We have added support for .HTTP (.REST) files in Visual Studio 2022. This support was inspired by the great VS Code Extension REST Client. This extension has become popular in VS Code, and the file format now has support in other tools as well. When we added support for HTTP files in Visual Studio, we initially wanted to directly integrate this extension, but the extension is implemented by calling directly into the VS Code extensibility APIs, so that wasn’t an option. We have developed a new HTTP editor in Visual Studio to support this file type. Currently the REST Client extension has syntax that is not supported yet in Visual Studio, but we are working to close that gap. Now that we’ve discussed the origin of this new editor, let’s explore its features.
The primary purpose of the HTTP editor is to enable you to declare one, or more, HTTP requests and to enable you to view/inspect the response that is produced when the request is sent. Let’s take a closer look at the code that was generated for the /api/MenuItem/ endpoint. The code is below.
@MyRestaurantApi_HostAddress = https://localhost:7020

Get {{MyRestaurantApi_HostAddress}}/api/MenuItem/

###
Let’s go over every line here.
@MyRestaurantApi_HostAddress = https://localhost:7020The first line declares a variable named MyRestaurantApi_HostAddress and assigns its value to https://localhost:7020. The URL comes from the project where the HTTP file was added to. The syntax to declare a new variable is:
@VariableName = valueThese variables can be declared anywhere in the HTTP file. You can use the values after the declaration in the HTTP file. Let’s look at the next line to see how to use a variable.
Get {{MyRestaurantApi_HostAddress}}/api/MenuItem/This represents an HTTP request. When defining an HTTP request the first value is the HTTP request method, GET in this case. Followed by the URL. In this case we are using the variable declared in the previous line. To get the value for a variable use the syntax {{VariableName}} in the HTTP file. On this line, if you needed to specify a specific HTTP version to use you can add that after the URL. For example, for the same request, if we wanted to use HTTP 1.1 the line would look like the following.
Get {{MyRestaurantApi_HostAddress}}/api/MenuItem/ HTTP/1.1Now let’s move on to the last line in this file.
###This denotes the end of an HTTP request. You can add additional HTTP requests to this file after that. Now let’s look at an example that also contains a body and some headers to the request.
The example that we looked at was a simple GET request with no headers or body added to the request. Having a body and headers are very common for HTTP requests, so let’s see what that looks like. In this case we can generate a request in the Endpoints Explorer and then add the body and headers.
Earlier we saw that we have a MenuItem API endpoint to get/create/edit menu items that are available to order. Let’s say that we want to add a new MenuItem, to do that we need to create a POST request to add a new MenuItem. We can use the Endpoints Explorer to help generate that request. Right click on the POST for /api/MenuItem/ and then click on Generate Request.
In the current version of Endpoints Explorer this will generate the following to the HTTP file.
Post {{MyRestaurantApi_HostAddress}}/api/MenuItem/

###
In a future version we are hoping to provide a stub for the JSON body that is needed for this request. From here we want to add the JSON body as well as a header so that we can demonstrate how those are used. The JSON that we need to add to the body should represent the JSON for a MenuItem with the values set accordingly, excluding the id field which will be set by the database. The updated request is shown below.
Post {{MyRestaurantApi_HostAddress}}/api/MenuItem/
Content-Type: application/json
Accept: application/json

{
  "name": "All-beef hotdog and soda",
  "price": 1.50,
  "description": "An all-beef hotdog and soda with a permanent fixed price.",
  "category": 1
}

###
Let’s describe the syntax of this request in more detail. The syntax for a request is to have the first line be the HTTP method followed by the URL and an optional HTTP version as discussed earlier. After the request line you can specify each header on its own line immediately after the request line (no blank lines in between). When specifying a header, the syntax is HeaderName: Value, where HeaderName is the name of the header being passed in, and Value the value you’re specifying for it. In this case we are specifying two headers, Content-Type and Accept. These headers are not needed for this request since these are the defaults, but they are being show here to demonstrate how to pass in headers. After the headers, or request line if there are no headers, you should add a blank line followed by the body of the request. And finally, we add ### at the end to indicate the end of the request.
In this request we are going to add a new MenuItem which will be available for ordering. We are adding a new “All-beef hotdog and soda combo”. First, we want to ensure that the API is running by starting it from Visual Studio. After you have started the Web API, you can send the request with the green play button to the left of the request line. The result should be similar to the following in Visual Studio.
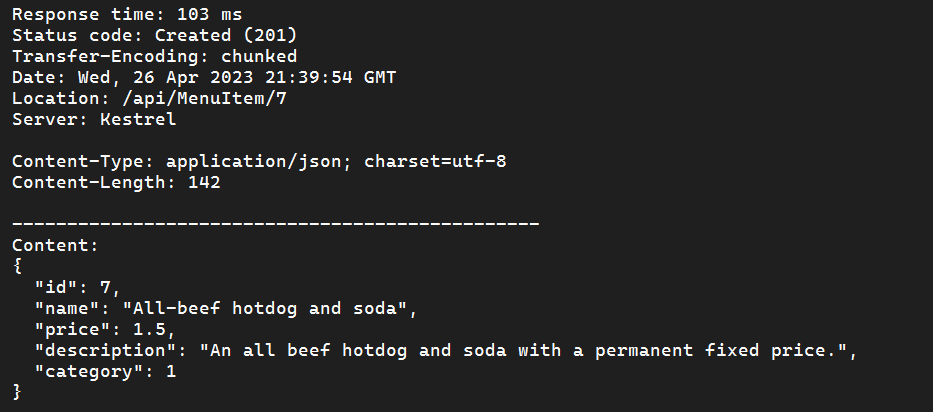
Here we can see that the request to add the “All-beef hotdog and soda” has successfully been added to the database. It was assigned the id value of 7 from the database. Now we can create a request to add a new togo order. Before we can submit a new TogoOrder we need to modify the TogoOrderEndpoints class where the POST method is being handled. When a TogoOrder is submitted, the OrderCreated value should be set to the current date/time if it’s null, and we also want to fill in details of the MenuItemOrdered from the MenuItem values. Below is the updated code for the TogoOrder post handler. The updated code is below.
group.MapPost("/", async (TogoOrder togoOrder, MyRestaurantApiContext db) =>
{
    togoOrder.Customer = await db.Contact.FindAsync(togoOrder.Customer!.Id);

    if (togoOrder.OrderCreated == null) {
        togoOrder.OrderCreated = DateTime.Now;
    }
    if (togoOrder.ItemsOrdered != null && togoOrder.ItemsOrdered.Count > 0) {
        foreach (var item in togoOrder.ItemsOrdered) {
            var menuItem = await db.MenuItem.FindAsync(item.MenuItemId);
            item.Name = menuItem!.Name;
            if (item.Price is null || !item.Price.HasValue || item.Price.Value < 0) {
                item.Price = menuItem.Price!.Value;
            }
            if (item.Category is null || !item.Category.HasValue) {
                item.Category = menuItem.Category!.Value;
            }
        }
    }
    db.TogoOrder.Add(togoOrder);
    await db.SaveChangesAsync();
    return TypedResults.Created($"/api/TogoOrder/{togoOrder.Id}",togoOrder);
})
.WithName("CreateTogoOrder")
.WithOpenApi();
The code which needed to be added is what appears before db.TogoOrder.Add(togoOrder). It’s pretty self-explanatory. When the request is submitted values for OrderCreated will be populated if it’s empty and then any values from MenuItem which is missing will be filled in from the corresponding MenuItemId. The MenuItemId is the only required value for each MenuItemOrdered which will be created.
First, we will generate the stub request with the Endpoints Explorer, by right clicking on the POST /api/TogoOrder/ and select Generate Request. Then we will need to add the JSON body to the request. After adding the JSON body the request should look like the following.
Post {{MyRestaurantApi_HostAddress}}/api/TogoOrder/
Content-Type: application/json

{
  "itemsOrdered": [
    {
      "menuItemId":1
    }
  ],
  "subtotal": 3.50,
  "tax": 0.8,
  "total": 4.30,
  "paymentMethod": 1,
  "customer": {
    "id": 2
  }
}
###
In this request we use the POST method to add a new TogoOrder entry. As mentioned, we can list the items ordered, and the only required field is the menuItemId. The code we added to the Post method will fill in the missing fields. We also assign the dollar amounts in the TogoOrder object. We can send this request by pressing the green play button to the left of the request line. After invoking that, the response should be similar to the following.
{
  "id": 1,
  "orderCreated": "2023-04-27T14:14:48.3785278-04:00",
  "itemsOrdered": [
    {
      "id": 1,
      "menuItemId": 1,
      "togoOrderId": 1,
      "name": "Hamburger",
      "price": 3.68,
      "category": 1
    }
  ],
  "subtotal": 3.5,
  "tax": 0.8,
  "total": 4.3,
  "paymentMethod": 1,
  "customer": {
    "id": 2,
    "name": "Mads Kristensen",
    "email": "mads@example.com",
    "phone": "555-111-3333"
  }
}
Now that we have added a TogoOrder to the database, let’s verify that we are getting the correct results by making a GET request to list all the TogoOrders that are in the database. We can generate that request with the Endpoints Explorer by selecting Generate request in the context menu for the GET /api/TogoOrder/ endpoint. After invoking that, the following request is added to the HTTP file.
Get {{MyRestaurantApi_HostAddress}}/api/TogoOrder/

###
To send this request, click the green play button. After doing that, the result in the response view should be similar to the following.
[
  {
    "id": 1,
    "orderCreated": "2023-04-27T14:22:53.2117889",
    "itemsOrdered": null,
    "subtotal": 3.5,
    "tax": 0.8,
    "total": 4.3,
    "paymentMethod": 1,
    "customer": null
  }
]
We have successfully received the result, but here itemsOrdered is null. If we were to inspect the database, we would see that all the correct entries have been created and all the relationships are correct as well. The issue here is that Entity Framework has not loaded the related data automatically. For more info on how EF loads related data see the doc Loading Related Data – EF Core. In this case, when a TogoOrder is returned we always want to load the data for the itemsOrdered field. We need to make a simple edit to the generated GET request to satisfy this need. In this case, when a TogoOrder is returned we always want to load the data for the ItemsOrdered field. We need to make a simple edit to the generated GET request to satisfy this need. The method handling this request is in the TogoOrderEndpoints class. We need to add an include statement for EF to hydrate the ItemsOrdered property. The modified method is below.
group.MapGet("/", async (MyRestaurantApiContext db) =>
{
    return await db.TogoOrder
        .Include(order => order.ItemsOrdered)
        .ToListAsync();
})
After adding this, we will restart the Web API project and resend the GET request to list all the orders. The result should be like the following snippet.
[
  {
    "id": 1,
    "orderCreated": "2023-04-27T14:22:53.2117889",
    "itemsOrdered": [
      {
        "id": 1,
        "menuItemId": 1,
        "togoOrderId": 1,
        "name": "Hamburger",
        "price": 3.68,
        "category": 1
      }
    ],
    "subtotal": 3.5,
    "tax": 0.8,
    "total": 4.3,
    "paymentMethod": 1,
    "customer": null
  }
]
Now we can see that the request has returned the TogoOrder object with the items ordered value populated. We have now successfully built an ASP.NET Core Web API to handle togo order requests. Let’s move on to discuss the syntax that is supported in the HTTP files.
HTTP File Syntax
Previously we have mentioned that the HTTP Editor and its related support was inspired by the Visual Studio Code REST Client extension. That extension supports a broader syntax in the HTTP files than what Visual Studio supports today. As we proceed, we will be adding more support to close that gap. In this section we will discuss the syntax that is currently supported in Visual Studio.
In this section the requests will use httpbin.org, which is free third-party Web API that everyone can use. You can send request to it, and it will echo the request back to you. Let’s explore the syntax that is currently supported in Visual Studio.
Comments
Comments are lines that start with either a # or //. These lines will be ignored and will not be included in the request.
Variables
As mentioned previously, you can define variables that can be reused in subsequent request. You can define any number of variables that are needed. Variables can be defined using values of other variables that have already been defined. For example, see the following snippet.
@searchTerm = some-search-term
@hostname = httpbin.org
# variable using another variable
@host = https://{{hostname}}
@name = Sayed
@phone = 111-222-3333
Here we have defined several variables, including the host variable which uses the value for another variable named hostname. Below is a sample request using one of these variables.
GET {{host}}/anything HTTP/1.1
User-Agent: rest-client
Content-Type: application/json
###
Request line
For the Request line, we mentioned earlier that the format for the request line is
HTTPMethod URL HTTPVersion
Here HTTPMethod is the HTTP method to use, for example GET, POST, PUT, PATCH, etc. The URL is the URL that the request will be sent to. This URL can also include query string parameters like the following example request. The optional HTTPVersion is the HTTP version which should be used. Below are some sample requests.
GET https://httpbin.org/get
###

GET https://httpbin.org/get?name=Sayed?&phone=111-222-3333
###

GET https://httpbin.org/get?name=Sayed?&phone=111-222-3333 HTTP/1.1
###
There is some support that the Visual Studio Code REST Client extension supports that we don’t have support for today. Those include.
- Optional HTTP Method. The REST Client has support for not specifying the HTTP method. In those cases, GET is the default HTTP method.
- Request URL spans more than one line. In the current implementation in Visual Studio, the request line must be on a single line.
We are hoping to add support for these in a future release.
Multiple requests in the same file
As shown above, an HTTP file can have multiple different requests listed. They need to be separated with ### at the end of each request.
Headers
To add one, or more, headers add each header on its own line immediately after (no blank lines) after the request line. Below are a few different examples.
GET https://httpbin.org/get?name=Sayed?&phone=111-222-3333 HTTP/1.1
Date: Wed, 27 Apr 2023 07:28:00 GMT
###

GET https://httpbin.org/get?name=Sayed?&phone=111-222-3333
Cache-Control: max-age=604800
Age: 100
###

POST https://httpbin.org/post HTTP/1.1
Content-Type: application/json
Accept-Language: en-US,en;q=0.5

{
    "name": "sample",
    "time": "Wed, 21 Oct 2015 18:27:50 GMT"
}
###
If you are calling an API which can authenticate with headers you can specify those in the headers as well. If you do this, be careful to not commit any secrets to your repository. We will be working on ways to supports secrets in a secure manner.
Now that we’ve gone through some of the supported syntax, in the next section we will list some features that the REST Client has which Visual Studio doesn’t currently support. If you’d like to see support for any of these features, please leave a comment below or send some feedback to the team (see the closing section below). This list is in no particular order. For more info on any of the items listed below, see the Visual Studio Code REST Client extension.
Not currently supported in the Visual Studio HTTP Editor
- Optional HTTP Method
- Request line that spans more than one line
- Named Requests
- Dynamic variables
- Environment files
- Specify file path as body of the request
- Mixed format for body when using multipart/form-data
- GraphQL requests
- cURL request
- Copy/paste as cURL
- Request history
- Save response body to file
- Certificate based authentication
- Prompt variables
- System variables
- Customize response preview
- Per-request settings
Now that we have covered what is, and what is not, supported in the Visual Studio HTTP Editor, let’s move on to discuss what will be coming next for ASP.NET Core Web API developers in Visual Studio 2022.
What’s Next
In this post we have discussed the end-to-end flow of developing an ASP.NET Core Web API project including some new tools for those developers including the Endpoints Explorer and the HTTP Editor. This is the beginning of a long journey for us, we are planning to continue investment in this space for a significant amount of time. Some of the features and capabilities that we are investigating to add support for include. This list below is not in any particular order. The list below are some ideas that we are exploring, we are not making a commitment to deliver all these features at this time.
- Add a stub for the body of a request – for request that require a body, today Visual Studio doesn’t add any content for the body of the request. We are looking at ways that we can add a stub for the body to make it easier to complete that request.
- Add more support for the syntax of the HTTP file – we only support a subset of the syntax that the REST Client supports. We will be working to close that gap, we may not be able to support 100% of the features, but we are going to get as close as we can. Some of the top items that come to mind here include support for; Named Requests, environment files, support for mixed responses in a multipart/form-data request and copy/paste as cURL.
- Improved Response View – the response view is very basic at the moment. We are planning to make a more structured response view to make it easier to read the results coming from the web server.
- Show HTTP files in the Endpoints Explorer – currently the Endpoints Explorer only shows API endpoints in the solution. We would also like to surface HTTP files that are in the solution or opened in Visual Studio. This will enable you to inspect and explorer those files in a simpler manner.
- Request history – we would like to provide support for you to be able to view requests that have been previously sent, and then to resend those requests. Editing a previous request is also a feature we would like to add support for.
- UX to simplify making a request – currently to create a request you must type in the request manually. Some users would prefer to work with a graphical user interface to author that request.
- Save response body to a file – after we improve the response view, we would like to add the ability for you to save the response body to a file.
- Testing – we would like to find a way to simplify testing Web API projects. We don’t have any specific plans here yet, but this is an important area for us.
In the next section, I’ll describe the different ways that you can provide feedback regarding these scenarios. If there are features in the list above that you feel is very important, please share that feedback with us. We can only create incredible features with your help, your feedback is very important to us.
Closing
Most of the updates that we delivered in this release were inspired by feedback from users like yourself. You can share feedback with us via Developer Community: report any bugs or issues via report a problem and share your suggestions for new features or improvements to existing ones. You can also leave a comment here or reach out to Sayed on twitter at @SayedIHashimi.
 Light
Light Dark
Dark
42 comments
I’d vote for authentication shortcuts – especially for AAD.
Hi Jiří, could you provide some more details of what support you’re looking for? I want to make sure that I’m following you.
That was my first thought, too 🙂
We authenticate via OAUTH.
I have the correct preview installed. I don’t see the option under `View \ Other Windows`. I assumed this was because the feature wasn’t enabled so I went to my settings and it seems like it is defaulting to enabled with this update. I didn’t change any settings and the feature is checked.
I toggled it off and then back on and it didn’t change anything. I turned it off, closed the dialog, reopened the dialog and turned it on. Still nothing. I restarted VS, still nothing.
What eventually got it to appear for me was to load up a .NET 6 API project. Then the window was available. I closed the solution and opened a .NET 4.7.2 Web API project and the window is still available although it doesn’t show anything. Does this window only show up/work for .NET 6+ API projects?
The window is loaded after you open an ASP.NET Core web project. We don’t have any integration with ASP.NET Framework projects. This window is loaded in the background, so it may take a small amount of time for the entry to appear in the View menu.
I’m a little confused over whether HTTP support is tied to the Endpoint explorer or not. Assuming I have Endpoint explorer open then is there some magic to get an HTTP file in my project to show up here? I’m using a web API project and I understand that EE won’t work with it but since an HTTP file is a client side request it doesn’t seem like the server-side implementation matters. Indeed I could potentially call a server endpoint that I don’t even host. Creating a test HTTP file, I cannot find any way to “execute” it. It doesn’t show up in EE but I put it into a “Tests” subfolder so I’m not sure if the path matters. It does correctly open the HTTP editor and I get intellisense for it so it seems to recognize the file.
Hi Michael, the HTTP Editor does not depend on the Endpoints Explorer. One thing that I didn’t make clear in this post is that you can execute any HTTP request in the HTTP file, it doesn’t have to call into local APIs that you are developing.
Another thing that I forgot to mention in my post is that you can add HTTP files using the New Item dialog. I think there is a bug in the current release where we don’t show the HTTP item template when you add items to Solution Folders, but it’s there when you try to add files to web projects. You can always create a txt file and then rename it to .http if needed.
Regarding how to execute the request, you should see a green “play” (arrow pointing to the left) button to the left of the request line. FYI we are changing that to use Code Lens support in a future release. Check the video from Mads at near the top of the post where he shows how to submit the requests.
Please let me know if you have any more questions.
I see the green arrow now. It didn’t like the syntax of the URL I was using so it wasn’t showing the play option. Fixing that syntax error caused it to show up. Thanks!
Happy to hear you got it figured out! Feel free to reach out when you have any more feedback.
This is great timing as we’re in the process of transitioning to Azure Cloud and rewriting a lot of code and processes into microservices as a result. Being able to test these endpoints and APIs with ease inside the IDE is awesome news. I shared with my coworkers and I’m downloading the latest preview of 2022 as we speak. 🙂
Thanks for the note Edwin, that is great to hear. Please let us know if you have any feedback.
This feature is just cool! 😎 Very handy!
Happy to hear that you like it! Please let us know if you have any feedback after you’ve had a chance to try it out.
What about the promised Web API templates for Visual Basic? If .NET Core support Web API with Visual Basic, and Microsoft post some blogs with examples of programming Web API’s with Visual Basic, where are the templates?
We are not planning to do Web API templates for Visual Basic.
We support Web API in Visual Basic in that if you find bugs we will consider them alongside C# bugs. However, the experience is more complete for C# (minimal API, scaffolding, and the Endpoints explorer) and the ASP.NET folks do not want to give the impression that the VB experience will be as good as the C# experience.
Add support for using the result of an APi call. Most notably I use this feature in REST Client to login and retrieve the token for subsequent calls to other endpoints.
Adding support for Named Requests is high on the backlog. We have a few things ahead of it.
This is a great feature, thank you!
I think it would be useful to extend the way Endpoints Explorer discovers endpoints. In my setup, the controllers live in a Class Library and are used by separate ASPNET Hosting projects. Endpoints Explorer is showing the projects but no endpoints.
Hello Bogdan, thanks for the feedback. If the Endpoints are defined in a class library, they need to be registered with an API project in order to be hosted, and runnable. Do these endpoints not appear under that project? I may not be understanding your scenario correct though. If you have a sample solution that I could look at that would be helpful.
I’m having the same issue – my API project is listed in the Endpoints Explorer as “Api.Host (0)” (where Api.Host is the name of the API project), and no other projects are listed.
In my Program.cs, I’m registering the controllers in the class library with:
builder.Services.AddControllers()
    .AddApplicationPart(classLibraryAssembly);
Is that what you meant by “registered with an API project”? Or is there something else I’m missing? Swagger picks up those library-based endpoints successfully.
Would it be possible for you to share a sample solution showing the issue? I’d like to investigate with the team to see what may be happening.
I’ve run into the same problem. To test it, you can simply take one of the controller classes and move it to the library in separate project within the solution. Then you can reference this library in API project and register using AddApplicationPart(…) as Mark has shown. When you run such application, the “imported” endpoint is visible in Swagger, but not in Endpoints Explorer.
Hi, I’m testing the endpoint explorer but I’m getting Status code: GatewayTimeout (504). I guess this is because I have my datacontext in another project.
Are there a way to configure the datacontext?
You can get a 504 error if the API is not running. Before sending the request, did you start the API project so that it can respond to requests? If you did, it would be great if you could share a sample solution with me so that I can investigate the issue.
Hello Sayed,
I’d like to use the EFCore connected services feature, however, my DbContext is in a separate project from my startup project. When I tried to add the connected services to the project containing the DbContext, it did not work. When I added the connected services to the startup project, it continuously fails because it’s not the migrations project (error below). This is solved with dotnet-ef by providing the –startup-project and –project parameters. Am I overlooking anything?
Your target project ‘Presentation.Console’ doesn’t match your migrations assembly ‘Persistence.SQL, Version=0.23.0.0, Culture=neutral, PublicKeyToken=null’. Either change your target project or change your migrations assembly.
Change your migrations assembly by using DbContextOptionsBuilder. E.g. options.UseSqlServer(connection, b => b.MigrationsAssembly(“Presentation.Console”)). By default, the migrations assembly is the assembly containing the DbContext.
Change your target project to the migrations project by using the Package Manager Console’s Default project drop-down list, or by executing “dotnet ef” from the directory containing the migrations project.
Thank you for the work on these features!
Hi Casey, if you could create a feedback ticket with Report a Problem https://learn.microsoft.com/en-us/visualstudio/ide/how-to-report-a-problem-with-visual-studio?view=vs-2022 with these details that would be great. We can get the engineering team to investigate this issue. I think you’re correct that scaffolding may not properly work if the DbContext is in another project.
Hi Ibrahim, thanks for the blog and the cool features. Today (5/16) I installed the latest stable VS2022 update, which is 17.6.0, but the endpoints explorer UI is not available yet. So, isn’t this feature out of preview? Your intro gave me the impression that the feature will be available in stable 17.6. Thanks! 👍
Sorry about the confusion. I have updated the Endpoints Explorer section to add a sentence clarifying this.
Something that I think could be really useful would be a keyboard shortcut to run the currently request, such as the CTRL + SHIFT + E shortcut to execute the current SQL statement in a .sql file.
Hi Mark, you can use the keyboard shortcut CTRL-ALT-S to send the request where the cursor is located. If you ever forget the shortcut, you can see it in the right-click context menu.
I hate the fact, that there is yet another developement scenario thah supposes sending DB entities straight to public APIs/UI pages.
That is sooo wrong. And causes any application that outgrows a phase of simple tutorial app to collapse on itself eventually.
There should always be a layer between “outside” models and DB entities. People are sometimes afraid of all the time “wasted” copying most information 1:1 between the entity and model, but it’s time well invested into future mainainability.
The PUT method generated by the “scaffold” doesn’t include ItemsOrdered in udpate of the ToGoOrder. I mean it seems unable to update a parent/child relationship. Do you have any suggestions to fix that?
var affected = await db.TogoOrder
.Where(model => model.Id == id)
.ExecuteUpdateAsync(setters => setters
.SetProperty(m => m.Id, togoOrder.Id)
.SetProperty(m => m.OrderCreated, togoOrder.OrderCreated)
.SetProperty(m => m.Subtotal, togoOrder.Subtotal)
.SetProperty(m => m.Tax, togoOrder.Tax)
.SetProperty(m => m.Total, togoOrder.Total)
.SetProperty(m => m.PaymentMethod, togoOrder.PaymentMethod)
);
Hi Luciano, thanks for your comment. I’ve started a discussion with the team to see if we can simplify this going forward. I will try and remember to reply back here once that is settled, it may take some time. Thanks again.
Could be great to have Certificate based authentication in the Visual Studio HTTP Editor.
Thanks, we are planning to work on auth related scenarios after we add support for Named Requests which is necessary for the scenario.
Sayed, has the team considered having a simple way of firing requests for a given controller action (or minimal API route mapping) by clicking a button somewhere on the action itself? Kinda like the play button on a unit test method in the code-lens region?
That, combined in the future with named requests, would make it possible for devs to fire any request from the controller itself which I think would be a fairly intuitive approach to it, particularly when controller logic is being implemented as devs want to get fast feedback about their changes and they are right there in the editor.
If named requests are not supported initially, a simplified version of it could be done where each request would sit in a separate .http/.rest file, and the file name would serve as the request name when picking which request to run from the controller.
Hi Juliano, thanks for the feedback. This is on our radar, but I’m not sure the exact experience yet. We are going to be working to add support for Named Requests but before that we have a few other features in front of it.
Hi Sayed.
When I see the Enpoints Explorer I only see few endpoints, bu the most of them are missing. I don’t see any difference between them. Is any reason for that?.
You have commented that “… that were generated using scaffolding…”, however in another sandbox project I created a new .Net Core 6 Api project and I creating manually endpoints in controllers I can see them in the explorer.
Am I missing something?
Thanks a million.
Hi Jorge, if you could share a project which demonstrates the endpoints not appearing we can take a look to see what’s happening. What you’re seeig is probably a bug that needs to be addressed. We can discuss more over email if you prefer, my email is sayedha [AT] (MICROSOFTdotCOM).
I really appreciate the effort from the Microsoft team to bring such features to the IDE. I tried to scaffold a Minimal API project. I added a Models folder with a Person class and added a connection string for SQLExpress. I am getting an error. There was an error running the selected code generator: ‘Object reference not set to an instance of an object’. Your help will be much appreciated. I am using the VS Community edition v17.6.2.
Hi Jiten, if you could file an issue with Report a Problem https://learn.microsoft.com/visualstudio/ide/how-to-report-a-problem-with-visual-studio?view=vs-2022 we will investigate. Thanks.
Hi,
How do I go about writing validation for the endpoints?
within the group verb method
would like to do these in quote
group.MapPost(“/”, async (ShoppingList.ShoppingList shoppingList, APITestContext db) =>
{
////validate name must be not empty null
//if (string.IsNullOrEmpty(shoppingList.ShoppingListName))
//{
// return TypedResults.BadRequest(“ShoppingListName must not be empty”);
//}
//validate name must be shorter than 255 characters
//if (shoppingList.ShoppingListName.Length > 255)
//{
// return TypedResults.BadRequest(“ShoppingListName must be shorter than 255 characters”);
//}
db.ShoppingList.Add(shoppingList);
await db.SaveChangesAsync();
return TypedResults.Created($”/api/ShoppingList/{shoppingList.ShoppingListId}”,shoppingList);
})
.WithName(“CreateShoppingList”)
.WithOpenApi();