Weekend Scripter: Configure HyperV on Windows 8 Computer
Summary: Guest blogger, Greg Lindsay, tells how to configure Hyper-V on a computer running Windows 8.1 or Windows 8.
Microsoft Scripting Guy, Ed Wilson, is here. Today we welcome a new guest blogger, Greg Lindsay. In Greg’s own words: I am a technical writer for Windows Server. I have written documentation for Network Access Protection (NAP), DNS, DHCP, and IP Address Management (IPAM).
You might already have experience using Windows Virtual PC in Windows 7, which enables you to run virtual machines on a client operating system. You can still install Windows Virtual PC in Windows 8, but be aware that with Windows 8 there is now a requirement that the host computer’s microprocessor support SLAT. For more information, see Hyper-V: List of SLAT-Capable CPUs for Hosts.
The good news is that if your processor supports SLAT, you don’t need to download and install Windows Virtual PC because Hyper-V Manager is already included in Windows 8.1 and Windows 8 under Programs and Features. Hyper-V manager has several advantages over Windows Virtual PC, including the ability to create virtual switches with VLAN tagging and virtual machine snapshots.
Note If you installed a 32-bit version of Windows 8, you won’t be able to create and manage local virtual machines. To fully manage virtual machines by using the host computer, you must install the 64-bit version of Windows 8.1 or Windows 8.
The Hyper-V feature is not installed by default in Windows 8. To get it, you can use the following Windows PowerShell command:
Enable-WindowsOptionalFeature -Online -FeatureName Microsoft-Hyper-V –All
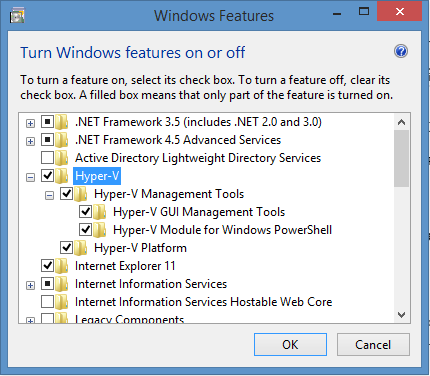
You can also install it via the Control Panel in Windows under Turn Windows features on or off, as shown here:
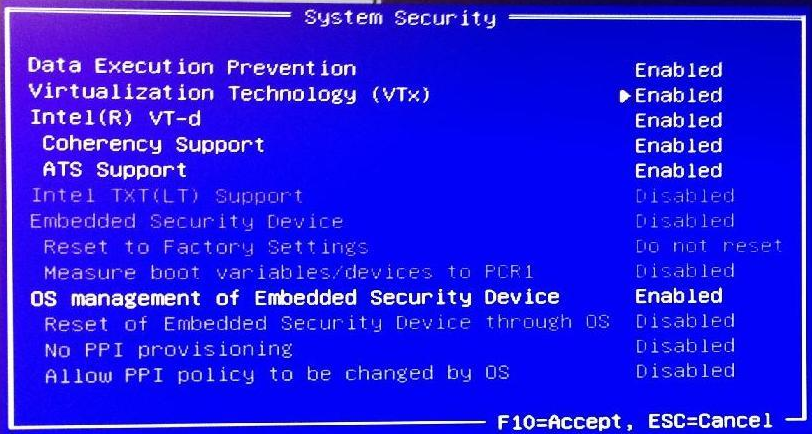
Important If you know that your processor supports SLAT, but you still get an error message that states Hyper-V cannot be installed, you might need to enable virtualization in the BIOS. The location of this setting will depend on the manufacturer and BIOS version. The following image shows an example of the required settings (under Security) in a Hewlett-Packard BIOS for an Intel processor:
After you have Hyper-V installed, check out Using PowerShell to Set Up Hyper-V.
Note Hyper-V Manager running on Windows 8.1 or Windows Server 2012 R2 also supports enhanced session mode, which allows you to more easily share local resources among virtual machines. For example, enhanced session mode enables you to copy text from a Windows PowerShell session on one virtual machine and paste it into the Windows PowerShell session on another virtual machine. For more information, see Virtual Machine Connection – Enhanced Session Mode Overview.
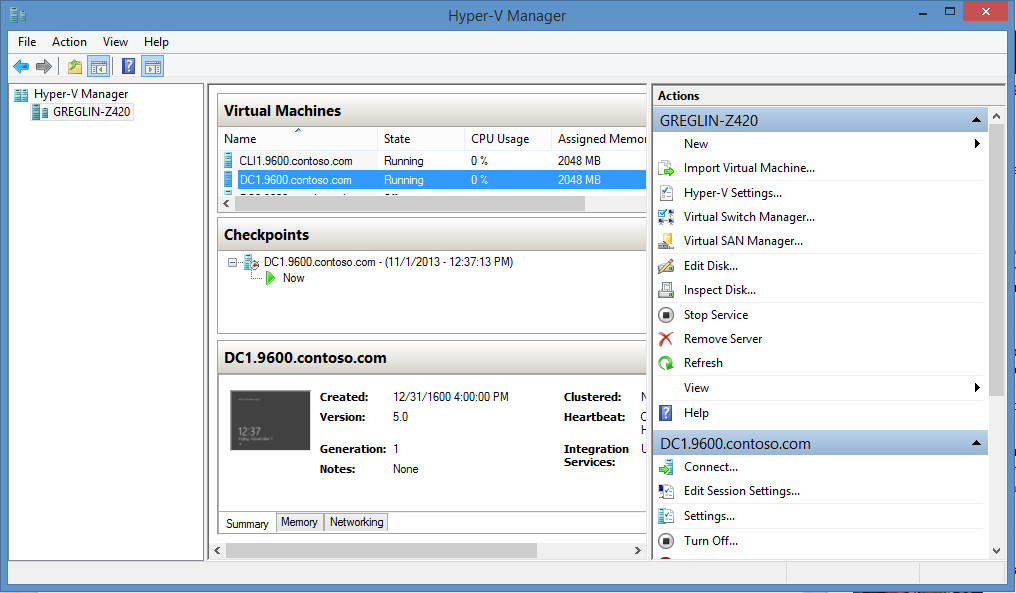
Hyper-V Manager in Windows 8.1 and Windows 8 brings the power of Hyper-V to your client computer. If you’ve used Hyper-V Manager before, you will recognize it immediately:
If you haven’t tried Hyper-V yet, you should definitely check it out!
Also see these resources:
- Client Hyper-V Survival Guide
- Client Hyper-V
- Bringing Hyper-V to Windows 8
- Installing Hyper-V in Windows 8
Tip
If you’ve been trying Hyper-V in Windows 8, you might be interested in this tip…
Adjust Network Adapter Binding Order in Windows 8 with Hyper-V
When you add a new internal or external virtual switch in Hyper-V, you might notice that networking is slower than usual. This might mean you need to adjust the network adapter binding order.
Virtual switches in Hyper-V are used to connect network adapters on virtual machines to other virtual machines and to the virtual host. If you create an internal or external virtual switch, a new virtual network adapter is added to the host computer and promoted to the top of the binding order. This is important because DNS always starts with the preferred network adapter, which is the one that is first in the binding order. If DNS has to wait for a timeout period before moving to your LAN DNS servers, this can cause a significant delay in all network requests.
Use Get-NetAdapterBinding to view the current binding order on your computer:
PS C:\> Get-NetAdapterBinding | where bindname -eq 'tcpip'
Name DisplayName ComponentID Enabled
—- ———– ———– ——-
Ethernet 2 (Internal Network) Internet Protocol Version 4 (TCP/IPv4) ms_tcpip True
Ethernet Internet Protocol Version 4 (TCP/IPv4) ms_tcpip True
In this example, the network adapter that is connecting to the internal virtual switch is first in the binding order.
If you type nslookup, you’ll see that the DNS server that is being used first is the one assigned to the first adapter in the binding order.
Use ipconfig to verify network adapter names and TCP/IP settings, and then modify the binding order so that the adapter with IP addressing scheme and DNS servers assigned by your corporate LAN is first. To modify the binding order, open Network Connections, press the ALT key to view the menu items, click Advanced, and then click Advanced Settings.
Choose the adapter you want to move up or down, click the Up or Down arrow on the right to move the binding order, and then click OK when you are finished.
You can verify that the binding order is using your LAN adapter first by typing nslookup again. You should see your physical adapter’s DNS server listed instead of the virtual network’s DNS server
~Greg
Thank you, Greg, for writing this and sharing.
I invite you to follow me on Twitter and Facebook. If you have any questions, send email to me at scripter@microsoft.com, or post your questions on the Official Scripting Guys Forum. See you tomorrow. Until then, peace.
Ed Wilson, Microsoft Scripting Guy


 Light
Light Dark
Dark
0 comments