Add a Symbol to a Word Document by Using PowerShell
Summary: Microsoft Scripting Guy, Ed Wilson, shows how to use Windows PowerShell to add a symbol to a Microsoft Word document.
Microsoft Scripting Guy, Ed Wilson, is here. The big day is finally here. Today we kick off Microsoft TechEd 2012 in Orlando, Florida. We have been planning our participation in this event for several months. The Scripting Wife, Daniel Cruz, and I are hosting the Scripting Guys booth this year. I also am doing two Birds-of-a-Feather sessions (one with Don Jones and the other with Jeffery Hicks). I also have an autograph session lined up. But, hey, you know all of that because I posted my schedule a couple of weeks ago. The Scripting Wife has been extremely busy these past several weeks managing our schedule, fielding invitations to various events that have been coming in via email, Twitter, and FaceBook. If not for her, I do not think I could manage a busy week like TechEd and still get anything else done. (But don’t tell her I said so or she will get the “big head.”)
Anyway, our road to TechEd actually began with the Windows PowerShell User Group meeting in Charlotte, North Carolina. We left there and went to Auburn, Alabama to spend the night. While we were driving to the hotel, I am positive I saw a panther in the weeds. Interestingly enough, when we were at breakfast, the server mentioned that someone had written a comment about seeing a panther—this was before I even told her I had seen one. A little search with Bing and I found that there are several unconfirmed reports of Florida panthers roaming around in Alabama. Cool! All we have in Charlotte are Carolina Panthers, and they are not nearly as fun to watch as Florida panthers might be.
As Teresa was driving on our way to Pensecola for SQL Saturday, I remembered an old Hey, Scripting Guy! Blog that I read about inserting “special” characters into a Word document. This is something I have needed to do in the past due to the need for diacritical characters in certain non-English words. But until now, I had never had the chance to play around with it.
The nice thing about using Windows PowerShell and Word automation is that almost anything you can do from inside the application can also be accomplished from outside the application via the automation model. It is not always easy, nor is it always consistent, but it is possible. I actually enjoy Word automation, and I have been using it for years. I have also written many Hey, Scripting Guy! Blogs about using Windows PowerShell to automate Microsoft Word.
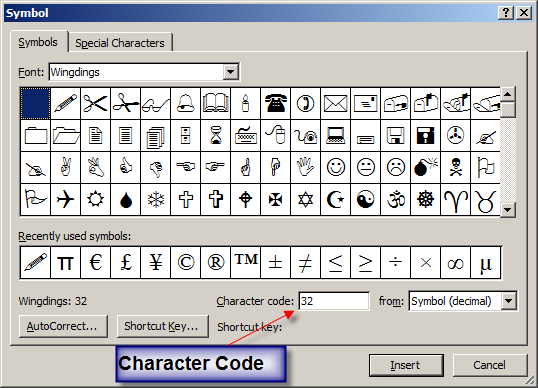
To manually insert a symbol in Microsoft Word 2010, select the symbol from the Insert menu. This brings up the Symbol dialog box (incidentally this dialog box has not altered significantly through the years). You choose the font from the Font drop-down list, and you select the symbol from the panel in the middle of the dialog. The important thing for scripters is the character code that is shown in the image that follows.
The first character code utilized is 32. In the previous image, the first symbol selected is 32, and it is basically blank. The pencil (the next symbol beside the dark blue box) is character code 33. The scissors (next to the pencil) is character code 34. This pattern continues until you reach character code 255.
The process to insert a symbol in a Microsoft Word document follows the same pattern as any other Windows PowerShell script that works with Microsoft Word. The first thing to do is create an instance of the Word.Application object. This object is a COM object, and therefore, I use the ComObject parameter of the New-Object cmdlet when creating the object. I store the returned Word.Application object in a variable that I call $word. This line of code is shown here.
$word = New-Object -ComObject word.application
Because I am basically experimenting, I make the Word application visible. If I was actually doing something where I knew what I was doing, and I was attempting to automate a common task, there would be no need to make the application visible. To make the Word application visible, I set the Visible property to $true. This line of code is shown here.
$word.visible = $true
Now that I have the Word application running and visible, it is time to add a document. Not very much is practical in Microsoft Word without a document with which to work. To add a document, I use the Add method from the Documents collection. This line of code is shown here.
$document = $word.documents.add()
There are two objects that have the InsertSymbol method: the Range object and the Selection object. I plan to use the Range object, so I use the Range method to retrieve an instance of the Range object from the Range object. This is shown here.
$range = $document.Range()
Lastly, I need to call the InsertSymbol method. This overloaded method accepts up to four parameters. Here, I only need to use two parameters: the character code (retrieved earlier) and the font name that hosts the character I want to insert. This line of code is shown here.
$range.insertsymbol(34,”wingdings”)
The complete AddSymbolToWord.ps1 script is presented here.
AddSymbolToWord.ps1
$word = New-Object -ComObject word.application
$word.visible = $true
$document = $word.documents.add()
$range = $document.Range()
$range.insertsymbol(34,”wingdings”)
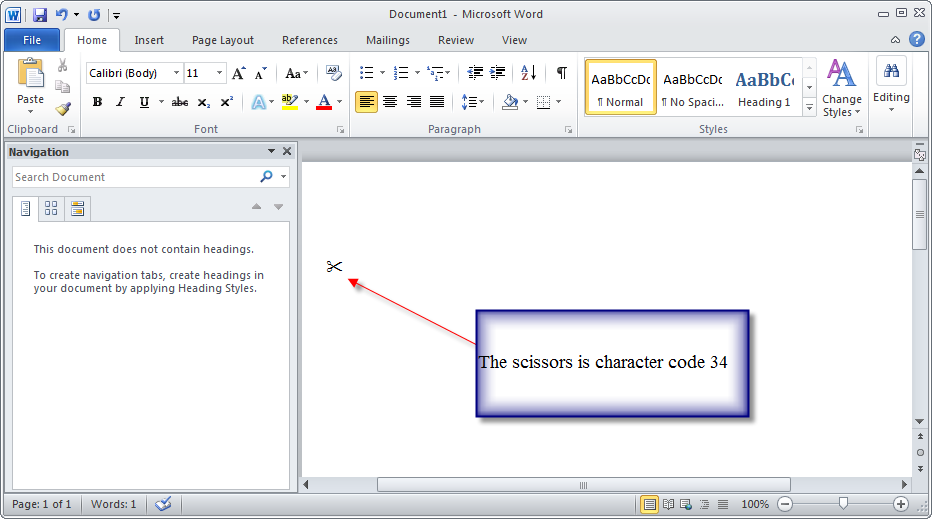
When I run the script, it opens Microsoft Word, creates a new document, and adds the scissors symbol to the document. I added the red arrow and the blue box manually when I edited the picture (which frankly would be REALLY boring without my additions). The image is shown here.
Well, that is all there is to using Windows PowerShell to add a symbol to a newly created Microsoft Word document. Microsoft Word Automation Week will continue tomorrow when I will talk about creating a Word document that contains inserts all of the characters from the Wingdings font.
I invite you to follow me on Twitter and Facebook. If you have any questions, send email to me at scripter@microsoft.com, or post your questions on the Official Scripting Guys Forum. See you tomorrow. Until then, peace.
Ed Wilson, Microsoft Scripting Guy


 Light
Light Dark
Dark
0 comments