Use PowerShell to Aid in Security Forensics
Summary: Microsoft Scripting Guy, Ed Wilson, discusses using Windows PowerShell to aid in security forensic analysis of processes and services on a compromised system.
 Hey, Scripting Guy! It seems that somewhere I read that you have your CISSP certification, so I expect that you know about security. I am wondering, do you know anything about using Windows PowerShell for forensic analysis of potentially compromised servers?
—RM
 Hello RM,
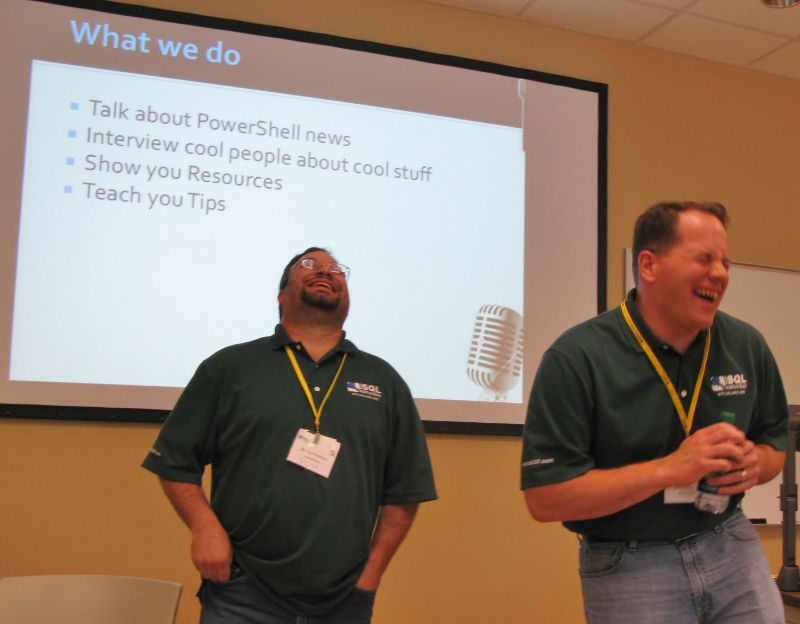
Microsoft Scripting Guy, Ed Wilson, is here. Today is a holiday in the United States, so I decided to celebrate by getting up early and checking the email sent to scripter@microsoft.com. The Scripting Wife is also up (it is always a little eerie when she is up before noon on her day off). I have no idea what she is up to, but she did volunteer to make a pot of tea for me. She mixed up a bit of English Breakfast tea, a half spoon of organic hibiscus flower, and a half spoon of lemon grass. She topped it off with a cinnamon stick. I have to say she did an excellent job. If you are anywhere near Atlanta, you should definitely make plans to attend the Atlanta TechStravaganza. I am making two presentations, and there is an entire Windows PowerShell track (the Scripting Wife will be there too). One thing that is unique this year (although they did it during the SQL Saturday in Atlanta) is Hal Rottenberg and Jon Walz will record the PowerScripting Podcast live during the last session of the day. As shown in the photo that follows, we had a TON of fun during SQL Saturday, and the session during the Atlanta TechStravaganza should be no different.
PowerShell is PowerShell is PowerShell
RM, the key thing to remember, whether you are doing security forensics, Exchange Server administration, Office automation, or anything between, is that Windows PowerShell is Windows PowerShell is Windows PowerShell. This means that all of the Windows PowerShell best practices still apply. One of those Windows PowerShell best practices is to preserve the object. The object-oriented nature of Windows PowerShell is one of the revolutionary features of the language, and it is a major contributor to its ease-of-use.
Note When doing any type of computer forensics, a major principle is to avoid making any changes to the system. Therefore, as a crucial first step, you should use a tool such as the Windows Sysinternals utility tool, Disk2vhd, so you can be assured of not changing things like file access times on the original system.
Therefore, in keeping with the object-oriented nature of Windows PowerShell, you want to use techniques that preserve the object for as long as possible.
Preserving process and service objects
I feel a bit sad when I see people saving process or service information to a text file, and then watch as they create a hundred-line script that invokes various complex regular expressions to parse each file as they attempt to compare two files to pull out information. With security work, what you accomplish prior to a problem arising determines what you can do after the problem manifests itself. For example, if you have obtained periodic baselines, you have a great reference for comparison as you attempt to discover the differences between your pristine system and the compromised machine with which you now work. If you do not have a baseline, the next best thing is to build a duplicate system (hopefully from some backup device), and use that as your reference point.
So what am I talking about? Well, remember that you want to preserve objects so further analysis is easy. The best way to preserve process objects and service objects is to export them to XML. The following two commands export process and service information to an XML format (and thus preserve their object-oriented nature). The commands take a few seconds to work because the file is stored on a network file share.
Get-Process | Export-Clixml -Path \\hyperv1\shared\forensics\EDPROC.XML
Get-Service | Export-Clixml -Path \\hyperv1\shared\forensics\EDService.XML
Comparing process and service information
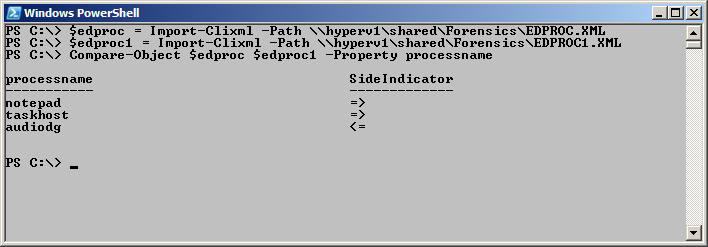
In doing security forensics, it is typical to want to compare one “snapshot” with another “snapshot.” What you need to do is to compare the baseline (or what you are using for your baseline) with the information that is gathered from the compromised system. The following command reads the baseline of process information into a variable, and it also reads the delta snapshot into a variable. Next, it uses Compare-Object to find the difference between the two process snapshots.
$edproc = Import-Clixml -Path \\hyperv1\shared\Forensics\EDPROC.XML
$edproc1 = Import-Clixml -Path \\hyperv1\shared\Forensics\EDPROC1.XML
Compare-Object $edproc $edproc1 -Property processname
The commands and the output associated with running the three commands are shown in the image that follows.
If you only need to determine the number of changes between the baseline and the delta snapshot, pipe the results to the Group-Object cmdlet. This technique is shown here.
PS C:\> Compare-Object $edproc $edproc1 -Property processname | group sideindicator
Count Name Group
—– —- —–
2 => {@{processname=notepad; SideIndicator==>}, @{proc…
1 <= {@{processname=audiodg; SideIndicator=<=}}
Because you are working with rich objects (not mere text), the normal properties of the object continue to exist.
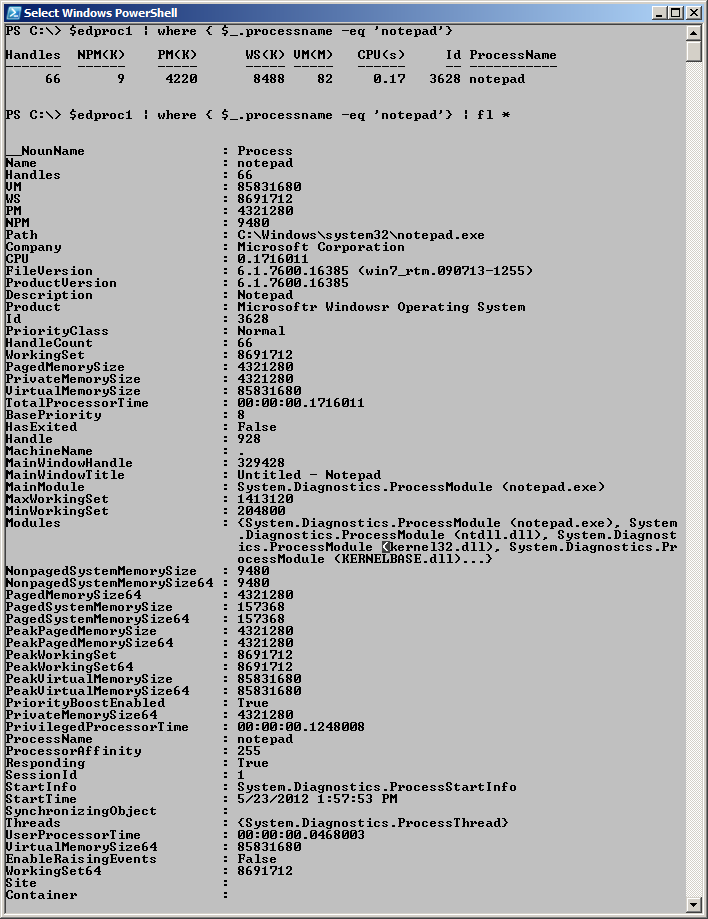
To drill in on one of the newly created processes, pipe the variable that contains the new process to the Where-Object, and pick it out of the collection. To view all of the information about the process, send the results to the Format-List cmdlet. That command is shown here.
$edproc1 | where { $_.processname -eq ‘notepad’} | fl *
This technique is illustrated in the image that follows.
A number of properties from the process object appear to merit additional investigation. Some of the properties that interest me are StartTime, PrivilegedProcessorTime, Path, FileVersion, and the memory information.
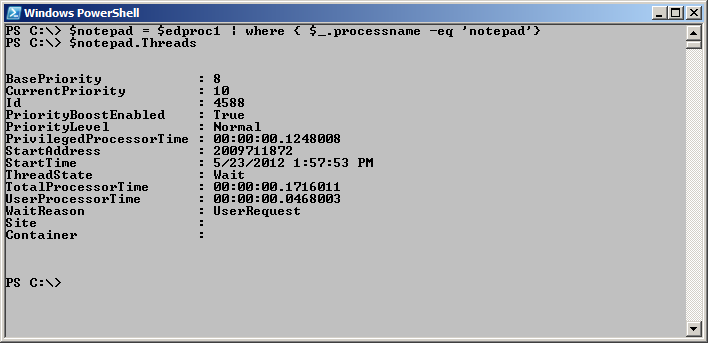
Some of the properties contain other objects, such as the Threads property. To examine that more fully, store resultant object in a variable, and then drill down into it. This technique is shown here.
$notepad = $edproc1 | where { $_.processname -eq ‘notepad’}
$notepad.Threads
The commands and the associated output from the commands are shown here.
Use the same technique to compare your service information.
Note When you take your snapshots (either the baseline or the delta), ensure that you use administrative rights. This is because some information is not available to a non-privileged account.
RM, that is all there is to using Windows PowerShell to compare service and process information. Security Week will continue tomorrow when I will talk about using Windows PowerShell to analyze Security event logs.
I invite you to follow me on Twitter and Facebook. If you have any questions, send email to me at scripter@microsoft.com, or post your questions on the Official Scripting Guys Forum. See you tomorrow. Until then, peace.
Ed Wilson, Microsoft Scripting Guy


 Light
Light Dark
Dark
0 comments