Security Series: Using PowerShell to Enable BYOD–Part 1
Summary: Guest blogger and security expert, Yuri Diogenes, talks about using Windows PowerShell to enable BYOD.
Microsoft Scripting Guy, Ed Wilson, is here. Today’s guest blogger is Yuri Diogenes, who is bringing us the beginning of a new security series. Yuri is a senior knowledge engineer, and he is a coauthor of the book Windows Server 2012 Security from End to Edge and Beyond. You can follow him on Twitter at @YuriDiogenes.
Take it away, Yuri…
The explosion of mobile devices and how users are connecting to resources online changed the way users consume information, and this change has arrived in the enterprise model. In the past, you could easily say that user Bob would always sign in from the UserBobPC computer. This allowed IT to control the computer (device) the way they wanted, and to control the user’s profile—hardening and authorizing, based on the need-to-know security principle.
However, with the demand from users to use their own devices to access corporate information, the concept that one user will always use one device, which is managed by IT, doesn’t fit anymore. This new model is called “bring your own device” (BYOD).
This series of posts will focus in three core BYOD scenarios that use Windows Server 2012 R2 technologies that can be enabled by using Windows PowerShell. If you want to know more about BYOD, read the General Considerations Regarding BYOD section in Bring Your Own Device (BYOD) Survival Guide for Microsoft Technologies.
Scenario 1: Know devices before users access resources
One of the biggest challenges that IT faces with the BYOD model is the lack of control of users’ devices. Even worse, IT has no idea who is bringing the device or if the device is rogue. Before you think about a management solution for user-owned devices, you should ask yourself the following questions:
- How can I track who is bringing an unmanaged device?
- How can I authenticate the device according to the user that is bringing the device?
- How can I track this device?
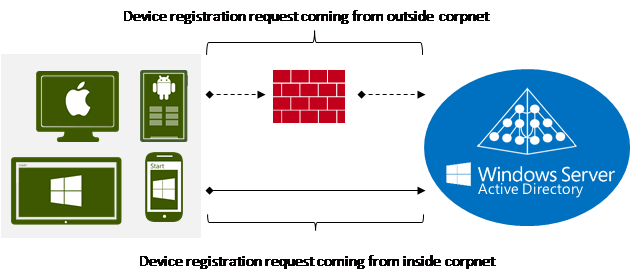
These simple questions can be answered with the capabilities that are built-in to Windows Server 2012 R2, and rapidly enabled by using Windows PowerShell. To know more about the device, you can leverage the Device Registration Service (DRS) in Windows Server 2012 R2. This registration can be performed from devices that are connected within the corporate network (corpnet) or devices that are connecting from an external network, such as the Internet, as shown here:
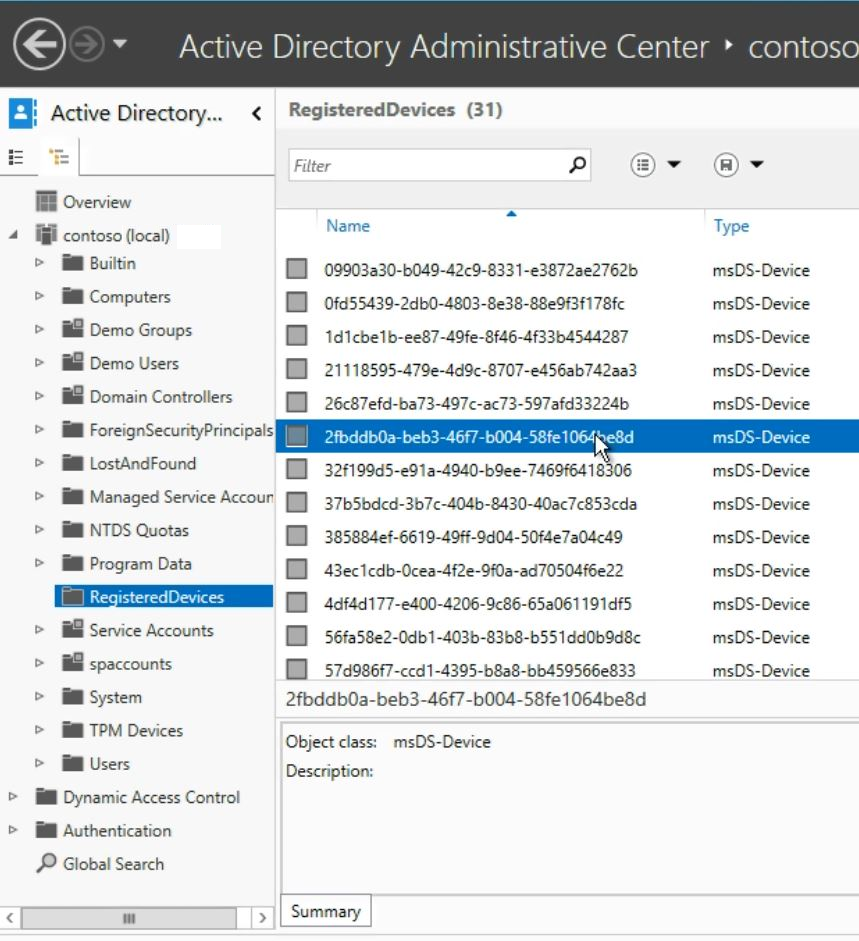
As part of this registration process, a certificate is installed on the device, and a new device object is created in Active Directory. The following image shows an example of a record in Active Directory:
This device object establishes a link between a user and a device, making it known to IT. It allows the device to be authenticated, effectively creating a seamless second-factor authentication. In return for registering their devices and making them known to IT, users gain access to corporate resources that were previously not available outside of their domain-joined computers.
Scenario definition
Contoso IT wants to embrace BYOD. As a first step toward this strategy, they want to understand the footprint of the users’ devices. Initially they want to enable device registration only for devices that are connected through the on-premises corporate network.
The steps to enable device registration by using Windows PowerShell are pretty straightforward. However, there are some prerequisites that must be in place before enabling this capability. Ensure that the following actions were completed before you enable DRS:
- Install a server certificate on the local computer container of the server that will receive the Active Directory Federation Services (AD FS) server role.
- Install and configure the AD FS role in the server running Windows Server 2012 R2 (by running the Install-AdfsFarm cmdlet).
- Configure the Domain Name System (DNS) Server service with an alias CNAME resource record for the AD FS farm and a host (A) resource record for the AD FS nodes.
DRS is installed by running the Install-AdfsFarm cmdlet, and it will use the same service account credentials that are used by AD FS. When the environment is ready, you can prepare Active Directory for DRS by running the following command once for the entire ADFS farm:
Initialize-ADDeviceRegistration -ServiceAccountName contoso\<serviceaccountname>
Following is an example of this operation, where the service account name is adfsfarm:
After you finish this operation, you should run the following cmdlet in each AD FS node in the farm:
Enable-AdfsDeviceRegistration
Following is an example of this operation:
Validate the device
After the operation is complete, you can use the Get-AdfsDeviceRegistration cmdlet to verify the ObjectDN and its parameters, as shown here:
At this point, you can connect a device running Windows 8.1 in the corporate network and use the Workplace Join capability to join and register the device. For more information about this operation, see Walkthrough Guide: Workplace Join with a Windows Device.
To set up your environment for this functionality, you can follow the instructions in Set up the lab environment for AD FS in Windows Server 2012 R2. See you next time!
~Yuri
Thank you, Yuri, for your time and knowledge.
I invite you to follow me on Twitter and Facebook. If you have any questions, send email to me at scripter@microsoft.com, or post your questions on the Official Scripting Guys Forum. See you tomorrow. Until then, peace.
Ed Wilson, Microsoft Scripting Guy


 Light
Light Dark
Dark
0 comments