
Custom Controls for WinForm’s Out-Of-Process Designer
WinForms is a success story that is now in its 20th year. Developers were thrilled from the beginning with how quickly even complex user interfaces could be built – often with considerably less coding effort compared to any other UI stack. The popularity of WinForms would not have grown so widely over the years however, if not for two critical success factors: First, the simple way in which developers can create additional UI Controls with comparatively little effort, including professional design-time support. And secondly the resulting huge ecosystem of WinForms user control libraries for almost every imaginable domain-specific purpose.
Creating user controls for .NET Core/.NET 5-8 (which we call just .NET from here on) or migrating them from .NET Framework works with close to no effort – at least when it is about the runtime functionality. WinForms applications written in .NET can benefit from 3 – 5x performance improvements in many areas (which again increased in .NET 7). Additionally, migrated applications and control libraries profit from much more modest memory consumption when rendering elements from GDI+. That said, there is one aspect of a custom control or a control library which needs somewhat more effort to target the .NET runtime: The new Out-Of-Process WinForms Designer.
The Out-Of-Process WinForms Designer
Until we added support in Visual Studio for .NET Core WinForms applications,
there was only a single process, devenv.exe, that both the Visual Studio
environment and the WinForms application being designed ran within. But .NET
Framework and .NET Core can’t both run together within the devenv.exe process,
and as a result we had to take part of the designer out of process to support
.NET applications. Since .NET Core 3.0 started to support the WinForms .NET
Runtime, a new WinForms designer was needed to support .NET applications. This
work required a near-complete re-architect of the designer as we responded to
the differences between .NET and the .NET Framework based WinForms designer
everyone knows and loves. Developers need to see their Forms in the designer
looking precisely the way it will at runtime (WYSIWYG). Whether it is about a
TextBox and its PlaceholderText property, Button and its Command, or the
layout of a form with the desired default font – in order for it to generate the
WinForms code which sets up the form or UserControl at runtime in
InitializeComponent, the CodeDom Serializer must run in the context of the
version of .NET the project is targeting. And we naturally can’t do that, if the
CodeDom serialization is running in the same .NET Framework process as Visual
Studio. To stick with the example: In .NET Framework, TextBox does not have a
PlaceHolder property (introduced in .NET Core 3.0), and Button is missing
the Command property, which has been introduced in .NET
7.
The correct version of those .NET types simply cannot be resolved in the .NET
Framework process. To solve this, we run the designer out-of-process in a new
.NET (Core) process called DesignToolsServer. The DesignToolsServer process
runs the same version of .NET and the same bitness (x86, x64 or ARM64) as your
application.
To handle the interaction with Visual Studio, we have introduced proxy classes
(.NET Framework ObjectProxy) for the components and controls on a form which
are created along with the real components and controls on the form in the
DesignToolsServer process. For each component or control on the form, an Object
Proxy is created. While the real controls live in the DesignToolsServer process,
the Object Proxy instances live in the client – the Visual Studio process.
Object Proxies then talk with their actual .NET counter parts across the
processes.
You can read more about the details about the concept of the two processes in this blog post about the state of the WinForms Designer.
For the design-time support, this has consequences. One principle of WinForms
controls is that each control brings its own Designer: For a TextBox control
there is TextBoxDesigner class which provides special TextBox design-time
support. For the ListBox control, there is the ListBoxDesigner class, which
provides special design-time support for that control, and so on. Design-time
support often means that there is UI-related functionality which the Designer
needs to provide. For example, when the user picks an item from a list for a
control’s property in the Property Browser, the control’s designer has to
provide that list as a Type Converter. For more sophisticated scenarios,
control designers can also provide custom painting at design time. The handling
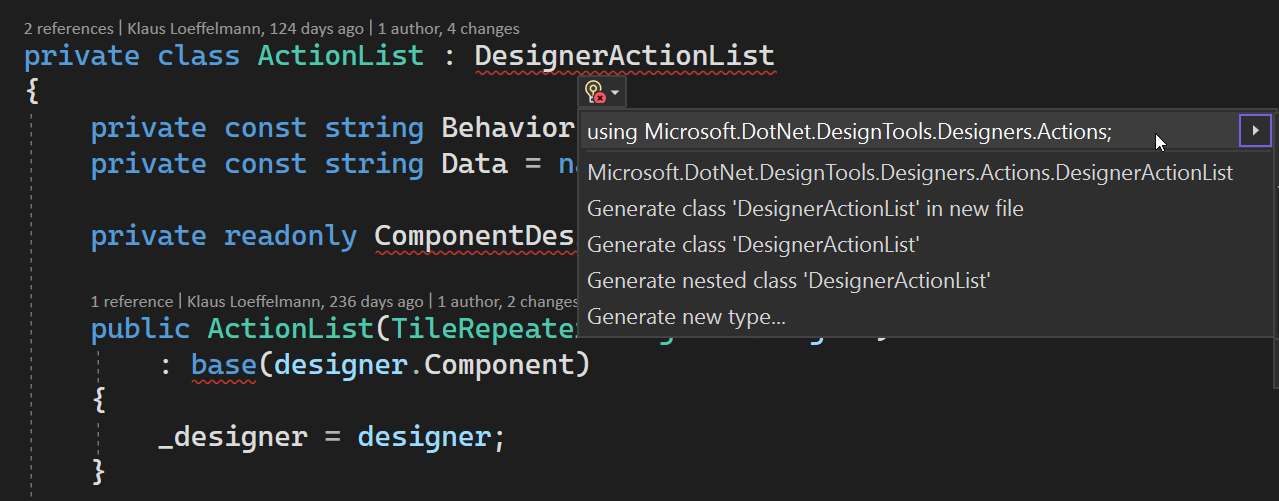
of Action Lists, which provide a quick access to special design-time
functionalities or properties (the feature image of this blog post is such an
Action List) is one additional Designer feature. Ultimately, they can also
provide real complex UIs, which are modal dialogs, shown in the context of
Visual Studio.
Migrating existing Control Designers with almost no effort
Depending on what type of UI-based Design time functionality your Designer provides, the coding effort compared to .NET Framework maybe the same or almost the same. Here is what that means exactly:
-
If your control requires a UI which is based on a type-converter and therefore, shown in the context of the Property Browser (like Enums or dedicated items to show in a property grid’s property grid cell ComboBox), your UI will be supported by the new designer model out of the box.
-
If your control requires a UI, which shows up as part of the control (like custom painted adorners or Action Lists) at design time, then you would need to write your control library against the WinForms Designer SDK, but you don’t need to take care about round-tripping data to the Server process. Everything from the Developer’s perspective seems to actually be done server-side, and you can reuse most of the existing control designer Code.
Note though, that in those cases you need to target the control Designer against the WinForms Designer SDK. That means, you need to reference the Microsoft.WinForms.Designer.SDK NuGet package from your control library. In addition, you need to refactor the namespaces from
System.ComponentModel.DesigntoMicrosoft.DotNet.DesignTools.Designers, where it applies. Some classes are more finely granulated when it comes to namespace definitions, so for example theDesignerActionListbase class, which is originally located inSystem.ComponentModel.Designin the runtime, you’d find inMicrosoft.DotNet.DesignTools.Designers.Actions. It’s easiest to let Visual Studio do the namespace lookup in those refactoring cases:
If your control designer however needs to provide a custom Type Editor for a property whose type’s value need a more complex user interaction, then there is some additional effort for the different processes, which you need to take into account.
Note: This blog post provides a couple of samples, which you can use as a guidance to either create new .NET based or migrate your existing .NET Framework-based control designers to .NET. Section Two .NET samples, and the Why describes those scenarios in more detail.
Recap: Type Editors for special control properties
While more simple control designer scenarios like type converters, Action Lists or CodeDom Serializers don’t need any substantial rewrites, Type Editors, which are responsible for a complex dialog-based UI experience, are a different beast altogether. But before we get into that, let’s recap what Type Editors in the context of WinForms Control Designers are and what purpose they serve.
Technically speaking, a Type Editor is a mechanism which provides the front end
for a user to set the value for a certain control property via some data entry
device. The simplest one: A string editor for a control’s property of type
string, whose value is entered via the keyboard in the Property Browser.
But not all properties are of type string. So, for most of the cases, a type
converter will
extend the functionality of the build-in string editor by providing a mechanism
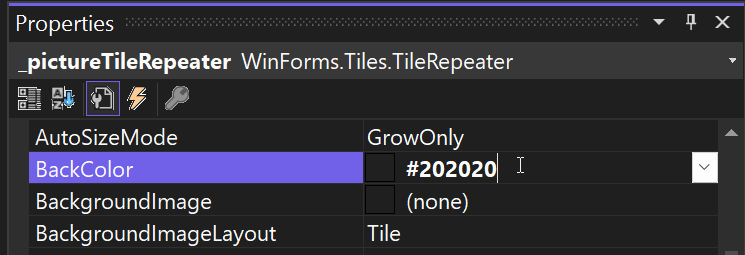
to convert the characters you types to the actual type’s value. For example, the
characters ‘#202020’ are assumed to be hexadecimal representations for the
RGB-color values ‘Red: 32, Green: 32, Blue: 32’ and thus converted to a color of
very dark gray for a background. Unfortunately, not all properties have a
meaningful way to convert to its native value based on a string. Or, it is way
more useful to interact on a visual representation of a type’s value. For a
property which represents a picture for example, the respective Type Editor must
provide the UI to select a picture from disk, serialize the picture, store it as
a resource or file in the project, and generate the required code to assign that
picture at runtime.
Let’s see how such a Type Editor works for a .NET Framework control in the In-Proc-WinForms Designer, and then, why that approach does no longer work in the context of the out-of-process WinForms Designer.
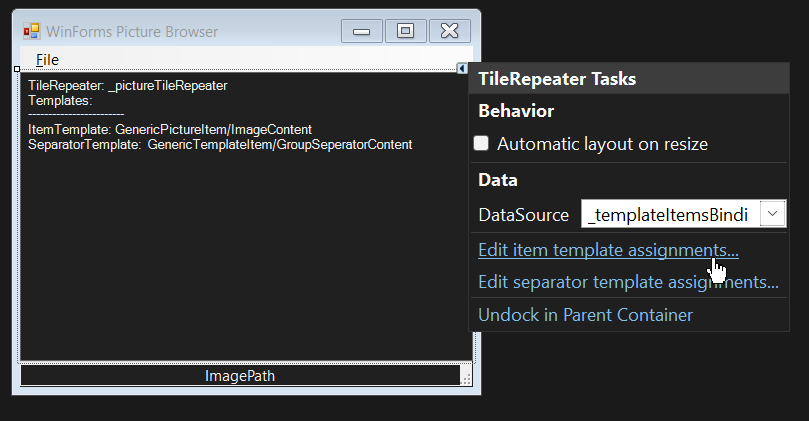
The Demo scenario – the WinForms TileRepeater Control
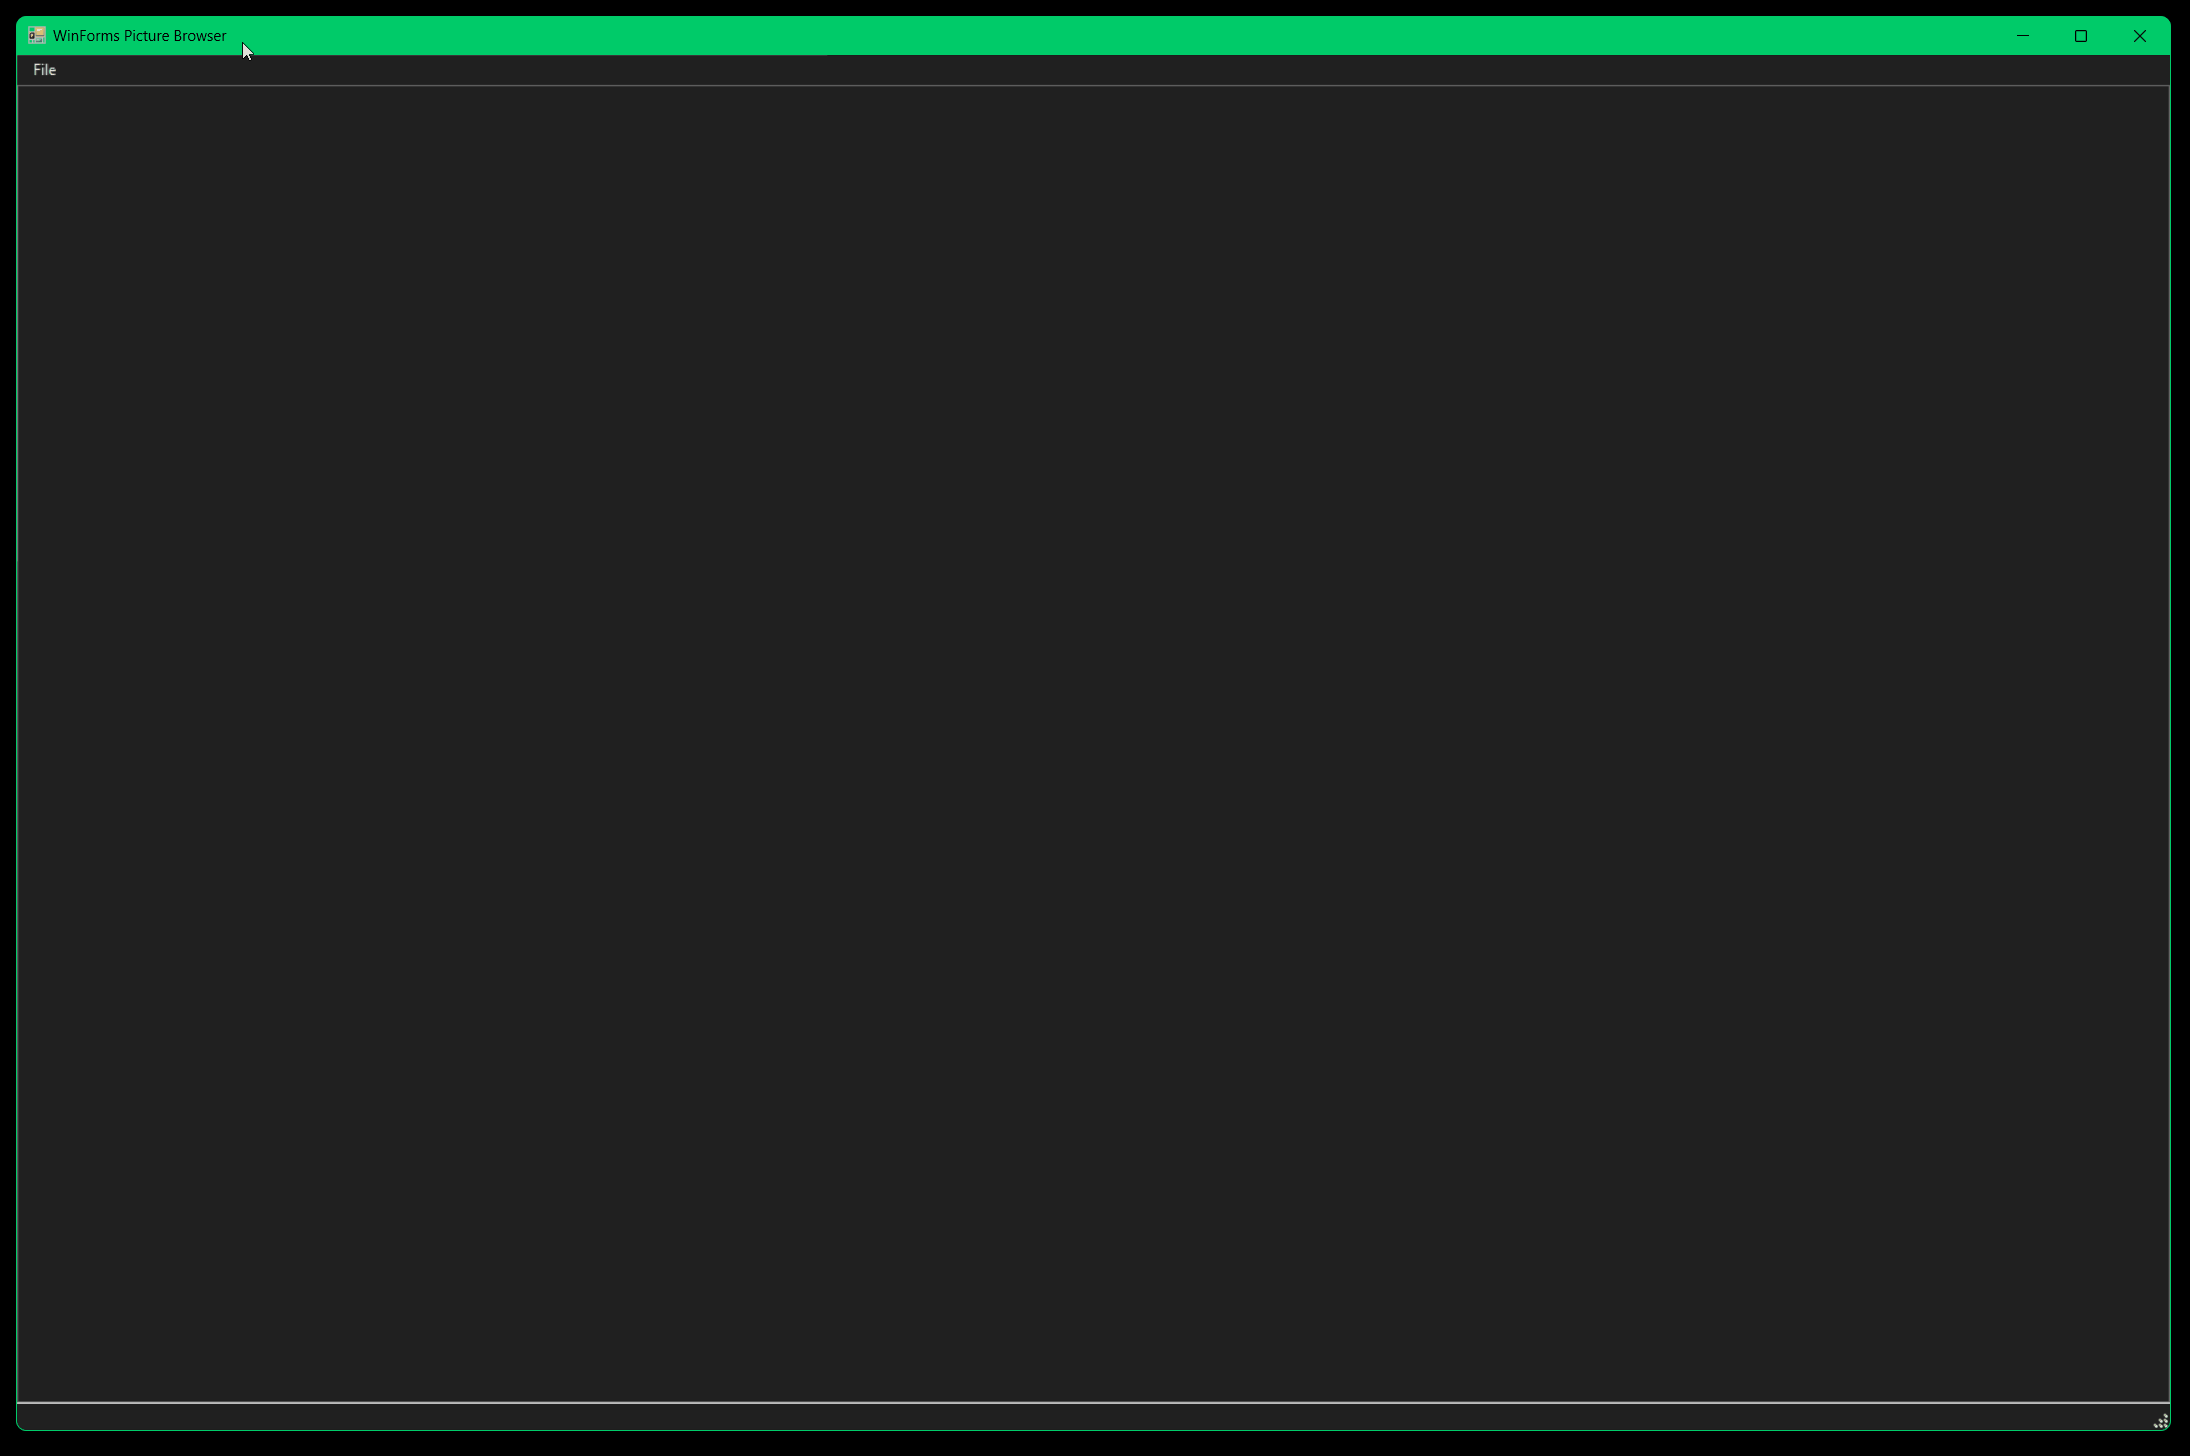
In our Template and Samples GitHub Repo, you find a sample WinForms app for this scenario. It is a picture browser, which shows the jpeg-Images of a folder in a special way:
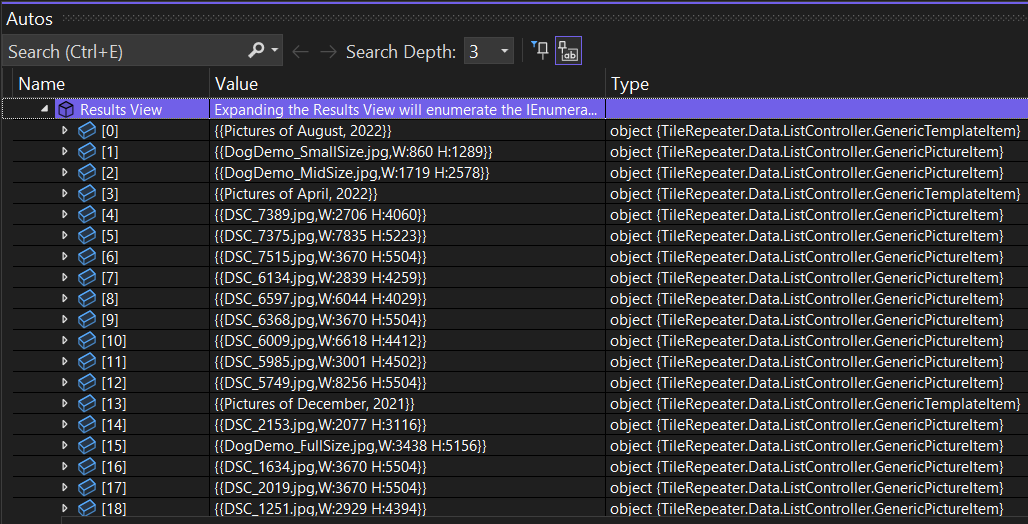
In our example app, those are items holding JPeg-image filenames of a folder on
disk. On the UI-side you have a user control which represents the template for
each element of the data source. At runtime, for each element in the data source
one tile based on this user control template gets created. Each item of the data
source is then data-bound to the instance of that user control, and the user
control is responsible for rendering the content. To this end, our
TileRepeater control has an ItemTemplate property. This property determines,
which type of an element of the data source results in what user control
template type in the UI. And to make this approach even more flexible,
TileRepeater also has a SeparatorTemplate property: It determines another type
for the items, which would serve as a visible separator at runtime.
So, the data source list which holds the pictures in the list is not completely homogenous. Rather, we find two types of elements in it – but we still can use a generic list, since the types built an inheritance type hierarchy.
DISCLAIMER: The TileRepeater control is a demo for the specific .NET
WinForms Designer scenario – it lacks a virtual rendering mode. It works fine
for up to 100 elements, but more than that drains the available resources too
much, and a virtual mode would be necessary to show a large number of items
reliably.
How a Type Editor works in the In-Process WinForms Designer
Here is what happens behind the scenes at design-time when the user sets the
values for ItemTemplate or SeparatorTemplate. When they determine which of
the element types in the data source list should lead to what user control type
(derived from TileRepeaterTemplate) for the actual rendering container at
runtime, this happens behind the scenes.
- The user wants to show the Type Editor for the
TemplateAssignmenttype of theItemTemplateproperty of the TileRepeater control. To that end, they either use a command from the Action List or the Property Browser of Visual Studio (by clicking on the … button in the grid for that property).
- Since the
TemplateAssignmenttype is annotated with theEditorAttribute, the Type EditorTemplateAssignmentEditoris found and instantiated. Since itsGetEditStyle()method returnsUITypeEditorEditStyle.Modal, the WinForms Designer knows that this Type Editor as a modal WinForms Dialog. The Designer calls theEditValuemethod and passes the type descriptor context, the service provider and the actual value to edit. The type descriptor context provides information about the context in which the Type Editor has been called, e.g. if that has been the Property Browser or an Action List. The Service Provider allows the Editor to acquire required Visual Studio services – for example theWindowsFormsEditorServiceto show the actual Dialog in the context of Visual Studio.

-
The UI of the Type Editor is controlled by a ViewModel (
TemplateAssignmentViewModel). That means that code for displaying the UI elements and the code for figuring out what to display are separated from each other. This is the recommended architectural practice. The Dialog UI (TemplateAssignmentDialog) is then instantiated and passed the ViewModel. -
The Type Editor dialog is shown on the screen by passing it to the
ShowDialogmethod of Visual Studio’s editor service. In that dialog, the user can now pick the two types which needs to be assigned to each other:
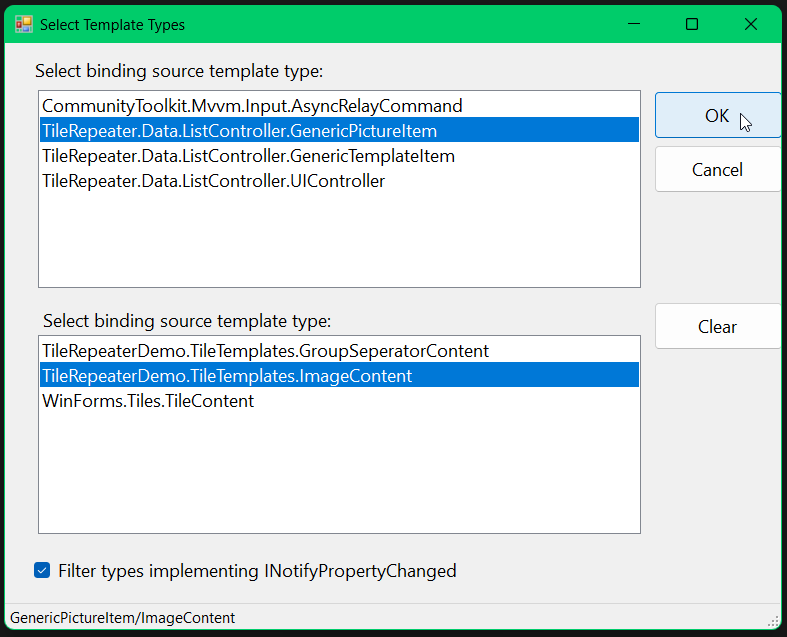
- When the user commits the new setting with OK, the dialog calls the
OKClickmethod in the ViewModel to actually create the new value for the property in itsTemplateAssignmentproperty. The code flow returns to theEditValuemethod, where the new property value is taken from thatTemplateAssignmentproperty and returned to the Designer, which then eventually assigned the new value to theTileRepeatercontrol.
The challenge of Type Editors in the Out-Of-Process Designer
To make the TileRepeater control work at design time in the new out-of-process
Designer, we need to add the support for the process separation. When we want to
show the Type Editor as a modal Dialog, which allows the user to pick the types
for the data template assignment, we have to deal with the different processes:
The Visual Studio Process runs in .NET Framework. But the actual control, for
which we are showing the custom UI, runs in the dedicated .NET server process.
If your WinForms project using the control, is targeting .NET Core 6.0, then
that process runs .NET Core 6.0. If your target is 7.0, the Server Process runs
against .NET 7.0, and so on. That is necessary, because you need and use types
only the specific version of .NET knows about. The Visual Studio and .NET
Framework-based client process is simply not able to discover or handle those
.NET types. From that fact arises the real challenge: Since the control
designer’s dialogs are running in the context of .NET Framework, it cannot
simply search for the types (in our example neither both the items to bind and
the resulting UserControl types) it is supposed to offer the user in that
dialog. Rather, the .NET Framework part of the Type Editor needs to ask the .NET
Process for those types and then use transport classes to get those types
cross-process back to the .NET Framework based Visual Studio process. It can now
process the user’s input and send the results back to the server process. And
yes, that is a necessary breaking change from the previous .NET Framework-only
control designers, and it involves some refactoring of the design time code. But
this refactoring is needed only if there is an actual UI which needs to be
shown on top of the UI that is presented in the context of your actual control,
as we already discussed in the section [Control Designers with almost no
migration effort] (#control-designers-with-almost-no-migration-effort).
-
If you have custom Type Editors, which are displaying dedicated modal dialogs, then there is some rewriting effort involved for round-tripping the required data between the two processes.
-
If you have Type Editors which are derived from existing Type Editors (like
ColorEditororFileNameEditor) for editing certain types of values for existing controls in .NET Framework, then you also need the client/server approach. That said, your control designer solution most probably doesn’t need to have additional communication code to exchange data between the server and the client process in those cases. As long as you do not change the type the original editor is handling, the Designer handles the necessary communication behind the covers. But: That communication is still required to happen, and the modified (inherited) editor types still need to be run in the context of Visual Studio – which at this time is either the 32-Bit .NET Framework process (VS 2019) or the 64-bit .NET Framework process (VS 2022). -
If you however just use the editors (which again need to be provided by the client process), a server-only control designer suffices. In that case though, you need to state the types in the required attributes as strings, and cannot use
typeof(in C#) orGetType(in VB). It would look something like this:
[Editor("System.Windows.Forms.Design.FileNameEditor, System.Design, Version=4.0.0.0, Culture=neutral, PublicKeyToken=b03f5f7f11d50a3a",
        "System.Drawing.Design.UITypeEditor, System.Drawing, Version=4.0.0.0, Culture=neutral, PublicKeyToken=b03f5f7f11d50a3a")]
public string? Filename { get; set; }
Two .NET samples, and the Why
The example that you’ve seen earlier showed the approach of control designer functionality and Type Editors in .NET Framework. When we either port those designers from .NET Framework to .NET, or develop new control designers for .NET altogether, we’ve already discussed that different controls designers might need different kind of UIs. When you use only stock Type Editors editors, or you just need your control designers to provide custom Adorner painting, Action Lists or custom CodeDOM serializers, a server-only version for the Designer will do, and which is pretty much the way, you’ve developed in control designers in .NET Framework. Only if your Control or your Control Library needs custom UI Type Editors, then you need a Client/Server-solution for your Control library.
That is the reason, the sample folder for this blog post contains yet another version of the sample:
We won’t got to much into this sample – it’s pretty much self-explanatory as the
only difference to a .NET Framework version is that it targets the WinForms
Designer SDK instead of the APIs in System.ComponentModel of the runtime as
explained in section [Existing Control Designers with almost no migration
effort] (#existing-control-designers-with-almost-no-migration-effort).
The second sample, however, is the full TileRepeater control version ported
from .NET Framework to .NET. Before we take a look at that solution, let’s learn
more about about the differences for Type Editors between In-Process and
Out-Of-Process WinForms Designer, and what the easiest way is to port a Type
Editor for a .NET Framework Control (or control library) to .NET – or start authoring
a .NET Control Library from scratch.
Type Editor templates for creating the out-of-process Designer Projects
A Type Editor for the out-of-process WinForms Designer needs to be built from several projects. The section Using the Type Editor Template gives all the necessary background information in detail. What’s important for now: The Type Editor Solution Templates are based on two sample solutions, one in C# and one in Visual Basic. These solutions are located in the path
.\\winforms-designer-extensibility\\Templates\\TypeEditor\\src\\TemplateSolutions*.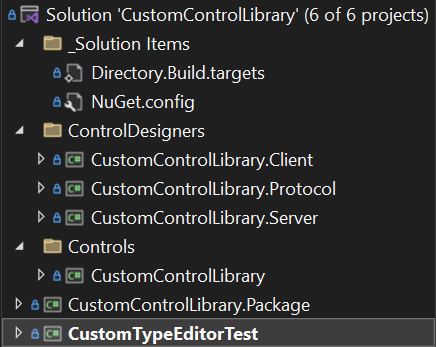
The actual Solution Templates (which are NuGet packages) are built from these solutions by a batch file (more about that below).
These solutions provide:
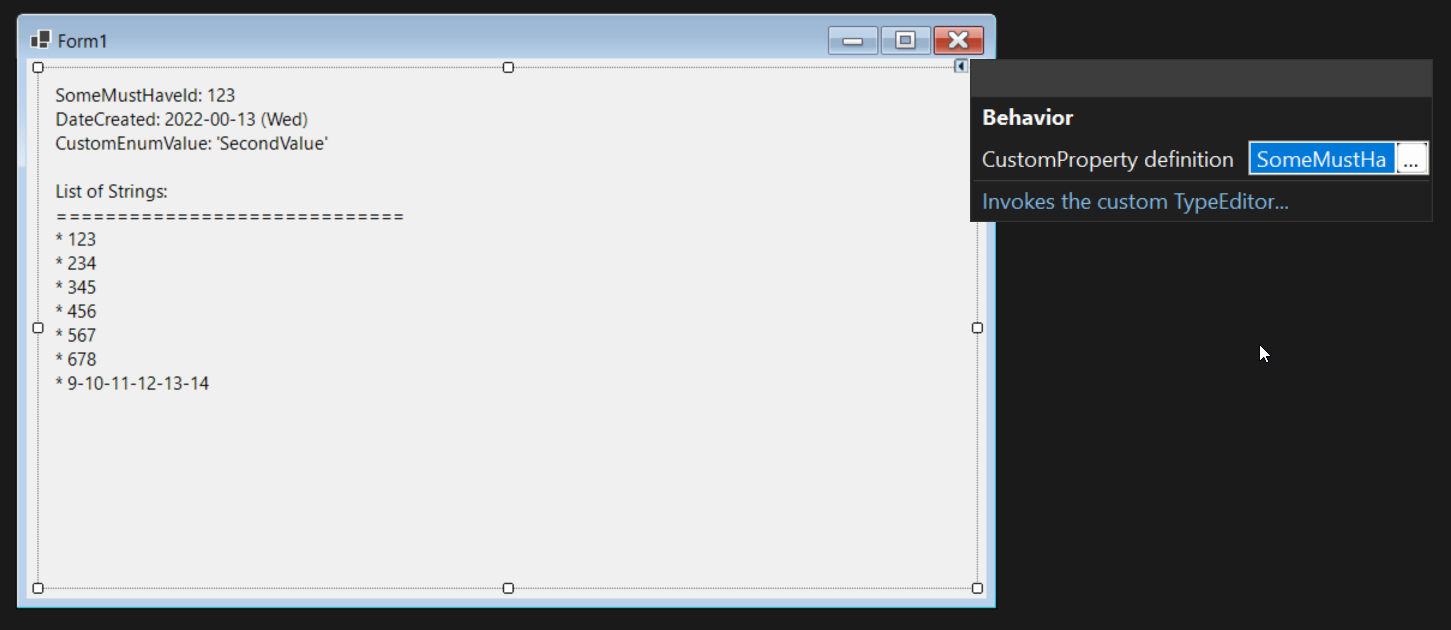
- A WinForms .NET 6 custom control project named CustomControlLibrary which holds the actual custom control. The custom control’s only purpose is to render the content of a composite type named CustomPropertyStore, which is just the composition of a bunch of properties of different types.
-
Three projects which make up the control’s designer:
- The CustomControlLibrary.Client project which targets the same .NET Framework version as Visual Studio (in the sample .NET Framework 4.7.2). It holds the actual WinForms Type Editor, the Type Editor’s UI, and the client-side ViewModel.
- The CustomControlLibrary.Server project, which targets .NET 6. It holds
the actual control designer, along with a custom CodeDom serializer which
determines the necessary steps to generate custom property code for
InitializeComponent. The project also contains a designer action list implementation for the control (see screenshot above). Finally, it includes a couple of methods in the server-side ViewModel, which are called by the client to control aspects of the UI. - The CustomControlLibrary.Protocol project which holds all the classes which are necessary to handle the communication between the client and the server process.
-
A Package project named CustomControlLibrary.Package, which packs the binaries of all those projects in a special structure as a NuGet project, so they can be loaded by the WinForms Designer in the individual client and server processes.
-
A .NET 6 WinForms project named CustomTypeEditorTest to test the control and its design-time functionality.
The procedure for building the actual templates from the template solutions is as follows:
- Make sure the template solutions work as planned if you’ve made any modifications.
- In the command line, change the current directory to Templates.
- Run the prepareTemplates.bat batch file.
This copies the relevant project files from the template solution to the templates folder. The batch file then calls dotnet pack to create the solution template package and also installs the package with dotnet new install. You should see the result of that operation:
D:\Git\winforms-designer-extensibility\Templates\TypeEditor\src\Templates>dotnet pack
MSBuild version 17.4.0-preview-22470-08+6521b1591 for .NET
  Determining projects to restore...
  All projects are up-to-date for restore.
C:\Program Files\dotnet\sdk\7.0.100-rc.2.22477.23\Sdks\Microsoft.NET.Sdk\targets\Microsoft.NET.RuntimeIdentifierInference.targets(257,5): message NETSDK1057: You are using a preview version of .NET. See: https://aka.ms/dotnet-support-policy [D:\Git\winforms-designer-extensibility\Templates\TypeEditor\src\Templates\CustomTypeEditorTemplatePack.csproj]
  CustomTypeEditorTemplatePack -> D:\Git\winforms-designer-extensibility\Templates\TypeEditor\src\Templates\bin\Debug\netstandard2.0\CustomTypeEditorTemplatePack.dll
  Successfully created package 'D:\Git\winforms-designer-extensibility\Templates\TypeEditor\src\Templates\bin\Debug\Microsoft.WinForms.Designer.TypeEditorTemplate.1.1.0-prerelease-preview3.nupkg'.

D:\Git\winforms-designer-extensibility\Templates\TypeEditor\src\Templates>dotnet new install .\bin\Debug\Microsoft.WinForms.Designer.TypeEditorTemplate.1.1.0-prerelease-preview3.nupkg
The following template packages will be installed:
   D:\Git\winforms-designer-extensibility\Templates\TypeEditor\src\Templates\bin\Debug\Microsoft.WinForms.Designer.TypeEditorTemplate.1.1.0-prerelease-preview3.nupkg

Success: Microsoft.WinForms.Designer.TypeEditorTemplate::1.1.0-prerelease-preview3 installed the following templates:
Template Name                   Short Name          Language  Tags
------------------------------  ------------------  --------  ---------------------------------------------------------
WinForms .NET Custom Type E...  WinFormsTypeEditor  [C#],VB   WinForms/Designer/TypeEditor/ActionList/CodeDomSerializer
Using the Type Editor Template
After building the templates they are ready to use from the CLI as well as from Visual Studio.
Creating a new Type Editor Solution within Visual Studio
- Start Visual Studio, and click on Create a new Project.
- In the New-Project-Dialog, type “winforms” in the filter textbox.
- Pick one of the newly available Type Editor templates, either for C# or Visual Basic.
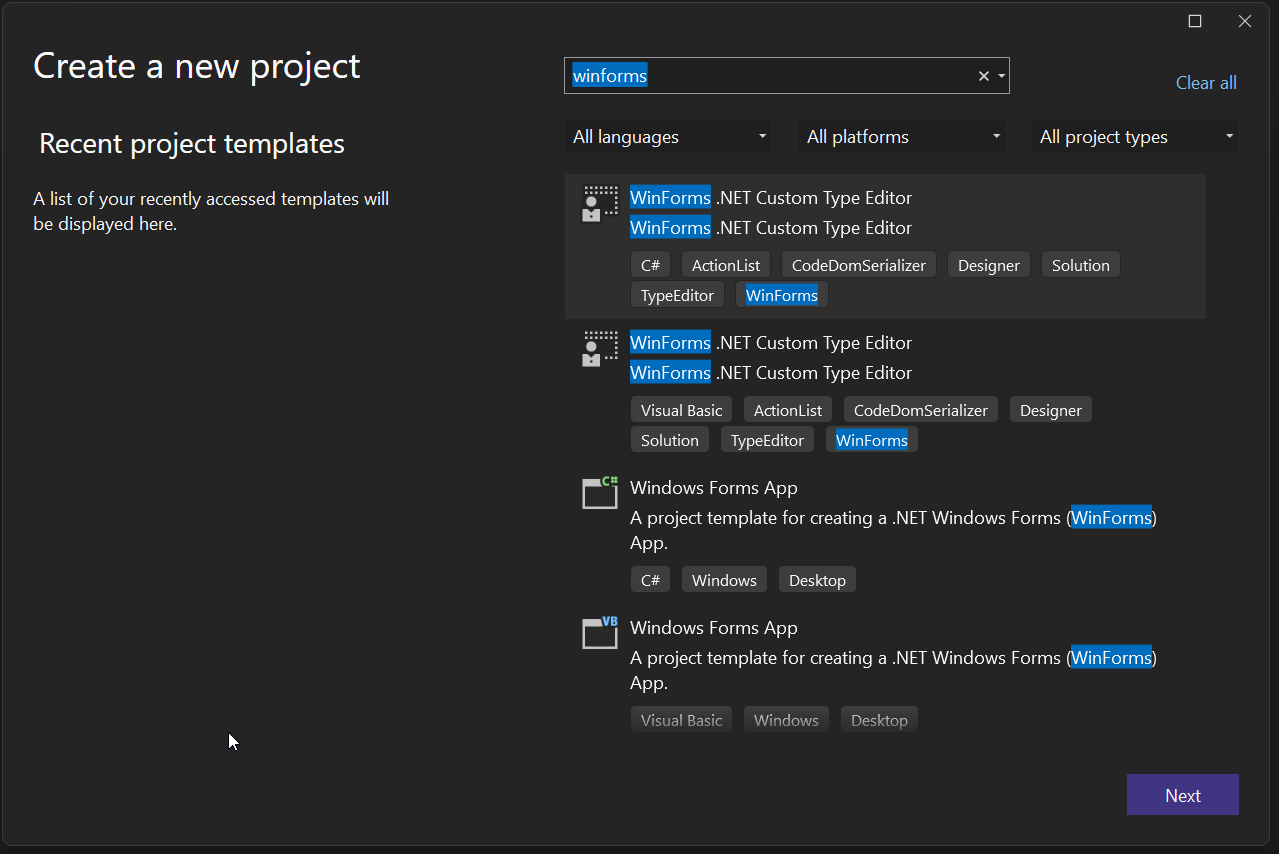
-
Click Next.
-
In the Configure your Project page, specify the following options:
- Project name: This will become the base name of the Project.
- Location: This is the path where the solution and the respective projects will be created.
- Solution: You can choose here if the projects should be created anew or added to an existing solution.
- Solution name: The name of the solution.
-
Click Next.
-
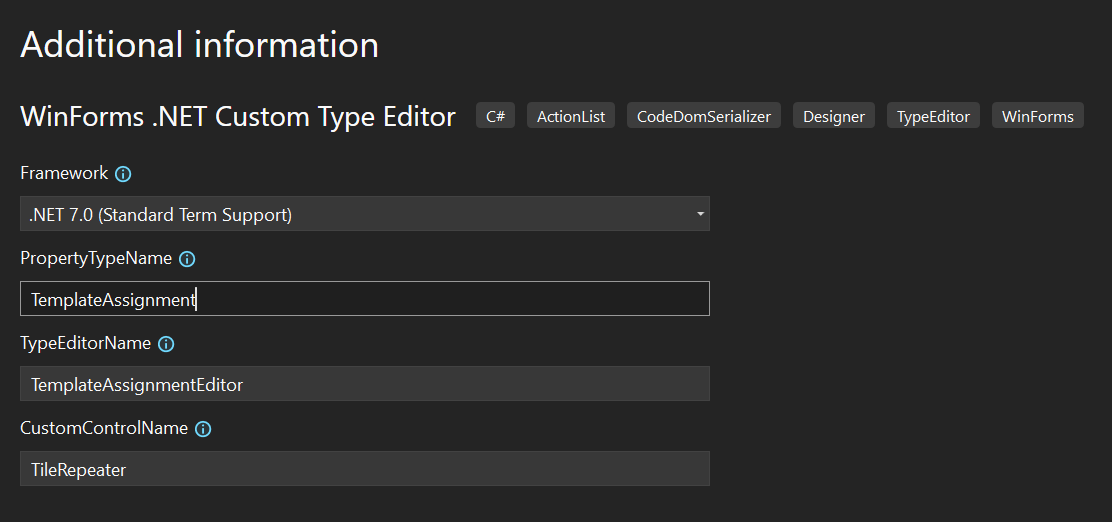
On the Additional Information page, specify the following options:
- Framework: Pick the .NET Version you want the server components (control library, control designer project) targeted against. NOTE: At this point the client projects will always target .NET Framework 4.7.2, as this is the Visual Studio target framework version. The Type Editor templates support .NET Versions from 6.0 on.
- PropertyTypeName: This is the name of the individual custom property the
Type Editor will offer the editing functionality for. In the sample project
the templates are based on, this is the
CustomPropertyStoretype. Every reference to this type name or file name will be renamed to the class name you enter here. - Type Editor Name: This is the name of the Type Editor. In the sample
project the templates are based on, this is the
CustomTypeEditortype. Every reference to this type name or file name will be renamed to the class name you enter here. - CustomControlName: This is the name of the custom control. In the sample
project the templates are based on, this is the
CustomControltype. And again, every reference to this type name or file name will be renamed to the class name you’re entering here.
-
Click Create to create the solution.
Creating a new Type Editor Solution from the dotnet CLI
After installing the templates, you use the Type Editor solution templates like every other Visual Basic or C# templates from the CLI. Refer to the help option for the exact parameter names. The parameters are the same as in the additional options description above.
Projects which the templates create
Setting all the aforementioned projects up manually means coordinating a lot of moving parts, and there is some potential that things go wrong. The individual projects created by this template help to prevent falling into those traps. The templates create a series of projects and important solution folders, depending on your needs for both C# and Visual Basic. Let’s look at the projects which are part of the template solution in detail:
-
_Solution Items: This is not really a project, but rather a solution folder, which holds the readme, the Directory.Build target which determines the NuGet package version for the WinForms Designer Extensibility SDK version used, and the NuGet.config setting. If at any point you need to change the Designer SDK version which is used throughout the solution, you would only need to change them in this one spot.
-
CustomControlLibrary.Client This is a project of the same target framework version as Visual Studio, and it holds the actual Type Editor UI running in the context of Visual Studio. It also contains the client ViewModel, which is a UI controller class. There are actually two ViewModel versions. One in the client, and one in the server. Only the latter has access to the actual server types, while only the client one has direct access to the UI – that’s why both are needed. Both are communicating with each other, so that the client ViewModel can control the UI based on that.
-
CustomControlLibrary.Server: This project holds every aspect of the control designer, which needs to be executed in the context of the server process. Those are:
- The server-side ViewModel, which provides the necessary data to the client-side ViewModel.
- The factory class, which generates the server-side ViewModel.
- A custom CodeDom serializer for the custom property type the Type Editor is handling, should one be needed.
- A custom designer action list which can be accessed at design time through the designer action glyph of the control. Please note, that although these classes are hosted purely in the server-side designer assembly, the UI for the respective action list is still shown in the context of Visual Studio. The necessary communication with the client is done completely behind the scenes by the out-of-process WinForms Designer.
- The actual control designer, which among other things, paints the adorners for the controls. Although it looks like this rendering is done in the context of Visual Studio, it is not. The rendering of the Form and all its components at design time is done by the DesignToolsServer process and projected on the client-area of Visual Studio Design surface. Although rendered on the server-side, there is no direct interaction with the message queue of the server. Every keyboard- and mouse-input is still received in the Visual Studio-based client process, and then communicated to the server. This is the key to how the WinForms Designer ensures that no deadlocks can occur due to competing message queues of different processes.
-
CustomControlLibrary.Protocol: This project contains all the classes which are necessary for the communication between the client and the server process via JSON-RPC. The Designer SDK provides a series of base classes which are optimized for transferring WinForms-typical data types between the client- and the server-process. A typical protocol library for a control designer builds on those classes.
-
CustomControlLibrary: This is the project, which contains your actual custom control(s).
-
CustomControlLibrary.Package: This is the project which creates the control library’s NuGet package. This NuGet package organizes the individual control designer components for the DesignToolsServer process and the Visual Studio client process in respective folders, so that the required parts are available for the processes at design time.
Invoking Type Editors, In-Process vs. Out-Of-Process
The differences between the in-process and the out-of-process WinForms Designer are very fundamental. So, especially when you need to migrate a classic Type Editor to work in the out-of-process Designer, understanding where and how to make the necessary adjustments is paramount.
In the in-process WinForms Designer the invoking of a Type Editor in .NET Framework is a straightforward procedure, and from the .NET Framework version of the TileRepeater project, you already know how Type Editors are getting invoked in the In-Proc-WinForms Designer.
Type Editors in the Out-of-Process WinForms Designer
Here now is the all-important difference compared to the in-process Designer scenario: When the Property Browser asks the Type Editor to display the visual representation of the value, that value’s type is not available in the context of Visual Studio. The Property Browser runs in a process targeting a different .NET version than the process that defines the type. Visual Studio runs against .NET Framework 4.7.2 while the custom control library you are developing is e. g. targeting .NET 7. So, instead of giving the UITypeEditor the control’s custom/special property’s value directly, it’s handing it via the Object Proxy.
The concept of Object Proxies in the client (Visual Studio) process does require a special infrastructure for handling user inputs in custom Type Editors. Let’s look at what infrastructure components of the Designer we need to understand, before we talk about the workflow for setting the value in the out-of-process scenario:
-
Using ViewModels: ViewModels are for controlling aspects of a UI without having a direct reference to the UI specific components – we have seen that concept already in the .NET Framework sample. Don’t confuse view models we use here with ViewModels you might know from XAML languages: While they are also controlling the UI without having any direct dependencies on the UI technology, in contrast to XAML, they are not doing this by direct data binding. Here, they are used to synchronize certain aspects of the UI between the client and the server process. The class
CustomTypeEditorVMClientprovides a static methodCreate, which is the dedicated way to create a ViewModel. You pass the service provider and also the Object Proxy representing the instance of the property’s value, which the client-side Type Editor just got from the Property Browser, to edit to theCreatemethod. -
Sessions and the DesignToolsClient: For the communication with the DesignToolsServer process the Designer needs a sending and a receiving endpoint. The
DesignToolsClientclass represents the client-side sending endpoint and provides the basic mechanisms for communication with the server. To separate the concerns of each WinForms document within Visual Studio which has been opened, each designer document is associated with a session and its related session ID. TheCreatemethod in the sample demonstrates how to retrieve a session and theDesignToolsClientthrough the Service Provider, and use those objects how to subsequently talk to the server – in this case to create the respective server-side ViewModel. -
Object Proxy classes: These classes solve the basic challenge of representing objects of server-side .NET version types which are not known to the .NET Framework based client. If you select a component in the Designer, what the property browser “sees” is an Object Proxy which represents the real object in the server process. A value of a property of a complex type is also represented by a proxy object, since – again – its type only exists on the server, because it’s targeting a different .NET version. And remember: the server-side ViewModel returned from the server is not the actual ViewModel instance, but rather its corresponding Object Proxy.
-
Data transport and remote procedure calls: The communication between client and server is always synchronous, in other words, blocking. You define endpoints in the server-process, which the client calls. The client waits until the server has finished processing those remote procedure calls. Basically, each endpoint needs three dedicated classes:
- A Request class, defined in the Protocol project (see below), which transports necessary data to the DesignToolsServer.
- A Response class, which transports result data back to the client process – also defined in the Protocol project.
- A Handler class, which is the server-side remote-procedure to call, if you will. This class is defined in the Server-Project, since it will most likely use the actual Control types.
In the Type Editor solution template, two endpoints are already predefined:
CreateCustomTypeEditorVM creates the server-side ViewModel, whose instance is
then hosted as a proxy-object in the client-side ViewModel. The communication
and data exchange can be simplified over those two instances. And then there is
also the TypeEditorOKClick endpoint: This method is called when the user
clicked the OK button of the Type Editor’s dialog during design time to
indicate that they finished changing the value passed by the Property Browser.
Since the custom property type only exists in the DesignToolsServer, the client
can only pass over the individual data fragments from what the user entered in
the dialog to the server process. But it is the server which then creates the
actual instance of the value passed from the client. And it
eventually assigns that value to the property of the user control.
Now, with these important basics in mind, here is the internal workflow for setting a property value via a Type Editor in the out-of-process Designer scenario in detail:
-
As in the classic in-process-Scenario, the user wants to set a value for a custom property. And again, a Type Editor for that property type is defined by the
EditorAttribute(see classCustomPropertyStorein the template project). The first important difference: Since the type in question might not be available in the client process’ target framework, the type can only be defined as a string. Also as before, the custom Type Editor class is instantiated, when the user clicks on the … button in the property’s cell of the Property Browser. Now, here is a first exciting challenge that the modern WinForms control developer faces: When the custom control lives only in the server process, and the actual Type Editor lives only in the client, how does the WinForms Designer finds the Type Editor on the client side? This is where an important component in the client designer project comes into play: theTypeRoutingProvider. It holds a table ofTypeRoutingDefinitionobjects and assigns the names of the editors to the actual types. That means, if you were ever to add additional Type Editors for other property types or controls to your control library solution, this table must be maintained accordingly. It’s best practice to use theEditorNamesdefinitions in the Protocol project to that end, since it minimizes typos by providing IntelliSense support. -
The Property Browser now calls the
EditValuemethod of the Type Editor and passes the value of the property to set. But, again, the value is not the actual value of the property. Instead, it is the Object Proxy, which points to the instance of the property type in the server process. This also means the processing of the value must happen in the server-process. To this end, the two ViewModel types to control the edit procedure need now to be used: one on the client side (CustomTypeEditorVMClient), and one on the server side (CustomTypeEditorVM). The template creates both classes for you, along with the infrastructure methods to set them up. -
The static
Createmethod in the client ViewModel has now all the information to create the actual ViewModel instance and to that end, it can call theCreateViewModelClientmethod of the Designer service provider. -
The Type Editor’s main task is to edit the value of type
CustomPropertyStore. To keep the example simple, this is just a composite type, composed of astring, aDateTime, a list ofstringelements and a custom Enum. As a reminder: since this type only exists server-side, the UI (living in the context of Visual Studio) cannot use this type. This is where the Protocol project/assembly comes into play. The Protocol project defines all the transport classes, which can be used in either process. It is defined as a .NET Standard 2.0 library, so all its types can be projected and used in both .NET and .NET Framework projects. We mirror theCustomPropertyStoretype with a special data class we define in the Protocol project namedCustomPropertyStoreData, so that it becomes available on both sides. This type also provides the necessary methods to convert the data it’s hosting into the JSON format and back from it, which is needed to transport it across the process’s boundaries. The response class for the endpoint to create the server-side ViewModel not only takes the proxy of the server-side ViewModel, but also the original values of the types which the custom property type is composed of. And this data we now use to populate the Type Editor’s dialog client side. -
The user now edits the values.
-
When the user clicks OK, we validate the data on the client inside the
CustomTypeEditorDialog. If that validation passes, the dialog returnsDialogResult.OK, and we call theExecuteOKCommandmethod of the client ViewModel to kick of the data transfer to the server. This method now sends theCustomTypeEditorOKClickRequestto the server passing the individual retrieved data from the user’s input of the dialog along. The endpoint’s handler gets those data and passes – in turn – that data to the server-side ViewModel. That again calls itsOnClickmethod, composes the actual instance of the custom control’s property type, and stores it in thePropertyStoreproperty of the server-side ViewModel. And with that, the call chain seems to be finished. So, the server-side ViewModel now holds the edited and committed result. One question remains: How does the ViewModel property find the way back to the control’s property, which we see in the Designer and – through the ObjectProxy – reflected in the property browser? That last step is done client-side, and it’s kind of subtle. Remember? When the client-side view model got created, it not only triggered the creation of the server-side view model. It also requested the proxy of that ViewModel to be returned to the client side. On the client, the client-side ViewModel holds the reference to the server-side ViewModel’sPropertyStoreproperty over a proxy object. When the user clicks OK in the editor, that code flow is returned to the Type Editor (running in the context of Visual Studio), which had opened the modal dialog to begin with. Now, back in the actual Type Editor class, it is where the assignment from this ViewModel to the actual property of the control happens:
    var dialogResult = editorService.ShowDialog(_customTypeEditorDialog);
    if (dialogResult == DialogResult.OK)
    {
        // By now, the UI of the Editor has asked its (client-side) ViewModel
        // to run the code which updates the property value. It passes the data to
        // the server, which in turn updates the server-side ViewModel.
        // When it's time to return the value from the client-side ViewModel back to the
        // Property Browser (which has called the Type Editor in the first place), the client-side
        // ViewModel accesses its PropertyStore property, which in turn gets the required PropertyStore
        // proxy object directly from the server-side ViewModel.
        value = viewModelClient.PropertyStore;
    }
The PropertyStore property of the ViewModelClient doesn’t have a dedicated
backing field to hold the value. Rather, it uses the infrastructure of the proxy
to communicate with the server-side ViewModel to get the just created proxy of
the server-side ViewModel’s PropertyStore content directly. And the proxy
object is what we need here. Again, since the client doesn’t know the type, it
can only deal with the proxy objects which point and represent the server types
instead.
Migrating the TileRepeater sample from .NET Framework to .NET
With the knowledge of how the Type Editor (which is created by the solution template) works, the migration of a Type Editor from .NET Framework to .NET is a straight forward process, despite the fact that there is some effort needed to write the respective boiler-plate code.
The principle approach applied to move a .NET Framework control designer is this:
-
If you haven’t yet, separate the UI inside your Type Editor(s) from the controlling logic by introducing ViewModels. This is important, because the new WinForms-SDK Type Editor base classes use the concept of ViewModels to control the UI both from the client and the server-side. Separating a UI-Controller of a Type Editor’s Dialog into client and server part is way easier, when you already have a UI-independent ViewModel that holds all the UI-logic.
-
Use the solution template to create the necessary projects. For our the migration of our TileRepeater-example, we use TileRepeater as solution name. For entering the project details, we use these settings for naming the respective solution items:
- TemplateAssignment for PropertyTypeName,
- TemplateAssignmentEditor for TypeEditorName,
- TileRepeater for CustomControlName,
- and we Target the solution to either .NET 6 or .NET 7.
The most important thing in the migration process is to figure out which components need to go to to what side and why. Obviously, when you’re starting off with a brand new control designer solution, there are already components in place, which need to be replaced. This is what you can use as guidance for their replacements by your actual components.
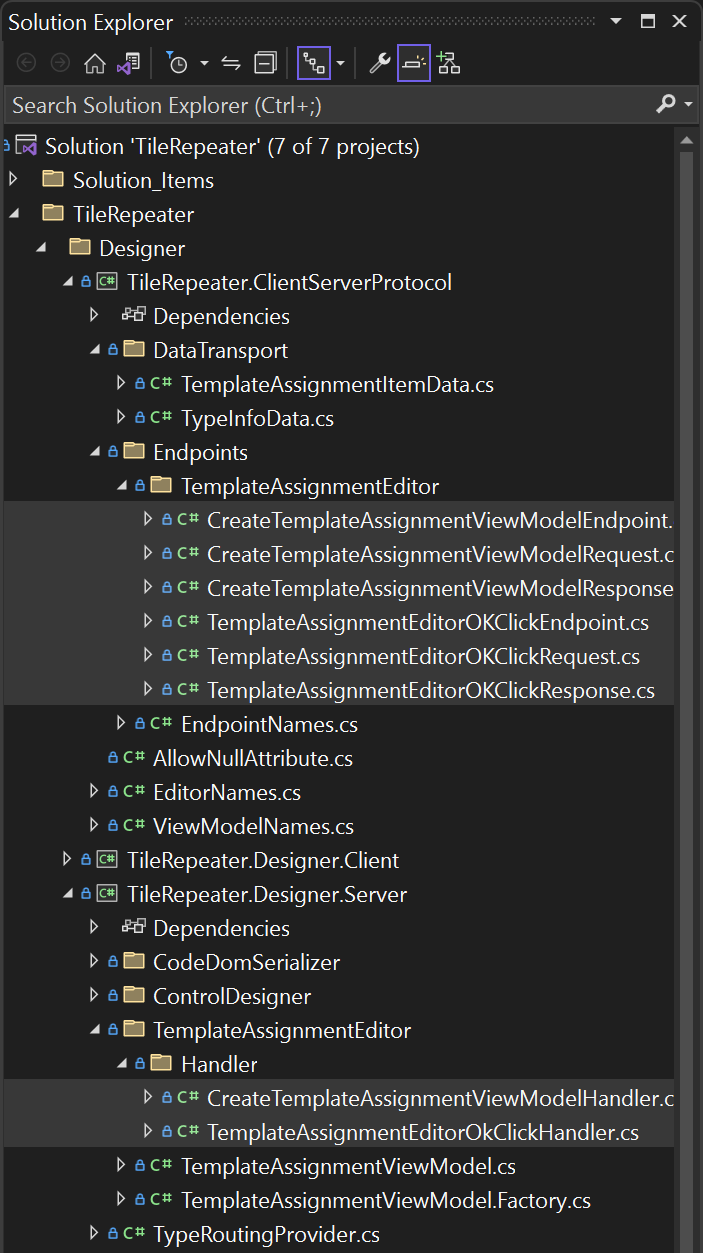
Note: The completely migrated solution you also find in the new WinForms Designer Extensibility GitHub repo. You can always check against its solution explorer structure to make sure you “got” all necessary adjustments.
As you know from the previous description of the scenario that the templates creates, these are the major area that needs rework:
- The actual Custom Control needs to be replaced. So, everything which is placed in the Controls solution folder of the template generated solution should be addressed first. That would already enable the TileRepeater control at runtime. We discuss this in Migrating runtime functionality.
- The ViewModel needs to be split into server and client part. We discuss this in [Migrating the ViewModel to server and client areas] (#migrating-the-view-model-to-server-and-client-areas).
- We need communication classes which serve as proxies for types .NET Framework cannot use from the server process. We discuss this in Providing the protocol classes for communication between client and server.
- We need to modify the endpoints so that actions, which get initiated client-side, are ultimately executed in the server process, and then return the respective result back to the client. We discuss this in Implementing endpoints for server-side functionality.
Migrating runtime functionality
In most cases, migrating the actual control from .NET Framework to .NET, or creating a control in .NET from scratch will not engender additional effort. On the contrary: running in .NET means way better performance, more considerate memory consumption and just broader options due to a way bigger .NET runtime API. To migrate the control’s runtime part of our .NET Framework TileRepeater version to the solution create by the Type Editor .NET template…
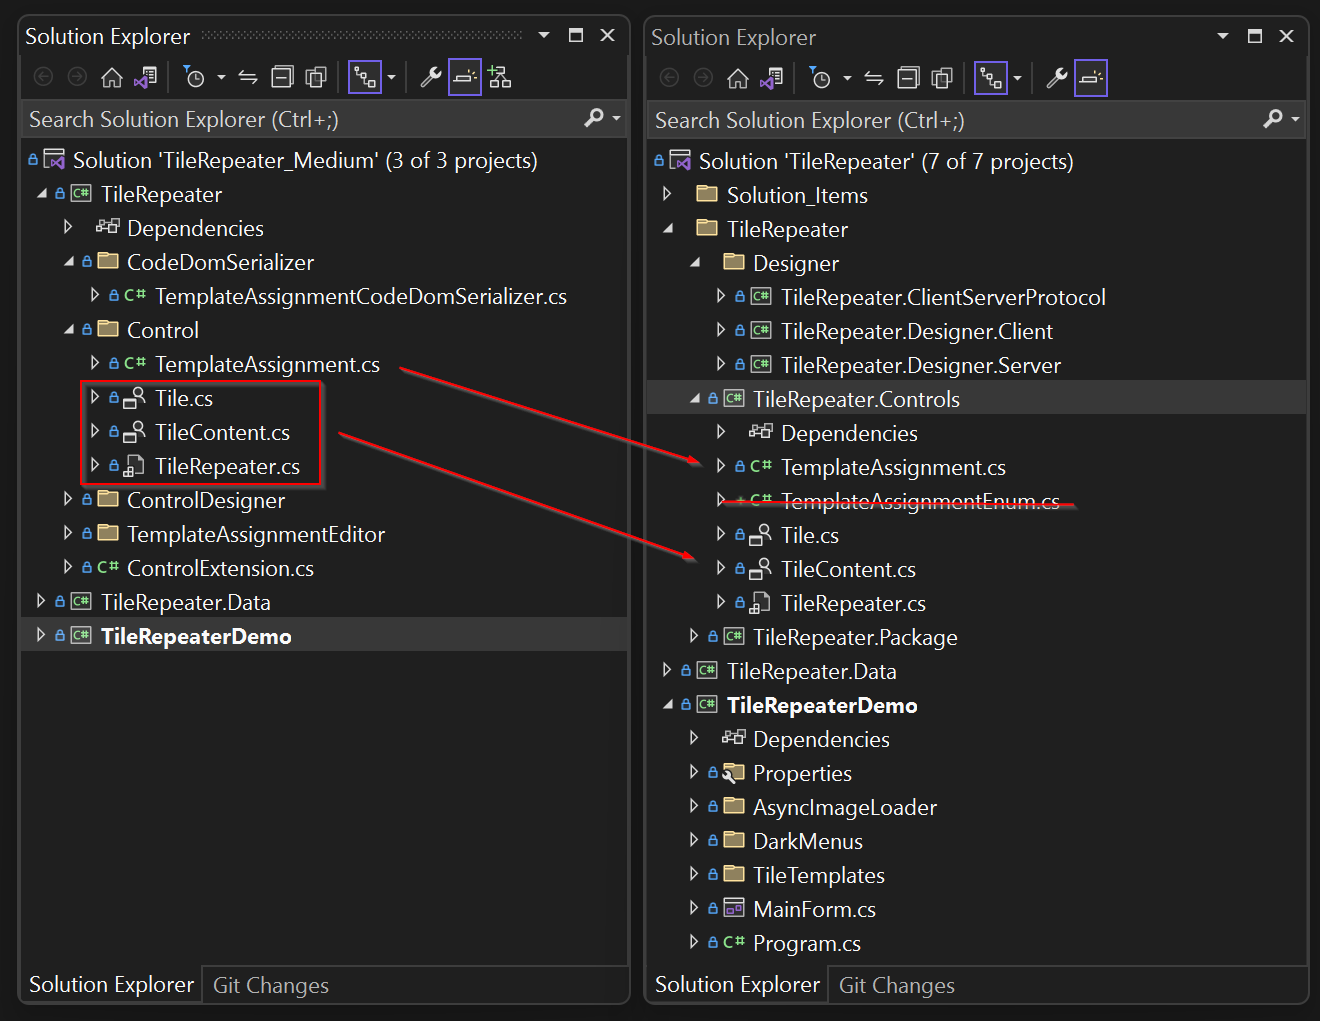
- We would need to swap out the class code for
TemplateAssignmentandTileRepeater. - In addition to those files, we’d need the classes
TileandTileContent, and we can copy them just over from the .NET Framework solution. - Our TileRepeater doesn’t have a custom Enum, so wouldn’t need that code file
(
TemplateAssignmentEnum) at all, and can delete it.
Migrating the ViewModel to server and client areas
When looking at the ViewModel, we stumble over the core problem, due to which we had to take the Designer itself out of the Visual Studio process in the first place. Let’s take a look at the following code of the ViewModel in the .NET Framework source version:
using System;
using System.ComponentModel;
using System.ComponentModel.Design;
using System.Linq;

namespace WinForms.Tiles.Designer
{
    internal partial class TemplateAssignmentViewModel
    {
        private const string SystemNamespace = "System";
        private const string MicrosoftNamespace = "Microsoft";
        private const string AccessibilityNamespace = "Accessibility";

        private ITypeDiscoveryService _typeDiscoveryService;

        private TemplateAssignmentViewModel(IServiceProvider serviceProvider)
        {
            _typeDiscoveryService = (ITypeDiscoveryService)serviceProvider.GetService(typeof(ITypeDiscoveryService));
        }

        .
        .
        .

        private TypeInfoData[] GetTemplateTypelist()
        {
            var types = _typeDiscoveryService.GetTypes(typeof(object), true)
                .Cast<Type>()

        .
        .
        .

            return types.ToArray();
        }
    }
}
The GetTemplateTypeList method of the TemplateAssignmentViewModel class
shows how the list of all available types within the target framework is first
determined via Visual Studio’s TypeDiscoveryService and then filtered for the
types we’re interested in. And it is exactly this which would not work for .NET as target
framework: If the ViewModel ran in the context of Visual Studio, then of course
only those types would be returned from the .NET Framework version that would
correspond to that of Visual Studio. And that would be .NET Framework 4.7.2. But
we need the type list based on .NET, and therefore the determination of the
types must be done server-side. So, we need a second ViewModel running in the
server process.
Thus the ViewModel class needs to be split in two parts:
-
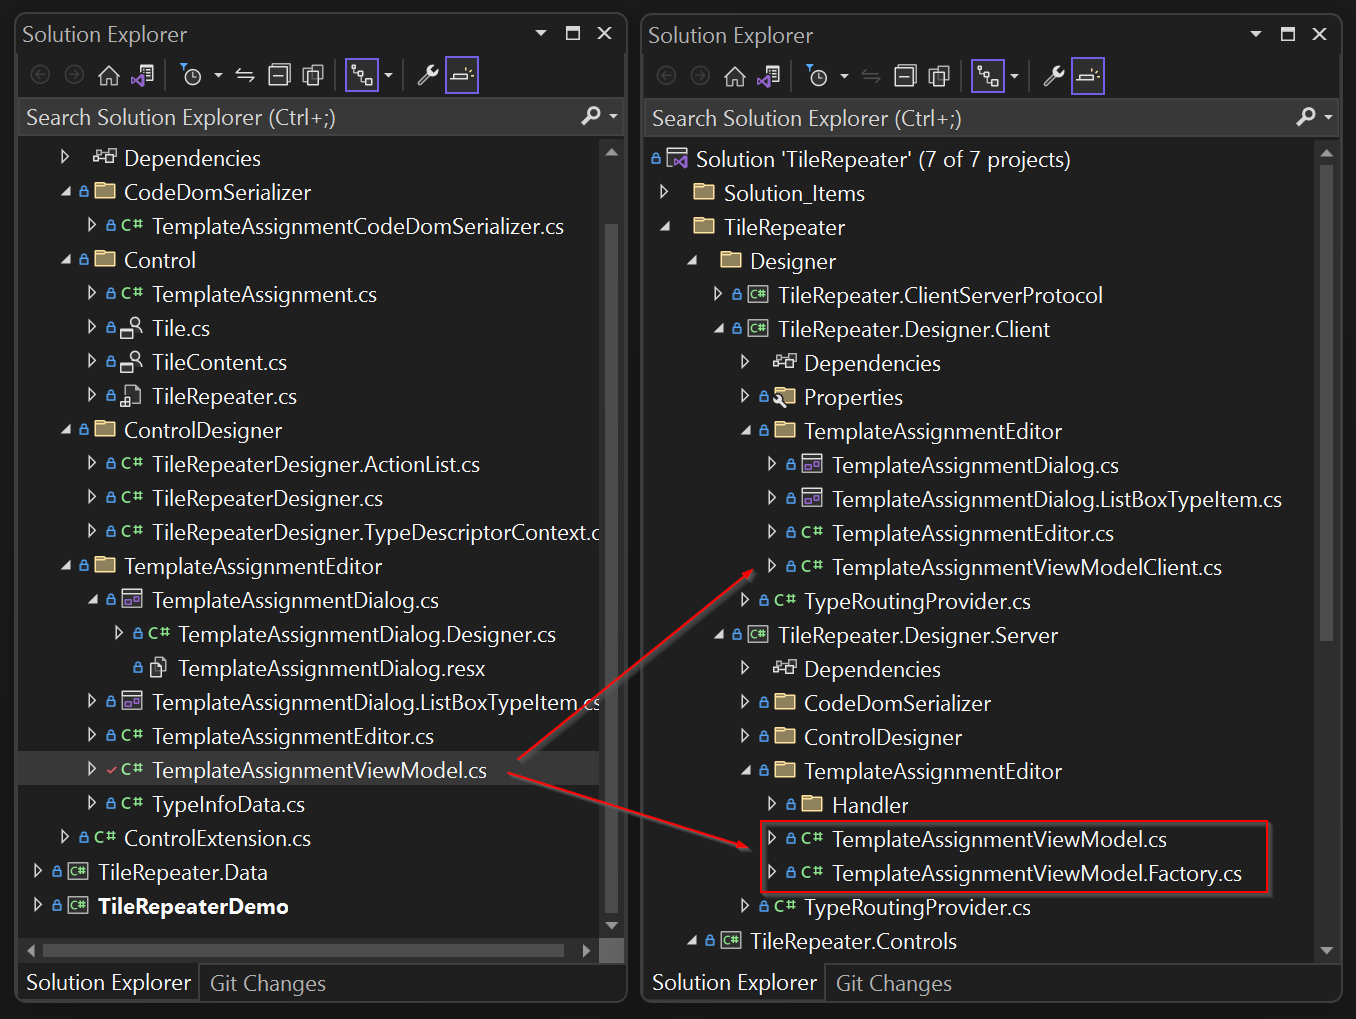
The project TileRepeater.Designer.Client will have all the Type Editor classes like before and the client part of the ViewModel.
-
The project TileRepeater.Designer.Server will have the server-side view model classes. It will also have a server-side Factory of that ViewModel, which is part of the WinForms Designer infrastructure:
The original .NET Framework ViewModel class now needs some refactoring.
- First of all, it needs to use the inbuilt ViewModel infrastructure of the
Out-of-process designer, and that means the client-side ViewModel needs to be
inherited from
Microsoft.DotNet.DesignTools.Client.Views.ViewModelClient. It also needs to use a special internal procedure to create the ViewModel, and has to implement a respective factory to that end. Thirdly, the client ViewModel needs to have access to the server-side ViewModel, which of course also must be created. For that reason, the definition and initialization of the client ViewModel changes into this:
using Microsoft.DotNet.DesignTools.Client;
using Microsoft.DotNet.DesignTools.Client.Proxies;
using Microsoft.DotNet.DesignTools.Client.Views;
using System;
using WinForms.Tiles.ClientServerProtocol;
using WinForms.Tiles.Designer.Protocol;
using WinForms.Tiles.Designer.Protocol.Endpoints;

namespace WinForms.Tiles.Designer.Client
{
    internal partial class TemplateAssignmentViewModelClient : ViewModelClient
    {
        [ExportViewModelClientFactory(ViewModelNames.TemplateAssignmentViewModel)]
        private class Factory : ViewModelClientFactory<TemplateAssignmentViewModelClient>
        {
            protected override TemplateAssignmentViewModelClient CreateViewModelClient(ObjectProxy? viewModel)
                => new(viewModel);
        }

        private TemplateAssignmentViewModelClient(ObjectProxy? viewModel)
            : base(viewModel)
        {
            if (viewModel is null)
            {
                throw new NullReferenceException(nameof(viewModel));
            }
        }

        /// <summary>
        ///  Creates an instance of this ViewModelClient and initializes it with the ServerTypes
        ///  from which the Data Sources can be generated.
        /// </summary>
        /// <param name="session">
        ///  The designer session to create the ViewModelClient server side.
        /// </param>
        /// <returns>
        ///  The ViewModelClient for controlling the NewObjectDataSource dialog.
        /// </returns>
        public static TemplateAssignmentViewModelClient Create(
            IServiceProvider provider,
            object? templateAssignmentProxy)
        {
            var session = provider.GetRequiredService<DesignerSession>();
            var client = provider.GetRequiredService<IDesignToolsClient>();

            var createViewModelEndpointSender = client.Protocol.GetEndpoint<CreateTemplateAssignmentViewModelEndpoint>().GetSender(client);

            var response = createViewModelEndpointSender.SendRequest(new CreateTemplateAssignmentViewModelRequest(session.Id, templateAssignmentProxy));
            var viewModel = (ObjectProxy)response.ViewModel!;

            var clientViewModel = provider.CreateViewModelClient<TemplateAssignmentViewModelClient>(viewModel);
            clientViewModel.Initialize(response.TemplateServerTypes, response.TileServerTypes);

            return clientViewModel;
        }

        private void Initialize(TypeInfoData[] templateServerTypes, TypeInfoData[] tileServerTypes)
        {
            TemplateServerTypes = templateServerTypes;
            TileServerTypes = tileServerTypes;
        }
There are a series of changes to observe, which always need to become part of the migration effort for a Type Editor.
Note: It’s important at this point, that you are comfortable with the fundamentals of ViewModels, sessions and proxy classes in the context of the Out-of-process Designer. You may review the section Type Editors in the Out-of-Process WinForms Designer for more details.
-
Since the Designer must be notified that there is now a new client-side ViewModel, the correlating factory class
Factoryneeds to be a) implemented, b) derived fromViewModelClientFactory<TemplateAssignmentViewModelClient>and c) annotated with theExportViewModelClientFactory(ViewModelNames.TemplateAssignmentViewModel)attribute. -
The constructor of our client-side ViewModel class is private. The reason for this is: Only the factory class should be able to create it. The constructor also takes an argument of type
ObjectProxy, and that is the proxy class of the server-side ViewModel. To get that, the constructor of our factory class calls the static methodCreateof our client-side ViewModel which initiates the following:- It gets a
DesignerSessionand theDesignToolsClientto be able to communicate with the DesignToolsServer. - It gets the Endpoint
CreateTemplateAssignmentViewModelEndpoint, so that it can call a method server-side in which the server-side ViewModel will be created. - In the
CreateTemplateAssignmentViewModelResponseclass, that ViewModel proxy is then returned, and can be used to create the actual client side ViewModel.
- It gets a
Now, obviously, the types that we need to display in the Dialog cannot be the
actual Type class instances. And, as mentioned before, the reason is the
client-side ViewModel runs against .NET Framework 4.7.2 while the types it needs
to display are .NET types.
For that reason, we also need to have the server-side ViewModel, which looks like this:
using Microsoft.DotNet.DesignTools.ViewModels;
using System;
using System.ComponentModel;
using System.ComponentModel.Design;
using System.Diagnostics.CodeAnalysis;
using System.Linq;
using WinForms.Tiles.ClientServerProtocol;
using WinForms.Tiles.Designer.Protocol.Endpoints;

namespace WinForms.Tiles.Designer.Server
{
    internal partial class TemplateAssignmentViewModel : ViewModel
    {
        private ITypeDiscoveryService? _typeResolutionService;

        private const string SystemNamespace = "System";
        private const string MicrosoftNamespace = "Microsoft";
        private const string AccessibilityNamespace = "Accessibility";

        private static readonly Type s_tileContentType = typeof(TileContent);
        private static readonly string[] s_systemAssembliesFilter = new[]
        {
            AccessibilityNamespace,
            $"{SystemNamespace}.",
            $"{MicrosoftNamespace}."
        };

        public TemplateAssignmentViewModel(IServiceProvider provider)
            : base(provider)
        {
        }

        public CreateTemplateAssignmentViewModelResponse Initialize(object templateAssignment)
        {
            // Here in the Server process, we first get the list of potential template types...
            TemplateTypeList = GetTemplateTypelist();

            // ...and then every type which is derived from 'Tile'.
            TileContentTypeList = GetTileTypeList();

            this.TemplateAssignment = (TemplateAssignment)templateAssignment;

            return new CreateTemplateAssignmentViewModelResponse(this, TemplateTypeList, TileContentTypeList);
        }

        private TypeInfoData[] GetTemplateTypelist()
        {
            _typeResolutionService ??= GetRequiredService<ITypeDiscoveryService>();

            var types = _typeResolutionService.GetTypes(typeof(object), true)
                .Cast<Type>()

            .
            .
            .

            return types.ToArray();
        }
        private TypeInfoData[] GetTileTypeList()
        {
            _typeResolutionService ??= GetRequiredService<ITypeDiscoveryService>();

            .
            .
            .

            return types.ToArray();
        }

        // When we reach this, TemplateQualifiedTypename as well as
        // TileContentQualifiedTypename have been set by the Client-
        // ViewModel (see there).
        internal void OKClick()
        {
            // Create a new Instance of the TemplateAssignment:
            var templateType = Type.GetType(TemplateQualifiedTypename!);
            var tileContentType = Type.GetType(TileContentQualifiedTypename!);
            TemplateAssignment = new(templateType, tileContentType);
        }

        [AllowNull]
        public TypeInfoData[]? TemplateTypeList { get; private set; }

        [AllowNull]
        public TypeInfoData[]? TileContentTypeList { get; private set; }

        public string? TemplateQualifiedTypename { get; set; }
        public string? TileContentQualifiedTypename { get; set; }

        [AllowNull]
        public TemplateAssignment TemplateAssignment { get; set; }
    }
}
You can see that the actual domain-specific code has not changed at all. The only thing the server-side ViewModel has in addition to the .NET Framework version is that the public properties providing the type-results-list are no longer based on the actual type classes, but rather on the data transport classes, which can be understood by both target framework versions.
So, from that the question derives: Where are those transport classes defined and how can we get the type-information from the server to the client side?
Providing the protocol classes for communication between client and server
This brings us to the point where the protocol classes take the stage. The protocol project contains the entire infrastructure to transfer required information between the two processes via JSON-RPC.
- It holds transport classes which carry data for those types which can not be used by both target frameworks.
- It provides the serialization mechanism for those classes from and to JSON.
- It defines the endpoint definitions and the parameter classes (
RequestandResponse) for those endpoints.
To stay with our specific TileRepeater example: Instead of presenting the type
information as a string representation directly in the UI, the protocol project
provides two classes named TypeInfoData and TemplateAssignmentItemData that
contain necessary type information in a way that is compatible for both target
framework versions. By the way: this is also the reason why the protocol
project’s target framework is .NET Standard 2.0. The resulting assembly
contains only types that can be projected to both assembly target framework
versions of client and server and thus can be used compatibly. Let’s look at the
TypeInfoData class:
using Microsoft.DotNet.DesignTools.Protocol.DataPipe;
using System;
using System.Diagnostics;
using System.Diagnostics.CodeAnalysis;

namespace WinForms.Tiles.ClientServerProtocol
{
    [DebuggerDisplay("{" + nameof(GetDebuggerDisplay) + "(),nq}")]
    public partial class TypeInfoData : IDataPipeObject
    {
        [AllowNull]
        public string AssemblyFullName { get; private set; }

        [AllowNull]
        public string Namespace { get; private set; }

        [AllowNull]
        public string FullName { get; private set; }

        [AllowNull]
        public string AssemblyQualifiedName { get; private set; }

        public bool ImplementsINotifyPropertyChanged { get; private set; }

        [AllowNull]
        public string Name { get; private set; }

        public TypeInfoData()
        {
        }

        public TypeInfoData(
            string assemblyFullName,
            string @namespace,
            string fullName,
            string assemblyQualifiedName,
            bool implementsINotifyPropertyChanged,
            string name)
        {
            AssemblyFullName = assemblyFullName ?? throw new ArgumentNullException(nameof(assemblyFullName));
            Namespace = @namespace ?? throw new ArgumentNullException(nameof(@namespace));
            FullName = fullName ?? throw new ArgumentNullException(nameof(fullName));
            AssemblyQualifiedName = assemblyQualifiedName ?? throw new ArgumentNullException(nameof(assemblyQualifiedName));
            ImplementsINotifyPropertyChanged = implementsINotifyPropertyChanged;
            Name = name ?? throw new ArgumentNullException(nameof(name));
        }

        public static TypeInfoData CreateMissingTypeInfoData(string assemblyQualifiedName, string name)
            => new(
                assemblyFullName: string.Empty,
                @namespace: string.Empty,
                fullName: string.Empty,
                assemblyQualifiedName: assemblyQualifiedName,
                implementsINotifyPropertyChanged: false,
                name: name);

        public void ReadProperties(IDataPipeReader reader)
        {
            AssemblyFullName = reader.ReadString(nameof(AssemblyFullName));
            FullName = reader.ReadString(nameof(FullName));
            AssemblyQualifiedName = reader.ReadString(nameof(AssemblyQualifiedName));
            Namespace = reader.ReadString(nameof(Namespace));
            ImplementsINotifyPropertyChanged = reader.ReadBooleanOrFalse(nameof(ImplementsINotifyPropertyChanged));
            Name = reader.ReadString(nameof(Name));
        }

        public void WriteProperties(IDataPipeWriter writer)
        {
            writer.Write(nameof(AssemblyFullName), AssemblyFullName);
            writer.Write(nameof(FullName), FullName);
            writer.Write(nameof(AssemblyQualifiedName), AssemblyQualifiedName);
            writer.Write(nameof(Namespace), Namespace);
            writer.WriteIfNotFalse(nameof(ImplementsINotifyPropertyChanged), ImplementsINotifyPropertyChanged);
            writer.Write(nameof(Name), Name);
        }

        private string GetDebuggerDisplay()
            => $"{Name}: {Namespace}, {AssemblyFullName} INPC:{(ImplementsINotifyPropertyChanged ? "Yes" : "No")}";
    }
}
When implementing data classes to transport results back and forth from and to the server-process, keep this in mind:
- Transport classes need to implement the
IDataPipeObjectinterface. This interface ensures that the necessary methods for converting the content of the class from (ReadProperties(IDataPipeReader reader)) and to (WriteProperties(IDataPipeWriter writer)) JSON are implemented. You need to make sure that the properties are written in the same order as they are being read, otherwise the deserialization of an object’s content would fail. - You can only use data types which are part of .NET Standard 2.1.
- If property types are not nullable, they should be annotated with the
AllowNullattribute (thus allowing the compiler to accept a type to be null for a while, if you will). The reason is that every transport class needs a public, parameterless constructor. Technically, there would be a chance that the properties are not initialized. But the Designer takes care of that during the deserialization process. Still, you don’t want to make the properties nullable just because of that semantic convention.
Note: In some circumstances it is necessary that you display a rendered result from a control or component, which is only available server-side. In that case, you would need to create an endpoint which renders that result into a bitmap, and then implement a respective transport class, which would serialize and transfer the content of that bitmap between the processes by byte array.
Implementing endpoints for server-side functionality
When the transport classes are in place, the endpoints need to be implemented. The classes which pass the arguments from and to the endpoint handlers are part of the protocol assembly along with their endpoint definitions. The actual methods which will be executed server-side are the endpoint handler classes, and because they need to have access to the actual control types and the control’s property types, they are part of the server-side designer assemblies, which reference the control library.
- For creating the server-side ViewModel, which also retrieves the list of
types at the same time, we have the
CreateTemplateAssignmentViewModelEndpoint. TheRequestandResponseclasses for that endpoint are defined in the TileRepeater.ClientServer.Protocol project.CreateTemplateAssignmentViewModelRequest: This class needs to take the session ID and the Object Proxy of the actual control, and passes it to theCreateTemplateAssignmentViewModelHandlerclass in the server.CreateTemplateAssignmentViewModelResponse: This class gets the server-side ViewModel, the list with template types and the list with Tile-user-control types, and returns it to the client ViewModel.
- For notifying the server ViewModel that the OK-Button of the Type Editor was
clicked and the selected Template/Tile-user-control combination now needs to
be committed as the new
TemplateAssignmentproperty value, we have theTemplateAssignmentEditorOKClickEndpoint.TemplateAssignmentEditorOKClickRequest: This class just passes the server-side ViewModel, so the handler knows, which ViewModel instance to execute theOKClickmethod on.TemplateAssignmentEditorOKClickResponse: This class doesn’t carry any additional parameter. But it must be there to fullfil the required convention.
The actual methods that are getting executed are defined in the server-side
Designer assembly, which is made from the project
TileRepeater.Designer.Server. They basically call the respective methods in
the server-side ViewModel. Let’s look at the implementation of how the
CreateTemplateAssignmentViewModelEndpoint is generating the ViewModel and
returns the list of types back to Visual Studio’s client process (see comments
of listing):
using Microsoft.DotNet.DesignTools.Protocol.Endpoints;
using WinForms.Tiles.Designer.Protocol.Endpoints;

namespace WinForms.Tiles.Designer.Server.Handlers
{
    [ExportRequestHandler(EndpointNames.CreateTemplateAssignmentViewModel)]
    internal class CreateTemplateAssignmentViewModelHandler
        : RequestHandler<CreateTemplateAssignmentViewModelRequest, CreateTemplateAssignmentViewModelResponse>
    {
        public override CreateTemplateAssignmentViewModelResponse HandleRequest(CreateTemplateAssignmentViewModelRequest request)
        {
            // We need the DesignerHost to have the Designer-infrastructure create our server-side ViewModel:
            // We get the DesignerHost for the session that is correlating to the open design document in VS
            // by the session ID:
            var designerHost = GetDesignerHost(request.SessionId);

            // With the designerHost instance, we're now able to have the server-side ViewModel created.
            var viewModel = CreateViewModel<TemplateAssignmentViewModel>(designerHost);

            // The ViewModel now not only creates the list of types we need to show "on the other side";
            // it also creates the necessary response class, which wraps everything - so with this one line,
            // we're returning the server-side ViewModel (as a proxy) and both of the type lists in one go.
            return viewModel.Initialize(request.TileRepeaterProxy!);
        }
    }
}
NOTE: Whenever you need to create a new Endpoint to execute an endpoint handler on the server-side, keep this checklist in mind:
- In the protocol project, define the
Endpoint,RequestandResponseclasses. - Make sure,
RequestandResponseclass are inherited from those base classes. - As data transport properties in
RequestorResponseclasses, only use types which are defined by the .NET Standard 2.0 target framework. If you need classes specific to your control which only run in the context of the server target framework, you need create wrapper classes. These wrapper classes also need to be defined in the project ClientServerProtocol, and must implementIDataPipeObjectso the content can be serialized to JSON and transported across the process-boundaries. Alternatively (or in addition), implement results which need to be rendered on the Type Editor UI by providing bitmaps, and transport those as byte-arrays back to the client, where they can converted back to bitmaps and rendered on the surface of the Type Editor dialog. - Implement the respective endpoint handler classes, which are representing the actual method to be executed in the context of the server-assembly (with full access to the custom control’s types).
- Make sure, you annotate each endpoint handler class with the
ExportRequestHandler(EndpointNames.EndpointName). See the code above for an example. - Make sure to maintain the list of endpoint names in EndpointNames.cs, the list of editors in EditorNames.cs and the names of the ViewModels in ViewModelNames.cs.
- And last but not least: Make sure the Type Routing for Type Editors is configured correctly. How that works is described in the following section.
Setting up the Type Routing where it applies
When you are converting Type Editors from .NET Framework to .NET, there is one
additional aspect to keep in mind: Usually, the designer host (normally the
WinForms In-process Designer) finds Type Editors for types which need a
dedicated UI by their EditorAttribute. In the out-of-process Designer, this is
not the case. The problem is that the Property Browser needs to examine the type
to detect if it contains the EditorAttribute. But it can’t, since the type
needing that attribute is not a .NET Framework Type. To overcome this, we need
to implement client-side type routing providers for each Type Editor like this:
using Microsoft.DotNet.DesignTools.Client.TypeRouting;
using System.Collections.Generic;
using WinForms.Tiles.Designer.Protocol;

namespace WinForms.Tiles.Designer.Client
{
    [ExportTypeRoutingDefinitionProvider]
    internal class TypeRoutingProvider : TypeRoutingDefinitionProvider
    {
        public override IEnumerable<TypeRoutingDefinition> GetDefinitions()
        {
            return new[]
            {
                new TypeRoutingDefinition(
                    TypeRoutingKinds.Editor,
                    nameof(EditorNames.TemplateAssignmentEditor),
                    typeof(TemplateAssignmentEditor)),
            };
        }
    }
}
This is important. If that routing is missing, the client-side Designer process isn’t able to establish the relation to the server-side definition of a type’s editor, and the adherence on the client side won’t take place: The property grid cell would be missing the … button to call the type editor, which could never be called.
Creating of the Designer/Control Library NuGet package and using it in the Demo App
During Designer startup, Visual Studio’s Designer-Startup-Service checks for out-of-process Control Designer NuGet packages that need to be loaded into the context of the two Designer processes. The structure of these NuGet packages is an implementation detail defined by the Type Editors’ Solution Templates. (If you are interested in exactly how this structure looks like, just examine a generated NuGet more closely: Since a NuGet is basically nothing more than a collection of files in a certain order structure packaged as a ZIP package, you can simply rename the extension of a NuGet package to .zip, and then see the folder structure in plain text.)
What’s important to know when you’re developing a control library: It’s likely that you want to test immediately after a change to a control or its designer functionality whether the changes had the desired effect. To do this, you need another project in the solution that consumes the control library, and you need to make sure of the following:
-
Never reference the control library from your test project directly as a project reference. Always and only reference the NuGet package.
-
The solution template sets up the generation of the NuGet package in a way so it can be easily detected from a local package source. This definition is done in the solution folder Solution_Items with the file NuGet.Config. It points to the folder which will contain the respective next version of the NuGet Package after a successful build:
<?xml version="1.0" encoding="utf-8"?>
<configuration>
  <packageSources>
    <add key="local" value=".\NuGet\BuildOut" />
  </packageSources>
  <disabledPackageSources />
</configuration>
It’s important to know in this context that every new build will generate a NuGet package with a new version. And this is important, since your test app will pick up a new version of the NuGet package, when the version number has actually changed. If the version number has not changes, the NuGet package will not be reloaded, even if the content of the package has changed and the build date of the NuGet package is newer.
-
For that reason, it is also important to not use a fixed version of the NuGet package during development. You should reference the latest version of the NuGet package in the consuming project, like this:
<ItemGroup> <PackageReference Include="TileRepeater.Package" Version="*" /> </ItemGroup> -
And then lastly, please make sure to setup the build dependencies correctly:
- Client- and Server Projects should reference the Protocol library.
- The Server-project needs to reference the actual Control Library in addition, since it needs to handle those types in the server-side Designer process.
- The NuGet-Package-Project should have dependencies on all the involved projects, so a rebuild of the NuGet package would trigger a rebuild of all the involved projects.
- And then your test project which consumes Control Library and its Control Designers should only reference the NuGet package, and also shouldn’t have any further build dependencies. This is important, so that a new version will only be pulled in, when you rebuild the NuGet-Package. And you need to build NuGet package and test app always only independently of each other.
Final thoughts
Migrating a .NET Framework Control Designer to .NET is an easy and straight forward process in most of the aspects of a Control Designer’s functional areas. That said, this doesn’t necessarily count for Type Editors which need more work to make them integrate in the client-server infrastructure. The template should help in the process, and as soon as the first type editor of a control library can be used successfully, the migration or integration of all following type editors for further types of the library is much faster.
As always: Feedback about the subject matter is really important to us, so please let us know your thoughts, and about your experiences with migrating existing .NET Framework Control Libraries to .NET or creating new ones from scratch. Also, we’re interested about what additional topics of this area you would like hear about from us. Please also note that the WinForms .NET runtime is open source, and you can contribute! If you have ideas, encountered bugs, or even want to take on PRs around the WinForms runtime, have a look at the WinForms Github repo. If you have suggestions around the WinForms Designer, feel free to file new issues there as well.
Happy coding!
 Light
Light Dark
Dark
19 comments
Everytime I’m using JetBrain’s Rider (based on IntelliJ), I’m shocked how incredible fast and responsive a Java application can be, compared to the incredible slow .NET Framework Visual Studio 2022.
This is a Java application and it beats a .NET Framework application.
“You must be kidding, Microsoft” comes regularly to my mind.
JetBrain Rider doesn’t even have a form designer.
If features don’t matter to you, I can show you something even faster than Rider: Notepad.
Uwe, your ridiculous lie is not needed, WE ARE real users of VS and see how pathetic Rider is.
This is maybe the funniest statement I’ve read lately.
I never liked JetBrain’s application exactly due to the fact they are Java based, hence slow like hell.
Plus Rider can’t even be compared to VS in terms of features.
Too complicated. MS tries to fix things which had to be fixed 20 years ago. TOO LATE. Don’t touch/screw up WinForms, keep it as is. Mind how you FAIL on porting DECLARATIVE(!!!!!) WPF to Linux! It’s a shame – having just XAML not making same library for other OSes.
It is complicated if you are author of custom controls for WinForms AND you want to port your app to .NET 6/.NET 7. If you don’t want to leverage what the recent versions of .NET offer, then you can stay in .NET Framework 4.8, it is still supported, including ARM in Windows 11.
:)))) Funny and true.
WinForms programmer since 2003 🙂 Has it been almost 20 years ? Ouch .. now I feel old 🙂
This article is exactly what I was looking for.
Thank You for all hard work put into WinForms. You surprised many of us WF fans with .NET Core support.
Many large organizations, like the one I work for, still use WF for many internal tools. We are so grateful we can use all the benefits of new .NET with WF.
I hope next few years (maybe for .NET 9 or 10) you consider updating some native WF components (ie. DataGridView) to DirectX. It’s so needed these days where many users are 4K).
That was a wonderful article with lots of detail I had not seen. Thank you!
It brings to mind a question – why hadn’t MS built a designer (equivalent in functionality and RAD benefits) for HTML (Blazor support) and for Xamarin and now MAUI UIs?
Taking a generic approach to UI widgets, implemented by the UI choice (WinForms, Blazor, Xamarin/MAUI, etc), one designer app can be used to improve productivity for all those UI apps.
Alan Cooper had a small team of very talented developers when he built the original “WinForms” designer for VB. Other companies tried to copy that designer because it was so productive.
MS should, now, some 30 years later, put together a team of experienced, knowledgeable, software engineers that can reason and think outside the usual confines of “conventional wisdom”. With the right “Skunkworks” style team, they should have something in beta in about a year.
The WinForms designer is great, but isn’t it just a better version of the original “Ruby” (not that Ruby) Visual Basic designer (also created by Alan Cooper’s team at Tripod)?
I agree 100% about desingers. WinForms won because of it’s completeness, it has everything you need to build an app from the scratch. Make blazor/maui designer for serious business apps, and let the hipsters discuss about how many patterns can stand on the head of a pin.
Thank you Klaus. This article will help a lot with porting old controls (and creating new ones) to new designer. My thoughts on all of this (you already know them🙄 ):
1. It’s really complicated in theory.
2. And in practice it’s even more complicated 🙁 If anyone is interested, here is my brief feedback on the process of porting System.Windows.Forms.DataVisualization
You have really done a good job by enabling WinForms on the Dotnet core platform but frankly, after seeing the Solution Explorer shown above, WinForms on Dotnet CORE looks scary. You have compromised the simplicity of legacy WinForms development a lot.
Please keep in mind that everything described here does only affect custom type editors. Usually, WinForms LOB apps are not affected by this, since normal UserControls with domain-specific requirements very rarely need a special UI for editing types at design-time. Also, simple things like TypeConverters don’t need the client/server separation – so even if UserControls would need something beyond the usual design time support (e. g. inside the Property Browser or custom Action Lists), it would work exactly like in .NET Framework.
.NET Framework code can execute .NET Core code via an implementation of an interface when the launcher is in .NET Core if the interface is .NET Standard 2.0 compliant.
Example:
https://gitlab.com/janseris/WinForms.NETFramework_DI_Demo/
Would this help?
No. In this case, if I am not mistaken, it would be just a projection of the respective APIs into the Target (.NET) Framework, but we would need it to be the Target (.NET Core) Framework. We need to be running the entire target framework in a dedicated .NET Core process, so that the core-specific type resolution (the types which are also being used in the app whose Forms and UserControl get designed) does work.
Klaus,
What are the plans for supporting the custom languages in the designer (languages other than C# and VB)?
We have added support for our language (X#) to the current designer. We have a CodeDom provider that creates the CodeDom for the form and a code generator that persists the CodeDom into the source. Furthermore, we have also added support to merge the form and form.designer into a single CodeDom and split them when writing.
I checked the current version of the designerserver and it only works for C# and VB.
Did you guys consider keeping the mechanism the same as before and “simply” serialize the CodeDom between the client (VS) and the server and back? That would have automatically provided support for custom languages ?
Robert
Hi Klaus,
I can’t find anywhere or anybody to help me with this problem. I had a programmer who wrote us a Form Designer using some old VS Designer Project from many years ago. Basically we allow user to design a form and then save it and the controls to xml. At runtime we read the xml make a dynamic user form with those controls. When they hit OK, it runs a stored procedure with SQL and the controls text entries are passed to the stored procedure as parameters. This allow things like a user can make a pricing update form with a simple textbox for price increase amount. The stored proc runs thru the price table and adds that. We have been using for many years. Just updating now off .Net 4 to .Net 7 to modernize our app. This Form Designer almost worked. The DateTimePicker and DataGridView get a no designer error. I’ve spent days tracking the code that fail and only get to this in the TypeDescriptor.
The line :type = Type.GetType(designerAttribute.DesignerTypeName); returns null for DTP and DGV but a designer for Labels, TextBox, RadioBUttons, CHeckBOx, etc.
Only null on DTP and DGV.
I can’t seem to get debug to step into the Type.GetType() so at a dead end.
I am stuck for days and at a loss what to do. DTP and DGV work in VS 2022 designer so there must be some way this can get at a designer for each.
Thanks Doug Manter, CTO Creative Information Systems, Inc.
dmanter@creativeinfo.net
Please help or advise. I wanted to leave under WinForms page but said comments closed.
We are discussing this issue on GitHub:
https://github.com/dotnet/winforms/issues/8508
Thanks!