

Did you know that .NET MAUI features a full Map control for iOS, Android, and MacCatalyst apps? It came with the launch of .NET 7 and it allows you to not only display a map with pins, but it also allows for full drawing with polygons, polylines, and circles! Lets take a look today at the Map control, how to display pins, and how to draw outlines and walking paths on the Microsoft campus in Redmond!

Pins on a Map
The Map controls in .NET MAUI offers a wide arrange of customization of how to display the map. One of the basic elements that people place on a map is a Pin that displays a marker with text. The Pins property on the Map control is an IList that we can populate dynamically to put as many pins on the map. This can be accomplished in XAML:
<ContentPage ...
             xmlns:maps="clr-namespace:Microsoft.Maui.Controls.Maps;assembly=Microsoft.Maui.Controls.Maps"
             xmlns:sensors="clr-namespace:Microsoft.Maui.Devices.Sensors;assembly=Microsoft.Maui.Essentials">
    <maps:Map x:Name="map">
        <x:Arguments>
            <MapSpan>
                <x:Arguments>
                    ...
                </x:Arguments>
            </MapSpan>
        </x:Arguments>
        <maps:Map.Pins>
            <maps:Pin Label="Santa Cruz"
                      Address="The city with a boardwalk"
                      Type="Place">
                <maps:Pin.Location>
                    <sensors:Location>
                        <x:Arguments>
                            <x:Double>36.9628066</x:Double>
                            <x:Double>-122.0194722</x:Double>
                        </x:Arguments>
                    </sensors:Location>
                </maps:Pin.Location>
            </maps:Pin>
        </maps:Map.Pins>
    </maps:Map>
</ContentPage>
You can specify the pins directly in the XAML or you can use data binding to a list of Pin using the ItemsSource property similar to a ListView or CollectionView.
You can also do this directly in C# code:
using Microsoft.Maui.Controls.Maps;
using Microsoft.Maui.Maps;

//...

var pin = new Pin
{
  Label = "Santa Cruz",
  Address = "The city with a boardwalk",
  Type = PinType.Place,
  Location = new Location(36.9628066, -122.0194722)
};

map.Pins.Add(pin);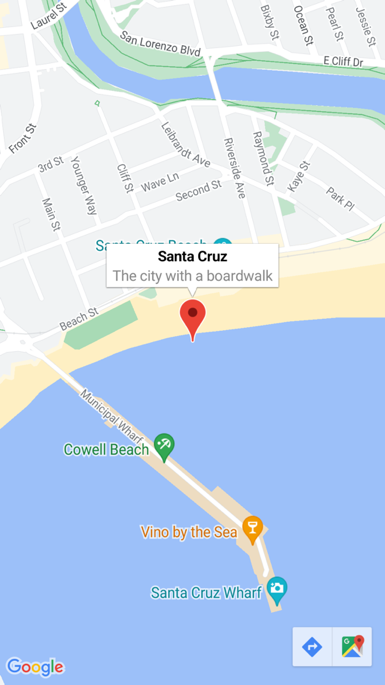
Better yet, you can add events to the Pin to see when it was clicked or when the info window was clicked with the MarkerClicked and InfoWindowClicked events on the Pin.
Drawing Elements on a Map
Now, let’s get into some fun and actually draw some lines and polygons on a map! The MapElements property on a Map takes in a list of MapElement that can be drawn on the map. Built into .NET MAUI are three elements:
- Circle: A circle drawn from a center point with a specified radius
- Polygon: A fully enclosed shape. The first & last points are automatically connected.
- Polyline: A series of points connected by drawn lines
With these three elements you can do just about anything on a map! Like drawing an overlay over the Microsoft Campus in Redmond with a line showing the walkway between the East and West campus:
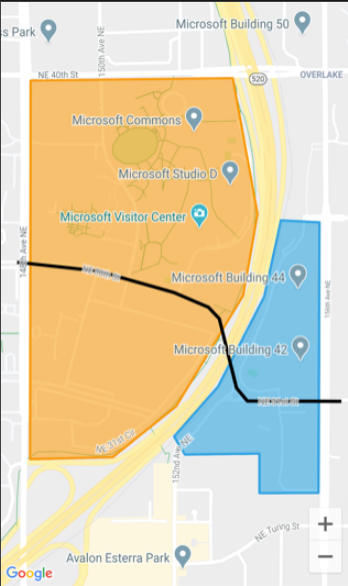
First, let’s draw two Polygon elements that represent our West and East campus. Each of them will take in a list of Location on the Geopath property that will define the outline points. The Polygon will automatically connect each of these points together with a Stroke that you can define and a full background FillColor. All of this can be created directly in XAML with our without data binding or directly in C# like I prefer when dealing with maps.
var msWest = new Polygon
{
    StrokeColor = Color.FromArgb("#FF9900"),
    StrokeWidth = 8,
    FillColor = Color.FromArgb("#88FF9900"),
    Geopath =
    {
        new Location(47.6458676, -122.1356007),
        new Location(47.6458097, -122.142789),
        new Location(47.6367593, -122.1428104),
        new Location(47.6368027, -122.1398707),
        new Location(47.6380172, -122.1376177),
        new Location(47.640663, -122.1352359),
        new Location(47.6426148, -122.1347209),
        new Location(47.6458676, -122.1356007)
    }
};

var msEast = new Polygon
{
    StrokeColor = Color.FromArgb("#1BA1E2"),
    StrokeWidth = 8,
    FillColor = Color.FromArgb("#881BA1E2"),
    Geopath =
    {
        new Location(47.6368678, -122.137305),
        new Location(47.6368894, -122.134655),
        new Location(47.6359424, -122.134655),
        new Location(47.6359496, -122.1325521),
        new Location(47.6424124, -122.1325199),
        new Location(47.642463, -122.1338932),
        new Location(47.6406414, -122.1344833),
        new Location(47.6384943, -122.1361248),
        new Location(47.6372943, -122.1376912),
        new Location(47.6368678, -122.137305),
    }
};
With our two Polygon regions defined now, all we need to do is create a Polyline to represent the bridge that connects the two parts of the campus. A Polyline is extremely similar to a Polygon, but it does not automatically “connect” the start and end points, and there is no background fill. It is simply points on a map that are connected by a line.
var interstateBridge = new Polyline
{
    StrokeColor = Colors.Black,
    StrokeWidth = 12,
    Geopath =
    {
        new Location(47.6381401, -122.1317367),
        new Location(47.6381473, -122.1350841),
        new Location(47.6382847, -122.1353094),
        new Location(47.6384582, -122.1354703),
        new Location(47.6401136, -122.1360819),
        new Location(47.6403883, -122.1364681),
        new Location(47.6407426, -122.1377019),
        new Location(47.6412558, -122.1404056),
        new Location(47.6414148, -122.1418647),
        new Location(47.6414654, -122.1432702)
    }
};
Now it is time to load these elements into our Map control’s MapElements property and of course zoom the map to the position above the campus:
map.MapElements.Add(msWest);
map.MapElements.Add(msEast);
map.MapElements.Add(interstateBridge);

map.MoveToRegion(MapSpan.FromCenterAndRadius(
                new Location(47.640663, -122.1376177), Distance.FromMiles(1)));
There you have it! Our map is now fully displaying our two regions and a line that represent the bridge walkway between the campus! You can always add and remove as many MapElements as you would like!
Learn More
There is so much more to learn about the Map control! I recently did a short overview video that I highly recommend watching:
Additionally, read through the entire documention where you will find the full source code for this sample and so much more!
When will images on iOS work? Basic feature not working. Why use maps when you can’t even show images.
It looks awesome!
Are there plans to utilize pins clusters?
Any sort of clustering solution available for Maui Map?
Maybe not an official Microsoft one?
When will maps be available for windows?
Take a look at some of the work going on here: https://github.com/CommunityToolkit/Maui/pull/604
This is an exciting new feature!
Is it also possible to give the pins a custom design? I currently have a use case where I need to display several different types of pins (with a custom svg image) on a map. It would be awesome if this was possible!
With a little bit of code it is possible: https://vladislavantonyuk.github.io/articles/Customize-map-pins-in-.NET-MAUI/
+1
Same need. That would be nice.
Can be done with a bit of code: https://vladislavantonyuk.github.io/articles/Customize-map-pins-in-.NET-MAUI/