Booting Windows 8.1 Update natively from a .VHDX image
This is very useful when you need to boot Windows natively, but you need to have different environments, like working with BETAS/CTPs, etc., like it is my case. 😉
In many cases HyperV might not suitable for you, for instance, if I want to deploy mobile apps from Visual Studio (Windows Phone apps or Xamarin apps to Android devices), I’d need to connect the mobile devices to USB ports. But, HyperV VMs don’t support USB connections to devices, etc…
Here’s some additional info if you want to know more about "Virtual Hard Disks (.VHD/.VHDX) with Native Boot": http://technet.microsoft.com/en-us/library/hh824872.aspx
In the past, I used to follow more complex steps in order to create a Windows 8 or Windows 7 .VHD master image, then booting natively my machine by configuring the boot options with bcdedit. Here’s my old post: http://blogs.msdn.com/b/cesardelatorre/archive/2012/05/31/creating-a-windows-8-release-preview-master-vhd.aspx?wa=wsignin1.0
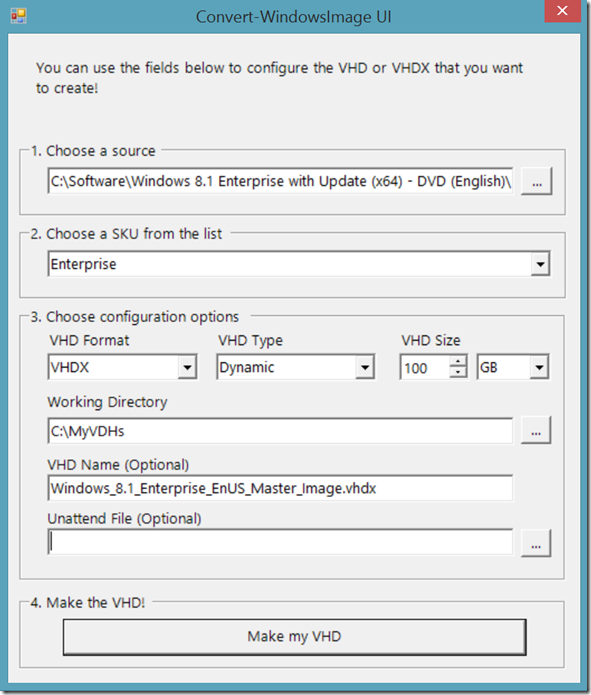
I found a newer and shorter way to do it, therefore, a better way. I’m also using now .VHDX rather than .VHD, since I’ll be using Windows 8.1 or further.
Here are the steps. Pretty simple, actually! 🙂
1. You need to have any Windows .ISO image, like a “Windows 8.1 Enterprise with Update (x64) – DVD (English)” from MSDN subscription, or any other version.
2. Download Convert-WindowsImage.ps1 from Microsoft TechNet Gallery ( https://gallery.technet.microsoft.com/scriptcenter/Convert-WindowsImageps1-0fe23a8f ) and copy it to a temporary directory.
3. Start the PowerShell console in administrator mode
4. Before executing the PowerShell script, you’ll need to allow scripts executions in the policies of your machine or user. If you want to allow that at a local machine scope, run the following command in the PowerShell console:
Set-ExecutionPolicy Unrestricted -Scope LocalMachine
For more info about those policies, read the following: http://technet.microsoft.com/library/hh847748.aspx
5. Run the script you downloaded as:
.\Convert-WindowsImage.ps1 –ShowUI
6. In the window, choose the required Windows ISO file
7. Choose the SKU (Like Enterprise or Professional)
8. Choose the VHD/VHDX Format (I go for VHDX since I don’t require legacy compatibility and the new VHDX format is more reliable)
9. Select Type. For production systems, I recommend “Fixed”, but for development and testing with betas, since I need many incremental versions, I use “Dynamic” so when the .VHDX is not being used, it will have a much smaller size, just the MB being used.
10. For the size, I go for the maximum allowed by the tool, which is 100GB. But, after installing Windows and if the .VHDX is not being used, it will take just around 8GB or less. But you know, it will grow, eventually.. 😉
11. Make sure that you write the right extension after the filename, like “.VHDX” or “.VHD”, or you’ll get an error.
12. Hit and burn the VHDX! 🙂
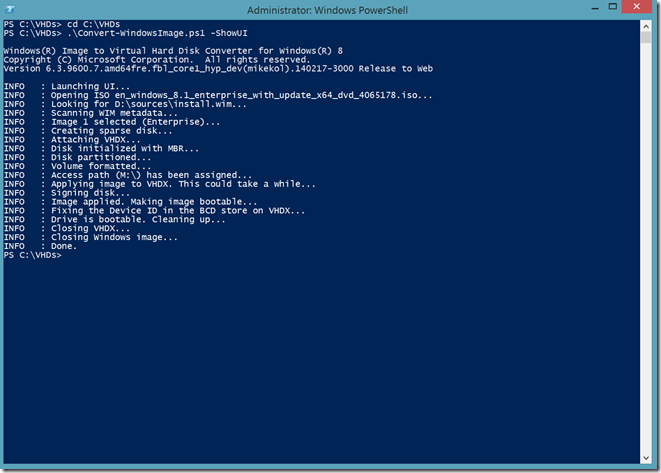
In the PowerShell console, you’ll see something like the following:
Since my .VHDX is Dynamic and it is still not mounted, its size was just something less than 8GB! 🙂
MOUNT the .VHDX as a drive in your machine
Right-click the VHDX and mount it. In my case I got the M: as my mounted drive.
Set the BOOT files within the .VHDX
The following steps are needed to make your computer boot from the VHDX file:
1.Open an administrative command prompt via WIN+X Command Prompt (Admin)
2.Type bcdboot M:\Windows in order to create the boot files in your .VHDX drive. 
SAVE YOUR “MASTER IMAGE”!!!
3. At this point you have a “MASTER IMAGE .VHDX” that you could use in different machines/hardware since you still didn’t spin it up, therefore, it still doesn’t have any specific driver related to any hardware.
So, un-mount it by right clicking the drive (M: in my case) and select on “Eject”, and copy your current .VHDX file and name it to something like “Windows81_MASTER.vhdx”.
You can continue the process with the original .VHDX now.
STEPS to setup point to your VHDX from the native Windows Boot
1. Make sure the .VHDX is un-mounted.
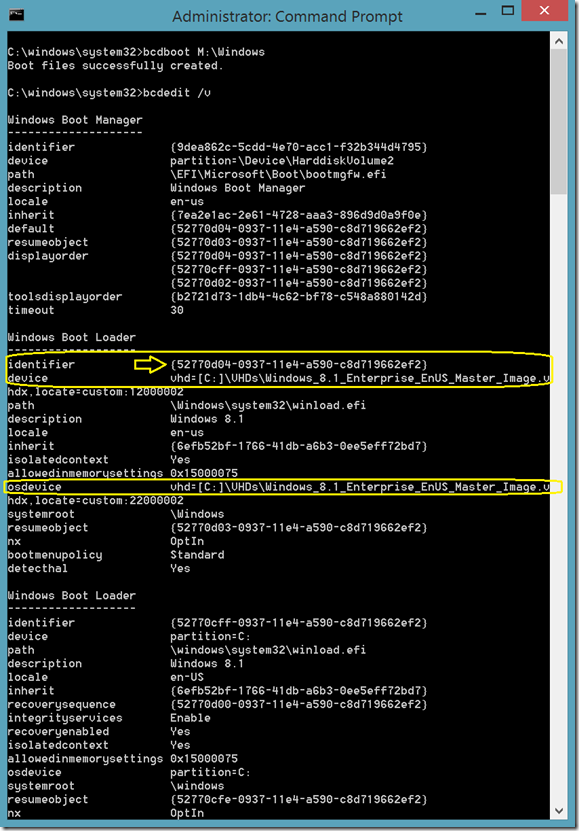
2. Type bcdedit /v to see the result in the Windows Boot Loader section. You’ll see something like the following.
Search for the path to your .VHDX file:
3. Taking the GUID identifier you can change the description in your bootlist by typing:
bcdedit /set {52770d04-0937-11e4-a590-c8d719662ef2} description “Windows 8.1 Enterprise .VHDX”
(Of course, you should have and use a different GUID..)
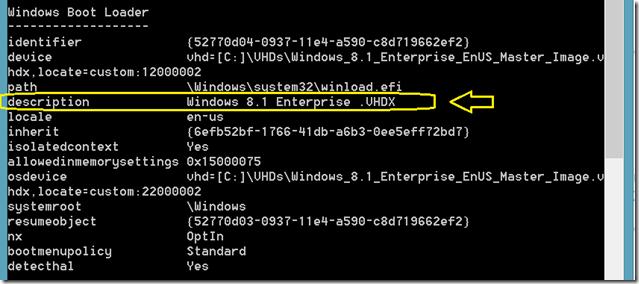
Check it out by typing bcdedit /v again and searching for the path to your .VHDX and the new description:
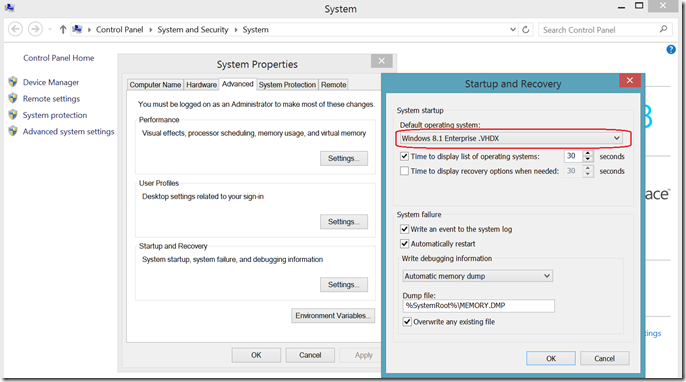
You can also check it out in the Computer properties –> Advanced System Settings –> Advaced –>Startup and Recvovery –>Settings button:
If you had configured Hyper-V on your Windows 8.1 computer, don’t forget to enable the hypervisor launchtype:
bcdedit /set hypervisorlaunchtype auto
When messing with the startup, it rebuilds your boot configuration data store. But it doesn’t know if Hyper-V needs to have some specific settings enabled in the boot configuration data store in order to start the hypervisor. In any case, this is not related and you just need to do it if you also have HyperV installed.
Additionally, bcdedit has many useful options, like copying an entry for pointing to another .VHDX that you just copied in your hard drive, etc. Just type bcdedit /? to check it out or see other options that I explain at the end of my old post: http://blogs.msdn.com/b/cesardelatorre/archive/2012/05/31/creating-a-windows-8-release-preview-master-vhd.aspx?wa=wsignin1.0
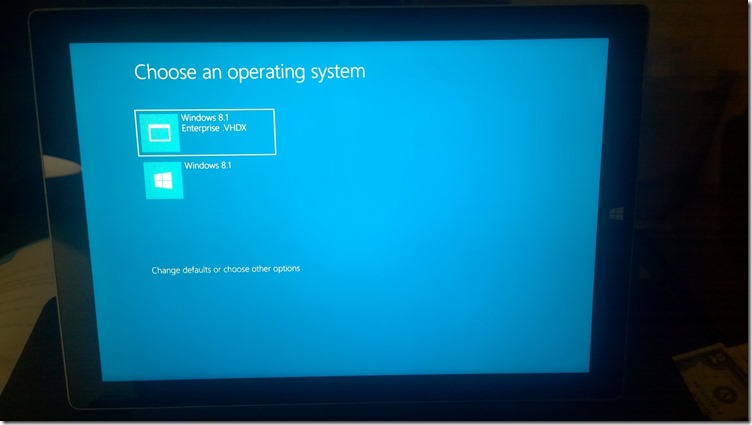
If you reboot your machine, you’ll be able to select the new NATIVE WINDOWS BOOT but from a .VHDX! 🙂
Have fun! 🙂



 Light
Light Dark
Dark
0 comments