
In Part 1 of this blog post, we demonstrated how to implement an OData service that serves media resources. In Part 2, we look at how to implement a client app that interacts with the OData binary large object (BLOB) feed to both retrieve and post binary data along with the metadata for the media resource.
The OData BLOB feed created in Part 1 supported the following functionality:
- Posting a media resource
- Retrieving a media resource
- Patching a media link entry
- Retrieving a media link entry
- Updating a media resource
The service also exposed a single media link entry (MLE) named Asset that is linked to a media resource (MR).
In the following sections, we implement a client app to interact with that BLOB feed.
Create a Console application
- Start Visual Studio 2022 and select Create a new project.
- In the Create a new project dialog:
- Enter
Consolein the Search for templates search box. - Select Console App project template and select Next.
- Enter
- Name the project ODataMRSample.Client and select Next.
- In the Additional information dialog:
- Select .NET 6.0 (Long Term Support).
- Check Do not use top-level statements – not necessary if you’re comfortable with using top-level statements that limits you to using local variables and local functions.
- Select Create.
Install required packages
In our client application, we are going to use the Microsoft.OData.Client library that offers APIs for interacting with OData BLOB feeds.
Run the following command on the Visual Studio Package Manager Console to install the Microsoft.OData.Client nuget package:
Install-Package Microsoft.OData.Client
Implement the client functionality
The BLOB feed implemented in Part 1 needs to be running for the endpoints that the client app will be interacting with to be available. Other than for the media resources, the service does not make use of a persistent storage. This means that if the service stopped, any MLEs associated with the media resources are lost. It makes sense therefore to keep the service running throughout the following exercises.
Start by making the following changes to the ODataMRSample.Client project:
- Add a folder named Resources to the project. We’ll stash media resources that we want to post to the BLOB feed in this folder.
- Add a folder named Store to the project. We’ll persist media resources that we retrieve from the BLOB feed in this folder.
- Add a static class variable named
serviceRoottoProgramclass – in Program.cs file. This variable will hold the root endpoint of the BLOB feed we implemented in Part 1.
namespace ODataMRSample.Client
{
    internal class Program
    {
        static readonly Uri serviceRoot = new Uri("http://localhost:5000");

        static void Main(string[] args)
        {
            // ...
        }
    }
}
Next, generate a strongly-typed OData client proxy using the OData Connected Service extension.
If OData Connected Service extension is not installed, follow the steps below to install from the Visual Studio marketplace:
- From the Visual Studio Extensions menu, select Manage Extensions.
- From the Manage Extensions window, type “OData Connected Service” on the Search box.
- The OData Connected Service 2022+ extension should appear on the list if you’re using Visual Studio 2022.
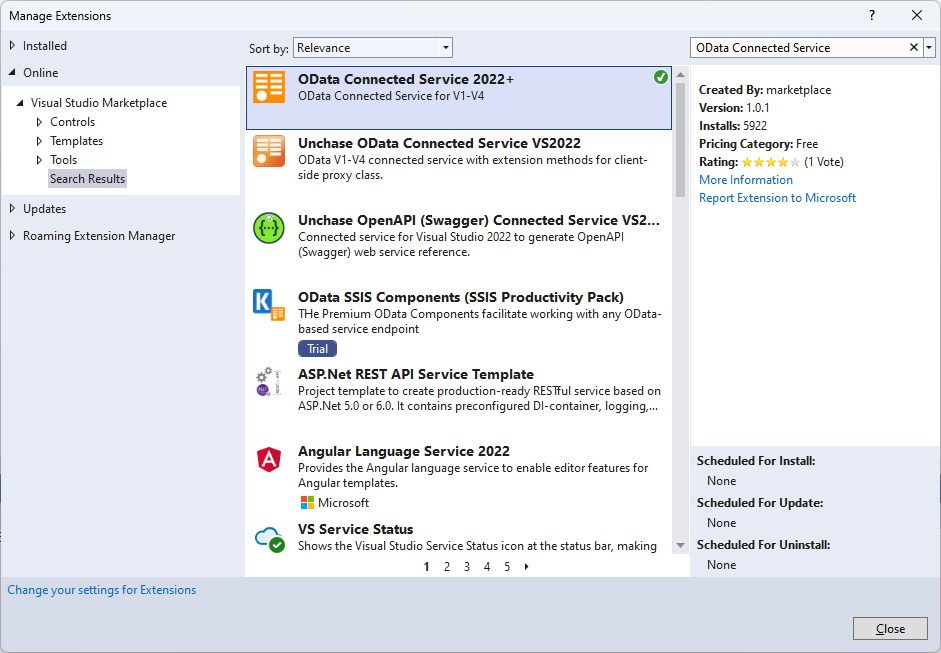
- A button labelled Download should appear on the list item if the extension is not installed. Click the button to install the extension.
Generate the client proxy
Ensure that the ASP.NET Core application created in Part 1 is running before proceeding with the following steps to generate the OData client proxy:
- In Solution Explorer, right-click ODataMRSample.Client project. Click Add > Connected Service to open the Connected Services view.
- Click OData Connected Service (under Other Services) to launch the OData Connected Service wizard.
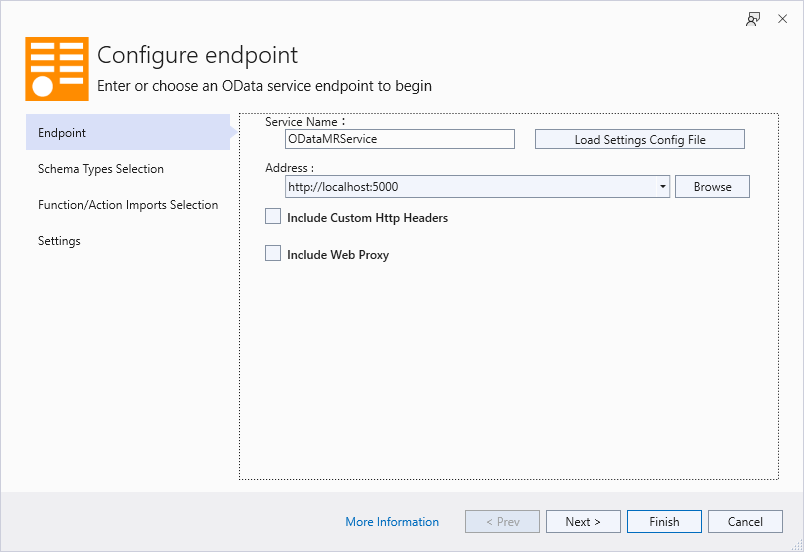
- On the Endpoint wizard page, provide a suitable service name (e.g., ODataMRService) and enter the endpoint which the OData service from Part 1 is listening on, e.g., http://localhost:5000. If you specified a route prefix for the OData service, make sure to append it to the endpoint, e.g., http://localhost:5000/ROUTE_PREFIX.
- Click Next to move to the Schema Types Selection wizard page. Leave everything unchanged.
- Click Next again to move to the Function/Action Imports Selection wizard page. Leave everything unchanged.
- Click Next again to move to the Settings wizard page. If you wish, you can provide your own name for the client proxy, e.g. ODataMRProxy. Leave the other settings unchanged.
- Click Finish to trigger the generation of the client proxy.
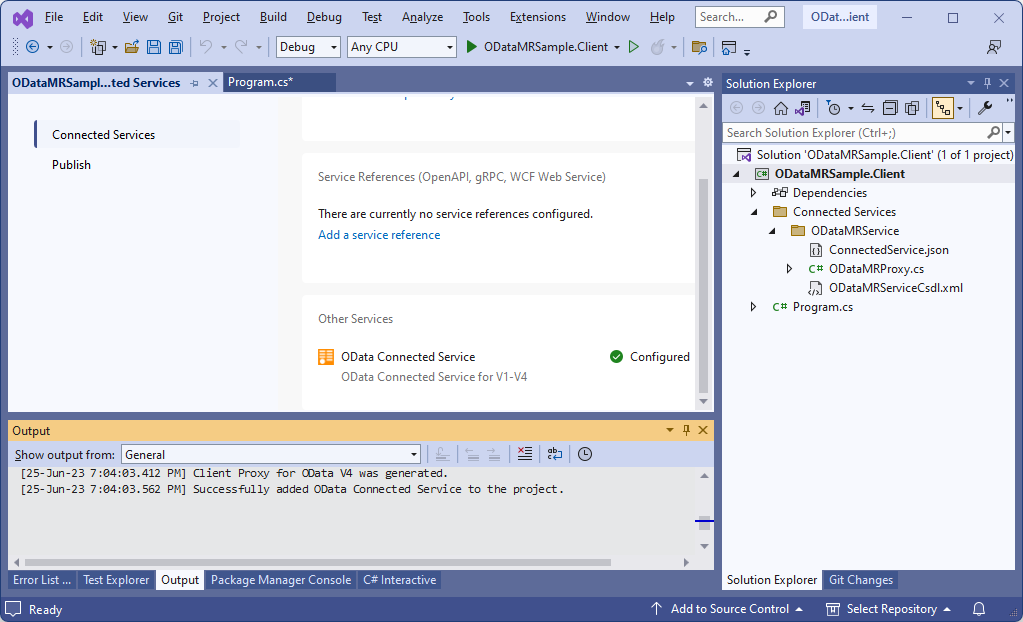
If you inspect the file containing the proxy classes generated using the OData Connected Service extension, you should find a class named Asset. Let’s augment the class with additional properties to hold the MR metadata:
- Add a folder named Models.
- Add a C# code file named Partials.cs to the Models folder.
- Replace the contents of the Partials.cs file with the following:
namespace ODataMRSample.Models
{
    public partial class Asset
    {
        public string? Description { get; set; }
        public string? Color { get; set; }
    }
}
An important thing to note here is that the namespace in the code block above is the same as the one for the Asset class in the client proxy – ODataMRProxy.cs.
At this point, we can proceed with the implementation of the logic for interacting with the BLOB feed.
Posting a media resource
Choose an image to upload to the service and add it to the Resources folder. For this exercise, we’ll upload a black square image – black.png.
Posting an MR from the client app to the BLOB feed requires the following steps:
- Create an MLE object and set its properties.
- Read an MR from the disk into a stream and then pass the stream together with the MLE object into the
SetSaveStreammethod of theDataServiceContextinstance. - Call
SaveChangesmethod (orSaveChangesAsyncin async scenarios) of theDataServiceContextinstance to send the MR as a binary stream in aPOSTrequest and the MLE properties in aPATCHrequest.
The CreateMLE method below shows the logic for posting an MR:
static void CreateMLE()
{
    var dataServiceContext = new Default.Container(serviceRoot);

    var asset = new Asset
    {
        Description = "Square",
        Color = "Black"
    };

    dataServiceContext.AddToAssets(asset);

    var fileName = "black.png";
    var path = $"..\\..\\..\\Resources\\{fileName}";

    using (var fileStream = new FileStream(path, FileMode.Open, FileAccess.Read))
    {
        var requestArgs = new DataServiceRequestArgs();
        requestArgs.ContentType = "image/png";
        requestArgs.Headers.Add("Content-Disposition", $"inline;filename={fileName}");

        dataServiceContext.SetSaveStream(asset, fileStream, closeStream: false, args: requestArgs);
        dataServiceContext.BuildingRequest += DataServiceContext_BuildingRequest;

        // The response for the POST request contains the Asset MLE
        // Retrieve the value of the Id property and assign it to Id property of the Asset object
        dataServiceContext.Configurations.ResponsePipeline.OnEntryStarted((args) =>
        {
            if (args.Entry.TypeName == typeof(Asset).FullName)
            {
                var idProperty = args.Entry.Properties.Single(p => p.Name == "Id");
                asset.Id = idProperty.Value.ToString();
            }
        });

        dataServiceContext.SaveChanges();
    }
}

private static void DataServiceContext_BuildingRequest(object? sender, BuildingRequestEventArgs e)
{

}
There are a few things to note about the above block of code:
- We are using a
DataServiceRequestArgsobject to specify theContent-Typeof the MR together with any other request headers. - Since the
Idis server-generated, we are hooking into the response pipeline to capture the entry materialized from the response payload whereupon we retrieve the value of theIdproperty and assign it to the `Id` property of theAssetobject. - The event handler attached to the
BuildRequestevent is only for the purpose of helping us inspect the 2 requests that will be sent to the service whenSaveChangesmethod is executed.
Modify the Main method to call the CreateMLE method:
static void Main(string[] args)
{
CreateMLE();
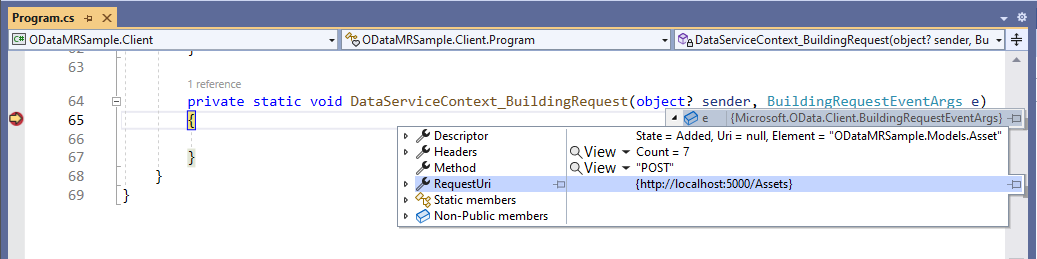
}Put a breakpoint in the DataServiceContext_BuildingRequest method and run the app – ensure that the ASP.NET Core application created in Part 1 is running.
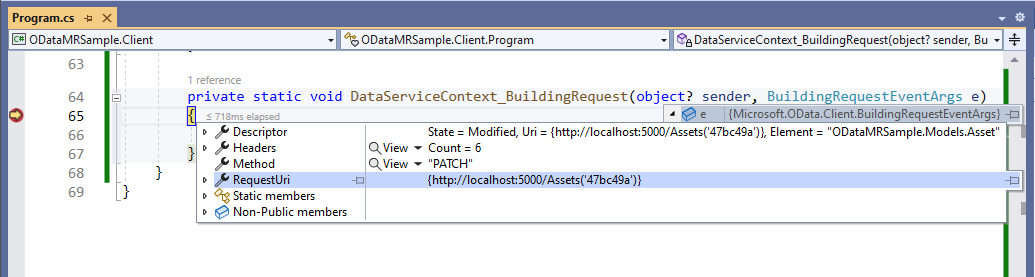
The first time the breakpoint is hit, inspecting the BuildingRequestEventArgs parameter shows that the request is a POST to the /Assets endpoint:
The second time the breakpoint is hit, the request is a PATCH to the /Assets({key}) endpoint:
Retrieving a media resource
A client app retrieves a media resource from the BLOB feed in the following steps:
- Retrieve the MLE entry linked to the MR from the service.
- Pass the MLE entry into the
GetReadStreammethod of theDataServiceContextinstance to retrieve the linked MR.
The GetMLE method below shows the logic for retrieving an MR:
static void GetMLE()
{
    var dataServiceContext = new Default.Container(serviceRoot);

    var asset = dataServiceContext.Assets.ByKey("47bc49a").GetValue();

    dataServiceContext.BuildingRequest += DataServiceContext_BuildingRequest;
    var dataServiceStreamResponse = dataServiceContext.GetReadStream(asset);

    var fileName = "black.png";
    var path = $"..\\..\\..\\Store\\{fileName}";

    using (var fileStream = new FileStream(path, FileMode.Create, FileAccess.Write))
    {
        dataServiceStreamResponse.Stream.CopyTo(fileStream);
    }
}
Just like in the previous section, the event handler attached to the BuildingRequest event will help us inspect the request that is sent to the service when GetReadStream method is executed.
Before running the app, modify the Main method to call the GetMLE method and put a breakpoint in the DataServiceContext_BuildingRequest method:
static void Main(string[] args)
{
GetMLE();
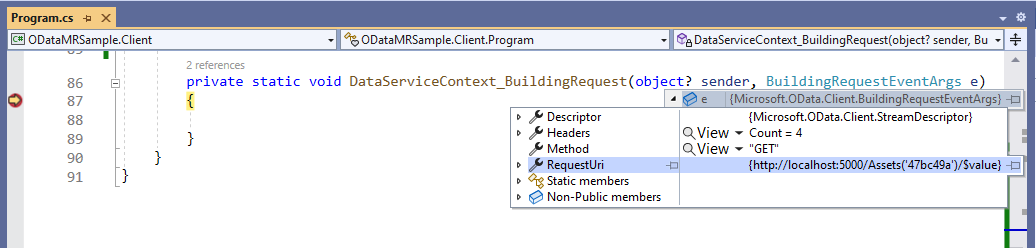
}When the app is ran, the MR uploaded in the previous section is retrieved and saved to the Store folder. Execution is paused at the breakpoint in the DataServiceContext_BuildingRequest method. Inspecting the BuildingRequestEventArgs parameter shows that the request for the MR is a GET to the /Assets({key}/$value endpoint:
Updating a media resource
Choose an image to replace the one uploaded previously and add it to the Resources folder. For this exercise, we’ll replace the uploaded MR with a purple square image – purple.png.
Updating an MR from the client app involves the following steps:
- Retrieve the MLE entry linked to the MR from the service.
- Optionally modify the MLE’s properties and pass the MLE object to the
UpdateObjectmethod of theDataServiceContextinstance. - Read the replacement MR from the disk into a stream and then pass the stream together with the MLE object into the
SetSaveStreammethod of theDataServiceContextinstance. - Call
SaveChangesmethod (orSaveChangesAsyncin async scenarios) of theDataServiceContextinstance to send the replacement MR as a binary stream in aPUTrequest, and the MLE properties in aPATCHrequest – if the MLE was modified.
The UpdateMLE method below shows the logic for updating an MR:
static void UpdateMLE()
{
    var dataServiceContext = new Default.Container(serviceRoot);
    var asset = dataServiceContext.Assets.ByKey("47bc49a").GetValue();

    asset.Color = "Purple";
    dataServiceContext.BuildingRequest += DataServiceContext_BuildingRequest;
    dataServiceContext.UpdateObject(asset);

    var fileName = "purple.png";
    var path = $"..\\..\\..\\Resources\\{fileName}";

    using (var fileStream = new FileStream(path, FileMode.Open, FileAccess.Read))
    {
        var requestArgs = new DataServiceRequestArgs();
        requestArgs.ContentType = "image/png";
        requestArgs.Headers.Add("Content-Disposition", $"inline;filename={fileName}");

        dataServiceContext.SetSaveStream(asset, fileStream, closeStream: false, args: requestArgs);

        dataServiceContext.SaveChanges();
    }
}
The event handler attached to the BuildingRequest event will help us inspect the request that is sent to the service when SaveChanges method is called.
Before running the app, modify the Main method to call the UpdateMLE method and put a breakpoint in the DataServiceContext_BuildingRequest method:
static void Main(string[] args)
{
    UpdateMLE();
}
When the app is ran, execution will pause at the breakpoint and inspecting the BuildingRequestEventArgs parameter the first time execution is paused shows that the request is a PUT to the /Assets({key})/$value endpoint:

Summary
It is my hope that this blog post helps you understand how the OData client library supports working with media resources.
If you have any questions, comments, or if you run into any issues, feel free to reach out on this blog post or report the issue on GitHub repo for OData client.
Find the source code for this blog post here.
0 comments