Node.js is a platform for building fast, scalable applications using JavaScript. It’s making its way just about everywhere – from servers, to Internet of Things devices, to desktop applications, to who knows what next?
Ooh—I know what next…bobbleheads!

Bobblehead Generator
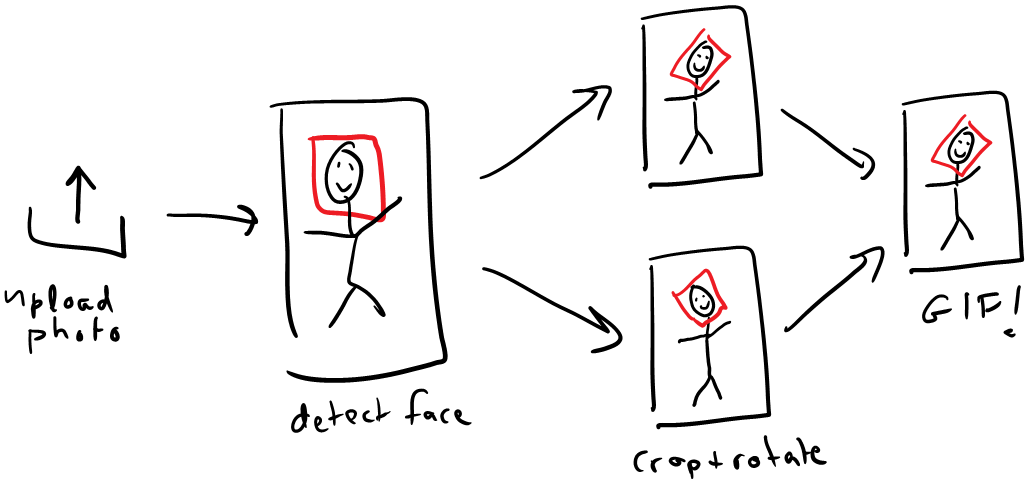
Of course, we don’t just want one bobblehead…we want so many bobbleheads! So let’s have a bit of fun with Node.js—for beginners and experienced Node developers alike—by implementing a bobblehead generator as follows:
- Build a simple web service for uploading images using the popular
expressNode.js web framework. - Do face detection using the artificial intelligence based APIs from Microsoft’s Project Oxford.
- Crop, rotate, and paste the face rectangle onto the original image at various angles.
- Combine those images into a GIF!
Ready, set, Node!
To start, go ahead and install the following:
- Node.js v5.x: the latest stable Node.js release, which comes bundled with npm v3 for installing dependencies maximally flat.
- Visual Studio Code: Microsoft’s free, cross-platform editor (Windows, OS X, and Linux) that comes with some nifty debugging and IntelliSense features for Node.js.
- Git: which we’ll use to deploy our app to Azure.
Scaffolding the application
First, use npm to install the express-generator package globally.
C:src> npm install express-generator -g
Next, run the following commands (and of course you don’t need to enter the comments!):
C:src> express myapp #generate Express scaffolding in a project folder
C:src> cd myapp #switch to the project folder
C:srcmyapp> npm install #install dependencies in package.json
C:srcmyapp> code . #start Visual Studio Code in this folder!
In Visual Studio Code, open the Explore pane on the left hand side to see what’s been generated.
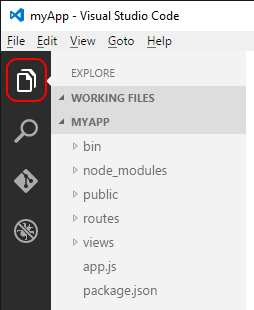
- package.json: lists required 3rd-party dependencies and other useful configuration info.
npm installgoes through this file to download and installs each dependency automatically. - node_modules: this is where
npm installstores all those dependencies. - bin/www: the application entry point (www is a JavaScript file even though it doesn’t have a .js extension). Note that it uses
require('../app.js')to invoke the code in app.js before it goes on to spin up the relevant ports. - app.js: the application configuration boilerplate.
- views/*: templates that are rendered as client-side UI; here we’re using the Jade templating engine (see app.js). There are many such engines to choose from, depending on your preference.
- routes/*: defines how various requests are handled. By default, the generated template handles GET requests to
/, and/users.
Let’s verify that this newly-scaffolded app is working. Just run node ./bin/www from the command line, then visit localhost:3000 in a browser to see the app running.

Press Ctrl+C on the command line to stop the server, because we now need to install a few other npm packages as follows:
C:srcmyapp> npm install --save gifencoder jimp multer png-file-stream project-oxford
If you’re new to npm, the --save parameter instructs npm to also create entries for these packages in the “dependencies” section of your package.json. This way, if you give your source code to other developers without all the packages in node_modules (as when you put code in a repo), they can just do npm install to quickly download all those dependencies.
Additionally, you can always just add dependencies directly to package.json, where Visual Studio Code gives you IntelliSense and auto-complete for available packages and their current versions! Then you can just run npm install again to do the work.
Here are two more very helpful npm tips:
- To view the documentation for a dependencies, run
npm doc <package-name> - If you use the
--save-devparameter instead of--save, the dependency is written into a section called “dev-dependencies”. This is where you list packages for development tools like test frameworks and task runners that won’t be included in the deployed application.
Configuring your Editor: debugger launch and IntelliSense
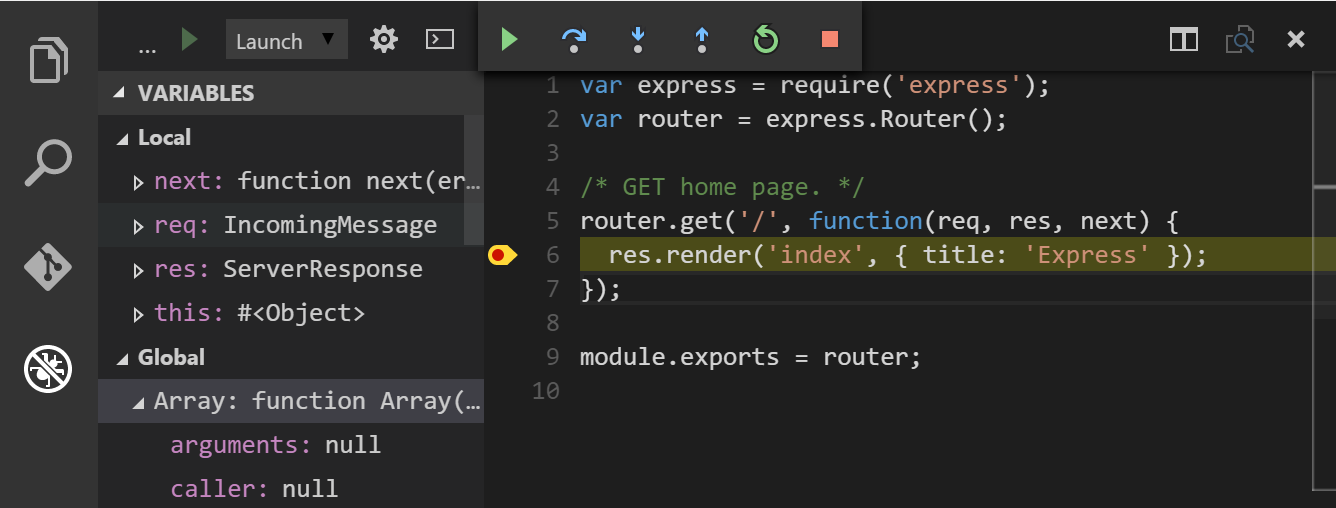
To minimize context-switching, let’s configure Visual Studio Code to launch the application directly from the editor. Press F5 and select the Node.js debug engine to automatically generate the .vscode/launch.json configuration file. Now, simply press F5 again to launch the app with the debugger attached. Set a breakpoint in routes/index.js and try reloading localhost:3000. You’ll find that you can use the debugging pane to inspect the call stack, variables, etc.
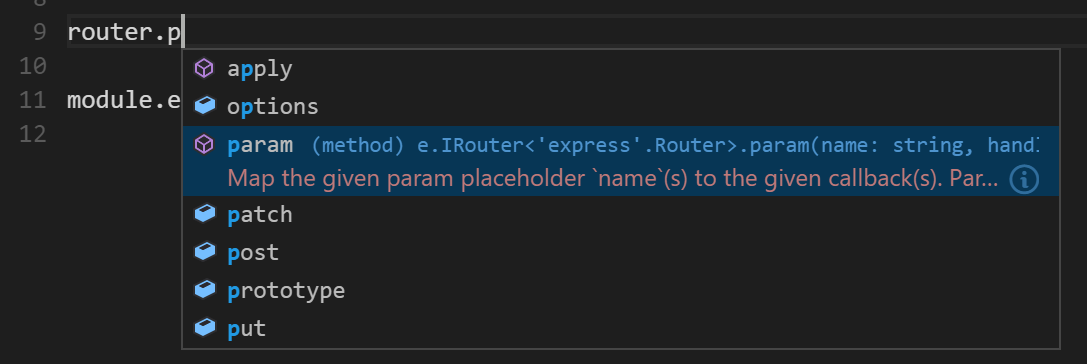
Visual Studio Code also provides code completion and IntelliSense for Node.js and many popular packages:
Because JavaScript is a dynamically-typed language, IntelliSense relies heavily on typings files (.d.ts) that are often included with npm packages. The community has also contributed typings files that you install using the tsd (TypeScript definitions) package:
C:src> npm install tsd –g          #install tsd as a global tool
C:src> cd myapp
C:srcmyapp> tsd install express   #install IntelliSense for express
Uploading a file
The scaffolding for the application includes a basic Express web service, so let’s have it accept a file upload. First, add a basic browse and upload UI by replacing the contents of views/index.jade with the following template:
<!-- views/index.jade -->

extends layout

block content
  div(style='width:400px')
    h1= title
    p= location
    p Upload a picture of a head to get started!

    form(action='/'       method='post' enctype="multipart/form-data")
      input(type="file" name="userPhoto")
      input(type="submit" value="Upload Image" name="submit")

    img(src= image)
If you restart the app here in Visual Studio code and refresh localhost:3000 in the browser, the UI is available attempting to upload a file gives you a 404 error because we’re not yet handling the POST request. To do that, stop the debugger and append the following code to routes/index.js to process the file in req.file.path, ultimately to display the output bobblehead on the page.
// Required Dependencies
var fs = require('fs');
var oxford = require('project-oxford');
var Jimp = require('jimp');
var pngFileStream = require('png-file-stream');
var GIFEncoder = require('gifencoder');

// Handle POST request
router.post('/', function (req, res, next) {
    var imgSrc = req.file ? req.file.path : '';
    Promise.resolve(imgSrc)
        .then(function detectFace(image) {
            console.log("TODO: detect face using Oxford API.");
        })
        .then(function generateBobblePermutations (response) {
            console.log("TODO: generate multiple images with head rotated.");
        })
        .then(function generateGif (dimensions) {
            console.log('TODO: generate GIF')
            return imgSrc;
        }).then(function displayGif(gifLocation) {
            res.render('index', { title: 'Done!', image: gifLocation })
        });
});
JavaScript’s asynchronous nature sometimes makes it challenging to follow application flow. Here we’re using the new EcmaScript 6 feature of Promises to sequentially execute detectFace, generateBobblePermutations, and generateGif while keeping our code readable.
Now when you run the app you should see the three TODOs on the console, but we’re still not saving the file to any particular location. To do that, add the following code to app.js right before where the / and /users routes are defined with app.use (around like 25):
// Expose files available in public/images so they can be viewed in the browser.
app.use('/public/images', express.static('public/images'));

// Use multer middleware to upload a photo to public/images
var multer = require('multer');
app.use(multer({dest: './public/images'}).single('userPhoto'));
With this, restart the application and you’ll see it render an uploaded photo, which is stored in public/images.
Detect the face
It sounds like a lot of work, but fortunately this kind of artificial intelligence is ready accessible through the Face APIs of Project Oxford. In routes/index.js, make the detectFace function in the promise chain look like the following:
function detectFace(image) {
    var client = new oxford.Client(process.env.OXFORD_API);
    return client.face.detect({path: image});
}
As you can see, you’ll need an API key retrieved from the OXFORD_API environment variable to use the Project Oxford client. Click here to sign up (free), then request an also-free Face API key. This will appear on your subscriptions page (click Show to see the key):  Next set the OXFORD_API environment variable on your machine to the Primary Key value, so that it is available to your code through the
 process.env.OXFORD_API property. (Note: you may need to restart Visual Studio Code after setting the variable for it to be picked up.) This is generally a much better practice than pasting a secure key into code that might be publicly visible in a repository.) Now set a breakpoint on the console.log call within the generateBobblePermutations step, run the application, and verify that face detection worked by checking response[0].faceRectangle. (Again, restart Visual Studio Code if you see an error about the API key not being there.) ![Verifying that face detection works by checking response[0].faceRectangle Verifying that face detection works by checking response[0].faceRectangle](https://devblogs.microsoft.com/visualstudio/wp-content/uploads/sites/4/2016/02/2016-02-16-BobbleGen-08.png) The Project Oxford APIs are pretty neat, so definitely explore the other APIs and options you can set. For instance, passing the following options into
The Project Oxford APIs are pretty neat, so definitely explore the other APIs and options you can set. For instance, passing the following options into client.face.detect tries Project Oxford’s hand at guessing an age and gender for the person in the photo (this is the same technology that powers https://how-old.net/).
{
    path: image,
    analyzesAge: true,
    analyzesGender: true
}
Crop, rotate, and paste the face in various configurations
To produce an animated bobblehead GIF, we’ll create three images with different rotations of the detected face area. For this, paste the code below in place of the generateBobblePermutations function in routes/index.js:
function generateBobblePermutations(response) {
     var promises = [];
     var degrees = [10, 0, -10];

         for (var i = 0; i < degrees.length; i++) {
             var outputName = req.file.path + '-' + i + '.png';
             promises.push(cropHeadAndPasteRotated(req.file.path,
                 response[0].faceRectangle, degrees[i], outputName))
         }
    return Promise.all(promises);
}
The workhorse here is the following cropHeadAndPasteRotated function that you need to append to routes/index.js:
function cropHeadAndPasteRotated(inputFile, faceRectangle, degrees, outputName) {
    return new Promise (function (resolve, reject) {
        Jimp.read(inputFile).then(function (image) {
            // Face detection only captures a small portion of the face,
            // so compensate for this by expanding the area appropriately.
            var height = faceRectangle['height'];
            var top = faceRectangle['top'] - height * 0.5;
            height *= 1.6;
            var left = faceRectangle['left'];
            var width = faceRectangle['width'];

            // Crop head, scale up slightly, rotate, and paste on original image
            image.crop(left, top, width, height)
            .scale(1.05)
            .rotate(degrees, function(err, rotated) {
                Jimp.read(inputFile).then(function (original) {
                    original.composite(rotated, left-0.1*width, top-0.05*height)
                    .write(outputName, function () {
                        resolve([original.bitmap.width, original.bitmap.height]);
                    });
                });
            });
        });
    });
}
This function reads the uploaded image, then expands the boundaries of faceRectangle to capture the full head (rather than just a portion of the face). We then crop this area, scale it up a bit, rotate it, and paste back to the original image.
Because we’re doing asynchronous work here, the images created by from cropHeadAndPasteRotated are not available immediately. This is why we call resolve to inform the application that the file has been written successfully.
Running the application now, you’ll find three PNG files in public/images alongside the original image. You can click on these in Visual Studio Code to see them directly in the editor.
Produce a GIF
We’re ready for the final step! We’ll use the gifencoder and png-file-stream libraries (we installed these with npm earlier) to compose the images generated above into a single GIF. Just replace the generateGif code in routes/index.js with the following:
function generateGif(dimensions) {
    return new Promise(function (resolve, reject) {
        var encoder = new GIFEncoder(dimensions[0][0], dimensions[0][1]);
        pngFileStream(req.file.path + '-?.png')
            .pipe(encoder.createWriteStream({ repeat: 0, delay: 500 }))
            .pipe(fs.createWriteStream(req.file.path + '.gif'))
            .on('finish', function () {
                resolve(req.file.path + '.gif');
            });
    })
}
Go ahead, run the code, and start generating bobbleheads!
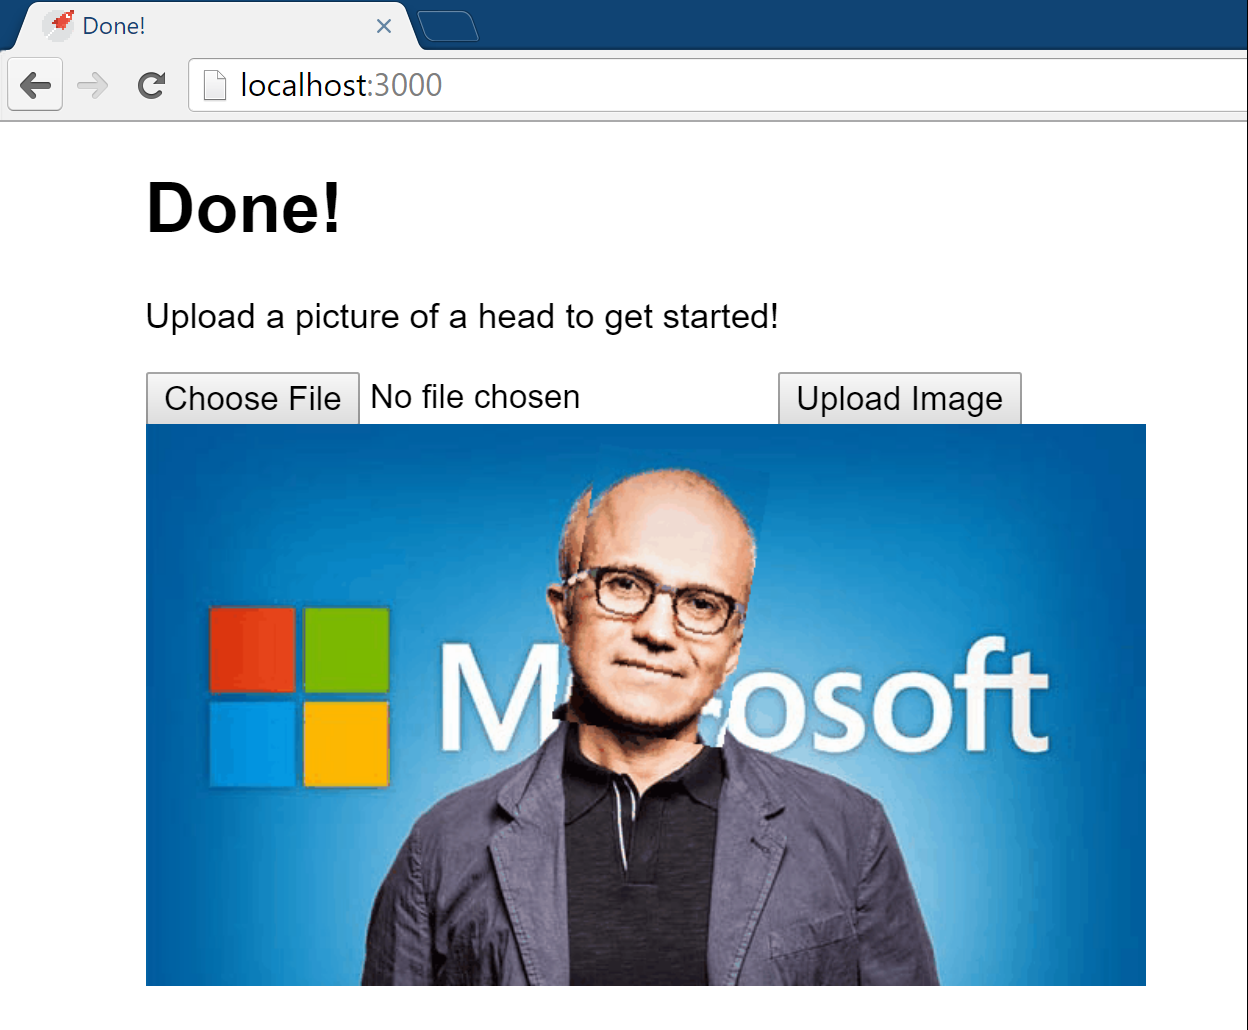
To the cloud!
There’s no way we’re going to achieve viral-quality bobbleheads with a mere locally-running app, so let’s see what we can do about that by using Git Deploy to deploy our app to Azure.
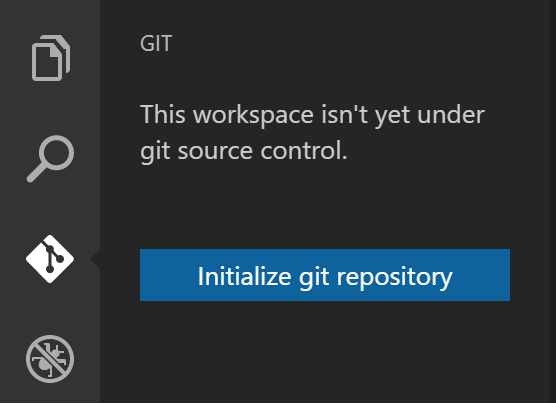
To initalize our repository, open the Git pane on the left side of Visual Studio Code and select Initialize git repository:
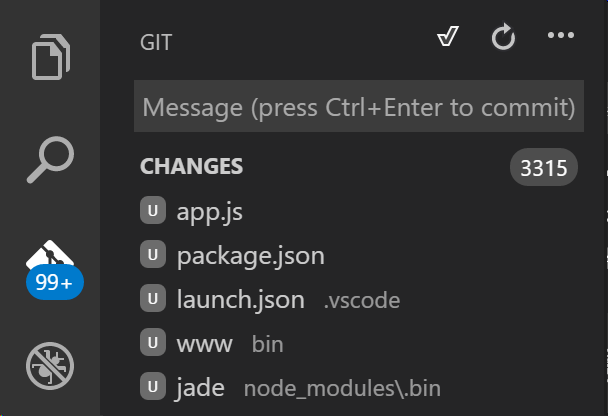
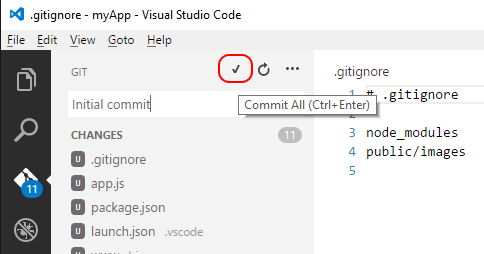
Whoa. 1000’s of changes?? That’s way too much. Let’s cut that down a bit. Create a file in the project root with the File > New File command (Ctrl+N), paste in the text below, and save the file as .gitignore:
# .gitignore

node_modules
public/images
That’s better! We don’t need to add all the packages in node_modules to the repo, and we can certainly ignore our uploaded and generated test images. In the Git pane, now you’ll see just a few files to commit to your local repo, entering a message and clicking the checkmark:
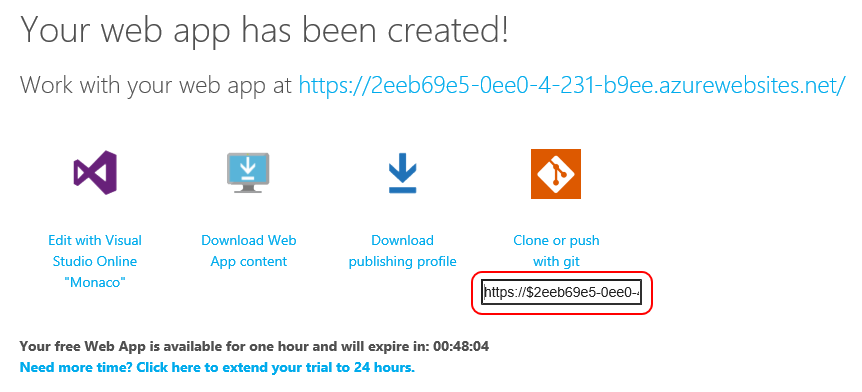
Next, head on over to https://try.azurewebsites.net to create a free one-hour trial website:
- Select Web App for the app type and click Next.
- Select Empty Site for the template and click Create
- Select a login provider, and in a few moments you’ll have a new site to use for the next hour!
Now, grab the git url for your web app (as outlined above), and push your code to the remote repository using the following command, replacing <git url> with the long bit you just copied from the portal:
C:srcmyapp> git push --set-upstream <git url> master
The command window shows the status of your deployment. Especially notice that in addition to copying the files in your project, Azure automatically runs an npm install for all your required dependencies as specified in package.json. Remember earlier that by listing all your dependencies in package.json, anyone who gets your source code without everything in node_modules can easily restore all the required packages. Deploying to Azure works exactly the same way, and it’s why you don’t need to add everything under node_modules to the repo.
Now although you can visit this new site, you won’t be able to generate the bobblehead just yet because the OXFORD_API environment variable is not set. Azure’s temporary 1-hour sites do not permit you to set environment variables, so we’ll just edit routes/index.js directly and drop in the primary key. To do this, click the “Edit with Visual Studio Online ‘Monaco’” link:
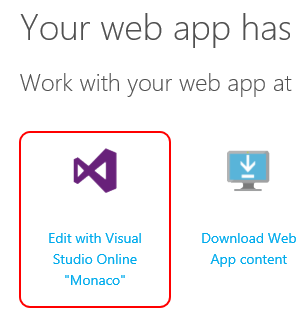
This takes you to an editor interface that looks very much like Visual Studio Code—open the Explore pane, navigate to routes/index.js, and paste in your primary key in quotes. Your change will be automatically saved:
Now in the browser, click on the URL after Work with your web app at … and Bobble away! (I’d suggest you can share your bobbleheard generator with the world, but you probably have only about 35 minutes left!)
Next steps
Our bobblehead generator is clearly demo-ware and nowhere close to production ready. Here are some things you can do to take it in that direction:
- Try refactoring and separating out some of the code into separate modules.
- Try passing in different image types, or images with multiple or no faces, etc. Debug any issues you run into using Visual Studio Code, and see how you might be able to do even better!
- Instead of saving images locally, try playing around with the Azure Storage APIs or MongoDB.
- Explore npmjs.com and find other useful packages to play around with, or—better yet— publish your own!
Be sure to also check out the following set of resources that should help you along the way:
- Visual Studio Code: our new lightweight and cross-platform editor that offers powerful debugging and IntelliSense for Node.js.
- Node.js Tools for Visual Studio (NTVS): Can’t get enough of Visual Studio? NTVS is free, open-source extension that turns Visual Studio into a full-blown Node.js IDE.
- Microsoft/nodejs-guidelines: A helpful set of tips and tricks for using Node.js, as well as links to some of the other cool Node.js efforts going on at Microsoft.
Questions, compliments, complaints?
We’d love to hear your feedback. Please comment below or shoot me a tweet! ALso be sure to check out the other nine (or ten) things to try on the leap day!
 |
Sara Itani (@mousetraps), Software Engineer, Node.js Tools Sara is an engineer focused on building best-of-breed Node.js experiences for Visual Studio and VS Code. At first, she was skeptical about Node.js – that is, until she realized its full potential…. Now, she’s all in, and excited to help it take over the world by bringing the power of Visual Studio to the Node.js community. She, for one, welcomes our new JavaScript overlords. 🙂 |


0 comments