
Introduction
The Consumer Packaged Goods (CPGs) industry relies on multiple channels for selling the products and aims to provide a seamless buying experience for the consumer. With the advent of omni-channel retailing, Consumer Packaged Goods (CPGs) and retailers are striving towards providing the best possible experience to the customer alongside working on providing the most available information on the product they are selling on these touch points. On an e-commerce Channel which sells multiple products, the need for a compliant product (SKU) image is key. This is where a Mobile Ready Hero Image (MRHI) becomes mandatory. Additionally, every CPG business wants to adhere to the brand guidelines. At a high-level, a composite of the MRHI and Brand Guidelines should be adhered to, by all SKU Images sold on a given e-commerce site.
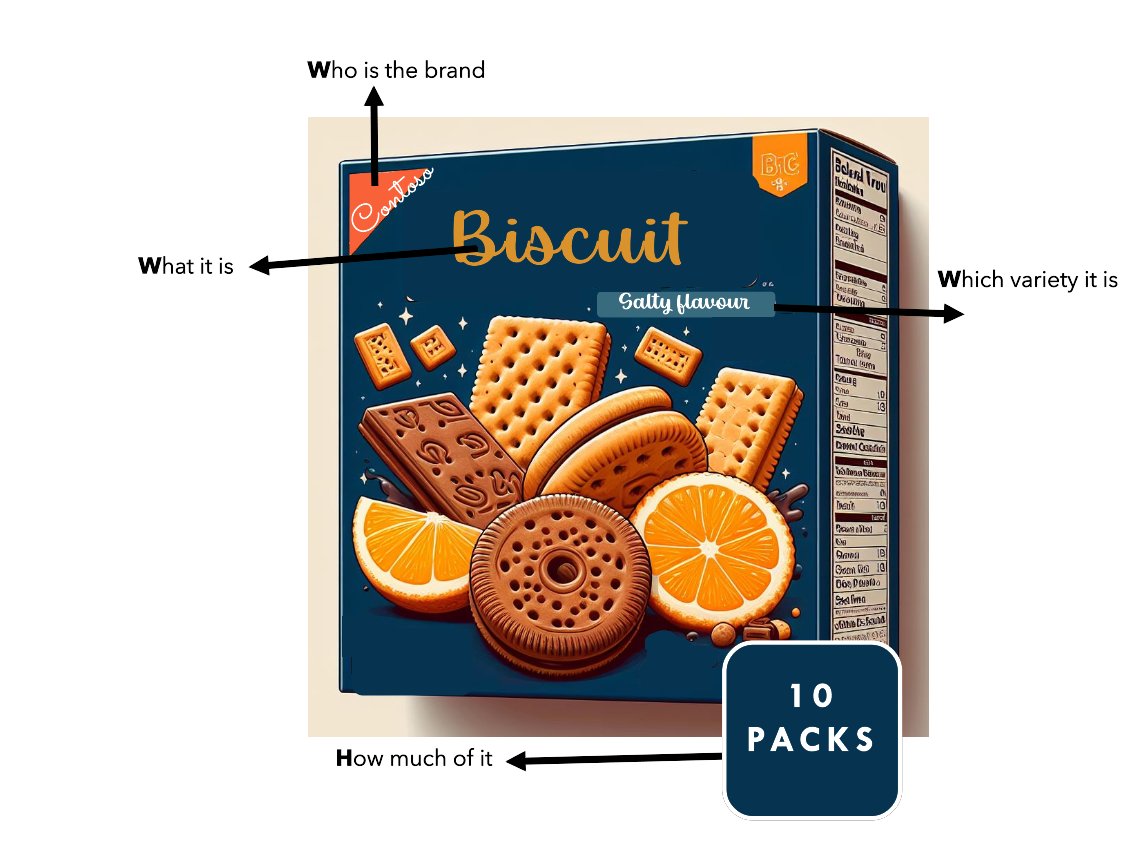
MRHI rules ensure that the image clearly specifies the 4Ws
- Who is the brand
- What it is
- Which variety it is
- HoW much of it there is
Note: All images in this blog are created using Microsoft Designer and not a real product image
In addition, various factors which ensure the readability of the text on the package is ensured through the rules. Similarly, brand guidelines ensure the font, color and various aesthetics of the image signifying the brand specially. In all cases, retailers and CPGs follow these standards for all SKU Images sold on the online selling platforms.
In the AI era, there is an incessant need to reduce the lead time to generate these images through the usage of the right technologies. This has further established the need to experiment both on the traditional as well as Generative AI based Image Analysis and manipulation techniques. This particular industry-based use case is more about images adhering to guidelines and standards. Most of the experiments done in this case have prioritized the need for precision in the images generated as outputs which would eventually be approved to be displayed on the online selling platforms.
An analysis of MRHI rules help us to arrive at high-level steps that are required to convert image into MRHI compatible format. These rules are as below.
- De-clutter the image by removing information not mandatory as per MRHI specification
- Make objects on the image prominent enough to convey the 4W information as mentioned above
- Cater to any additional brand guidelines that require some manipulation of images (increasing font/ realignment of objects etc.)
- Minimizing whitespace and effective utilization of the available space through zooming or emphasizing on nutrient or ingredient information especially allergens for example
To achieve these objectives initially we evaluated Generative AI. We studied capabilities of Generative AI to see if it can remove objects (de-clutter the image), make things on image more prominent and re-organize objects on the image. The findings and observations to use Generative AI for such specific type of image processing is documented below.
Generative AI Image generation experiment
We utilized generative AI techniques to attempt to remove content from images to comply with MRHI standards. One of the specific models we used was Stable Diffusion, a latent diffusion model and a variety of open source deep generative neural network.
Advantages:
- Open-source nature allows localized processing for data confidentiality.
- Capable of generating photo-realistic images based on text prompts, showcasing impressive visual outcomes.
- Supports inpainting and outpainting for content removal or addition.
- Various schedulers are at your disposal to customize image generation according to preferences.
In our MRHI use case, experimentation utilized Stable Diffusion V1.5 inpainting checkpoints.
- Through the process of inpainting, it becomes possible to mask a specific area, prompting the diffuser model to re-render the masked region based on the text input.
- While the inpainting checkpoints successfully removed content from some images, the results were not consistently satisfactory. The generative nature of the model sometimes generated new content to replace the removed area, which was not always necessary in our case.
- Generative AI technology is more suited for generating new content rather than solely removing existing content from images.
In later sections, we discuss using alternative deep learning inpainting techniques, which yield better results.
Limitations:
- It is crucial to acknowledge that, as of now, generative AI technology may not perform optimally for text generation. In cases where an image contains text, the diffuser model is likely to obscure the text, often due to considerations such as copyright concerns.
- Another significant limitation worth highlighting in the utilization of stable diffusion is the inclusion of an optional safety mechanism. This brings about a potential risk, as the system could be leveraged to generate objectionable content, encompassing categories like graphic violence and images portraying political violence.
Considering the above limitations of Generative AI for our use-case of MRHI image generation we discarded that approach. As the Gen-AI models mature over the period of time it might sometime in future can be re-considered for such use-cases.
We preferred conventional Machine Learning model and techniques over Gen-AI to perform image manipulations. The detailed steps are documented in subsequent sections.
Our primary tools that we used in to achieve the goal of converting image into MRHI compatible format are
- Azure Computer Vision
- Azure Custom Vision
- OpenCV
- Inpainting model
Flow diagram/process of generating MRHI using OpenCV and other Open Source Libraries
The idea to generate a Mobile Ready Hero Image(MRHI) programmatically based on GS1 guidelines is to detect & remove all non-4Ws elements from the image (for example, for a Vegetable Box, it could be the nutrient panel, additional product claims etc.) by leveraging technologies such as Azure Custom Vision and Python’s Computer Vision and Deep Learning libraries.
We start by utilizing the object detection capabilities of Azure Custom Vision. This involves taking a new Azure Custom Vision model & training it on a set of sample images by manually tagging each of the non-4Ws elements that we intend to remove.
Upon successful training of our Azure Custom Vision model, we initiate the MRHI generation process by submitting the image to the model. In return, the model provides the co-ordinates of bounding boxes for all the non-4Ws elements on which it was trained. We then proceed to remove all these non-4W elements using Computer vision techniques like inpainting and also generate any additional details via standard Image drawing libraries.
Here’s how the overall flow looks like:
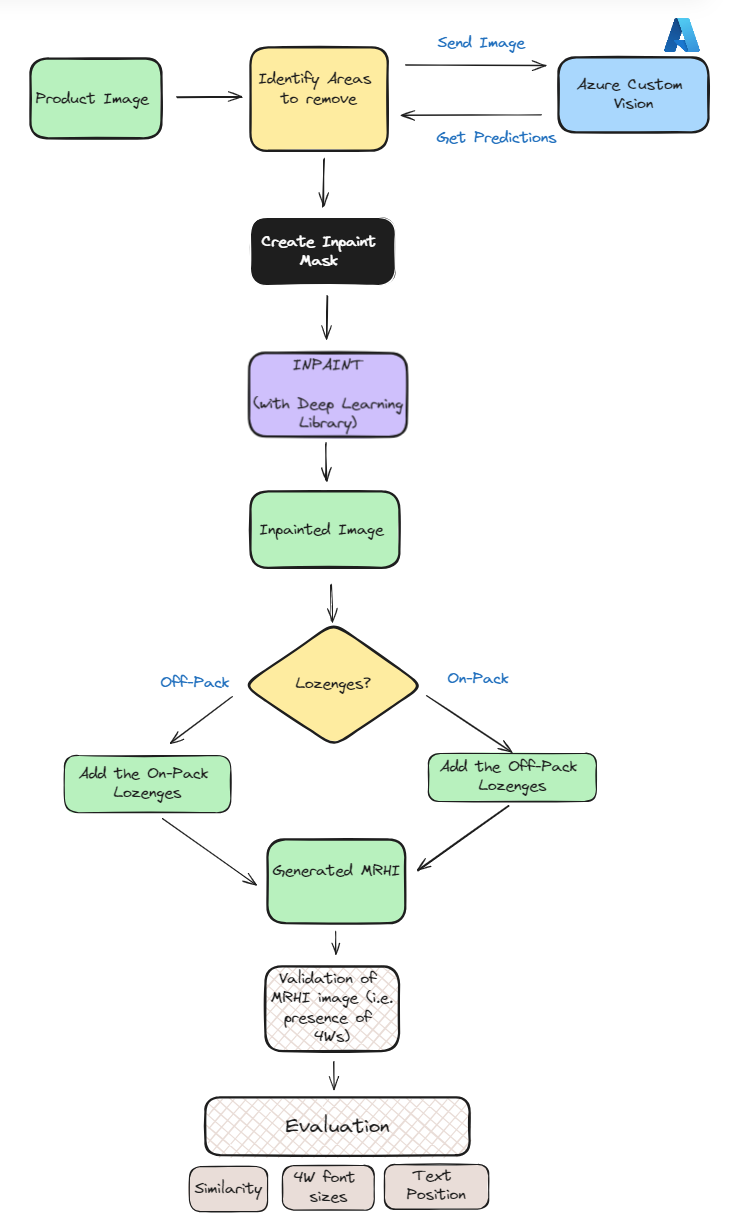
- Product Image : We start with our product image, which contains all the 4Ws along with other additional information or the non-4Ws, which we would like to remove in order to generate the corresponding MRHI image.
- Azure Custom Vision : We then send our base image to Azure Custom Vision to get the bounded boxes of all the non-4Ws, which we would like to remove from the image. Here, our Azure Custom Vision model has been pre-trained already.For details, please refer Model Training section
- Inpaint Masking : After getting the results from Azure Custom Vision, our next step is to mask all the objects which we would like to remove.
- inpainting : We then perform inpainting on all the masked areas as obtained from previous step. However, Instead of OpenCV, we have used an OpenSource Deep Learning inpainting library Lama Library.Please refer the Key Insights section for details on the reason of not using OpenCV’s inpainting.
- Adding any Lozenges : After inpainting, we then check whether we need to add any Lozenges(Additional text along with image)Please refer the Lozenges section for more details
- Validation & Evaluation : Lastly, we validate our generated image to assess the presence of all 4Ws i.e. whether the final image has all the 4Ws or not. We also evaluate it based on some Image similarity metrics to assess how closely the generated MRHI image is w.r.t it’s original version.Please refer the Validation and Evaluation section for more details.
Product Image
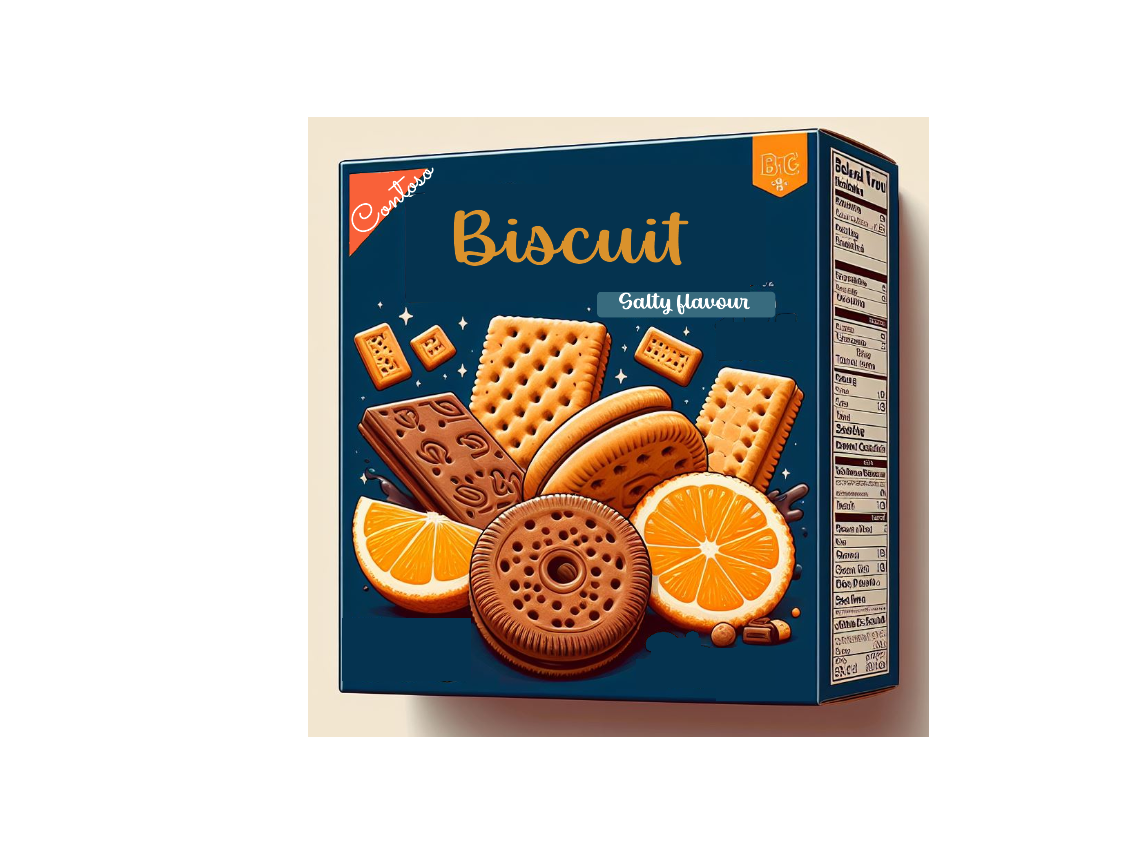
For our demonstration, let’s take a Product Image as below. This does not represent a real product image but is a representation of a typical product image that we would like to convert into a MRHI compatible format.:

As we can see, the Product image here is depicting the Brand “Contoso” and Product Name “Bisciit” clearly and thus the 4Ws :
Who : Contoso
What : Bisciit
Which : Salty
How Much : Not directly specified on the image, but available in metadata about the product
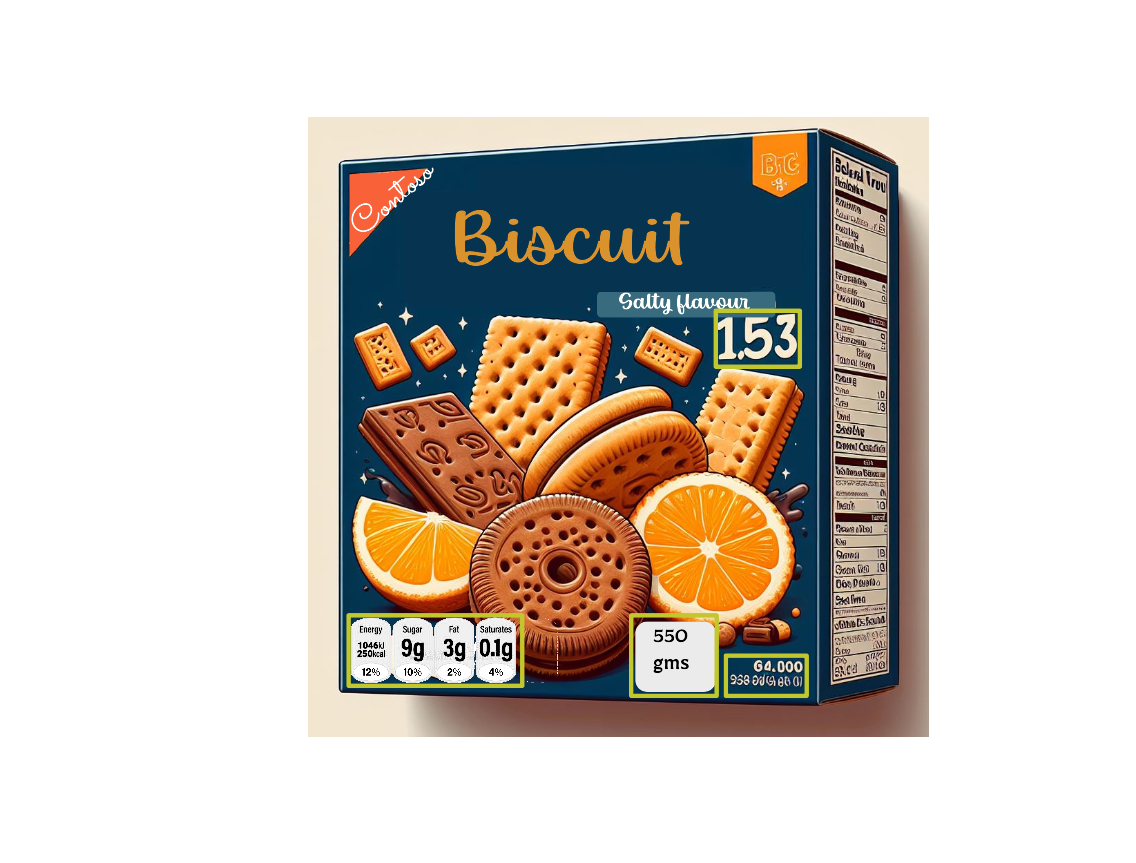
This image has some non-4W elements like Nutrient Panel and some other text which is not required as per the GS1 MRHI guidelines website guidelines & which we would train and remove as part of processing.
Model Training
Before we do anything on image it is very important to understand the image and various objects on it, we leverage the capabilities of Azure Custom Vision to train it with lots of images training data and tagging it appropriately so that we know bounding boxes of the objects on the image. Tagging also generates useful metadata (tags, bounding box co-ordinates, confidence) that can be used in application to decide what action we take on specific tag. We found Azure custom vision suits our requirements well and it exposes simple endpoint to which we can pass images and expect tag data as response. Azure Custom vision also enables to expose multiple iterations of model training as separate endpoints which provides quick migration from one iteration to another. It also provides ways to back-up the trained model which we considered as most important feature for production use-cases.
Here’s a step-by-step process to Model Training using Azure Custom Vision:
- Pattern Identification
- Identify elements considered as non-4Ws(or not relevant w.r.t MRHI), such as nutritional information (calories, saturated fat, sodium, net weight, etc.) for the MRHI process.
- Recognize common patterns from the non-4Ws to tag in Custom Vision effectively.
- Tagging
- Tag the identified elements within the product images.
- This process is also called as annotation and it is very important to use variety and variance in data to have well trained model
- Model Training
- The tagged product images are being trained to create a model capable of identifying and generating bounding boxes around each tagged element.
- After training has completed, the model’s performance is evaluated and displayed. The Custom Vision service uses the images that we submitted for training to calculate precision, recall, and mean average precision. One must also review the training performance numbers carefully to decide on if more training is required or its just good enough
- Model Publication
- After successful training, publish the model for prediction.
- This ensures that the model is ready to seamlessly generate mask in images based on the identified patterns and annotation.
Thus, for our example Product Image, here is how the results look like after the Model Training on the portal
This result can is made available in json format when we make call to published endpoint by passing image as input. This json contains all the tags and bounding boxes for the elements on image based on training. We would typically expect the tags for non-4Ws elements in this json response.
Inpainting
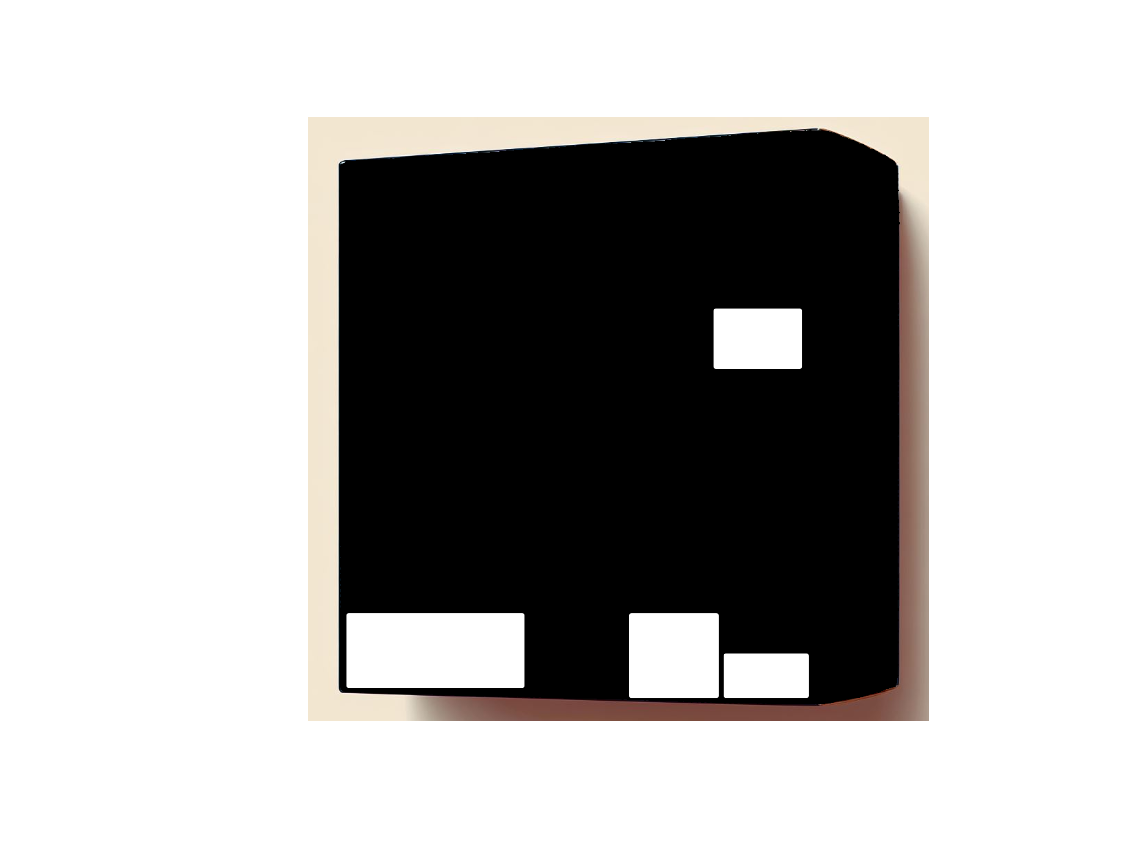
After obtaining the bounded box results from Azure Custom Vision(CV) for each of the non-4Ws element which we want to remove, we then create the inpaint mask for all those bounded boxes. For reference, we are following the OpenCV inpaint masking guidelines as described here for creating the inpaint mask.
Hence, for our example Product Image, here is how the Inpaint mask image looks like:
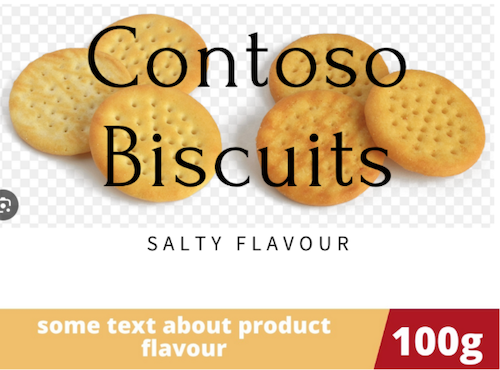
Using the original image and mask image, we then perform the inpainting operation using Lama library which then gives us following result:
Our Image is now successfully de-cluttered from all the non-4W elements.
Lozenges Generation
Lozenges is any additional text we have inside or alongside our image which helps in conveying one or more of the 4Ws- generally the “HoW much” aspect, in cases where that 4W element(s) is not clearly available or not at all available on the actual Product image. For example, 12 packs, 6 X 100g, etc.
As the last step in our MRHI generation process, we then accordingly check and add any Lozenges relevant for our product image.
Note: The lozenges addition may not be applicable for all the cases
Here, for example to convey the “How much” information, we added an On-Pack corner lozenges with text “8 Cubes”.

Similarly, if there would have been a requirement to add Off-Pack Lozenges, let’s say for a different image, same can be generated as follows:
With this, our MRHI generation process is now complete. We now move on to validation and evaluation of our generated results as described in next sections.
Validation and Evaluation
As we all know Mobile Ready Hero Images” (MRHI) are a specific type of product image designed to enhance online shopping experiences, particularly on mobile devices.
These images typically combine high-quality product photography with additional information like brand name, product type, and size or quantity, all presented in a clear, easy-to-read format. They are tailored to be easily viewable on smaller screens, where traditional product images might be less effective due to size constraints.
The evaluation and validation of MRHI usually involve several key factors:
- Clarity and Readability: The text and product in the image must be clear and easily readable on mobile devices. The design should avoid clutter, minimize white space, and accurately represent the physical product.
- Information Accuracy: The image should contain precise information, including brand, type, and size, corresponding to the product description. It should address the 4Ws: Who (brand), What (product), Which variety, and How much (quantity).
- Image Quality: High-quality images with good resolution and lighting are essential to represent the product accurately.
In terms of our platform, which generates these images, it’s crucial to validate and evaluate their accuracy and effectiveness.
Evaluation vs. Validation:
Evaluation involves assessing an image’s visual appeal or engagement, often requiring subjective judgments and previous data/ground truth or trends. A robust evaluation process with good results gives confidence in process and closeness towards ground truth.
Validation, however, confirms that the image meets technical specifications, such as image size, format, and content accuracy. A robust validation process with good results gives us confidence that the output generated is closer to specifications, consistent goof results here also helps in reducing “human in loop”
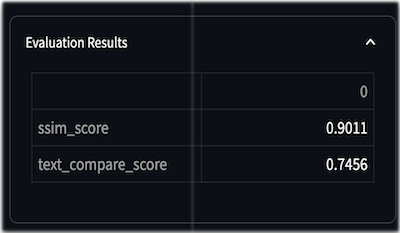
This calls for a flexible validation framework which can be expanded with more rules and provides a score based on our criteria. The evaluations and validations we included are as below
- Image Similarity Checks: We use the Structural Similarity Index Measure (SSIM) to ensure the MRHI and the original image are not drastically different.
- Text Compare Score: To guarantee no significant textual change from the original physical image, especially for text included in the packaging.
- Color Similarity Check: The original and MRHI should not significantly differ in colors and features.
- Presence of the 4Ws: Ensuring all essential information (brand, product, variety, quantity) is included.
- Size Proportionality of the 4Ws: Each element should be proportionate, avoiding any clutter or disproportionate sizing.
Note: This is just a subset of validations/evaluations that we performed. There could be a lot more that we might learn over the period of time and keep on including
This is the output of the validations and evaluations framework :

Key Insights
Inpainting Considerations:
OpenCV Approach:
Our exploration into inpainting techniques led us to OpenCV’s built-in method, specifically using the “Navier-Stokes” algorithm. Despite its effectiveness in simple background cases, it falls short in more complex scenarios, as seen in the provided screenshots. The method lacks a global understanding of the image, making it challenging to restore intricate details.
Example Code:
image = cv2.inpaint(image, mask, 2, cv2.INPAINT_NS)Deep Learning-Based Models:
In parallel, we explored two cutting-edge image inpainting models, both with free, commercially usable licenses:
- LaMa: Resolution-Robust Large Mask Inpainting with Fourier Convolutions
- ZITS: Incremental Transformer Structure Enhanced Image Inpainting with Masking Positional EncodingLeveraging pretrained models without fine-tuning, both models exceeded expectations. We ultimately chose the LaMa model due to its exceptional performance.
Model Training Considerations:
When constructing an object detection model in Azure Custom Vision, several critical factors came to light:
- Minimum Tag Requirements: Ensure each label in the input dataset has a minimum of 15 tags for effective training and enhanced object recognition.
- Data Segregation: Employ separate datasets for training and testing to validate model performance and prevent overfitting risks.
- Image Preprocessing: Convert input images to monochromatic format before training to adhere to Azure Custom Vision’s size limitations (images exceeding 4MB are unsuitable for training).
- Optimizing Performance: Enhance model performance by utilizing a larger input dataset with an evenly distributed tag distribution among labels. This strategy contributes to improved accuracy, precision, and recall.
Access the Code on GitHub
Utilized Tools and Libraries
Core Libraries:
- opencv-python: Core library for Computer Vision tasks.
- Example Usage: Inpaint mask generation, Lozenges generation, etc.
- pillow: Python Imaging Library for various image operations.
- Example Usage: Drawing Lozenges’s Text on Image.
- streamlit: Open-source Python library for creating custom web applications.
- custom-vision: Used for constructing object detection models.
- Example Usage: Get bounding boxes for non-4Ws and remove them from the image.
- lama-inpainting: Deep Learning-based SOTA inpainting model.
- Example Usage: Used for inpainting tasks.
- image-similarity-measures: Python package for evaluating image similarity.
- Example Usage: Used in validation and evaluation.
Other Libraries:
- python-dotenv: Simplifies loading environment variables from a file.
- numpy: Numerical computing library for large arrays and matrices.
- jupyter: Initially used for creating an integrated Jupyter notebook.
- pytorch and its dependencies: Dependency for Lama inpainting library.