

Context
At the start of every new project, we always face many challenges when setting up our development environment or onboarding a new team member. We have to install and configure many tools and dependencies to get the development environment up and running locally. In addition, dealing with different development machine configurations (OS, CPU, file system, etc.) or working across different IDEs (VS Code, IntelliJ, Codespaces, etc.) can be a real challenge. Finally, having a solution for the most famous statement in the software development world: “It works on my machine”.
In this post we will explore the concept of development containers and how it can help us to solve the above challenges. You can find a full code sample here
What is a development container?
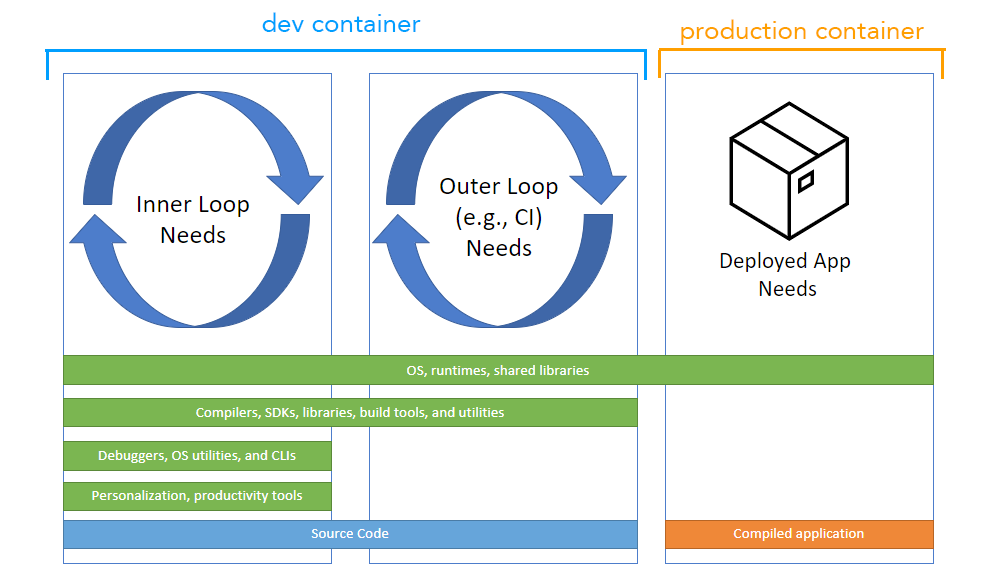
Development containers (or dev containers) are Docker containers that are specifically configured to provide a full-featured development environment. As containers become more popular in the software development world, the same concept is used to create a container that contains all the tools and dependencies needed to run our development environment. This container can be used by all team members to run the development environment locally (Inner loop), without the need to install any tools or dependencies on their machines or extend it to be used in the CI/CD pipeline (Outer loop) to build, test and deploy your application.
Dev containers support
Dev containers are supported by many IDEs until now and the list is growing. Some of the most popular IDEs that support dev containers are:
This post focuses on VS Code as it has a matured Dev container support and become more popular IDE, and we already use it in our last engagement.
Getting started
In this section we will build a sample dev container for a Java application. The container will contain the following tools and dependencies:
- Java 17
- Maven
- Git
- VS Code extensions
Note: Docker is required to build and run the dev container, In addition if you’re using Windows, you need to install WSL2 to run dev containers.
devcontainer.json
The definition of the development container is stored in a JSON (with comments) file called devcontainer.json. The file follows the dev containers specification. This file contains the metadata that is used to create the dev container.
While the structure of this metadata is critical, it is also important to call out how this data can be represented on disk where appropriate. IDEs using it should expect to find a devcontainer.json file in one or more of the following locations (in order of precedence):
# Main repo directory

└───.devcontainer.json

Or

└───.devcontainer
        ├───devcontainer.json

or to support multiple dev containers (where <folder> is one level deep)

└───.devcontainer
        └───<folder>
                └───devcontainer.json
The devcontainer.json file contains several configuration options, but This post focuses on the minimum required metadata to create a fully featured development environment:
name: the container name (could be your project or service name)image: the container image to use, list of available images can be found herefeatures: features are self-contained, shareable units of installation code and development container configurationLifecycle Scripts: different commands to be run at different points in the container’s lifecycle, likeinitializeCommand,postCreateCommand,postStartCommand,postAttachCommand, and morecustomizations: IDE specific properties, defined in supporting tools
1. Selecting the dev container image
Based on your project technology stack, you need to select the container image that contains all the tools and dependencies needed to run your development environment.
The following example shows how to configure your dev container to use the Java 17 on Debian OS container image.
{
  "name": "Java 17",
  "image": "mcr.microsoft.com/devcontainers/java:17-bullseye",
}
or using Dockerfile
{
  "name": "Java 17",
  "build": {
    "dockerfile": "/path/to/your/Dockerfile",
  }
}
2. Installing tools and dependencies using features
Dev containers features are self-contained shareable units of installation code and development container configurations. It can be used to install CLIs, tools, and dependencies. Please check the list of available features. The following example shows how to install Java, Maven, Azure-CLI and Docker using dev container’s features:
{
  "name": "Java 17",
  "image": "mcr.microsoft.com/devcontainers/base:ubuntu",
  "features": {
    "ghcr.io/devcontainers/features/java:1": {
      "version": "17",
      "installMaven": "true",
      "installGradle": "false"
    },
    "ghcr.io/devcontainers/features/azure-cli:1":{}, // Install Azure CLI
    "ghcr.io/devcontainers/features/docker-in-docker:2":{}, // install docker
 }
}
3. Executing commands using lifecycle scripts
In case you need to execute commands or add more tools that are not supported by features, you can use lifecycle scripts to execute these commands at different points in the container’s lifecycle. The following example shows how to install Git using lifecycle commands postCreateCommand:
{
  "postCreateCommand": "apt-get update && apt-get install -y git"
}
or using script file
{
  "postCreateCommand": "bash .devcontainer/postCreateCommand.sh"
}
4. IDE specific properties
IDE-specific properties can be used to customize the source code editor. A reference to these customizations can be found here. The following example shows how to install VS Code extensions:
{
  "customizations": {
      // Configure properties specific to VScode
      "vscode": {
        "settings": {},
        "extensions":[
          "ms-azuretools.azure-dev",
          "ms-azuretools.vscode-docker",
          "ms-vscode.makefile-tools",
          "ms-kubernetes-tools.vscode-kubernetes-tools",
          "ms-kubernetes-tools.vscode-aks-tools",
          "vscjava.vscode-java-pack",
          "vscjava.vscode-gradle",
          "github.vscode-github-actions",
          "github.vscode-pull-request-github",
          "k6.k6"
        ]
      },
      // Configure properties specific to Codespaces.
    "codespaces": {
        "openFiles": [ // Customize which files are initially opened when the codespace is created:
          "README"
          "src/index.js"
        ]
    }
  }
}
5. Environment variables
The environment variables are critical part of the development environment, it can be used to store secrets, configuration values, etc. These variables can be set inside the dev container using different ways:
//  Using the `runArgs` property
{
  "runArgs": ["--env-file",".env"],
}
// Using the `containerEnv` property
{
"containerEnv": {
"MY_VARIABLE": "${localEnv:MY_VARIABLE}"
}
}6. Running the dev container
After creating the devcontainer.json file, and setting up all the configurations required by your environment , you can run the dev container using the following:
- Open the command palette
Ctrl+Shift+P - Select
Dev Containers: Reopen in Container
7. More and beyond
More documentation and examples can be found here, In addition, you can find a very helpful Dev Containers How To series on VS code team YouTube channel.
Also, the dev container can improve the outer development loop by integrating it with the CI/CD pipeline to build, test, and deploy your application. It is now supported by the major Devops providers like GitHub Actions and Azure Devops.
Conclusion
In this post we explored the concept of development containers and how they can help us to solve the challenges we face when setting up our development environment or onboarding a new team member. We also explored how to create a dev container using VS Code.
References
- Dev Containers Specification
- Dev Container Repository
- Dev Container Templates
- Visual Studio Code Dev Containers
- IntelliJ Dev Containers
- ISE Dev Containers: Getting Started
- Dev Containers How To
- Dev Containers Overview
Attribution
The cover image is referenced from Dev Containers Overview