Announcing DevOps style deployments using Visual Studio 2015 Preview and Azure
While most teams realize integrating the development processes with the operation processes can return a ton of value –such as decreased release cycle times and much improved response times to live sight incidents most teams aren’t integrated due to the tools. With Visual Studio 2015 and Azure SDK 2.5 can now deploy your applications to an environment faster and easier than ever. This environment can then be shared across your team in VSO.
Pre-requisites
- Visual Studio 2015 Preview
- Visual Studio Online account. If you don’t have one then sign up for a free account.
- Windows Azure subscription. If you don’t have one then sign-up for a free trial or activate your MSDN Azure account.
- Link your Azure Subscription to your VSO Account. Be sure to associate an Azure Active Directory with your VSO account. Details are in the blog.
- If you don’t already have these, create an Azure storage account and a container from the Azure management portal.
- Create a team-project in VSO.
Getting the latest Web Platform Installer feed with Azure SDK 2.5
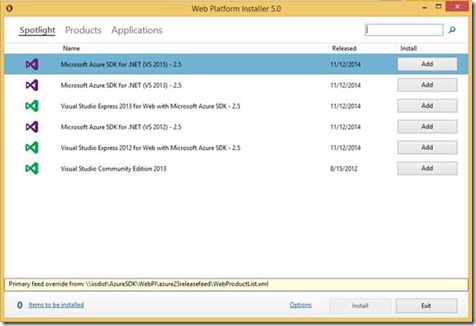
Download and install the Web Platform Installer. Launch the Web Platform Installer.
Install “Microsoft Azure SDK for .NET (VS 2015) – 2.5”.

Confirm that the following components have been installed.

Connect to your Visual Studio Online account
- Open Visual Studio 2015 Preview
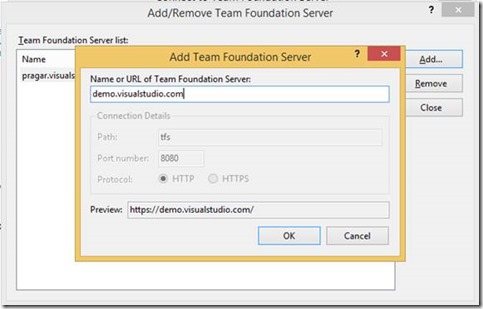
- Click on the menu option Team Explorer Select Team Projects Servers
- Specify the account URL in the “Add Team Foundation Server” dialog.
- Sign in with the Microsoft account that is a member of the VSO account.

Deploying your ASP.NET application
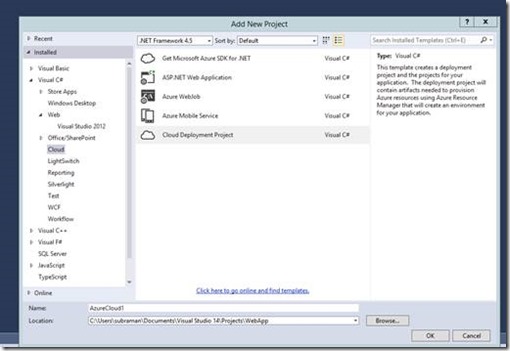
If you don’t have an ASP.NET solution start be creating one.
1. Add a “Cloud Deployment project” to the solution.

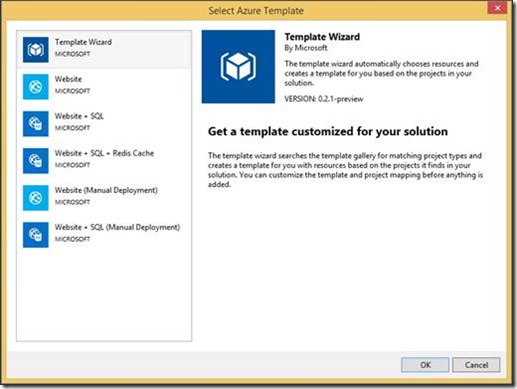
2. Select “template Wizard” option. The wizard inspects the solution and suggests the best fitting deployment template.

Note: For preview, two templates/blueprints wiz. Website and Website + SQL are being shipped. More will be added later-on.
a) Website – Creates a website resource in Azure, and hosts your application on it.
b) Website + SQL – Creates a website resource in Azure, takes the database connection string as input, and hosts you application. The data captured in your website now gets stored in your database.
Choose the template/blueprint that suits your needs. After this, select the “Web Project” that you want to deploy. This project will then get built, and deployed onto your website.
Deploying the solution
For deploying the solution follow the steps below:
1. Right click on the Cloud Deployment Project Deploy New Deployment
2. Choose Environment. If there is an error: “Not connected to a team project” then connect to a VSO team project from the team explorer, and try deploying again.

Creating an Environment
An environment comprises of the Infrastructure on which software runs. These resources may be present on the cloud or on premise.
To deploy the solution, a website is required. The deployment project that was created earlier, also creates a sample template for the website. However, parameters need to be specified for the website. This section provisions a website and deploys the solution.
1. The required parameters are as given below:
2. Subscription: The Azure subscription, where the website will be hosted.
The Azure subscription needs to be registered with the Visual Studio Environment Service. After registering the service all the members in the VSO’s team project can use the subscription to create environments in it.

2. Name: The name of the environment, as well as the, Azure Resource Group.
3. Environment Definition: Select the deployment template that was included in the Deployment project “{SolutionName}-Paas.json”. More details about the Environment Definition is available here.
4. Location: The Azure data centre where the environment add its associated Resource group will be deployed.
5. Shared: Sharing an environment with the team, enables every member of the team to perform operations on the environment like deploy, start, stop, delete.
6. Parameters: The environment parameters are required to create the environment from the environment definition. The parameters are parsed from the Environment Definition.
2. After all the mandatory parameters have been specified, click on the deploy button.
Deployment in progress. (Behind the curtains)
1. Open the output window and select the “Deployment” tag.
2. The following sequence of activities happen when the deployment operation commences:
- The deployment template is compiled to check for syntax errors. The DSC dependencies are ascertained and compiled with the deployment template.
- The project is built and then uploaded to the Azure storage account. The storage account used is the one listed in the parameter: drop location.
- After the upload to the storage account is complete, the Environment Service starts the provisioning and deployment of the environment.
- It takes 6 to 10 minutes to compile, upload, provision, and deploy the environment.
- After the deployment succeeds, the status of the environment changes to “ready”. The resources tab lists all the resources that have been provisioned for the environment.

3. Navigate to “sitename”.azurewebsites.net to verify that the website is running.
Re-deploy your website
1. To re-deploy an updated solution: Click on the cloud deployment toolbar Select Environment Click Next. To enable the cloud deployment toolbar, right click on the VS toolbar Select “Cloud Deployment”.
2. Verify all the inputs.
3. Click on the “Deploy” button.
4. Navigate to the website after the deployment has completed.
Frequently Asked Questions
What is a cloud deployment project?
A Cloud Deployment Project captures the deployment logic of your solution and thus facilitates Infrastructure as Code.
A major component of the Project is the Azure CSM (Cloud Service Model) file, also known as the Deployment Template. It is a JSON file which contains details about the Azure resources to be provisioned and the binaries that go into each of the resources.
What is the difference between a Resource Group and an Environment?
Azure Resource Manager allows you to group multiple resources as a logical group which serves as the lifecycle boundary for every resource contained within it. Typically a group will contain resources related to a specific application. For example, a group may contain a Website resource that hosts your public website, a SQL Database that stores relational data used by the site, and a Storage Account that stores non-relational assets.
An Environment is a wrapper over Resource Group which lets you track activities that are performed as a part of the application lifecycle, such as builds, test runs, releases. You can also manage environments by specifying access control permissions and retention policies.
Why do I need to register a subscription with the Environment service?
When creating environments, the Environment service makes calls to Azure on behalf of the user, and hence a subscription needs to be registered first.
Who can use these subscriptions?
A subscription is registered with a team project, and every member of the team project can use this subscription.****

 Light
Light Dark
Dark
0 comments