Building on my first Azure SQL Bindings blog post and taking inspiration from Drew Skwiers-Koballa’s post on SQL Bindings, we are going to create a change data stream with Azure SQL Database. Now, usually, the first part of these blogs is a prerequisite section that goes over what you need to install locally to get started. From talking to many of you in person and getting questions/emails on this process, this post is going to use GitHub codespaces; nothing to install locally or configure. I’ve created a project here that you can fork and create a codespace to get you up and running in minutes.
Starting the codespace
GitHub Account Needed!
You do need a free GitHub account to use codespaces. You can sign up for one
here!
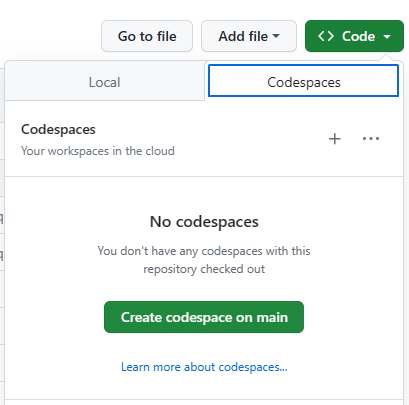
To start a codespace, just fork the project located here. Then, click the green Code button on the forked repository. Click the Codespaces tab followed by clicking the green Create codespace on main button.

This will create the codespace using the devcontainer.json file in the .devcontainer directory. Once the codespace is up and running, it will then run the install-dev-tools.sh file in the scripts directory to configure the codespace with all the necessary tools for this blog post and for developing with the Azure SQL Database in general.
Change data stream components
For this project, we are going to use the following services/features locally in the codespace and in Azure.
Create a table with change tracking
Once, the codespace has started up, go to the terminal and issue the following commands. We are going to create a directory for our database objects and a SQL Database Project:
mkdir database
cd database
dotnet new sqlproj -n "devDB" -tp "SqlAzureV12"

sqlproj in a nutshell
Here’s a breakdown of the command:
- dotnet new sqlproj: This is a command from the .NET CLI used to create a new SQL Server Database Project. It generates a project file with the .sqlproj extension, which can be used to manage database schemas, scripts, and related artifacts.
- -n “devDB”: This is an optional parameter specifying the name of the project or the database. In this case, it’s set to “devDB,” indicating that the project or database will be named “devDB.”
- -tp “SqlAzureV12”: This is another optional parameter that specifies the target platform for the project. In this case, it’s set to “SqlAzureV12,” indicating that the project is targeting SQL Server Azure version 12.
Now, click on the SQL Database Projects extension in codespaces
and click the Open existing green button. The project file is located at /workspaces/codespace-for-DB-Devs/database/devDB/ and named devDB.sqlproj.
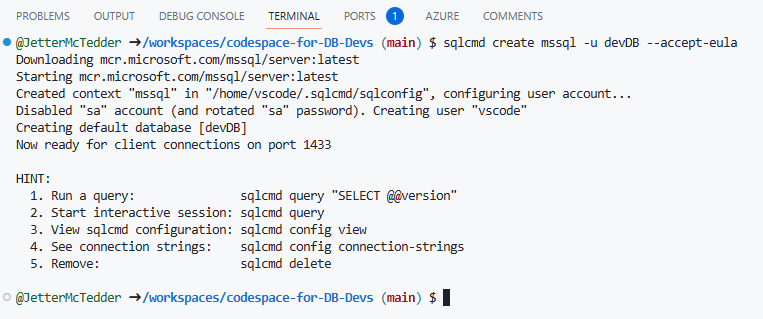
Use the next command in the terminal to create a SQL Server 2022 database right in your codespace. Yes, you heard that right…we can create a full SQL Server 2022 database in a codespace!
sqlcmd create mssql -u devDB –accept-eula
go-sqlcmd
Learn all about the new sqlcmd
here!
In a few short minutes, the database will be created within docker and ready to be used. Before we move on from the terminal, run the following command to get the username and password of the database:
sqlcmd config connection-strings
This command will provide the connect strings for various languages: ADO.NET, JDBC, GO, ODBC, and SQLCMD.
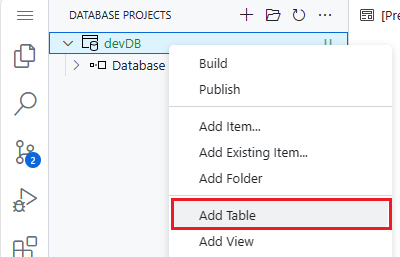
Create a table in SQL Database Projects
Back in the SQL Database Projects extension, right click the project and select Add Table.
In the Add Table dialog window, name the table customer and press enter.
It creates a skeleton customer table script for you.
Replace that code with the following:
CREATE TABLE [dbo].[customer] (
    [customer_id]        INT            IDENTITY (1, 1) NOT NULL PRIMARY KEY CLUSTERED ([customer_id] ASC),
    [customer_name]      NVARCHAR (200) NOT NULL,
    [customer_email]     NVARCHAR (200) NOT NULL,
    [customer_address]   NVARCHAR (500) NOT NULL
);

and SAVE the file.
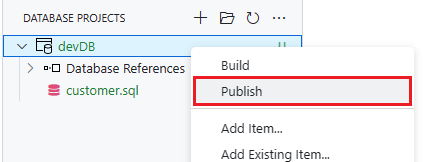
Publish to the local database
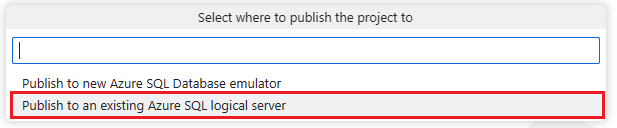
SQL Database Projects provides the ability to publish the database code added to the project to a database. Using this ability, the code can be deployed into the local SQL Server 2022 image that was created in this codespace with sqlcmd. Start by right clicking the project and select Publish.
After selecting Publish, the Publish dialog box will appear. For the first step, select “Publish to an existing Azure SQL logical server“
Next, select “Don’t use profile“
The next series of steps will create a connection profile to the locally running database. In the dialog, select “Create Connection Profile“
Now, Use “localhost” as the server name, then press Enter.
Use “devDB” as the database name, then press Enter.
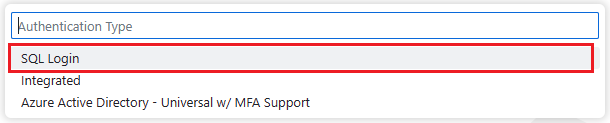
In the Authentication Type dialog box, select “SQL Login“.
Here is where it is best to refer back to the command “sqlcmd config connection-strings” to find the username and password. Run it again at the terminal to get the values if needed.
In the User name (SQL Login) dialog box, enter the user from the connect strings. It should be vscode, then press Enter.
and provide the password from the connect strings in the Password (SQL Login) dialog box, then press Enter.
Select “Yes” so that the password is saved (encrypted) on the connection profile
Provide a profile name in the last dialog box but this step is optional. Press Enter to finish the connection profile process.
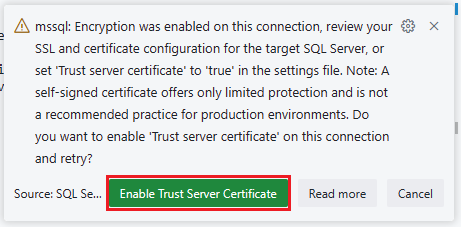
After pressing Enter and the connection profile is verified, a warning box will appear on the lower right of the screen. This warning is indicating that due to new security features within the database, you need to enable the self-signed certificate. Click the Enable Trust Server Certificate green button to continue.
You may be asked to choose a database. If so, choose devDB
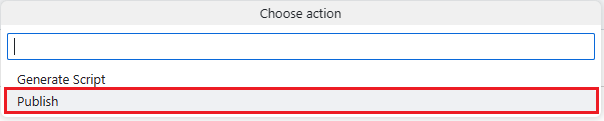
For the Action step, there are two options. Choose the Generate Script option to create publish scripts for the project. This is very useful for adding to CICD flows. Choose Publish to immedietly deploy the objects to the database chosen in the connection profile. For this project, choose Publish.
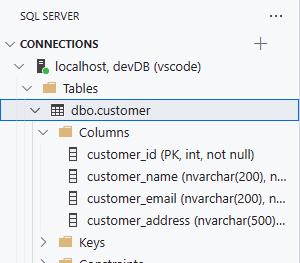
Viewing the published table
Upon choosing Publish, the project will build and then deploy to the database. Once finished
click the SQL Server extension
to view the connection profile we just created
Expand the Table folder to see the customer table and it’s columns
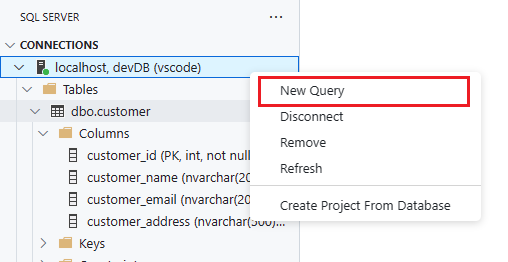
Enable change tracking
In the SQL Server extension, right click on the connection profile and select New Query.
This will open up a new query sheet where SQL commands can be run. The table needs change tracking enabled for the SQL bindings trigger to work correctly.
The first command to be run will enable change tracking in the database.
ALTER DATABASE [devDB]
SET CHANGE_TRACKING = ON;
GO
then enable change tracking on the customer table:
ALTER TABLE [dbo].[customer] ENABLE CHANGE_TRACKING;
GO
In this section, you created a SQL Database project, created a database right in your codespace with a single command, and published objects from the SQL Database project directly into the locally running database. The next section will create an Azure Function in which to house the SQL Bindings Trigger to watch for data changes.
Create an Azure Function
Back in the terminal at the bottom of the page,
Back to the terminal
You may have to click the terminal tab on the window bar on the bottom of the page. When you deployed the SQL Database Project, it may have moved from the terminal window to the Output window.
issue the following command to change the directory back to the top level of this project:
cd /workspaces/codespace-for-DB-Devs
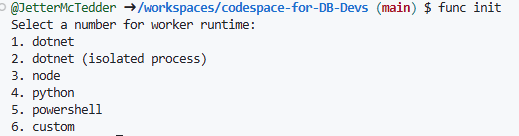
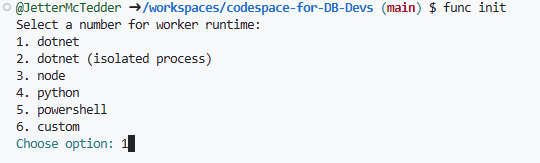
then, issue the following command to start the function creation process:
func init
Upon issuing that command, you will be presented with a choice of frameworks for this function to use.
The framework/runtime for this project is dotnet so enter 1, then press enter.
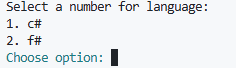
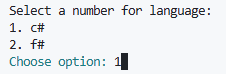
The next option is to choose a language.
C# is used for this project so again, enter 1, then press enter.
When this process is finished, click the File Explorer extension to see the new files that were created for you.
Adding necessary libraries to the project
Next, we need to add some package references to the project (for SQL Bindings and Azure Event Hub). The following commands will add these references to the codespace-for-DB-Devs.csproj file.
Run the following commands in the terminal:
dotnet add package Microsoft.Azure.WebJobs.Extensions.Sql --prerelease

dotnet add package Azure.Messaging.EventHubs
dotnet add package Microsoft.Azure.WebJobs.Extensions.EventHubs

Create the customer class object
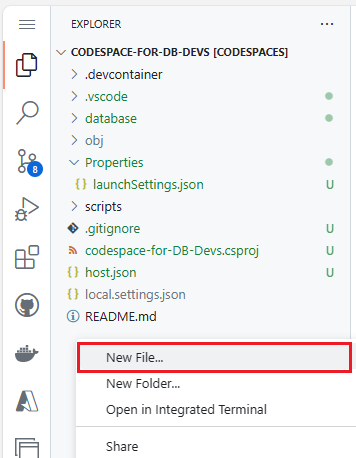
We are going to create a customer class object file. To create a new file in codespaces, right click below the files in the file explorer extension and select New File.

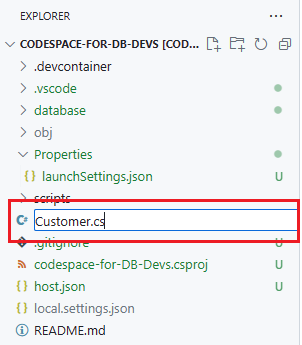
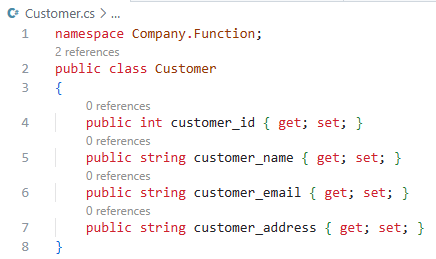
Name this file Customer.cs and press enter.

If the new file has not opened up for you in codespaces, select this file by right clicking on it. Copy and paste the following code into the Customer.cs file to create the customer class object.
namespace Company.Function;
public class Customer
{
    public int customer_id { get; set; }
    public string customer_name { get; set; }
    public string customer_email { get; set; }
    public string customer_address { get; set; }
}
and SAVE the file.
Create the SQL trigger function
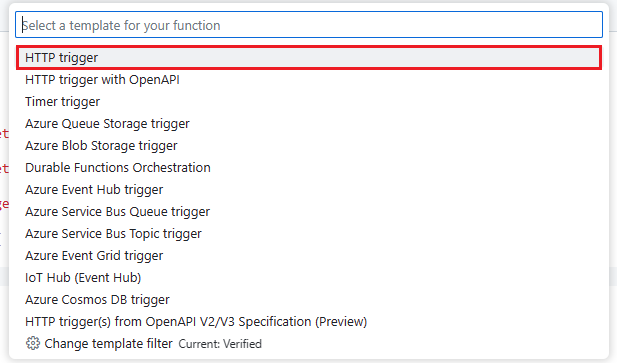
The next step is to create an Azure Function. Start by pressing F1 or Shift-Ctrl-P to bring up the command palette.
Enter “create function” into the text field and then select Azure Functions: Create Function.
A dialog box will appear in the center of the screen asking to “Initialize project for use with VS Code?”. Click Yes in the dialog box.
In the following dialog box, Select “HTTP Trigger” as the function template.
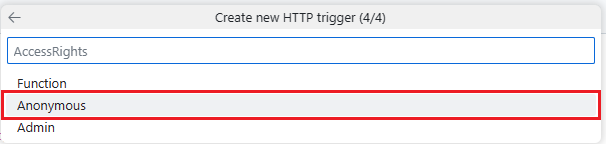
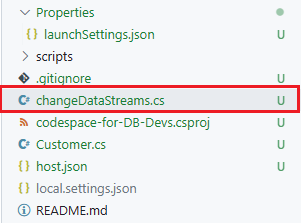
Now, on step 2, name the Function changeDataStreams in the next dialog box, and then press Enter.
Step 3 is for the function namespace. Accept the default namespace of Company.Function, and then press Enter.
In step four, select “Anonymous” for AccessRights.
Looking at the file explorer, there will be a new file called changeDataStream.cs which should also automatically open up in codespaces for you.
Adding the SQL Bindings code
If the file is not already open, open the file by right clicking on it. Replace the code in the file with the following:
using System.Collections.Generic;
using Microsoft.Azure.WebJobs;
using Microsoft.Extensions.Logging;
using Microsoft.Azure.WebJobs.Extensions.Sql;
using System.Threading.Tasks;
using System.Text.Json;
namespace Company.Function;
public static class streamCustomers
{
    [FunctionName("changeDataStream")]
    public static async Task RunAsync(
        [SqlTrigger("[dbo].[customer]", "SqlConnectionString")]
            IReadOnlyList<SqlChange<Customer>> changes,
        ILogger logger)
   {
      foreach (SqlChange<Customer> change in changes)
      {
          var customer = JsonSerializer.Serialize(change.Item);
          var message = $"{change.Operation} {customer}";
          logger.LogInformation(message);
        }
    }
}
and SAVE the file. This code uses the SQL trigger binding to watch the customer table for changes. When it sees a change, it will fire and so something for each change. Here, in this code, we are just logging the data change to the terminal.
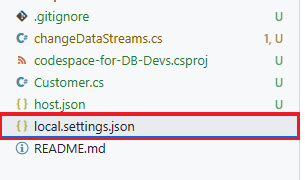
Now that the function code is done, we need to provide it a value for SqlConnectionString. This variable can be places in the local.settings.json file and contain the connect string for our locally running database.
Open the local.settings.json file and add the following line just below the “Values”: { section:
"SqlConnectionString": "Server=localhost,1433;Database=devDB;User ID=vscode;Password=XXXXX;Encrypt=True;TrustServerCertificate=True;Connection Timeout=30;",

and be sure to replace the XXXXX with the password of the database that was created before. If you forgot the password, run the following in the terminal to find it again:
sqlcmd config connection-strings
And remember to SAVE the file when done.
Test the trigger
Time to test the trigger and see if it catches changes to the customer table in the database. At the terminal run the following command to start the Azure Function:
func host start

and once the function is started, open a new query sheet for the devDB database

and issue the following SQL insert statement:
insert into dbo.customer values(N'Bill', N'bill@computer.commm', N'Anytown, Anycity 12345');
You should see the following in the terminal window indicating the trigger binding did see the change:
[2023-05-11T19:18:03.124Z] Executing 'changeDataStream' (Reason='New change detected on table '[dbo].[customer]' at 2023-05-11T19:18:03.0902305Z.', Id=541ff09e-54ac-48e8-8d17-bbcc9a451432)
[2023-05-11T19:18:03.176Z] Insert{"customer_id":1,"customer_name":"Bill","customer_email":"bill@computer.commm","customer_address":"Anytown, Anycity 12345"}
[2023-05-11T19:18:03.195Z] Executed 'changeDataStream' (Succeeded, Id=541ff09e-54ac-48e8-8d17-bbcc9a451432, Duration=93ms)

Passing change data to the Azure Event Hub
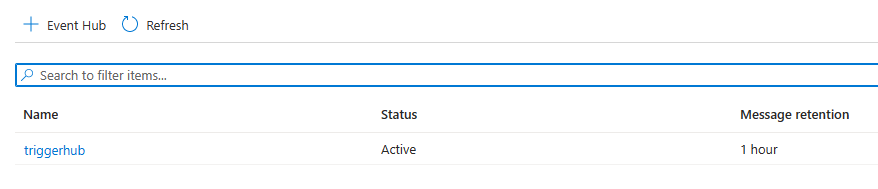
This next section uses an Azure Event Hub for passing the change data events from the database to the hub for processing/routing. You can use this
quickstart to create an Azure Event Hub in the Azure Portal and only need to create one in the Basic Tier; the lowest cost tier.
In the terminal window, press Ctrl-C to stop the function and open the changeDataStream.cs file if not already open in codespaces.
Replace the code in that file with the following new code:
using System.Collections.Generic;
using Microsoft.Azure.WebJobs;
using Microsoft.Extensions.Logging;
using Microsoft.Azure.WebJobs.Extensions.Sql;
using System.Threading.Tasks;
using Azure.Messaging.EventHubs;
using System.Text.Json;
namespace Company.Function;
public static class streamCustomers
{
    [FunctionName("changeDataStream")]
    public static async Task Run(
        [SqlTrigger("[dbo].[customer]", "SqlConnectionString")]
            IReadOnlyList<SqlChange<Customer>> changes,
        [EventHub("HUB_NAME", Connection = "EventHubConnectionAppSetting")]
            IAsyncCollector<EventData> outputEvents,
        ILogger logger)
    {
        foreach (SqlChange<Customer> change in changes)
        {
            var customer = JsonSerializer.Serialize(change.Item);
            var message = $"{change.Operation} {customer}";
            logger.LogInformation(message);
            await outputEvents.AddAsync(new EventData(message));
        }
    }
}
Replace HUB_NAME with the name of the hub that was created when the Azure Event Hub was set up.
The difference between this new code and the previous version is that once we get into the section
foreach (SqlChange<Customer> change in changes), not only are we still logging the result to the terminal, but we are also sending this change event over to an Azure Event Hub using
Event Hub bindings for Azure Functions.
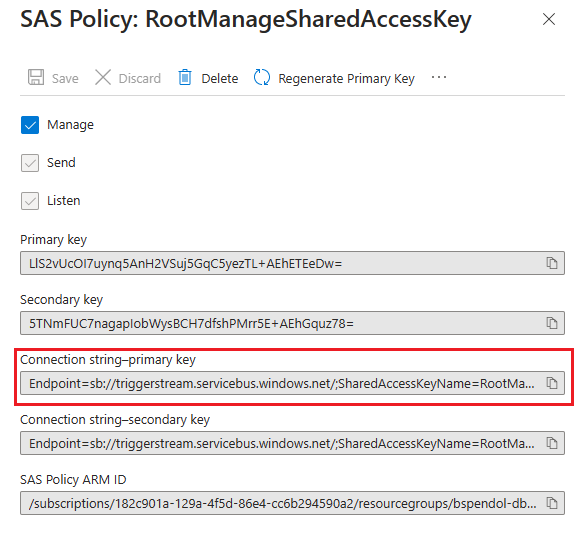
Next, open the local.settings.json file again and add the following entries under the SqlConnectionString entry:
"EventHubConnectionAppSetting": "XXXXX",

Not sure on where to find the connection string? You can read how to find it
here.
Once the value have been replaced in the local.settings.json file, SAVE the file and restart the function:
func host start
Using the query sheet again, issue another SQL insert statement:
insert into dbo.customer values(N'Ellie', N'ellie@computer.commm', N'Anytown, Anycity 12345');
In the terminal, there should be another JSON message indicating that the trigger binding has fired
[2023-05-12T21:47:03.447Z] Executing 'changeDataStream' (Reason='New change detected on table '[dbo].[customer]' at 2023-05-12T21:47:03.4465111Z.', Id=5c7077d5-cec9-424a-bc51-17f08b8677bb)
[2023-05-12T21:47:03.448Z] Insert {"customer_id":2,"customer_name":"Ellie","customer_email":"ellie@computer.commm","customer_address":"Anytown, Anycity 12345"}
[2023-05-12T21:47:03.561Z] Executed 'changeDataStream' (Succeeded, Id=5c7077d5-cec9-424a-bc51-17f08b8677bb, Duration=114ms)
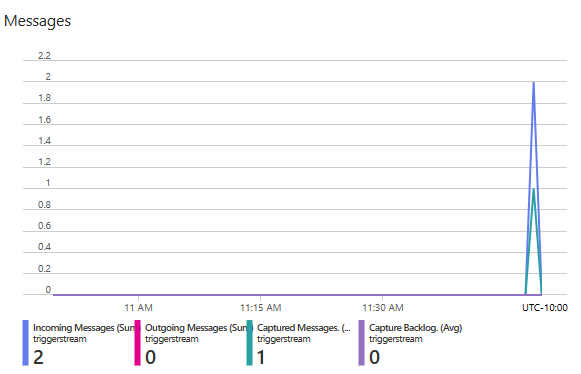
and if you look at the Azure Event Hub in the Azure Portal, you can see a message has been queued.
Congratulations! You have created a change data stream using SQL Server 2022/Azure SQL Database, Azure Functions, Azure Event Hub, and SQL Bindings! It is pretty amazing the small amount of code you need to work with services within Azure. Both the interaction with the database and the event hub we single lines of code; so easy and simple to understand and implement.
Passwordless Authentication
In this project, we placed the connect string of the database into the local.settings.json file with a password. While this is fine for local development, it will not be appropriate for production deployments in Azure. To solve this challenge, we can replace the user/password in the file with a managed identity. This will allow the connect string to look like the following:
Server=productiondatabase.database.windows.net; Authentication=Active Directory Managed Identity; Database=prodDB
This is a much more secure option and removes the ability for someone to find a password and user in a connect string. There is a tutorial on how to set this up
here. You can also migrate away from SAS tokens with the Event Hub connection string to managed identity as well. The tutorial on how to used functions with managed identity is
here.
Outbox pattern with stored procedures
A popular pattern for change data capture is the outbox pattern. Here, you create a table that contains committed transactions that separate from the base table where the transactions originate. This helps with transaction integrity and assists with rollbacks. To implement this pattern here, I would create a set of stored procedures for the CRUD operations on a table (Sometimes called Table APIs). In these stored procedures, not only do you write to the main table, but you also write to this outbox table. You can even include the operation that was performed and a message ID in this outbox for better routing and sorting on the hub as well as keeping the transactions in order.
Keep an eye out for either a follow up to this post with these two topics discussed in depth or a full scale workshop/lab encompassing everything here.


0 comments