
![]() The users of your application should always be at the center of the functionality you implement. With the beautiful, seamless user experiences that exist in popular mobile apps today, users have high expectations for a great mobile experience. Adding handoff to your iOS apps helps easily deliver a seamless user experience between Apple devices logged into the same iCloud account. Also known as Continuity, Handoff was introduced by Apple in iOS 8 and OS X Yosemite. It allows users to start an activity on one of their Apple devices and continue that same activity on another of device. Have you ever noticed an app icon on the bottom left corner of your iPhone’s lock screen? This was an app giving you the option to continue an activity that you had already started on your iPad or your Mac. In this blog post, I will explain how to implement handoff in your iOS apps and the improvements Apple has added to the Handoff APIs in iOS 9, specifically to NSUserActivity.
The users of your application should always be at the center of the functionality you implement. With the beautiful, seamless user experiences that exist in popular mobile apps today, users have high expectations for a great mobile experience. Adding handoff to your iOS apps helps easily deliver a seamless user experience between Apple devices logged into the same iCloud account. Also known as Continuity, Handoff was introduced by Apple in iOS 8 and OS X Yosemite. It allows users to start an activity on one of their Apple devices and continue that same activity on another of device. Have you ever noticed an app icon on the bottom left corner of your iPhone’s lock screen? This was an app giving you the option to continue an activity that you had already started on your iPad or your Mac. In this blog post, I will explain how to implement handoff in your iOS apps and the improvements Apple has added to the Handoff APIs in iOS 9, specifically to NSUserActivity.
Introducing the NSUserActivity
One thing that you need to know for this blog post is exactly what a NSUserActivity is and how it works. The NSUserActivity class is the primary object in a Handoff exchange and is used to encapsulate the state of a User Activity that is available to pass between Apple devices. Here’s a diagram of what a Handoff looks like:

In this diagram you’ll notice that the devices need to be logged into the same iCloud account. You can get more details about NSUserActivity class from Apple’s documentation.
NSUserActivity for iOS 9
In iOS 9, the NSUserActivity class that is used for Handoff now gives developers some additional benefits. In iOS 8, Activities were only used for Handoff, but with the release of iOS 9 Activities are used for App Search, Siri Suggestions, and Siri Smart Reminders. This means it’s very easy to add App Search capabilities to an app that is already using Handoff, or vice versa!
How To Implement Handoff
Implementing Handoff in a Xamarin.iOS app requires you to create a User Activity Object, update the object’s state to track the activity, and continue the activity on a receiving device. For this post, we are going to use an app that has four tabs, each with a web browser in them, and Handoff the most recent tab to another device.
Note: Please make sure you enable Handoff in your Xamarin app before you start adding the new functionality.
Getting Set Up
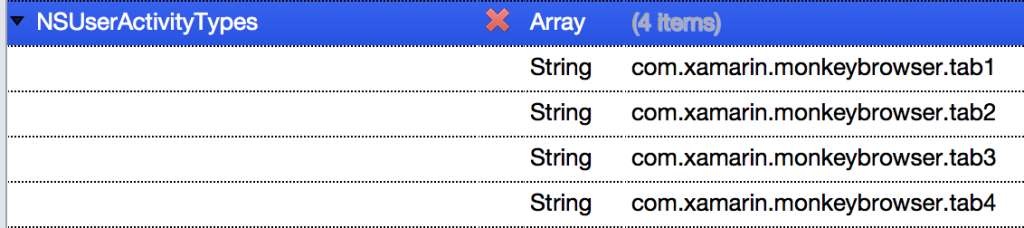
1. Add NSUserActivityTypes to your info.plist.
a. Since I have four tabs in my app, I’m going to add four Activity Types to my info.plist file like this:
2. Add NSUserActivity constants to AppDelegate.
a. Notice that my constants are consistent with the values in my info.plist.
public NSString UserActivityTab1 = new NSString ("com.xamarin.monkeybrowser.tab1");
public NSString UserActivityTab2 = new NSString ("com.xamarin.monkeybrowser.tab2");
public NSString UserActivityTab3 = new NSString ("com.xamarin.monkeybrowser.tab3");
public NSString UserActivityTab4 = new NSString ("com.xamarin.monkeybrowser.tab4");
Creating a NSUserActivity
In my app, I want to create a new NSUserActivity each time a user enters a new URL in the WebView.
1. On each ViewController, I want to add a public NSUserActivity object:
public NSUserActivity UserActivity { get; set; }
2. Now, in the method used to navigate to a new URL, I’ll create a new NSUserActivity (after invalidating the existing one:
if (UserActivity != null) {
     UserActivity.Invalidate();
     UserActivity = null;
}
UserActivity = new NSUserActivity (ThisApp.UserActivityTab1){
     Title = "Weather Tab",
     SupportsContinuationStreams = true
};
3. Finally, I’ll add some User Info to the new Activity and I’ll make it the Current activity.
var userInfo = new NSMutableDictionary ();
userInfo.Add (new NSString ("Url"), new NSString (url));
UserActivity.AddUserInfoEntries (userInfo);
UserActivity.BecomeCurrent ();
Continuing an Activity
1. Add a PerformHandoff method to each ViewController:
public void PerformHandoff(NSUserActivity activity)
{
     var url = activity.UserInfo ["Url"].ToString ();
     URL.Text = url;
     WebView.LoadRequest(new NSUrlRequest(NSUrl.FromString(url)));
     UserActivity = activity;
     UserActivity.BecomeCurrent ();
}
2. Add properties to UIApplicationDelegate for each ViewController so that I can access the PerformHandoff method I just implemented:
public FirstViewController Tab1 { get; set; }
public SecondViewController Tab2 { get; set;}
public ThirdViewController Tab3 { get; set; }
public FourthViewController Tab4 { get; set; }
3. Override the ContinueUserActivity method in App Delegate:
public override bool ContinueUserActivity (UIApplication application, NSUserActivity userActivity, UIApplicationRestorationHandler completionHandler)
{
     switch (userActivity.ActivityType) {
          case "com.xamarin.monkeybrowser.tab1":
	       Tab1.PerformHandoff (userActivity);
	       completionHandler (new NSObject[]{Tab1});
	       break;
	  case "com.xamarin.monkeybrowser.tab2":
	       Tab2.PerformHandoff (userActivity);
	       completionHandler (new NSObject[]{Tab2});
	       break;
	  case "com.xamarin.monkeybrowser.tab3":
	       Tab3.PerformHandoff (userActivity);
	       completionHandler (new NSObject[]{Tab3});
	       break;
	  case "com.xamarin.monkeybrowser.tab4":
	       Tab4.PerformHandoff (userActivity);
	       completionHandler (new NSObject[]{Tab4});
	       break;
     }
     return true;
}
Additional Resources
We have a detailed Introduction to Handoff guide that has more screenshots and details on how to gracefully handle failures with handoff, best practices, and more. There’s also a sample handoff app for iOS 8 that you could easily add some code to that makes each of the NSUserActivity used for Handoff searchable through spotlight.