Welcome back to our third and final post on using the Visual Studio 3D Starter Kit! If you read our previous posts in this series (here and here), you’ve got an app that has an animated die, and you’re ready to make the last few changes to get this app to run on Windows RT devices and Windows Phone 8.
If you haven’t read the previous posts, you may want to go through these posts and create an app – we’ll be here once you’re ready.
If you’re more of a visual learner, you might prefer following Part 1 and 2 in our new Channel 9 video! In less than 30 minutes you’ll go from zero to jumping dice!
Final steps for Windows RT
Since current Windows RT devices have a graphics card with D3D_FEATURE_LEVEL_9_1 and the Visual Studio Graphics tools generate shaders for graphics cards with D3D_FEATURE_LEVEL_10_0 and above, there’s one small extra step that has to be done for this app to run on Windows RT: we need to generate a version of the shaders to be compiled for the correct feature level.
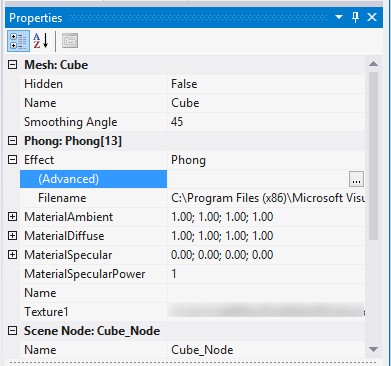
To do that, open your mesh (Die.fbx) and click the cube. On the Properties tool window look for a property called Effect. Click the “+” button to the left of that property and select the (Advanced) value. Finally, click the “…” button to open the shader source for the Phong effect.
What you see now is the default shader that Visual Studio applied to this mesh, displayed in the Visual Studio Shader Designer. The Shader Designer allows you to build complex visual effects without the need to learn a new programming language. To learn more about the Shader Designer, check the documentation and walkthrough on MSDN.
What we want to do with this shader is export it to HLSL in order to be able to re-compile it for Direct3D Feature Level 9 graphics cards. The Starter Kit will automatically look for a fallback shader with the same name as the original in case the device does not support D3D Feature Level 10 or higher.
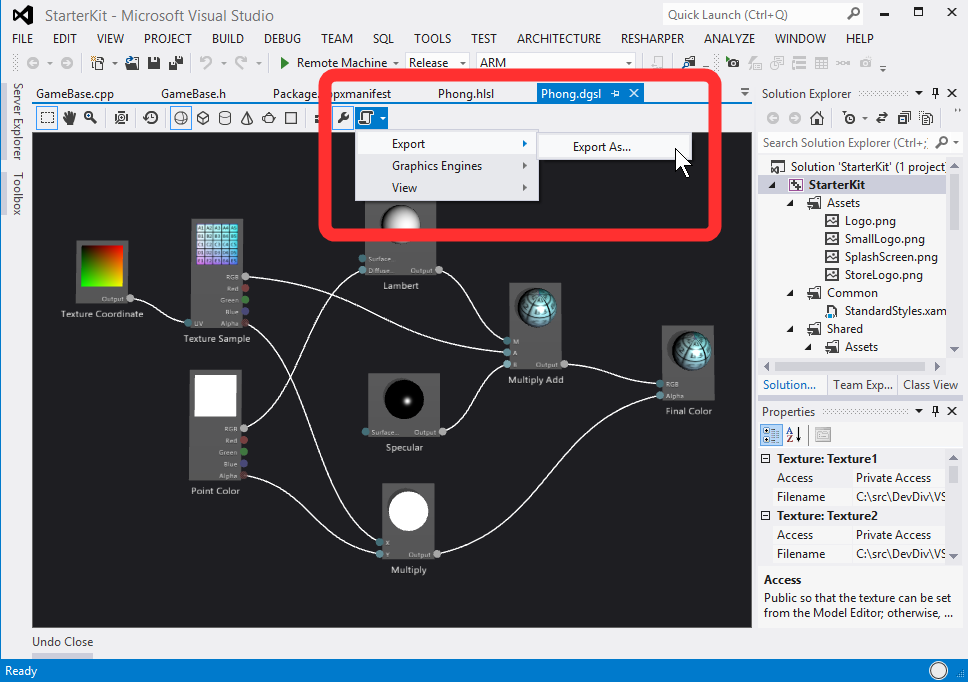
To export this shader, go to the last icon in the toolbar (Advanced) -> Export -> Export as… (see figure below) and save it as “Phong.hlsl” in your Assets folder. Then, add the file to the project by right-clicking the Assets folder on Solution Explorer -> Add -> Existing item… and selecting the file we just exported.
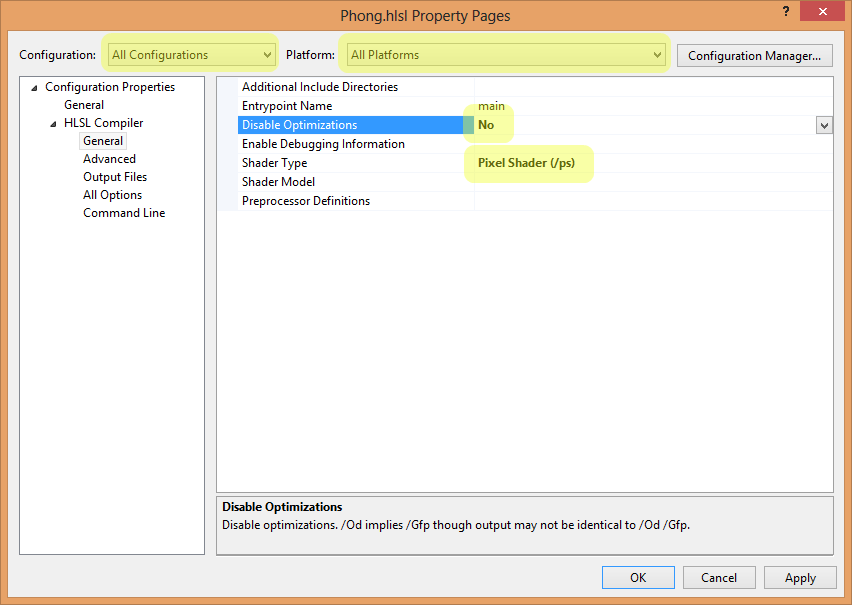
Finally, we need to tell the HLSL compiler that this file is a Pixel Shader. To do that, right-click “Phong.hlsl” on your Solution Explorer and choose Properties. On the Properties page, make sure the “Configuration” drop down is set to “All Configurations” and the “Platform” drop down is set to “All Platforms”, so that the changes we make are applied to all versions of our app.
Then, on the “HLSL Compiler” page, change the Shader Type property to “Pixel Shader (/ps)” and make sure to enable optimizations (set the Disable optimizations property to “No”), like the figure below:
With this step, everything is ready for Windows RT. This app can now be deployed to your favorite device using the Visual Studio Remote Debugging Tools.
Another change you should make before releasing the app for Windows RT is to make sure snap view and portrait mode work as expected. In this case, all we did was to make sure the camera stayed on the same orientation when we change the view, by deleting the following line on the CreateWindowSizeDependentResource() method on Game.cpp:
void Game::CreateWindowSizeDependentResources()
{
    GameBase::CreateWindowSizeDependentResources();
    // (snip) Initialize camera...
    if (aspectRatio < 1.0f)
    {
        ///
        /// portrait or snap view
        ///
        m_graphics.GetCamera().SetUpVector(XMFLOAT3(1.0f, 0.0f, 0.0f));
        fovAngleY = 120.0f * XM_PI / 180.0f;
    }
 // (snip) Lights...
}
You can download the project at this state on CodePlex (direct download link below).
Porting it to the Windows Phone
Using the Starter Kit with support for Windows Phone, porting this app to Windows Phone 8 is a breeze. All you have to do is get the Starter Kit, replace the Game.cpp and Game.h classes by the ones you created for this app, add all your assets (in this case, Die.fbx, DieTexture.png and Phong.hlsl), and change the XAML codebehind to call RollDie() when the screen is tapped. Let’s go over this in a short step by step:
- Make sure you have the Windows Phone 8 SDK installed on your PC.
- Get the Visual Studio 3D Starter Kit with support for Windows Phone and open it in Visual Studio.
- In the StarterKitPhoneComponent project, delete the Shared/Animation folder and delete all the assets from the Shared/Assets folder.
- Replace the Game.cpp and Game.h files by the ones you created in this tutorial.
- Add all the assets used in your game to the Shared/Assets folder in the StarterKitPhoneComponent project: Die.fbx, DieTexture.png and Phong.hlsl.
- For Phong.hlsl, on the Properties page, make sure the “Configuration” drop down is set to “All configurations” and the “Platform” drop down is set to “All Platforms”. Then, on the “HLSL Compiler” page, change the Shader Type property to “Pixel Shader (/ps)” and set the Disable optimizations property to ”No”.
- In Direct3DBackground.cpp/.h, remove the unused methods: ToggleHitEffect() and ChangeMaterialColor()
- In Direct3DBackground.cpp, add the following to the OnPointerReleased() method:
void Direct3DBackground::OnPointerReleased(DrawingSurfaceManipulationHost^ sender, PointerEventArgs^ args)
{
	m_renderer->RollDie();
}
- On MainPage.xaml, remove all XAML related to the counters and app bar.
- On MainPage.xaml.cs, remove all unused fields and methods.
Done! You can now run this app on the Windows Phone emulator or on your Windows Phone 8 device. You may want to tweak the camera position and field of view to get a bigger die on your phone screen.
You can download the final project on CodePlex (direct download link below).
For the future
This app is now complete, but there’s still a lot that can be done to make it shine on the Windows Store. Here are some initial ideas:
- Change the logo, tile icons and splash screen to match the app theme
- Create a cool background, and possibly a “table” where the die is resting
- Add shadows, reflections and other realistic visual effects
- Make the die customizable, translucent, or add rounded edges
- Make the app work with more than one die, or with dice with a different number of sides
- Add realistic physics elements, such as bouncing, force-based spinning, and collision detection
- Save the dice state when the app is suspended and restore afterwards
- Save the history of previous dice rolls
- Add sensor support to allow the dice to be rolled by shaking the device
- Add sound when the dice are rolled
- Use the dice roller to implement a board game or a casino simulator…
Wrapping up
In this blog series you saw how to create a 3D app for Windows 8, Windows RT and Windows Phone with the Visual Studio 3D Starter Kit, sharing all the app logic and assets between all platforms. You also learned a little bit about the Visual Studio Graphics tools, and discovered that creating a 3D app is not a mysterious task – you can start without a deep knowledge of 3D modeling, complex math and HLSL, and learn new concepts at your own pace.
We’d love to hear feedback about this walkthrough, the Visual Studio 3D Starter Kit, or what you’d like to see in the future from Visual Studio for graphics development. Leave us a note in the comments!
Very special thanks to Jennifer Leaf for co-authoring the articles and beta-testing the code. Special thanks to Golnaz Alibeigi for all the help with the video, and Bruno Sonnino and Eric Battalio for reviewing the blog posts.



0 comments