
This is the last in a ten-part blog series where we’ll demonstrate principles of the Cybersecurity Maturity Model Certification aligned with Microsoft Azure. In previous blogs in the series we’ve explored access control, audit & accountability maturity, asset & configuration management, identification & authentication, incident response, maintenance & media protection, recovery & risk management, security assessment & risk management and system & communications protection. In this last blog of the series we will explore how to leverage Microsoft Azure for system & information integrity.
Please note that the information cutoff date for this post is October 2020, and that as of the date of this writing, CMMC developments and guidance are in progress. Additionally, as of the date of this writing, the CMMC Accreditation Body has not certified any the third-party assessors and guidance on the formal assessment process is still under development. As a result, the information herein, including our CMMC related offerings, may be enhanced in the future to align with future guidance from the DoD and CMMC Accreditation Body. Microsoft is closely tracking developments related to the CMMC.
Stay tuned for the upcoming CMMC blogs in the series:
- Access Control Maturity – live
- Audit & Accountability Maturity – live
- Asset & Configuration Management Maturity – live
- Identification & Authentication Maturity – live
- Incident Response Maturity – live
- Maintenance & Media Protection Maturity – live
- Recovery & Risk Management Maturity – live
- Security Assessment & Situational Awareness Maturity – live
- System & Communications Protection Maturity – live
- System & Information Integrity Maturity – this blog
What is Cybersecurity Maturity Model Certification (CMMC)?
The Defense Industrial Base (DIB) is charged with implementing Defense Federal Acquisition Regulation Supplement (DFARS) 252.204-7012. DFARS requires organizations supporting the Department of Defense (DoD) to implement NIST SP 800-171 and FedRAMP Moderate Impact level controls. DoD has mandated CMMC with periodic assessments in order to strengthen cybersecurity across the DIB. CMMC builds upon DFARS 7012 by verifying an organization’s readiness to protect Federal Contract Information (FCI) and Controlled Unclassified Information (CUI) such as International Traffic in Arms Regulation (ITAR) and Export Administration Regulations (EAR) export-controlled data.
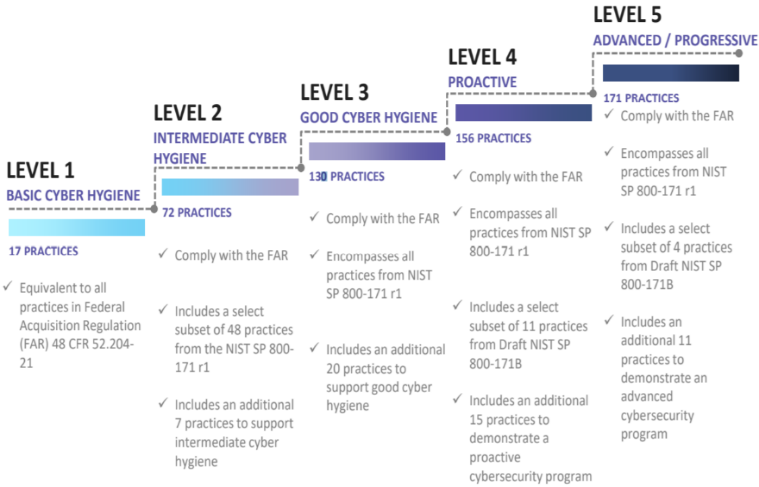
CMMC extends beyond the parent organization into sub-contractors, partners, and suppliers. The framework is intended to enforce critical thinking approaches for comprehensive security. The CMMC framework specifies 5 levels of maturity measurement from Maturity Level 1 (Basic Cyber Hygiene) to Maturity Level 5 (Proactive & Advanced Cyber Practice). The Certification levels will be determined through audits from independent, third-party assessment organizations (C3PAO).
What preparation is required for CMMC alignment to system & information integrity management?
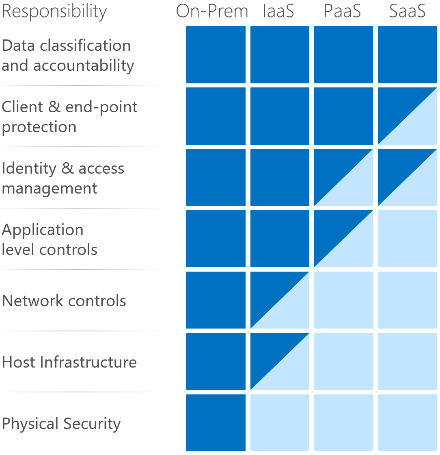
It’s important to understand that compliance is a shared responsibility between the customer and the Cloud Services Provider (CSP). The graphic on the left demonstrates the CSP responsibility in respective cloud models (On-Prem, IaaS, PaaS, SaaS) with dark blue aligning with customer responsibility and light blue aligning with CSP responsibility. For example, CMMC requirements such as Physical Protection (PE) for limiting physical access (C028) is managed by the CSP. Establishment of respective policies and procedures are the customer’s responsibility. It’s important to note that this blog series is aligned with setting the foundation of controls for CMMC Maturity Levels 1 & 2. Once C3PAOs are identified by the CMMC Accreditation Body, customers are advised to work with their respective C3PAO for guidance on comprehensive alignment of controls, audit and certification.
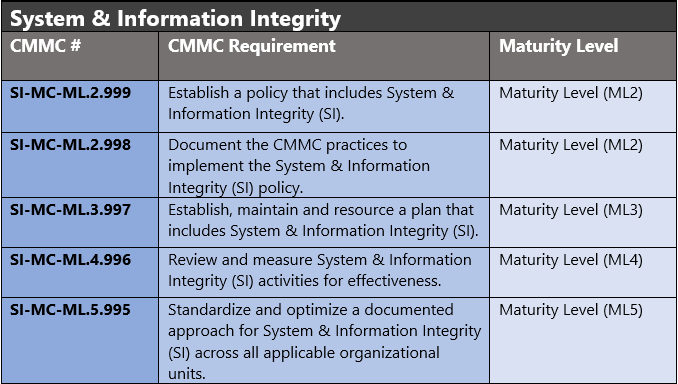
The administrative controls for the CMMC System & Information Integrity Maturity (SI-MC) are listed below. These controls fall within the customer’s responsibility. This starts with establishing polices to include system & information integrity (ML2) and progresses to a documented approach across all applicable organizational units (ML5). These controls should be formally created, documented in the System Security Plan (SSP) and implemented within the organization.
Azure Security Controls Aligned to CMMC: System & Information Integrity
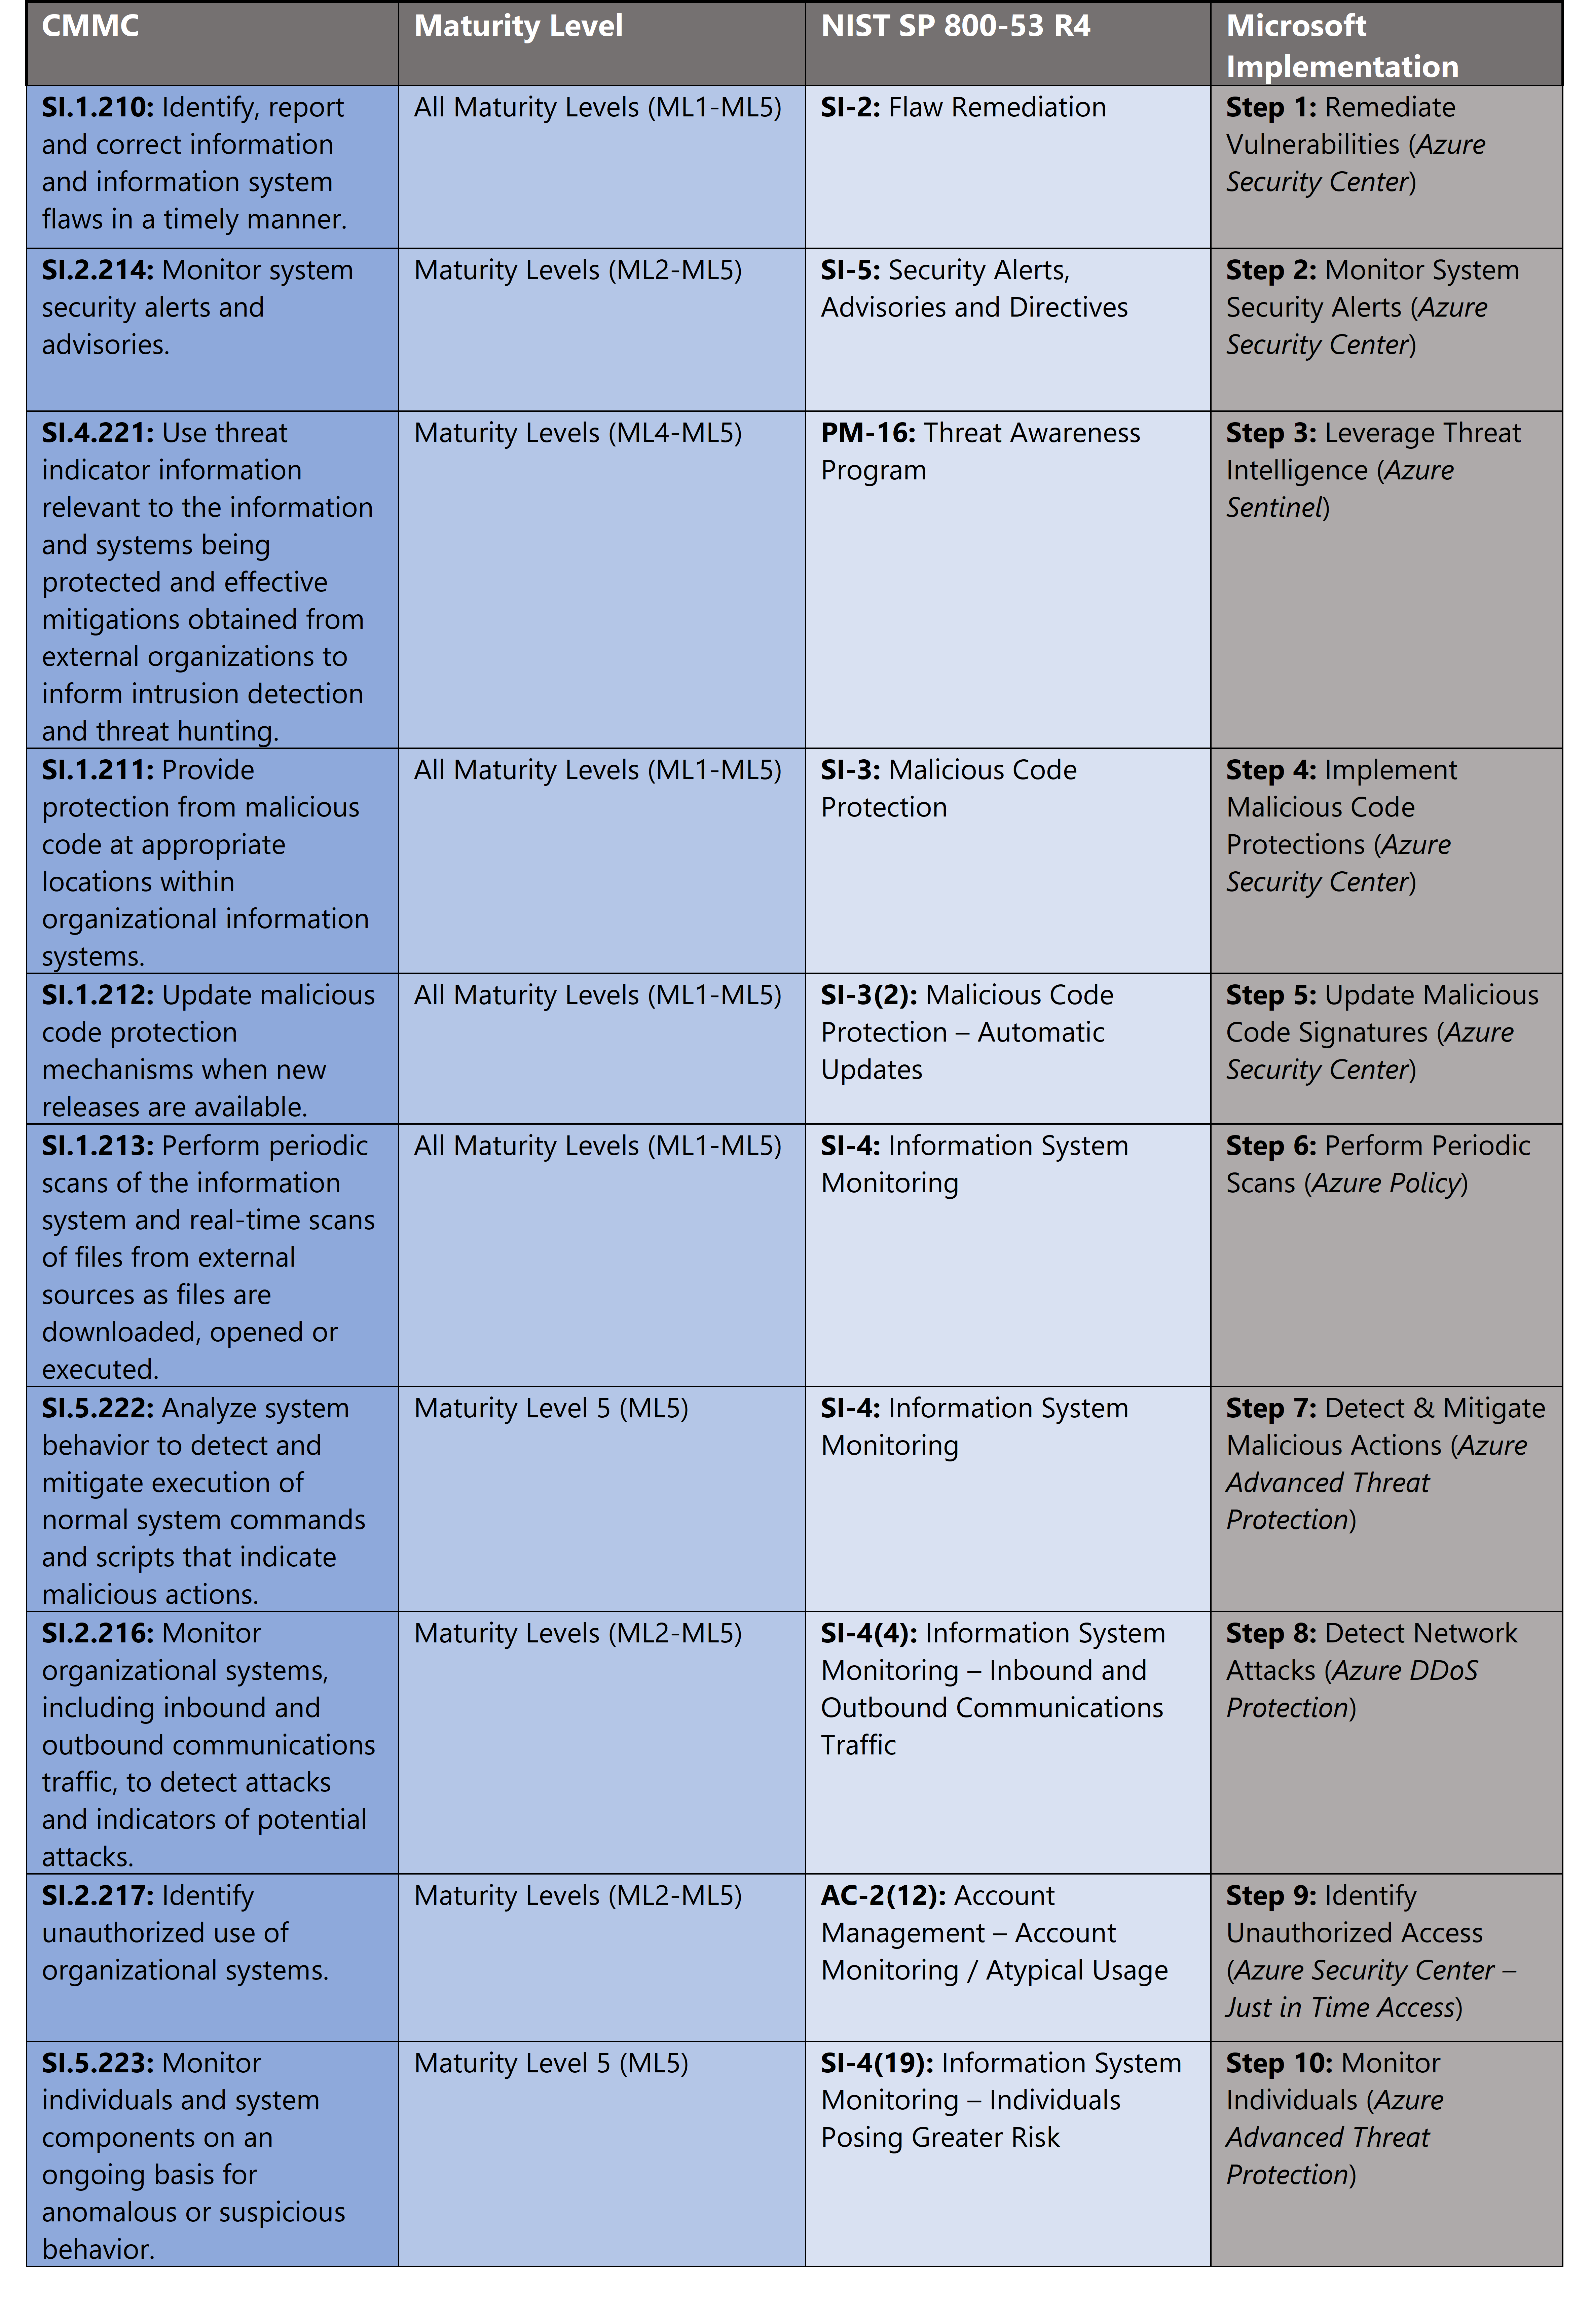
Azure Security Controls Aligned to CMMC: System & Information Integrity
Microsoft Azure Government has developed a 10-step process to facilitate system & information integrity with the security principles within CMMC, NIST SP 800-53 R4 and NIST SP 800-171 standards. Note this process is a starting point, as CMMC requires alignment of people, processes, policy and technology so refer to organizational requirements and respective standards for implementation. Azure has several offerings to facilitate system & information integrity including Azure DDoS Protection, Azure Policy, Azure Advanced Threat Protection, Azure Security Center and Azure Sentinel.
- Azure DDoS Protection Cover all resources on a virtual network when you enable Azure DDoS Protection via simplified configuration. Always-on traffic monitoring provides near real-time detection of a DDoS attack, with no intervention required.
- Azure Policy helps you manage and prevent IT issues with policy definitions that enforce rules and effects for your resources.
- Azure Advanced Threat Protection is a cloud-based security solution that leverages your on-premises Active Directory signals to identify, detect, and investigate advanced threats, compromised identities, and malicious insider actions directed at your organization.
- Azure Security Center is a unified infrastructure security management system that strengthens the security posture of your data centers and provides advanced threat protection across your hybrid workloads in the cloud – whether they’re in Azure or not – as well as on premises.
- Azure Sentinel is a scalable, cloud-native, security information event management (SIEM) and security orchestration automated response (SOAR) solution.
10 Steps to CMMC for System & Information Integrity with Microsoft Azure
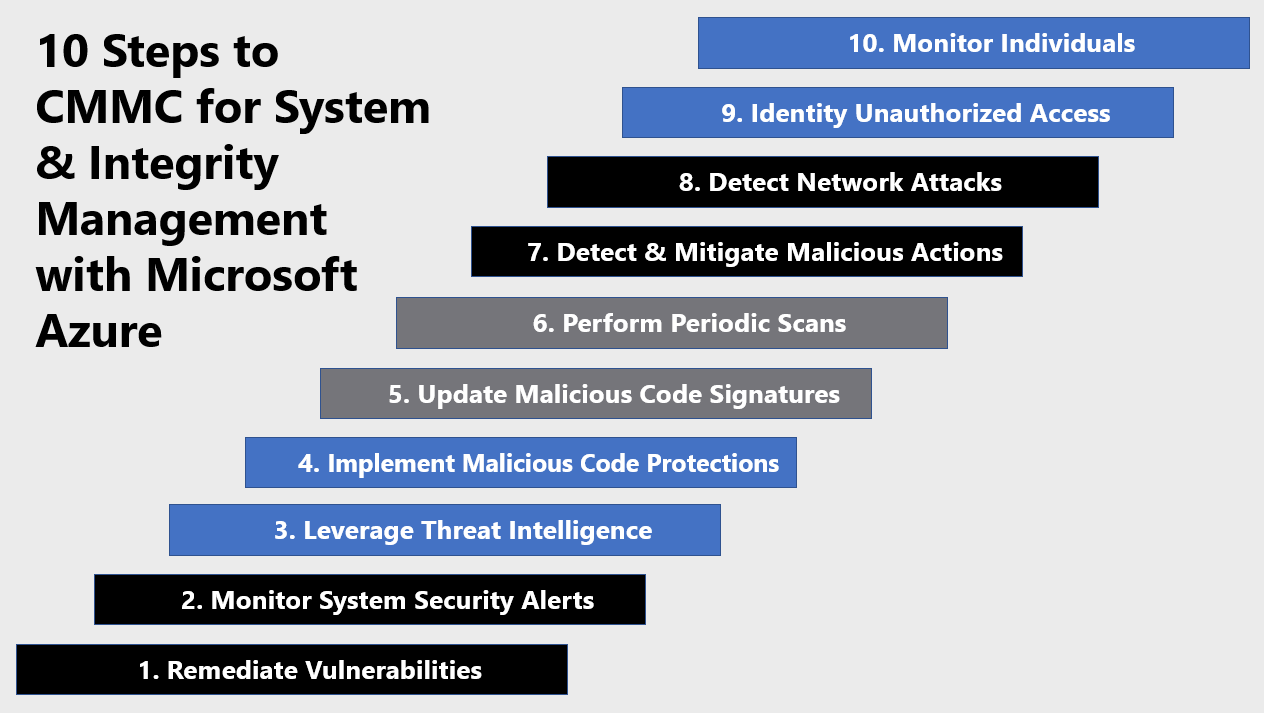
1) Remediate Vulnerabilities
Risk assessment highlights respective vulnerabilities. The severity of risk and it’s assessed impact on your organziation sets a priority list for remediation. Azure Security Center Secure Score highlights vulnerability and rank orders by severity to faciliate remediation. Each recommendation includes detailed remediation steps and respective documenation. Remediating vulnerabilities at scale can be a challenge. What if 1,000 of your virtual machines require a port closed on their host-based firewalls?
In order to simplify remediation of security misconfigurations and to be able to quickly improve your secure score, we are introducing a new capability that allows you to remediate a recommendation on a bulk of resources in a single click. This operation will allow you to select the resources you want to apply the remediation to and launch a remediation action that will configure the setting on your behalf. Single click remediation is available today for preview customers as part of the Security Center recommendations blade. You can look for the 1-click fix label next to the recommendation and click on the recommendation:
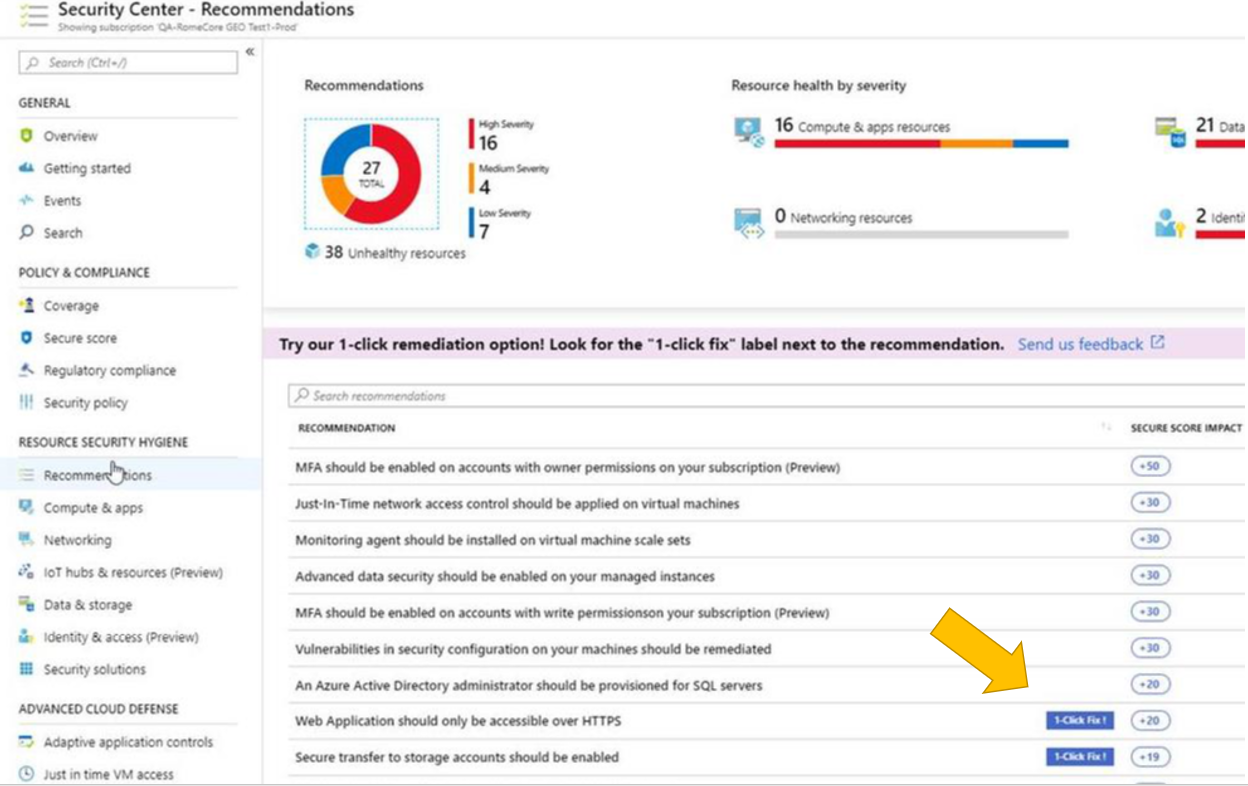
Single click remediation is part of the Azure Security Center free tier. Single-click remediations include policies to fix common vulnerabilities listed below. For more information, see Azure Security Center single click remediation.
- Web Apps, Function Apps, and API Apps should only be accessible over HTTPS
- Remote debugging should be turned off for Function Apps, Web Apps, and API Apps
- CORS should not allow every resource to access your Function Apps, Web Apps, or API Apps
- Secure transfer to storage accounts should be enabled
- Transparent data encryption for Azure SQL Database should be enabled
- Monitoring agent should be installed on your virtual machines
- Diagnostic logs in Azure Key Vault and Azure Service Bus should be enabled
- Diagnostic logs in Service Bus should be enabled
- Vulnerability assessment should be enabled on your SQL servers
- Advanced data security should be enabled on your SQL servers
- Vulnerability assessment should be enabled on your SQL managed instances
- Advanced data security should be enabled on your SQL managed instances
2) Monitor System Security Alerts
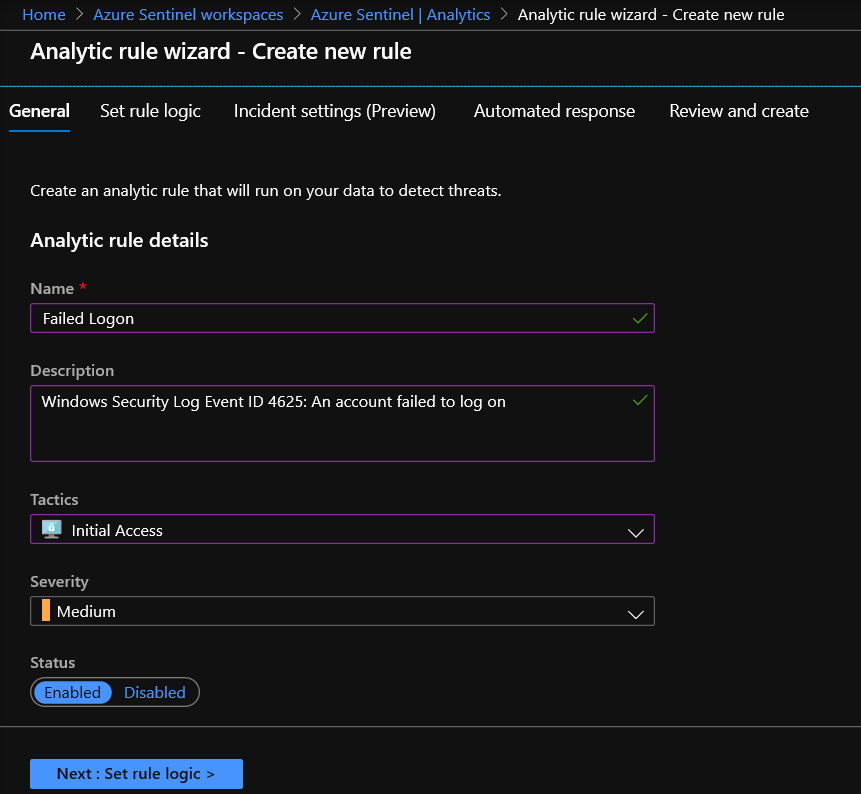
Monitoring security alerts is a key function for security operations teams. The security information event management (SIEM) platform is the capability of choice for responders. We’ve covered deployment and various functions of Azure Sentinel in previous blogs in this series. Create custom analytic rules to detect threats via the steps below. For more information, see Tutorial: Create custom analytic rules to detect suspicious threats.
- In the Azure portal under Azure Sentinel, select Analytics.
- In the top menu bar, select +Create and select Scheduled query rule. This opens the Analytics rule wizard.
- In the General tab, provide a unique Name and Description. In the Tactics field, you can choose from among categories of attacks by which to classify the rule. Set the alert Severity, as necessary.

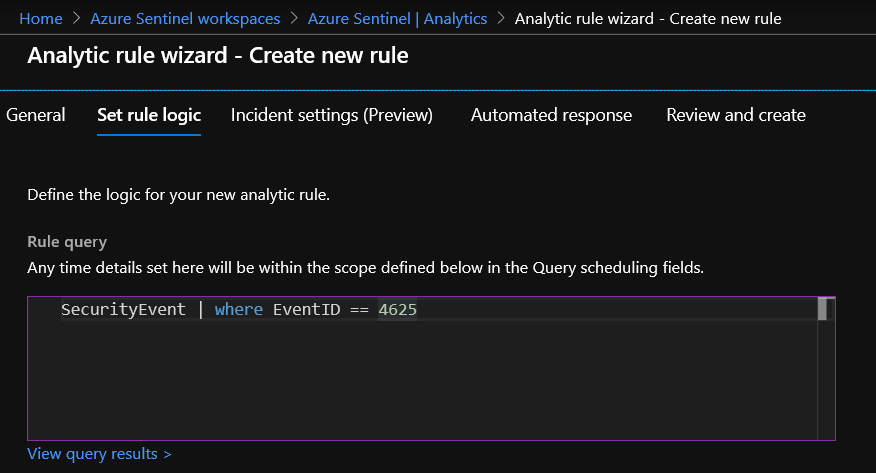
- In the Set rule logic tab, you can either write a query directly in the Rule query field, or create the query in Log Analytics, and then copy and paste it there.
- Evaluate Results preview, Alert threshold, Map entities, and Query Scheduling for quick tuning to your requirements.

- Evaluate Results preview, Alert threshold, Map entities, and Query Scheduling for quick tuning to your requirements.
- In the Incident Settings tab, you can choose whether and how Azure Sentinel turns alerts into actionable incidents.
- In the Automated responses tab, select any playbooks you want to run automatically when an alert is generated by the custom rule.
- Select Review and create to review all the settings for your new alert rule and then select Create to initialize your alert rule.
- After the alert is created, a custom rule is added to the table under Active rules. From this list you can enable, disable, or delete each rule.
- To view the results of the alert rules you create, go to the Incidents page, where you can triage, investigate incidents, and remediate the threats.
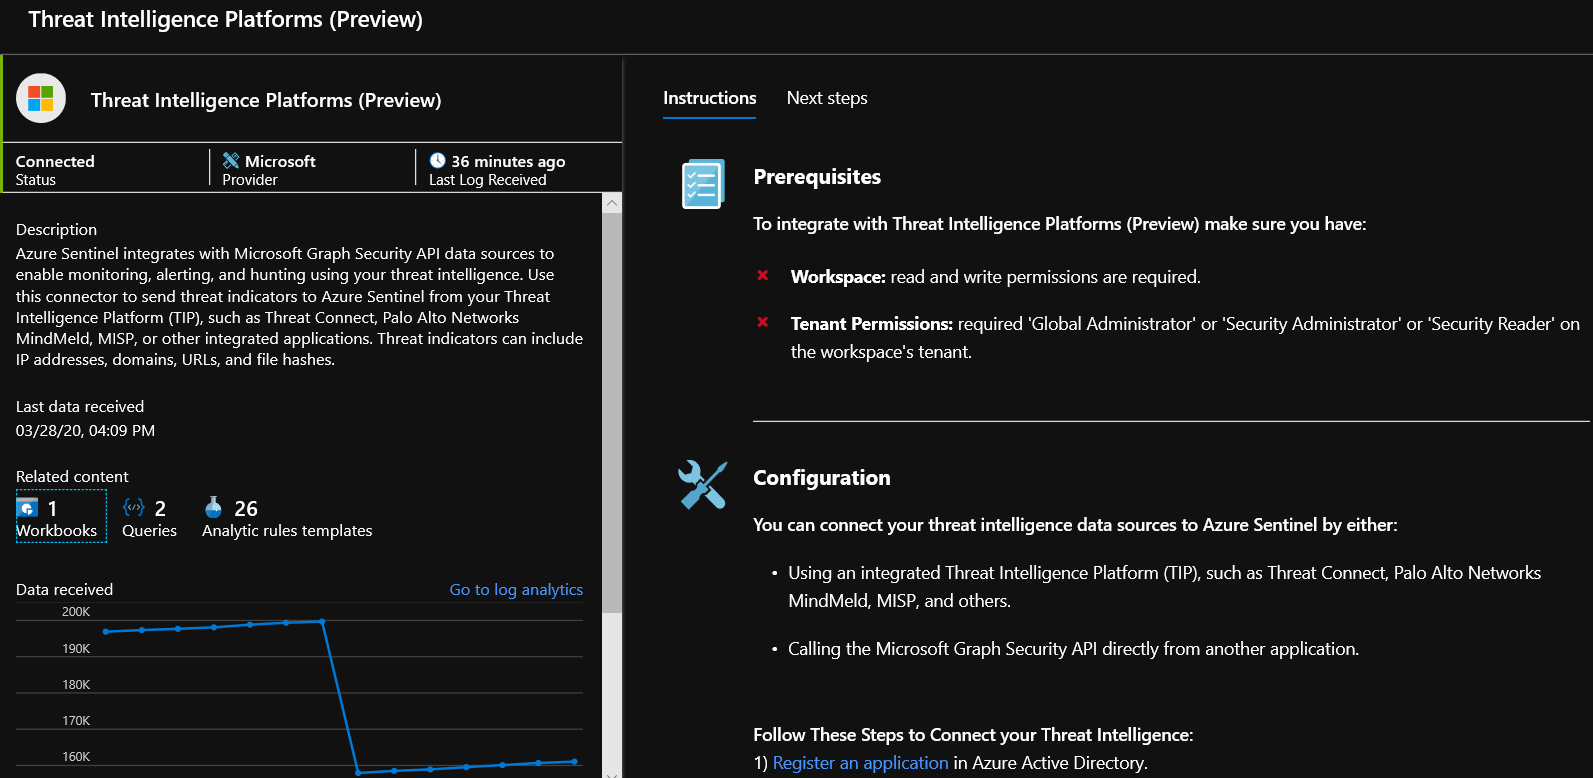
3) Leverage Threat Intelligence
Azure Sentinel lets you import the threat indicators your organization is using, which can enhance your security analysts’ ability to detect and prioritize known threats. Several features from Azure Sentinel then become available or are enhanced:
- Analytics includes a set of scheduled rule templates you can enable to generate alerts and incidents based on matches of log events from your threat indicators.
- Workbooks provide summarized information about the threat indicators imported into Azure Sentinel and any alerts generated from analytics rules that match your threat indicators.
- Hunting queries allow security investigators to use threat indicators within the context of common hunting scenarios.
- Notebooks can use threat indicators when you investigate anomalies and hunt for malicious behaviors.
You can stream threat indicators to Azure Sentinel by using one of the integrated threat intelligence platform (TIP) products listed in the next section, connecting to TAXII servers, or by using direct integration with the Microsoft Graph Security tiIndicators API:
- MISP Open Source Threat Intelligence Platform
- Palo Alto Networks MineMeld
- ThreatConnect Platform
Connect Azure Sentinel to your threat intelligence platform via the following steps. For more information, see Connect data from threat intelligence providers.
- Register an application in Azure Active Directory to get an application ID, application secret, and Azure Active Directory tenant ID. You need these values for when you configure your integrated TIP product or app that uses direct integration with Microsoft Graph Security tiIndicators API.
- Configure API permissions for the registered application: Add the Microsoft Graph Application permission ThreatIndicators.ReadWrite.OwnedBy to your registered application.
- Ask your Azure Active Directory tenant administrator to grant admin consent to the registered application for your organization. From the Azure portal: Azure Active Directory > App registrations > <app name> > View API Permissions > Grant admin consent for <tenant name>.
- Configure your TIP product or app that uses direct integration with Microsoft Graph Security tiIndicators API to send indicators to Azure Sentinel by specifying the following:
- The values for the registered application’s ID, secret, and tenant ID.
- For the target product, specify Azure Sentinel.
- For the action, specify alert.
- In the Azure portal, navigate to Azure Sentinel > Data connectors and then select the Threat Intelligence Platforms (Preview) connector.

- Select Open connector page, and then Connect.
- To view the threat indicators imported into Azure Sentinel, navigate to Azure Sentinel – Logs > SecurityInsights and then expand ThreatIntelligenceIndicator.
4) Implement Malicious Code Protections
Applying malicious code protections requires endpoint detection response platforms. Azure Security Center monitors the status of antimalware protection and reports this under the Endpoint protection issues page. Security Center highlights issues, such as detected threats and insufficient protection, which can make your virtual machines (VMs) and computers vulnerable to antimalware threats. By using the information under Endpoint protection issues, you can identify a plan to address any issues identified:
- Endpoint protection not installed on Azure VMs: A supported antimalware solution is not installed on these Azure VMs.
- Endpoint protection not installed on non-Azure computers: A supported antimalware is not installed on these non-Azure computers.
- Endpoint protection health:
- Signature out of date: An antimalware solution is installed on these VMs and computers, but the solution does not have the latest antimalware signatures.
- No real time protection: An antimalware solution is installed on these VMs and computers, but it is not configured for real-time protection. The service may be disabled, or Security Center may be unable to obtain the status because the solution is not supported. See partner integration for a list of supported solutions.
- Not reporting: An antimalware solution is installed but not reporting data.
Leverage Azure Security Center to detect gaps and install antimalware via the steps below. For more information, see Manage endpoint protection issues with Azure Security Center.
- Select Compute & apps under the Security Center main menu or Overview.
- Under Compute, select Endpoint protection issues.
- Select Endpoint protection not installed on Azure VMs.
- Under Endpoint protection not installed on Azure VMs is a list of Azure VMs that do not have antimalware installed. You can choose to install antimalware on all VMs in the list or select individual VMs to install antimalware on by clicking on the specific VM.
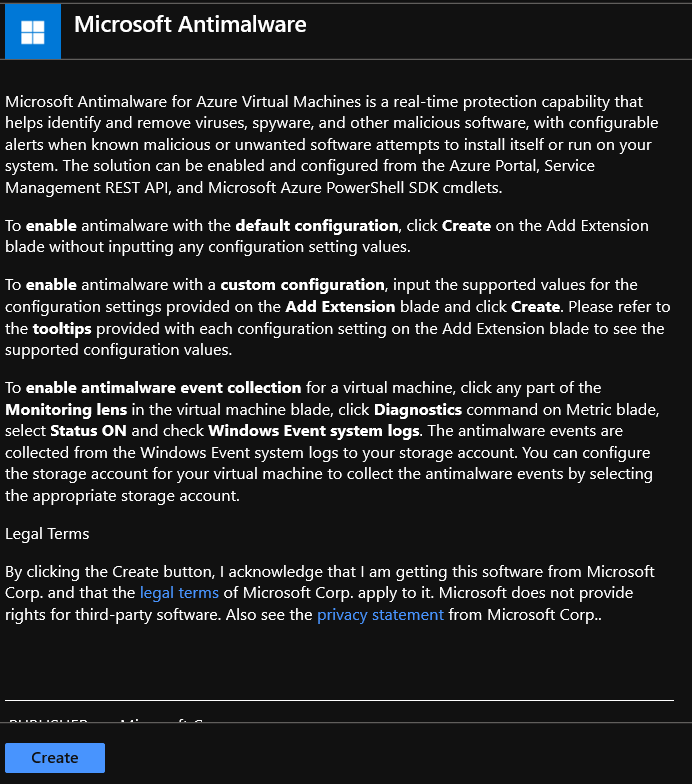
- Under Select Endpoint protection, select the endpoint protection solution you want to use. In this example, select Microsoft Antimalware.

- Select Create.
5) Update Malicious Code Signatures
Microsoft Antimalware for Azure is a free real-time protection that helps identify and remove viruses, spyware, and other malicious software. It generates alerts when known malicious or unwanted software tries to install itself or run on your Azure systems.
The solution is built on the same antimalware platform as Microsoft Security Essentials [MSE], Microsoft Forefront Endpoint Protection, Microsoft System Center Endpoint Protection, Windows Intune, and Windows Defender. Microsoft Antimalware for Azure is a single-agent solution for applications and tenant environments, designed to run in the background without human intervention. Protection may be deployed based on the needs of application workloads, with either basic secure-by-default or advanced custom configuration, including antimalware monitoring. Microsoft Antimalware automatically updates malicious code signatures and includes the features below. For more information, see Microsoft Antimalware for Azure Cloud Services and Virtual Machines.
- Real-time protection: monitors activity in Cloud Services and on Virtual Machines to detect and block malware execution.
- Scheduled scanning: Scans periodically to detect malware, including actively running programs.
- Malware remediation – automatically acts on detected malware, such as deleting or quarantining malicious files and cleaning up malicious registry entries.
- Signature updates: automatically installs the latest protection signatures (virus definitions) to ensure protection is up to date on a pre-determined frequency.
- Antimalware Engine updates: automatically updates the Microsoft Antimalware engine.
- Antimalware Platform updates: automatically updates the Microsoft Antimalware platform.
- Active protection: reports telemetry metadata about detected threats and suspicious resources to Microsoft Azure to ensure rapid response to the evolving threat landscape, as well as enabling real-time synchronous signature delivery through the Microsoft Active Protection System (MAPS).
- Samples reporting: provides and reports samples to the Microsoft Antimalware service to help refine the service and enable troubleshooting.
- Exclusions: allows application and service administrators to configure exclusions for files, processes, and drives.
- Antimalware event collection: records the antimalware service health, suspicious activities, and remediation actions taken in the operating system event log and collects them into the customer’s Azure Storage account.
6) Perform Periodic Scans
Conducting periodic scanning requires full visibility of assets within your environment. Specifically, the policies assigned audit and enforce deployment of the Log Analytics agent and enhanced security settings for SQL databases, storage accounts and network resources.
- [Preview]: Audit Log Analytics Agent Deployment – VM Image (OS) unlisted
- [Preview]: Audit Log Analytics Agent Deployment in VMSS – VM Image (OS) unlisted
- [Preview]: Audit Log Analytics Workspace for VM – Report Mismatch
- [Preview]: Deploy Log Analytics Agent for Linux VM Scale Sets (VMSS)
- [Preview]: Deploy Log Analytics Agent for Linux VMs
- [Preview]: Deploy Log Analytics Agent for Windows VM Scale Sets (VMSS)
- [Preview]: Deploy Log Analytics Agent for Windows VMs
- Advanced data security should be enabled on your managed instances
- Advanced data security should be enabled on your SQL servers
- Deploy Advanced Data Security on SQL servers
- Deploy Advanced Threat Protection on Storage Accounts
- Deploy Auditing on SQL servers
- Deploy network watcher when virtual networks are created
- Deploy Threat Detection on SQL servers
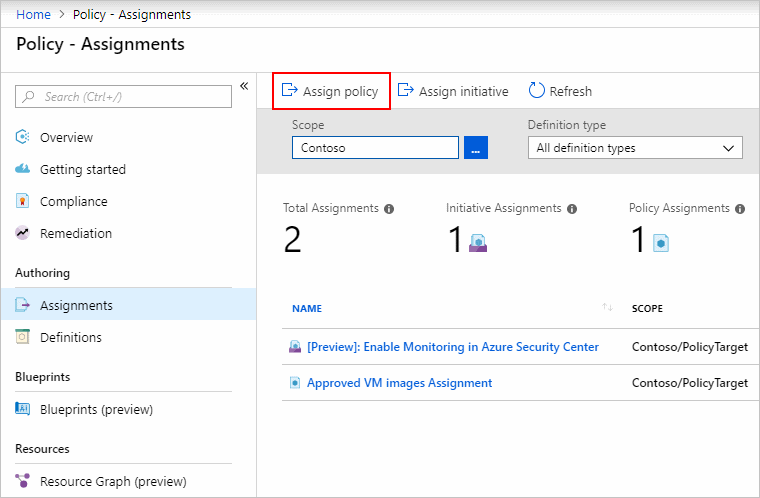
These capabilities can help you detect anomalous behavior and indicators of attacks so you can take appropriate action. Apply an Azure Policy for monitoring via the steps below. Azure Policy is highly versatile and can be created with the Azure portal, Azure CLI, Powershell and Azure Resource Manager (ARM) templates. Creating an Azure Policy in the portal is accomplished via the steps below. For more information, see Quickstart: Create a policy assignment to identify non-compliant resources.
- In the Policy portal, select Assignments
- Select Assign Policy from the top of the Policy – Assignments page.

- On the Assign Policy page, select the Scope by clicking the ellipsis and selecting either a management group or subscription.
- Select the Policy definition ellipsis, search for the desired policy definition and click Select.
- Set an Assignment name, Description, and set Policy Enforcement to Enabled.
- Click Assign.
7) Detect & Mitigate Malicious Actions
Azure Advanced Threat Protection (ATP) alert evidence provides clear indications when computers have been involved in suspicious activities or when indications exist that a machine is compromised. Azure ATP suggestions help determine the risk to your organization, decide how to remediate and determine the best way to prevent similar attacks in the future. To access the computer profile page, click on the specific computer mentioned in the alert that you wish to investigate. To assist your investigation, alert evidence lists all computers (and users) connected to each suspicious activity. Check and investigate the computer profile in Azure ATP for the following details and activities. For more information, see Tutorial: Investigate a computer.
- What happened around the time of the suspicious activity?
- Which user was logged in to the computer?
- Does that user normally log into or access the source or destination computer?
- Which resources where accessed? By which users?
- If resources were accessed, were they high value resources?
- Was the user supposed to access those resources?
- Did the user that accessed the computer perform other suspicious activities?
- Additional suspicious activities to investigate:
- Were other alerts opened around the same time as this alert in Azure ATP, or in other security tools such as Windows Defender ATP, Azure Security Center and/or Microsoft CAS?
- Were there failed logons?
- If Windows Defender ATP integration is enabled, click the Windows Defender ATP badge to further investigate the computer. In Windows Defender ATP you can see which processes and alerts occurred around the same time as the alert.
- Were any new programs deployed or installed?
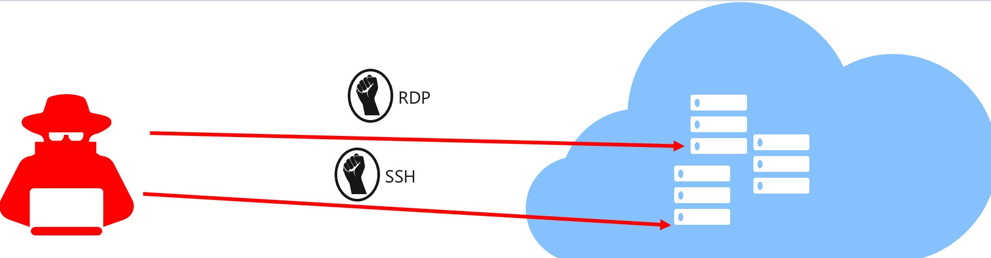
8) Detect Network Attacks
There are numerous types of network attacks and we’ve covered several methods to detecting network attacks in this blog series. One of the more dangerous types of network attacks is a Distributed Denial of Service (DDoS). DDoS attacks attempt to exhaust an application’s resources, making the application unavailable to legitimate users. DDoS attacks can be targeted at any endpoint that is publicly reachable through the internet. Azure DDoS protection, combined with application design best practices, provide defense against DDoS attacks. Azure DDoS protection provides the following service tiers:
- Basic: Automatically enabled as part of the Azure platform. Always-on traffic monitoring, and real-time mitigation of common network-level attacks, provide the same defenses utilized by Microsoft’s online services.
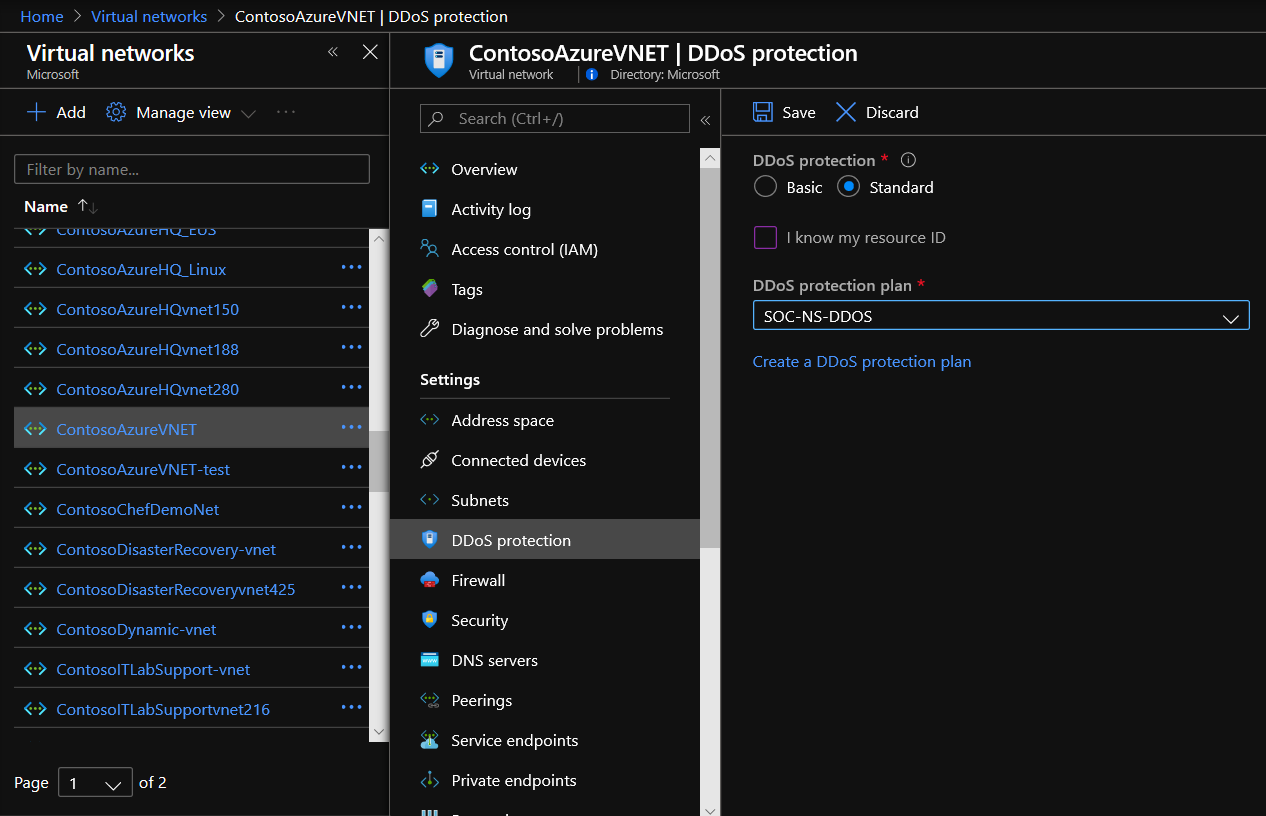
- Standard: DDoS Protection Standard is simple to enable and requires no application changes. Protection policies are tuned through dedicated traffic monitoring and machine learning algorithms. Policies are applied to public IP addresses associated to resources deployed in virtual networks, such as Azure Load Balancer, Azure Application Gateway, and Azure Service Fabric instances while featuring comprehensive logging. Enable Azure DDoS Standard for an existing virtual network via the steps below. For more information, see Manage Azure DDoS Protection Standard using the Azure portal.
-
- Enter Virtual Network in the Search resources, services, and docs box at the top of the portal.
- Select the name of the virtual network that you want to enable DDoS Protection Standard for. When the name of the virtual network appears in the search results, select it.
- Select DDoS protection, under Settings.

- Select Standard. Under DDoS protection plan, select an existing DDoS protection plan, or create a new DDoS protection plan and then select Save.
9) Identify Unauthorized Access
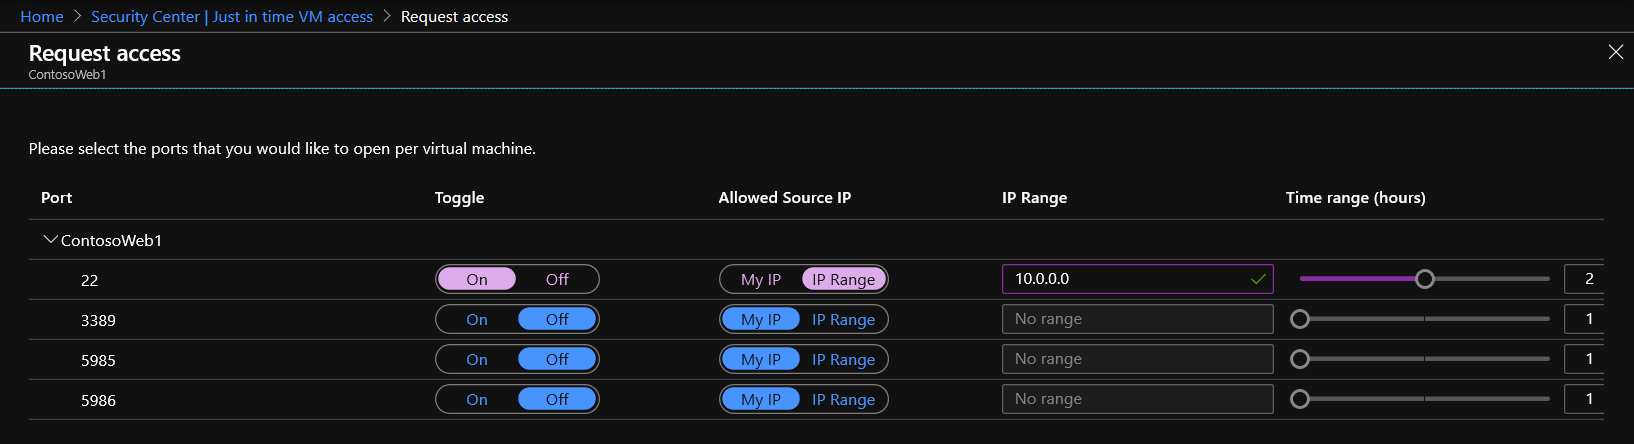
Controlling system access creates a baseline of user access. Monitoring for changes against this baseline patter can indicate unauthorized access. Azure Security Center Just-in-time (JIT) virtual machine access locks down inbound traffic to Azure virtual machines, reducing exposure to attacks while providing easy access to connect to VMs when needed. All JIT requests to access virtual machines are logged in the Activity Log allowing you to monitor for atypical usage.
When just-in-time is enabled, Security Center locks down inbound traffic to your Azure VMs by creating an NSG rule. You select the ports on the VM to which inbound traffic will be locked down. These ports are controlled by the just-in-time solution.
When a user requests access to a VM, Security Center checks that the user has Role-Based Access Control (RBAC) permissions for that VM. If the request is approved, Security Center automatically configures the Network Security Groups (NSGs) and Azure Firewall to allow inbound traffic to the selected ports and requested source IP addresses or ranges, for the amount of time that was specified. After the time has expired, Security Center restores the NSGs to their previous states. Those connections that are already established are not being interrupted, however. Configure JIT via the steps below. For more information see, Secure your management ports with just-in-time access.
- Open the Security Center dashboard.
- In the left pane, select Just-in-time VM access.
- Select the Recommended tab.
- Select the VMs from your list which you wish to enable JIT access to.
- Click Enable JIT on VMs.
- Select one of the default ports or configure custom ports:
- 22: SSH
- 3389: RDP
- 5985: WinRM
- 5986: WinRM
- Configure My IP or specify a source IP Range and specify a Time Range in hours.

- Click Open ports.
10) Monitor Individuals
Azure Advanced Threat Protection (ATP) monitors and analyzes user activities and information across your network. Azure ATP identifies anomalies with adaptive built-in intelligence providing insights into suspicious activities and events. Azure ATP’s proprietary sensors monitor organizational domain controllers, providing a comprehensive view for all user activities from every device. Azure ATP also enables SecOps analysts and security professionals struggling to detect advanced attacks in hybrid environments to:
- Protect user identities and credentials stored in Active Directory
- Identify and investigate suspicious user activities and advanced attacks throughout the kill chain
- Provide clear incident information on a simple timeline for fast triage
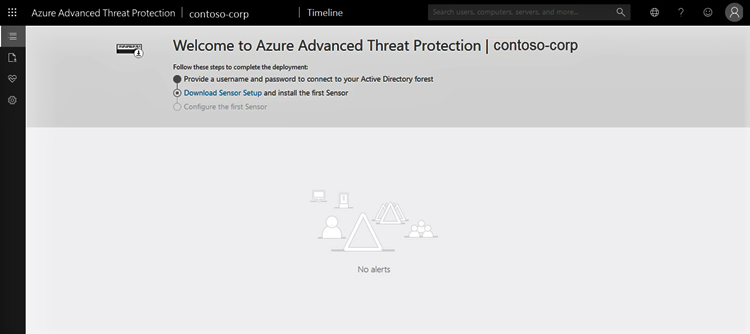
Enabling Azure ATP requires the following high-level steps:
- Create your ATP instance
- Connect to Active Directory
- Download the Azure ATP sensor package
- Install the ATP sensor
To get started with creating an Azure ATP instance follow the steps below. Note that GCC High customers must use the Azure ATP GCC High portal. For more information, see What is Azure Advanced Threat Protection? and Quickstart: Create your Azure ATP instance.
- Click Create instance.
- Your Azure ATP instance is automatically named with the Azure AD initial domain name and created in the data center located closest to your Azure AD.

- Click Configuration, Manage role groups and use the Azure AD Admin Center link to manage your role groups.
- Complete the process by following the deployment guide for Azure AD connection and the Azure ATP Sensor Download/Installation.
Learn more about CMMC with Microsoft
Here are some of the best resource to learn more about CMMC in the cloud with Microsoft:
- Accelerating CMMC compliance for Microsoft cloud (in depth review)
- Defense Federal Acquisition Regulation Supplement (DFARS)
- International Traffic in Arms Regulations (ITAR)
- Federal Risk and Authorization Management Program (FedRAMP)
- US Export Administration Regulations (EAR)
- NIST SP 800-171 Compliance
- Overview of the NIST SP 800-53 R4 blueprint sample
Bookmark the Security blog to keep up with our expert coverage on security matters and follow us at @MSFTSecurity or visit our website for the latest news and updates on cybersecurity.
Are you a federal government agency that needs help with cybersecurity? Reach out to TJ Banasik or Mark McIntyre for additional details on the content above, or if you have any other questions about Microsoft’s cybersecurity investments for the federal government.
0 comments