
This is the fifth in a ten-part blog series where we’ll demonstrate principles of the Cybersecurity Maturity Model Certification aligned with Microsoft Azure. Subsequent blogs in the series will delve into maintenance & media protection, recovery & risk management, security assessment & risk management, system & communications protection and system & information integrity. In this fifth blog of the series we will explore how to leverage Microsoft Azure for incident response maturity.
Please note that the information cutoff date for this post is October 2020, and that as of the date of this writing, CMMC developments and guidance are in progress. Additionally, as of the date of this writing, the CMMC Accreditation Body has not certified any the third-party assessors and guidance on the formal assessment process is still under development. As a result, the information herein, including our CMMC related offerings, may be enhanced in the future to align with future guidance from the DoD and CMMC Accreditation Body. Microsoft is closely tracking developments related to the CMMC.
Stay tuned for the upcoming CMMC blogs in the series:
- Access Control Maturity – live
- Audit & Accountability Maturity – live
- Asset & Configuration Management Maturity – live
- Identification & Authentication Maturity – live
- Incident Response Maturity – this blog
- Maintenance & Media Protection Maturity – live
- Recovery & Risk Management Maturity – live
- Security Assessment & Situational Awareness Maturity – live
- System & Communications Protection Maturity – live
- System & Information Integrity Maturity – 5/28
What is Cybersecurity Maturity Model Certification (CMMC)?
 The Defense Industrial Base (DIB) is charged with implementing Defense Federal Acquisition Regulation Supplement (DFARS) 252.204-7012. DFARS requires organizations supporting the Department of Defense (DoD) to implement NIST SP 800-171 and FedRAMP Moderate Impact level controls. DoD has mandated CMMC with periodic assessments in order to strengthen cybersecurity across the DIB. CMMC builds upon DFARS 7012 by verifying an organization’s readiness to protect Federal Contract Information (FCI) and Controlled Unclassified Information (CUI) such as International Traffic in Arms Regulation (ITAR) and Export Administration Regulations (EAR) export-controlled data.
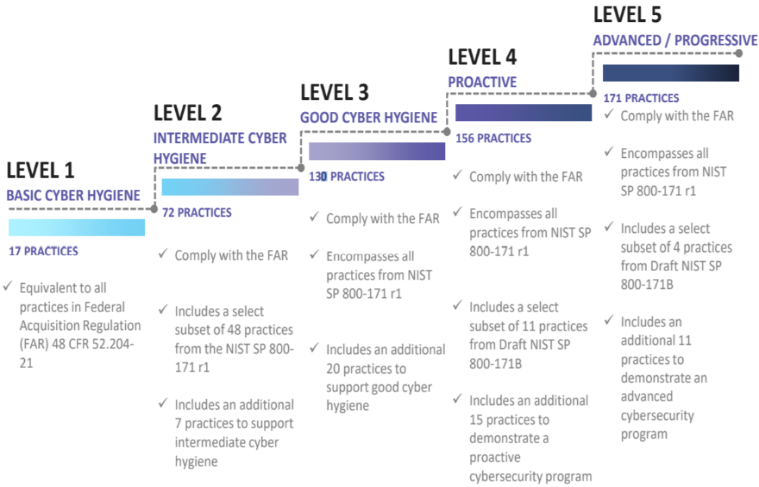
CMMC extends beyond the parent organization into sub-contractors, partners, and suppliers. The framework is intended to enforce critical thinking approaches for comprehensive security. The CMMC framework specifies 5 levels of maturity measurement from Maturity Level 1 (Basic Cyber Hygiene) to Maturity Level 5 (Proactive & Advanced Cyber Practice). The Certification levels will be determined through audits from independent, third-party assessment organizations (C3PAO).
What preparation is required for CMMC alignment to incident response management?

It’s important to understand that compliance is a shared responsibility between the customer and the Cloud Services Provider (CSP). The graphic on the left demonstrates the CSP responsibility in respective cloud models (On-Prem, IaaS, PaaS, SaaS) with dark blue aligning with customer responsibility and light blue aligning with CSP responsibility. For example, CMMC requirements such as Physical Pro
tection (PE) for limiting physical access (C028) is managed by the CSP. Establishment of respective policies and procedures are the customer’s responsibility. It’s important to note that this blog series is aligned with setting the foundation of controls for CMMC Maturity Levels 1 & 2. Once C3PAOs are identified by the CMMC Accreditation Body, customers are advised to work with their respective C3PAO for guidance on comprehensive alignment of controls, audit and certification.
The administrative controls for the CMMC Incident Response Capability (IR-MC) are listed here. These controls fall within the customer’s responsibility. This starts with establishing polices to include incident response management (ML2) and progresses to a documented approach across all applicable organizational units (ML5). These controls should be formally created, documented in the System Security Plan (SSP) and implemented within the organization.

Microsoft Azure Security Controls Aligned to CMMC: Incident Response

Azure Security Controls Aligned to CMMC: Incident Response Maturity
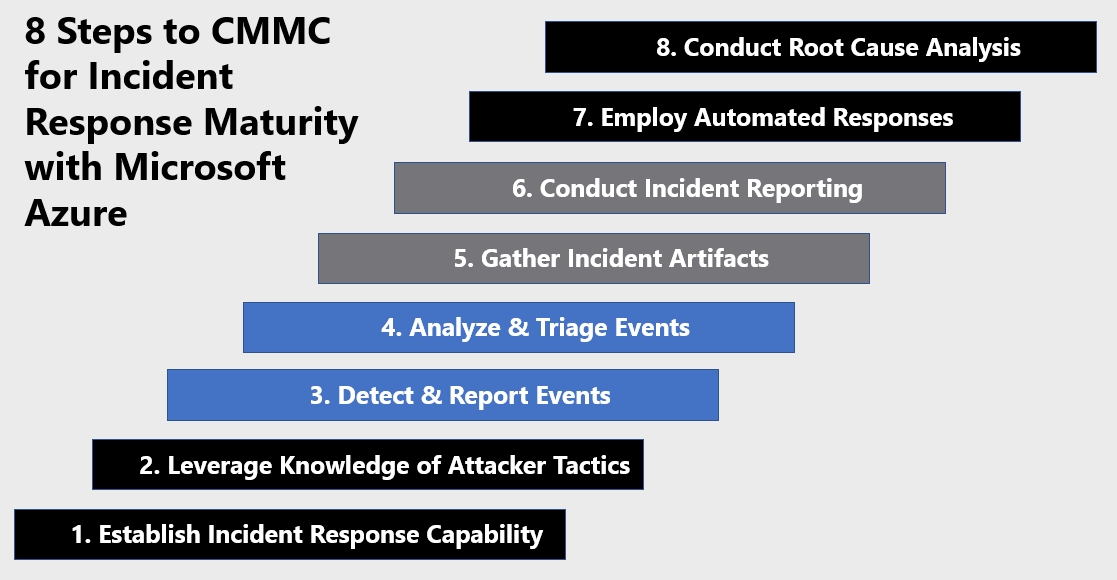
Microsoft Azure Government has developed an 8-step process to facilitate incident response maturity with the security principles within CMMC, NIST SP 800-53 R4 and NIST SP 800-171 standards. Note this process is a starting point, as CMMC requires alignment of people, processes, policy and technology so refer to organizational requirements and respective standards for implementation. Azure has several offerings to facilitate incident response including Azure Sentinel, Azure Security Center, Azure Logic Apps, Log Analytics Workspace and the Microsoft Graph Security API.
- Azure Sentinel is a scalable, cloud-native, security information event management (SIEM) and security orchestration automated response (SOAR) solution.
- Azure Security Center is a unified infrastructure security management system that strengthens the security posture of your data centers, and provides advanced threat protection across your hybrid workloads in the cloud – whether they’re in Azure or not – as well as on premises.
- Azure Logic Apps is a cloud service that helps you schedule, automate, and orchestrate tasks, business processes, and workflows when you need to integrate apps, data, systems and services across enterprises or organizations.
- Log Analytics Workspace is a unique environment for Azure Monitor log data. Each workspace has its own data repository and configuration. Data sources and solutions are configured to store their data in a workspace.
- Microsoft Graph Security API simplifies integration with Microsoft and third-party security solutions. Using one endpoint, one software development kit (SDK), one schema, and one authentication mechanism, customers and partners can easily build integrated security applications, workflows and analytics.
8 Steps to CMMC for Incident Response Maturity with Microsoft Azure
1) Establish an Incident Response Capability
Establishing an incident response capability is the foundation of combating threats to your environment. Incident response is geared to protect the organization’s information, as well as its reputation, by developing and implementing an incident response infrastructure (e.g., plans, defined roles, training, communications, management oversight) for quickly discovering an attack and then effectively containing the damage, eradicating the attacker’s presence, and restoring the integrity of the network and systems. Developing this capability is a customer responsibility, but there are Microsoft security tools to facilitate building this capability. Azure Security Center provides a Cloud Security Posture Management (CSPM) and Cloud Workload Protection Platform (CWPP) capability for hardening your resources and responding to threats. Azure Sentinel is a cloud native security information event management (SIEM) platform. Azure Sentinel combines threat intelligence, analysis, orchestration, automation, and response into a single pane of glass to support your incident response requirements. Enable Azure Security Center and Azure Sentinel via the steps below.
Azure Security Center provides unified security management and threat protection across your hybrid cloud workloads. While the Free tier offers limited security for your Azure resources only, the Standard tier extends these capabilities to on-premises and other clouds. Azure Security Center Standard helps you find and fix security vulnerabilities, apply access and application controls to block malicious activity, detect threats using analytics and intelligence, and respond quickly when under attack. Enabling Azure Security Center Standard is accomplished via the steps below:
- Under the Security Center main menu, select Getting started.
- Under Upgrade, Security Center lists subscriptions and workspaces eligible for onboarding.
- Click Start trial to start your trial on the selected subscriptions
Security Center collects data from your Azure VMs and non-Azure computers to monitor for security vulnerabilities and threats. Data is collected using the Microsoft Monitoring Agent, which reads various security-related configurations and event logs from the machine and copies the data to your workspace for analysis. By default, Security Center will create a new workspace for you. When automatic provisioning is enabled, Security Center installs the Microsoft Monitoring Agent on all supported Azure VMs and any new ones that are created. Automatic provisioning is strongly recommended. To enable automatic provisioning of the Microsoft Monitoring Agent:
- Sign into the Azure Portal. Select the subscription in which Azure Sentinel will be created.
- Search for and select Azure Security Center.
- Under the Security Center main menu, select Pricing & settings.
- On the row of the subscription, click on the subscription on which you’d like to change the settings
- In the Data Collection tab, set Auto provisioning to On.
- Select Save.

With this new insight into your Azure VMs; Azure Security Center can provide additional recommendations related to system update status, OS security configurations, and endpoint protection, as well as generate additional security alerts. For more information, see Quickstart: Onboard your Azure subscription to Security Center Standard
To onboard Azure Sentinel, you first need to connect to your security sources. Azure Sentinel comes with a number of connectors for Microsoft solutions, available out of the box and providing real-time integration, including Microsoft Threat Protection solutions, and Microsoft 365 sources, including Office 365, Azure AD, Azure ATP, and Microsoft Cloud App Security, and more. Enabling Azure Sentinel is accomplished via the steps below:
- Sign into the Azure Portal. Select the subscription in which Azure Sentinel will be created.
- Search for and select Azure Sentinel.
- Select Add
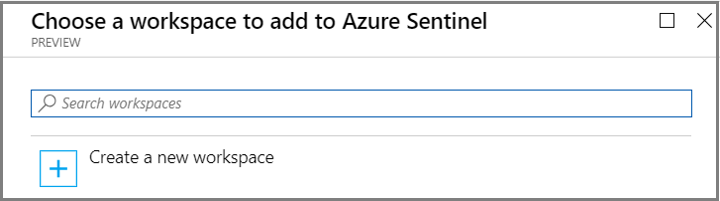
- Select the workspace you want to use or create a new one. You can run Azure Sentinel on more than one workspace, but the data is isolated to a single workspace.

- Select Add Azure Sentinel.
- Click Data collection.
- Select your respective data sources. Not there are tiles for each data source you can connect. For example, click Azure Active Directory. If you connect this data source, you stream all the logs from Azure AD into Azure Sentinel. You can select what type of logs you want to get – sign-in logs and/or audit logs.
- Select desired workbooks to get pre-built security insight dashboards for your data sources.
After your data sources are connected, your data starts streaming into Azure Sentinel and is ready for you to start working with. You can view the logs in the built-in dashboards and start building queries in Log Analytics to investigate the data. For more information, see Quickstart: On-board Azure Sentinel
2) Leverage Knowledge of Attacker Tactics
Knowledge of attacker tactics is critical when defending your enterprise. Azure provides several capabilities aligned with building awareness of threat tactics. These capabilities include Azure Sentinel’s hunting feature and threat intelligence connectors. Leveraging knowledge of attacker tactics enables blue team defenders to rapidly detect threats in proactive security models.
Azure Sentinel’s hunting search-and-query tools are based on the MITRE framework, which enable you to proactively hunt for security threats across your organization’s data sources, before an alert is triggered. After you discover which hunting query provides high-value insights into possible attacks, you can also create custom detection rules based on your query, and surface those insights as alerts to your security incident responders. While hunting, you can create bookmarks for interesting events, enabling you to return to them later, share them with others, and group them with other correlating events to create a compelling incident for investigation.

You can sort hunting queries by attacker tactics via the steps below:
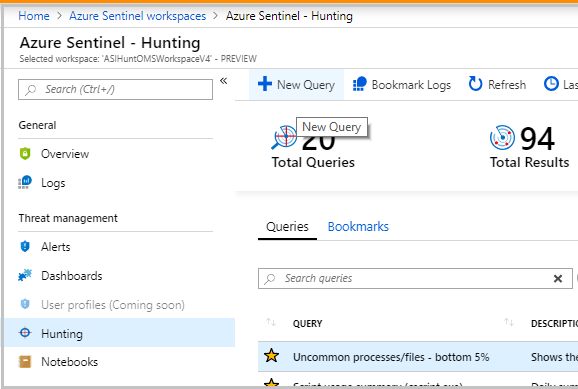
- In the Azure Sentinel portal, click Hunting.
- When you open the Hunting page, all the hunting queries are displayed in a single table. The table lists all the queries written by Microsoft’s team of security analysts as well as any additional query you created or modified.
- Select the Tactics data filter
- Select one or several tactics to filter Azure Sentinel hunting queries aligned to the attacker tactics. Tactics include: Initial Access, Execution, Persistence, Privilege Escalation, Defense Evasion, Credential Access, Discovery, Lateral Movement, Collection, Exfiltration, Command and Control, and Impact.


You can also incorporate knowledge of threat tactics by integrating threat intelligence with you Azure Sentinel Instance. Azure Sentinel lets you import the threat indicators your organization is using, which can enhance your security analysts’ ability to detect and prioritize known threats. Several features from Azure Sentinel then become available or are enhanced including analytics, workbooks, hunting, and notebooks. Connect your threat intelligence platform to Azure Sentinel via the steps below. For more information, see Connect Data from Threat Intelligence Providers
- Register your threat intelligence application in Azure Active Directory to get an application ID and application secret. Also make note of your Azure Active Directory tenant ID.
- Configure API permissions for the application. Add the Microsoft Graph Application permission ThreatIndicators.ReadWhite.Owned by to your registered application.
- Grant admin consent for the application. From the Azure portal: Azure Active Directory > App registrations > <app name> > View API Permissions > Grant admin consent for <tenant name>.
- Configure threat intelligence platform or application for direct integration with Microsoft Graph Security tiInidcators API and send data to Azure Sentinel by specifying the following:
- The values for the registered application’s ID, secret, and tenant ID.
- For the target product, specify Azure Sentinel.
- For the action, specify alert
- In the Azure portal, navigate to Azure Sentinel > Data connectors and then select the Threat Intelligence Platforms (Preview) connector.

- Select Open connector page, and then Connect.
- To view the threat indicators imported into Azure Sentinel, navigate to Azure Sentinel – Logs > SecurityInsights, and then expand ThreatIntelligenceIndicator.


3) Detect & Report Events
Azure Sentinel enables blue teams and incident responders to leverage data sources, machine learning and threat intelligence to detect, respond and eradicate the threat. Azure Sentinel enables incident responders to move from reactive to proactive incident response with hunting queries. To help security analysts look proactively for new anomalies that weren’t detected by your security apps, Azure Sentinel’s built-in hunting queries guide you into asking the right questions to find issues in the data you already have on your network. With Azure Sentinel hunting, you can take advantage of the following capabilities:
- Built-in queries: These built-in hunting queries are developed by Microsoft security researchers on a continuous basis, adding new queries, and fine-tuning existing queries to provide you with an entry point to look for new detections and figure out where to start hunting for the beginnings of new attacks.
- Powerful query language with IntelliSense: Built on top of a query language that gives you the flexibility you need to take hunting to the next level.
- Create your own bookmarks: Bookmarks let you save items for later, to be used to create an incident for investigation. For more information about bookmarks, see Use bookmarks in hunting.
- Use notebooks to automate investigation: Notebooks encapsulate all the hunting steps in a reusable playbook that can be shared with others in your organization.
- Query the stored data: The data is accessible in tables for you to query. For example, you can query process creation, DNS events, and many other event types.
- Links to community: Leverage the power of the greater community to find additional queries and data sources.
Start hunting with Azure Sentinel via the steps below:
- In the Azure Sentinel portal, click Hunting.
- When you open the Hunting page, all the hunting queries are displayed in a single table. The table lists all the queries written by Microsoft’s team of security analysts as well as any additional query you created or modified.
- Click Run query in the hunting query details page to run any query without leaving the hunting page. The number of matches is displayed within the table. Review the list of hunting queries and their matches. Check out which stage in the kill chain the match is associated with.
- Perform a quick review of the underlying query in the query details pane or click View query result to open the query in Log Analytics. At the bottom, review the matches for the query.
- Click on the row and select Add bookmark to add the rows to be investigated – you can do this for anything that looks suspicious.
- Then, go back to the main Hunting page and click the Bookmarks tab to see all the suspicious activities.
- Select a bookmark and then click Investigate to open the investigation experience. You can filter the bookmarks. For example, if you’re investigating a campaign, you can create a tag for the campaign and then filter all the bookmarks based on the campaign.
After you’ve discovered which hunting query provides high value insights into possible attacks, you can also create custom detection rules based on your query and surface those insights as alerts to your security incident responders. For more information, see Hunt for threats with Azure Sentinel.
4) Analyze & Triage Events
An incident can include multiple alerts. It’s an aggregation of all the relevant evidence for a specific investigation. An incident is created based on analytic rules that you created in the Analytics page. The properties related to the alerts, such as severity, and status, are set at the incident level. After you let Azure Sentinel know what kinds of threats you’re looking for and how to find them, you can monitor detected threats by investigating incidents. Investigate incidents in Azure Sentinel via the steps below. For more information, see Tutorial: Investigate incidents with Azure Sentinel.
- Sign into the Azure Portal. Select the subscription in which Azure Sentinel will be created.
- Search for and select Azure Sentinel.
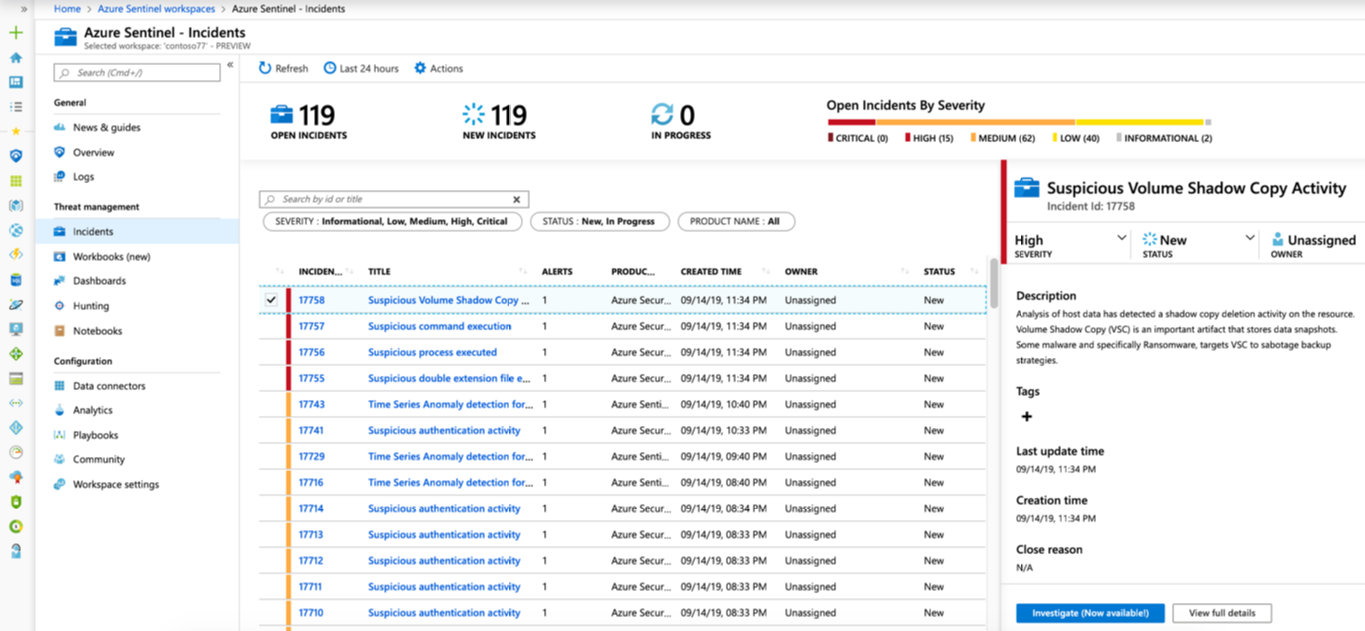
- Select Incidents. The Incidents page lets you know how many incidents you have, how many are open, how many you’ve set to In progress, and how many are closed. For each incident, you can see the time it occurred, and the status of the incident. Look at the severity to decide which incidents to handle first.

- You can filter the incidents as needed, for example by status or severity.
- To begin an investigation, select a specific incident. On the right, you can see detailed information for the incident including its severity, summary of the number of entities involved, the raw events that triggered this incident, and the incident’s unique ID.
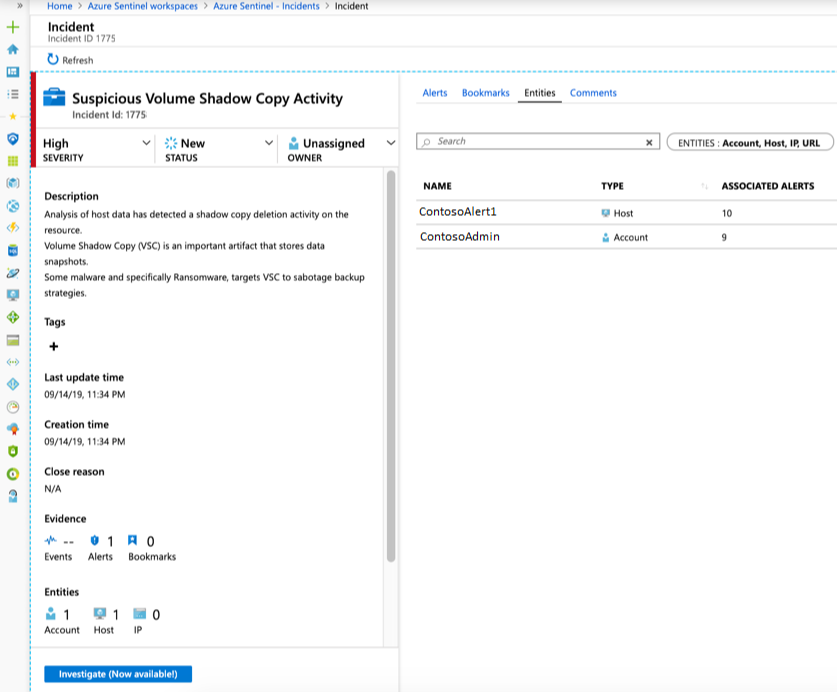
- To view more details about the alerts and entities in the incident, select View full details in the incident page and review the relevant tabs that summarize the incident information. In the Alerts tab, review the alert itself. You can see all relevant information about the alert – the query that triggered the alert, the number of results returned per query, and the ability to run playbooks on the alerts.

- Select Investigate to view the investigation map.
5) Gather Incident Artifacts
Once an incident is confirmed, incident responders must gather relevant artifacts and assess the scope of the incident. There are several processes required for artifact and forensic evidence collection which are outside the scope of this blog. Azure Sentinel has a helpful tool for keeping track of data during threat hunting and incident investigations.
Hunting bookmarks in Azure Sentinel help you do this, by preserving the queries you ran in Azure Sentinel – Logs, along with the query results that you deem relevant. You can also record your contextual observations and reference your findings by adding notes and tags. Bookmarked data is visible to you and your teammates for easy collaboration.
You can revisit your bookmarked data at any time on the Bookmarks tab of the Hunting pane. You can use filtering and search options to quickly find specific data for your current investigation. Alternatively, you can view your bookmarked data directly in the HuntingBookmark table in your Log Analytics workspace. Add a hunting bookmark via the steps below. For more information, see Keep track of data during hunting with Azure Sentinel.
- In the Azure portal, navigate to Sentinel > Threat management > Hunting to run queries for suspicious and anomalous behavior.
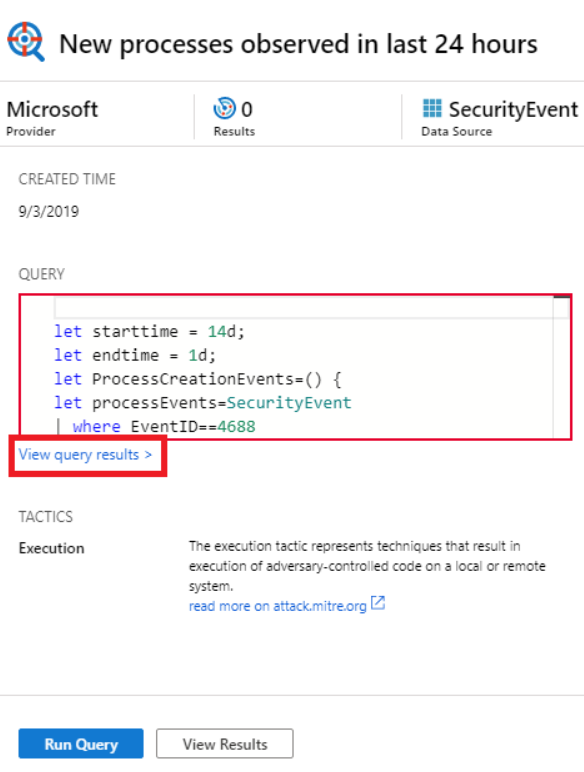
- Select one of the hunting queries and on the right, in the hunting query details, select Run Query.
- Select View query results which opens the Logs pane.

- From the log query results list, use the checkboxes to select one or more rows that contain the information you find interesting.
- Select Add bookmark

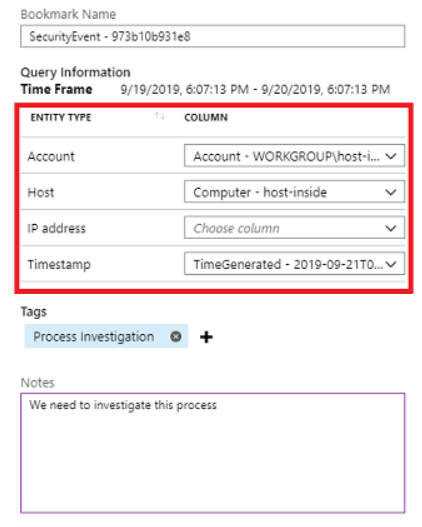
- On the right, in the Add bookmark pane, optionally, update the bookmark name, add tags, and notes to help you identify what was interesting about the item.
- In the Query Information section, use the drop-down boxes to extract information from the query results for the Account, Host, and IP address entity types. This action maps the selected entity type to a specific column from the query result.

- Click Save to commit your changes and add the bookmark.

6) Conduct Incident Reporting
Conducting incident reporting is another customer responsibility which is aligned to the established incident response plan and organizational requirements. There are two features in Azure Sentinel which facilitate incident reporting. The first feature is Azure Sentinel Workbooks. Workbooks provide a dashboard to summarize security data visually. Azure Sentinel includes numerous default dashboards and customizable templates to facilitate incident reporting. View Azure Sentinel Workbooks via the steps below. For more information, see Quickstart: Get started with Azure Sentinel.
- In the Azure portal, navigate to Sentinel > Threat management > Workbooks to view available workbooks and templates.

- Select a Workbook from My Workbooks or from Templates (Custom). In this example, we’ll select the Identity and Access Workbook.

- Select Edit to customize for your reporting requirements.
- Select Share to collaborate with peers or partner organizations.


Another Azure Sentinel tool for incident reporting is integration with Jupyter notebooks. The foundation of Azure Sentinel is the data store; it combines high performance querying, dynamic schema, and scales to massive data volumes. The Azure portal and all Azure Sentinel tools use a common API to access this data store. The same API is also available for external tools such as Jupyter notebooks and Python. While many common tasks can be carried out in the portal, Jupyter extends the scope of what you can do with this data. It combines full programmability with a huge collection of libraries for machine learning, visualization, and data analysis. These attributes make Jupyter a compelling tool for security investigation and hunting. Run a notebook from Azure Sentinel via the steps below. For more information, see Use Jupyter notebooks to hunt for security threats.
- From the Azure portal, navigate to Azure Sentinel > Threat management > Notebooks, where you can see notebooks that Azure Sentinel provides.
- Select individual notebooks to read their descriptions, required data types, and data sources. For example:

- Select the notebook you want to use, and then select Launch Notebook (Preview) to clone and configure the notebook into a new Azure Notebooks project that connects to your Azure Sentinel workspace. When the process is complete, the notebook opens within Azure Notebooks for you to run.

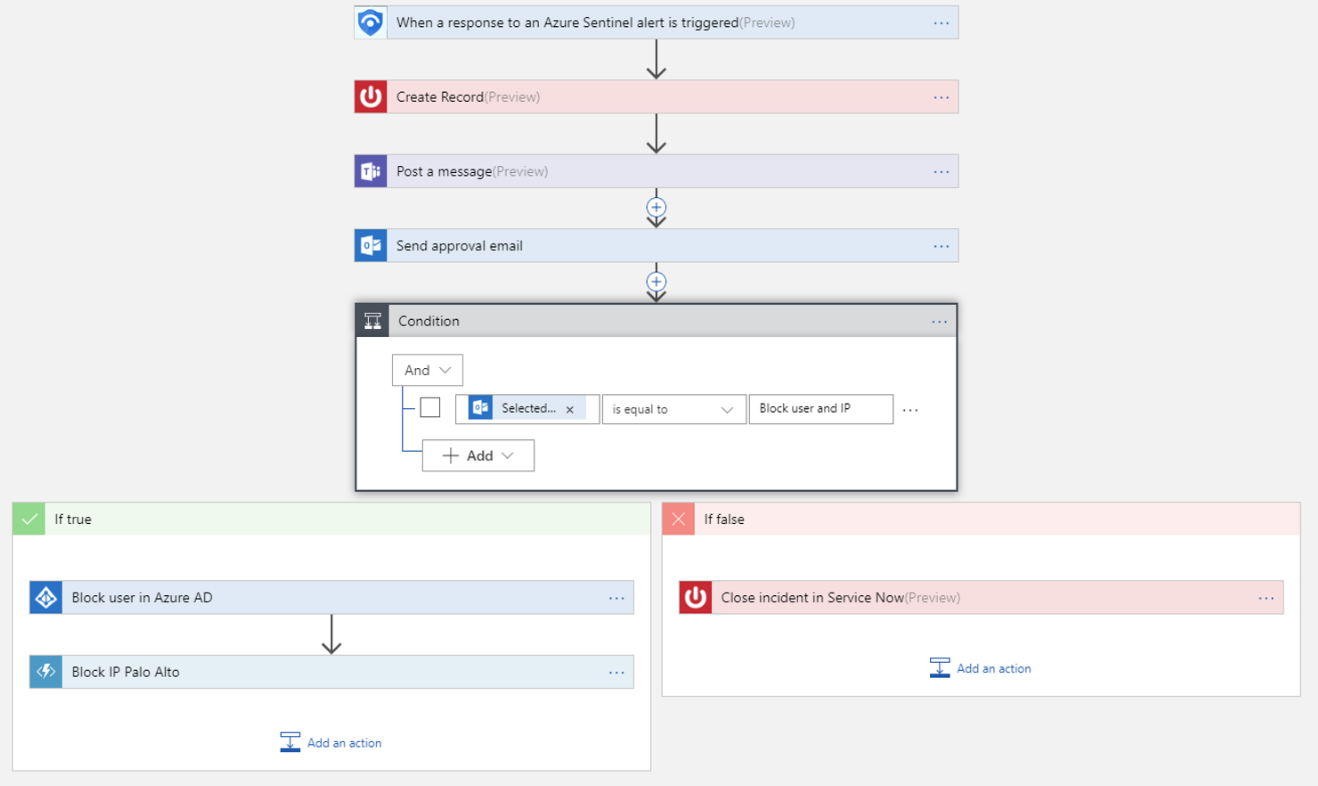
7) Employ Automated Responses
A security playbook is a collection of procedures that can be run from Azure Sentinel in response to an alert. A security playbook can help automate and orchestrate your response and can be run manually or set to run automatically when specific alerts are triggered. Security playbooks in Azure Sentinel are based on Azure Logic Apps, which means that you get all the power, customizability, and built-in templates of Logic Apps. Each playbook is created for the specific subscription you choose, but when you look at the Playbooks page, you will see all the playbooks across any selected subscriptions.
Follow these steps to create a new security playbook in Azure Sentinel:
- Open the Azure Sentinel dashboard.
- Under Management, select Playbooks.
- In the Azure Sentinel – Playbooks (Preview) page, click Add button.
- In the Create Logic app page, type the requested information to create your new logic app, and click Create.
- Select Blank Logic App.
- You are taken to the Logic App Designer where you can either build new or edit the template. For more information on creating a playbook with Logic Apps.
- Type Azure Sentinel in the Search all connectors field and select When a response to an Azure Sentinel alert is triggered.
- Use the Get entities functions, which enable you to get the relevant entities from inside the Entities list, such as accounts, IP addresses and hosts.
- Now you can define what happens when you trigger the playbook. You can add an action, logical condition, switch case conditions, or loops. For more information, see Tutorial: Set up automated threat responses in Azure Sentinel.
8) Conduct Root Cause Analysis
Root Cause Analysis (RCA) is one of the closing steps on the incident response process. Its important for incident responders to understand how the attack occurred and what mitigations are required to remediate the weakness. Azure Sentinel provides the investigation graph to deep dive incidents to provide a timeline of events, associated artifacts and relationship visualization.
The investigation graph enables analysts to ask the right questions for each investigation. The investigation graph helps you understand the scope, and identify the root cause, of a potential security threat by correlating relevant data with any involved entity. You can dive deeper and investigate any entity presented in the graph by selecting it and choosing between different expansion options.
The investigation graph provides you with:
- Visual context from raw data: The live, visual graph displays entity relationships extracted automatically from the raw data. This enables you to easily see connections across different data sources.
- Full investigation scope discovery: Expand your investigation scope using built-in exploration queries to surface the full scope of a breach.
- Built-in investigation steps: Use predefined exploration options to make sure you are asking the right questions in the face of a threat.
For more information on using Azure Sentinel Investigation graph to deep dive incidents, see Tutorial: Investigate incidents with Azure Sentinel.
Learn more about CMMC with Microsoft
Here are some of the best resource to learn more about CMMC in the cloud with Microsoft:
- Accelerating CMMC compliance for Microsoft cloud (in depth review)
- CMMC-AB Standards with Regan Edens – National Conversation
- Defense Federal Acquisition Regulation Supplement (DFARS)
- International Traffic in Arms Regulations (ITAR)
- Federal Risk and Authorization Management Program (FedRAMP)
- US Export Administration Regulations (EAR)
- NIST SP 800-171 Compliance
- Overview of the NIST SP 800-53 R4 blueprint sample
Bookmark the Security blog to keep up with our expert coverage on security matters and follow us at @MSFTSecurity or visit our website for the latest news and updates on cybersecurity.
Are you a federal government agency that needs help with cybersecurity? Reach out to TJ Banasik or Mark McIntyre for additional details on the content above, or if you have any other questions about Microsoft’s cybersecurity investments for the federal government.
0 comments