
This is the ninth in a ten-part blog series where we’ll demonstrate principles of the Cybersecurity Maturity Model Certification aligned with Microsoft Azure. The final blog in the series will delve into system & information integrity. In this ninth blog of the series we will explore how to leverage Microsoft Azure for system & communications protection.
Please note that the information cutoff date for this post is October 2020, and that as of the date of this writing, CMMC developments and guidance are in progress. Additionally, as of the date of this writing, the CMMC Accreditation Body has not certified any the third-party assessors and guidance on the formal assessment process is still under development. As a result, the information herein, including our CMMC related offerings, may be enhanced in the future to align with future guidance from the DoD and CMMC Accreditation Body. Microsoft is closely tracking developments related to the CMMC.
Stay tuned for the upcoming CMMC blogs in the series:
- Access Control Maturity – live
- Audit & Accountability Maturity – live
- Asset & Configuration Management Maturity – live
- Identification & Authentication Maturity – live
- Incident Response Maturity – live
- Maintenance & Media Protection Maturity – live
- Recovery & Risk Management Maturity – live
- Security Assessment & Situational Awareness Maturity – live
- System & Communications Protection Maturity – this blog
- System & Information Integrity Maturity – 5/28
What is Cybersecurity Maturity Model Certification (CMMC)?
The Defense Industrial Base (DIB) is charged with implementing Defense Federal Acquisition Regulation Supplement (DFARS) 252.204-7012. DFARS requires organizations supporting the Department of Defense (DoD) to implement NIST SP 800-171 and FedRAMP Moderate Impact level controls. DoD has mandated CMMC with periodic assessments in order to strengthen cybersecurity across the DIB. CMMC builds upon DFARS 7012 by verifying an organization’s readiness to protect Federal Contract Information (FCI) and Controlled Unclassified Information (CUI) such as International Traffic in Arms Regulation (ITAR) and Export Administration Regulations (EAR) export-controlled data.
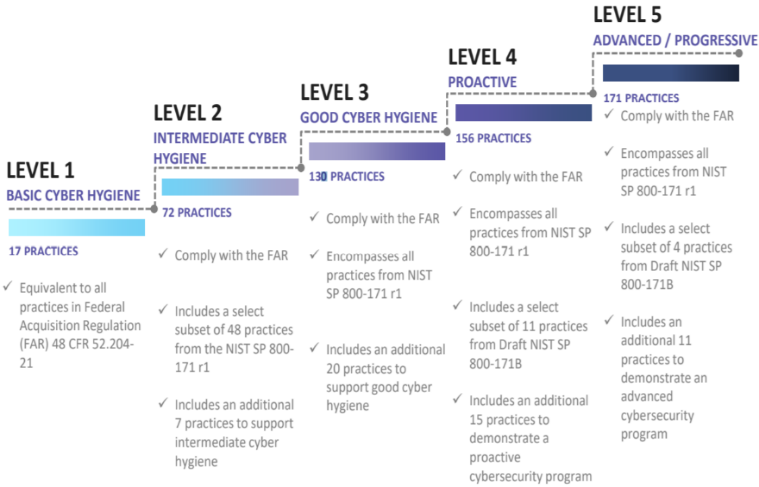
CMMC extends beyond the parent organization into sub-contractors, partners, and suppliers. The framework is intended to enforce critical thinking approaches for comprehensive security. The CMMC framework specifies 5 levels of maturity measurement from Maturity Level 1 (Basic Cyber Hygiene) to Maturity Level 5 (Proactive & Advanced Cyber Practice). The Certification levels will be determined through audits from independent, third-party assessment organizations (C3PAO).
What preparation is required for CMMC alignment to system & communications management?
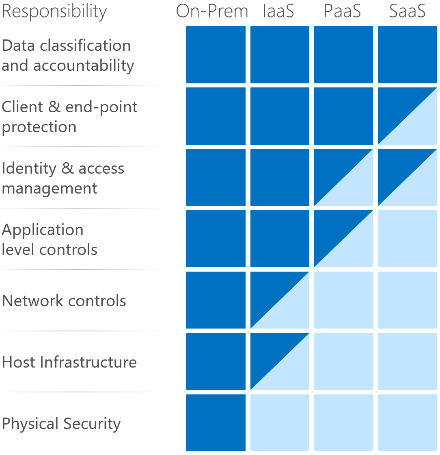
It’s important to understand that compliance is a shared responsibility between the customer and the Cloud Services Provider (CSP). The graphic on the left demonstrates the CSP responsibility in respective cloud models (On-Prem, IaaS, PaaS, SaaS) with dark blue aligning with customer responsibility and light blue aligning with CSP responsibility. For example, CMMC requirements such as Physical Protection (PE) for limiting physical access (C028) is managed by the CSP. Establishment of respective policies and procedures are the customer’s responsibility. It’s important to note that this blog series is aligned with setting the foundation of controls for CMMC Maturity Levels 1 & 2. Once C3PAOs are identified by the CMMC Accreditation Body, customers are advised to work with their respective C3PAO for guidance on comprehensive alignment of controls, audit and certification.
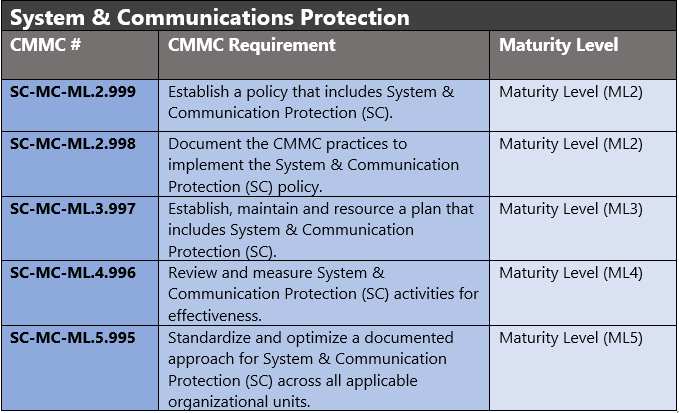
The administrative controls for the CMMC System & Communications Protection (SC-MC) are listed here. These controls fall within the customer’s responsibility. This starts with establishing polices to include system & communications protection (ML2) and progresses to a documented approach across all applicable organizational units (ML5). These controls should be formally created, documented in the System Security Plan (SSP) and implemented within the organization.
Azure Security Controls Aligned to CMMC: System & Communications Protection
Azure Security Controls Aligned to CMMC: System & Communications Protection
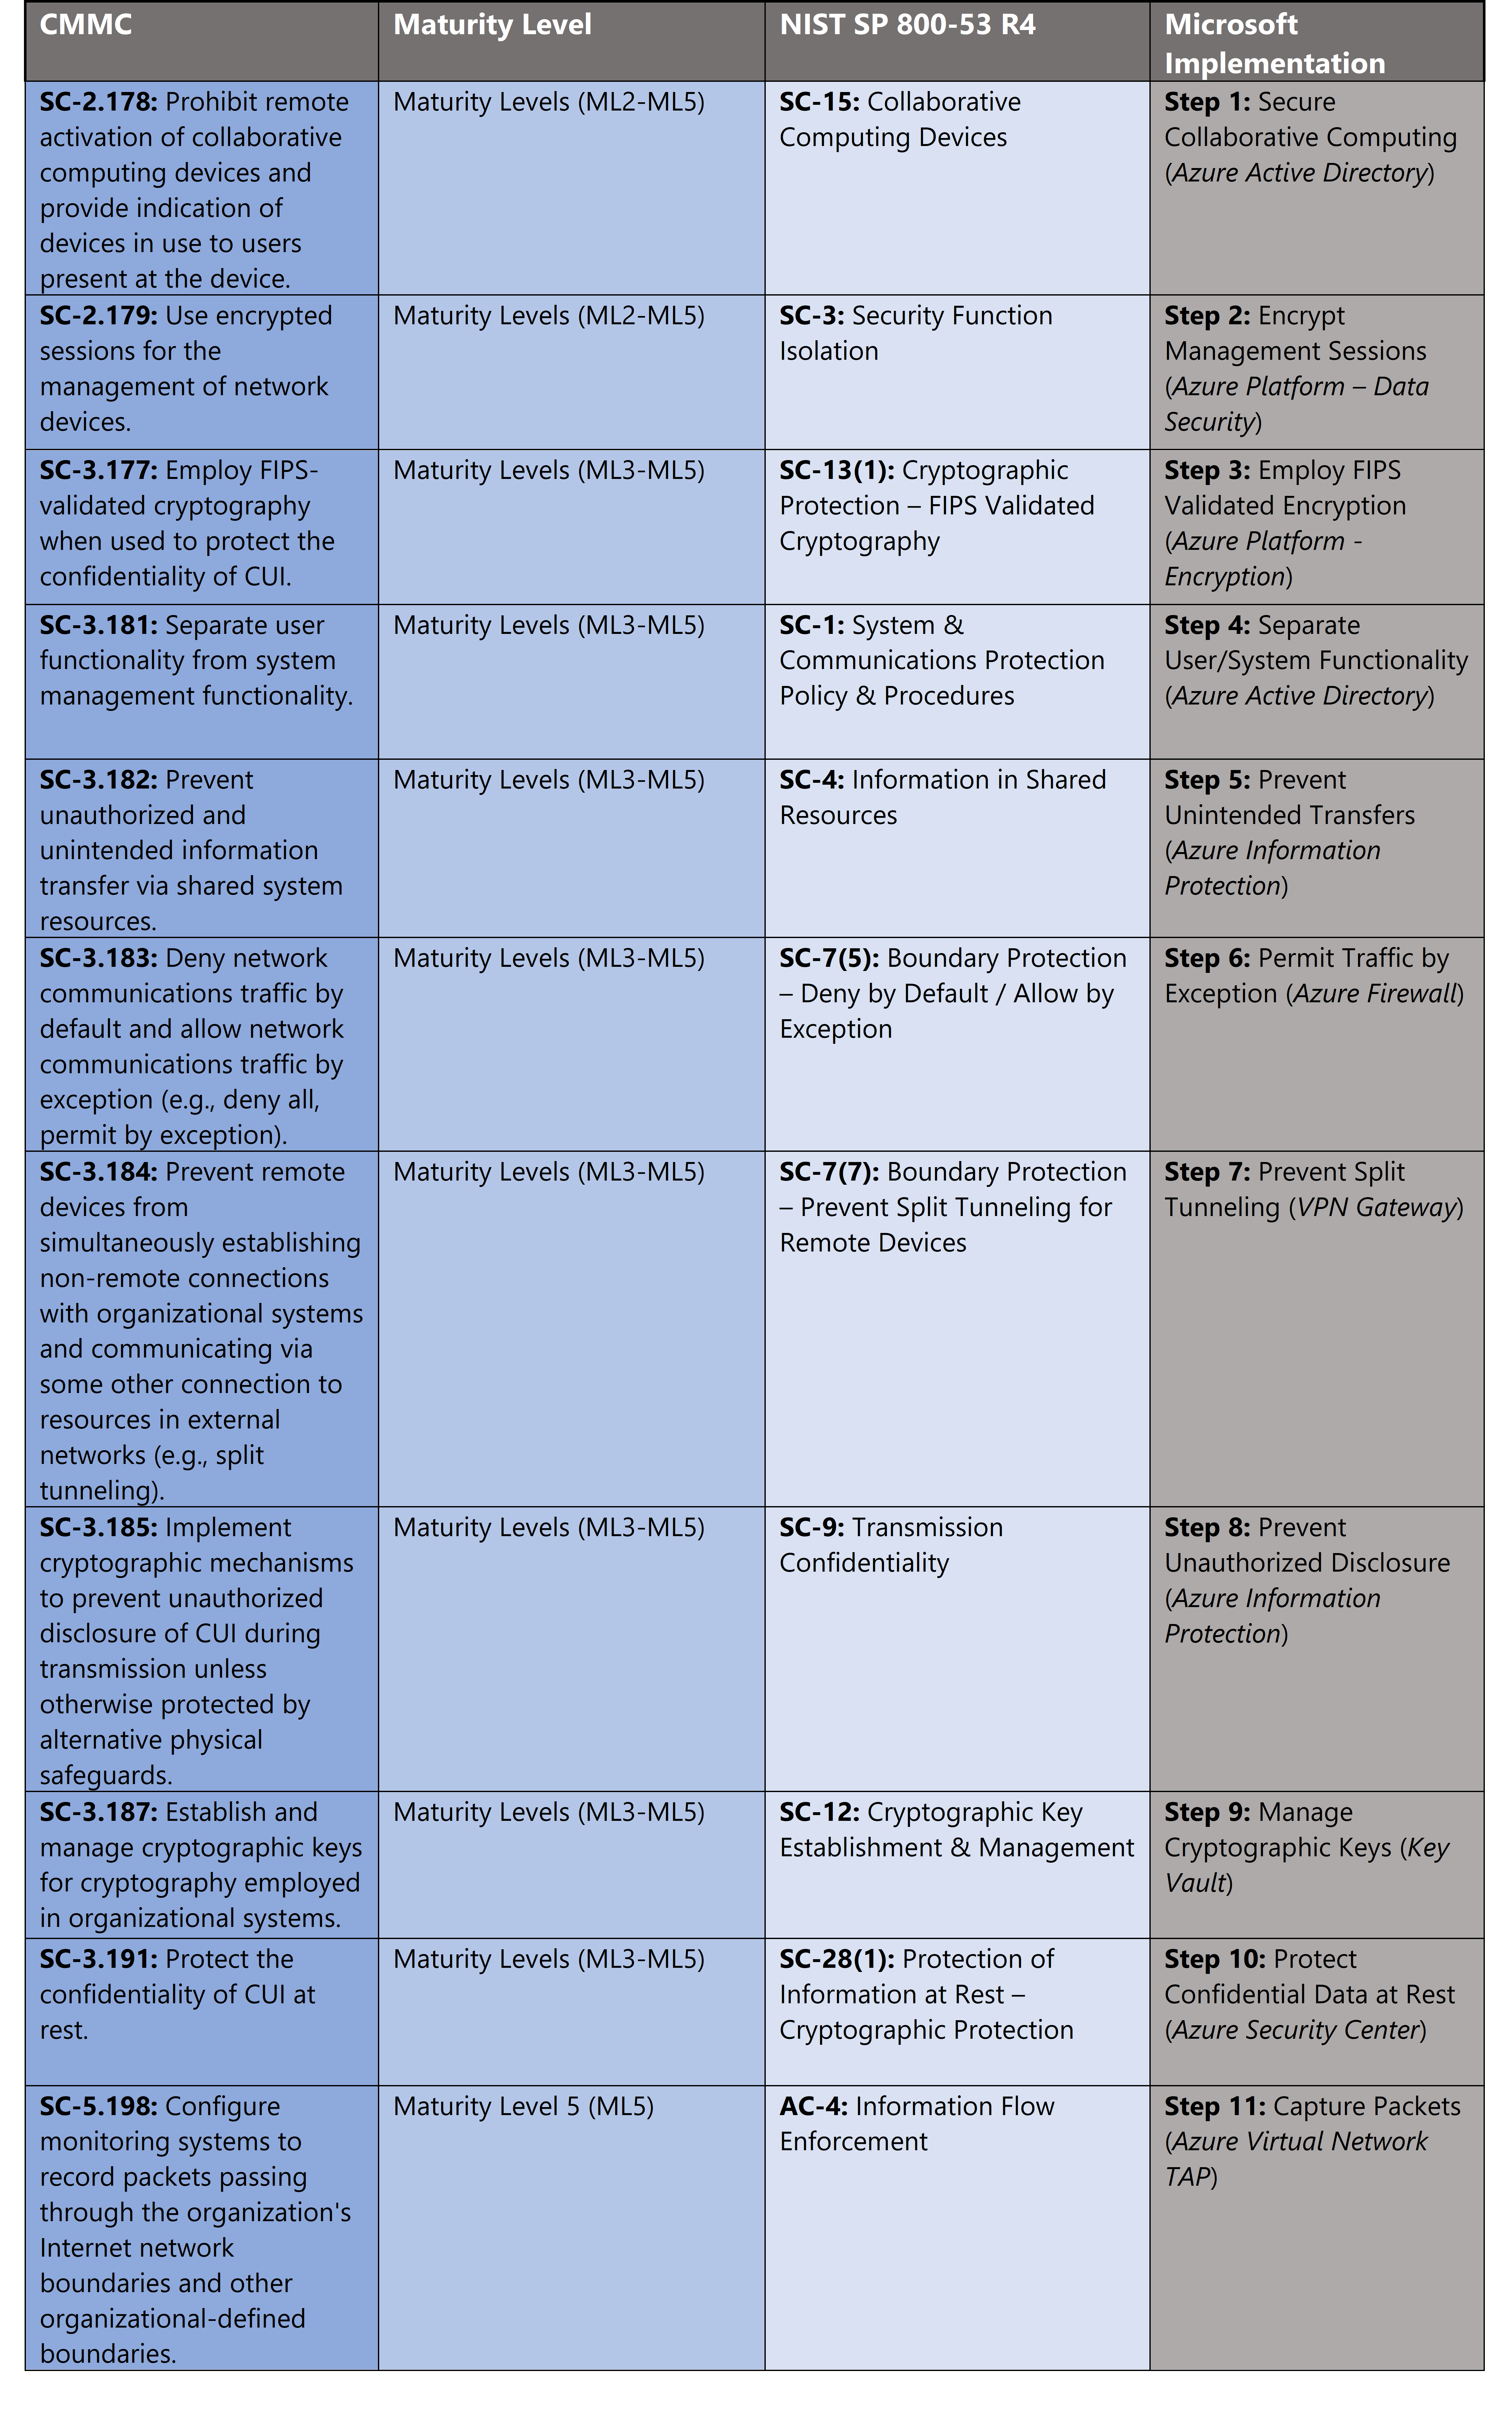
Microsoft Azure Government has developed an 11-step process to facilitate system & communications protection with the security principles within CMMC, NIST SP 800-53 R4 and NIST SP 800-171 standards. Note this process is a starting point, as CMMC requires alignment of people, processes, policy and technology so refer to organizational requirements and respective standards for implementation. Azure has several offerings to facilitate system & communications protection including Azure Security Center, Azure Active Directory, Azure Firewall, Azure Information Protection, Virtual Network TAP and VPN Gateway.
- Azure Security Center is a unified infrastructure security management system that strengthens the security posture of your data centers, and provides advanced threat protection across your hybrid workloads in the cloud – whether they’re in Azure or not – as well as on premises.
- Azure Active Directory is an identity and access management-as-a-service (IDaaS) solution that combines single-on capabilities to any cloud and on-premises application with advanced protection.
- Azure Firewall is a managed, cloud-based network security service that protects your Azure Virtual Network resources. It’s a fully stateful firewall as a service with built-in high availability and unrestricted cloud scalability.
- Azure Information Protection helps secure email, documents, and sensitive data that you share outside your company.
- Virtual Network TAP allows you to continuously stream your virtual machine network traffic to a network packet collector or analytics tool.
- VPN Gateway is a specific type of virtual network gateway that is used to send encrypted traffic between an Azure virtual network and an on-premises location over the public Internet.
11 Steps to CMMC for System & Communications Protection with Microsoft Azure
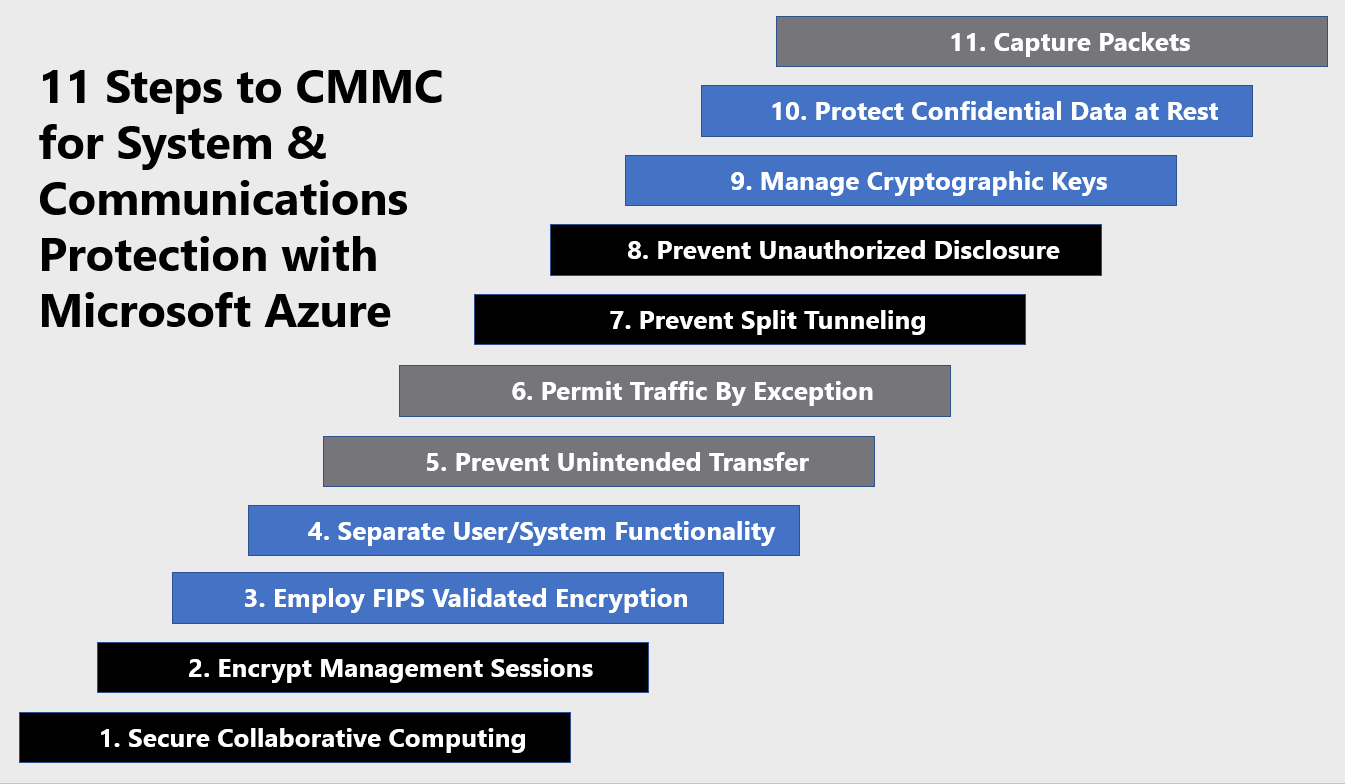
1) Secure Collaborative Computing
Collaborative computing devices include shared access terminals, web cameras, network whiteboards etc. Remote activation of these devices can provide an attacker with an entry point into your network. Collaborative computing devices require security authentications to validate a user is physically present with the device. Collaborative computing devices also require security controls for collaborative sessions to ensure all participants are authorized and that sessions logoff upon termination of the session. Windows Hello for Business and Azure Active Directory can mitigate many of these challenges such as Multi Factor Authentication (MFA) with biometric factors, authentication duration policies, shared session enforcement, and conditional access for trusted locations.
Windows Hello for Business replaces passwords with strong two-factor authentication on PCs and mobile devices. This authentication consists of a new type of user credential that is tied to a device and uses a biometric or PIN. Windows Hello for Business combined with Azure Active Directory joined devices makes it easy for users to securely access cloud-based resources using a strong, two-factor credential. Some resources may remain on-premises as enterprises transition resources to the cloud and Azure AD joined devices may need to access these resources. With additional configurations to your current hybrid deployment, you can provide single sign-on to your on-premises resources for Azure Active Directory joined devices using Windows Hello for Business, using a key or a certificate. For more information, see Configure Device Registration for Hybrid key trust Windows Hello for Business.
2) Encrypt Management Sessions
Encrypting management sessions ensures confidentiality of administrative functions. It restricts an attacker from sniffing and altering administrative functions and sessions. There are several approaches to securing these types of sessions. We’ve covered Privileged Access Workstations (PAW) in previous blogs in this series. The Azure platform offers several mechanisms for keeping these types of sessions secure including TLS/SSL Encryption, Perfect Forward Secrecy, Secure Storage Transactions, Secure RDP/SSH sessions. We’ll also cover Virtual Private Network (VPN) encryption in this blog. For more information see, Azure encryption overview.
- TLS/SSL Encryption in Azure: Microsoft uses the Transport Layer Security (TLS) protocol to protect data when it’s traveling between the cloud services and customers. Microsoft datacenters negotiate a TLS connection with client systems that connect to Azure services. TLS provides strong authentication, message privacy, and integrity (enabling detection of message tampering, interception, and forgery), interoperability, algorithm flexibility, and ease of deployment and use.
- Perfect Forward Secrecy (PFS): Protects connections between customers’ client systems and Microsoft cloud services by unique keys. Connections also use RSA-based 2,048-bit encryption key lengths. This combination makes it difficult for someone to intercept and access data that is in transit.
- Secure RDP Sessions: You can connect and sign in to a VM by using the Remote Desktop Protocol (RDP) from a Windows client computer, or from a Mac with an RDP client installed. Data in transit over the network in RDP sessions can be protected by TLS. You can also use Remote Desktop to connect to a Linux VM in Azure.
- Secure SSH Sessions: For remote management, you can use Secure Shell (SSH) to connect to Linux VMs running in Azure. SSH is an encrypted connection protocol that allows secure sign-ins over unsecured connections. It is the default connection protocol for Linux VMs hosted in Azure. By using SSH keys for authentication, you eliminate the need for passwords to sign in. SSH uses a public/private key pair (asymmetric encryption) for authentication.
3) Employ FIPS Validated Encryption
The Federal Information Processing Standard (FIPS) Publication 140-2 is a U.S. government standard that defines minimum security requirements for cryptographic modules in information technology products, as defined in Section 5131 of the Information Technology Management Reform Act of 1996.
Microsoft maintains an active commitment to meeting the 140-2 requirements, having validated cryptographic modules since the standard’s inception in 2001. Microsoft validates its cryptographic modules under the National Institute of Standards and Technology (NIST) Cryptographic Module Validation Program (CMVP). Multiple Microsoft products, including many cloud services, use these cryptographic modules. Enable “FIPS mode” for a Windows server in Azure via the steps below. For more information, see FIPS 140-2 Validation.
- Ensure FIPS 140-2 validated cryptographic modules are installed: Administrators must ensure that all cryptographic modules installed are FIPS 140-2 validated. This is accomplished by cross-checking the version number of the cryptographic module with the table of validated modules.
- Ensure all security policies for all cryptographic modules are followed: Each of the cryptographic modules has a defined security policy that must be met for the module to operate in its FIPS 140-2 approved mode. The security policy may be found in each module’s published Security Policy Document (SPD).
- Enable the FIPS security policy: Windows provides the security policy setting, “System cryptography: Use FIPS compliant algorithms for encryption, hashing, and signing,” which is used by some Microsoft products to determine whether to operate in a FIPS 140-2 approved mode. When this policy is enabled, the validated cryptographic modules in Windows will also operate in FIPS approved mode. The policy may be set using Local Security Policy, as part of Group Policy, or through a Modern Device Management (MDM) solution.
- Ensure only FIPS validated cryptographic algorithms are used: Neither the operating system nor the cryptographic modules can enforce a FIPS approved mode of operation, regardless of the FIPS security policy setting. To run in a FIPS approved mode, an application or service must check for the policy flag and enforce the security policies of the validated modules.
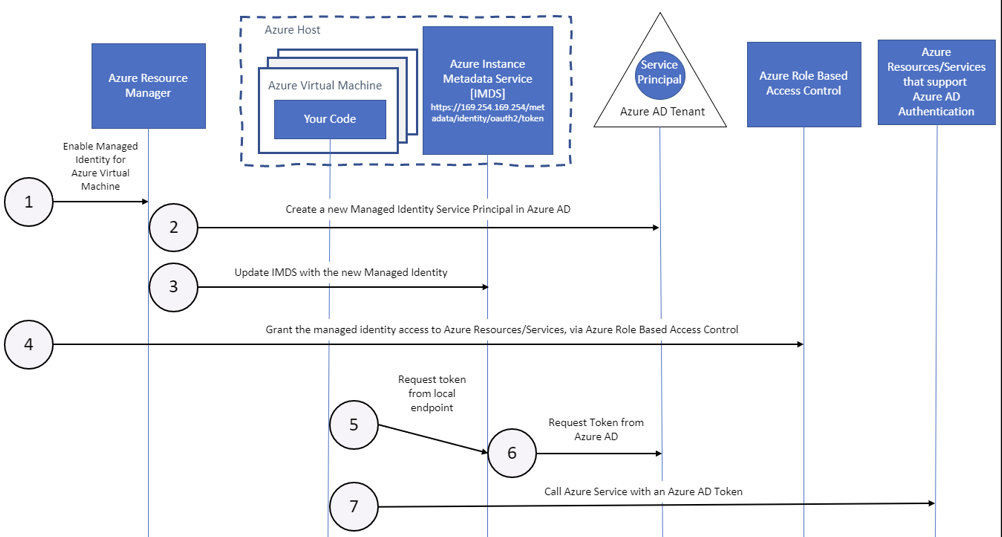
4) Separate User/System Functionality
Separating user and system functionality requires managing separate user/system identities. It becomes challenging to identify security issues if a system is authenticating with user credentials or if a user is authenticating with system credentials. This can also create security gaps if credentials are hard codes or exposed for unauthorized use. The managed identities for Azure resources feature in Azure Active Directory (Azure AD) solves this problem. The feature provides Azure services with an automatically managed identity in Azure AD. You can use the identity to authenticate to any service that supports Azure AD authentication, including Key Vault. There are two types of managed identities in Azure and below is a diagram of how they work for accessing virtual machines. For more information, see What are managed identities for Azure resources?
- System-assigned managed identity is enabled directly on an Azure service instance. When the identity is enabled, Azure creates an identity for the instance in the Azure AD tenant that’s trusted by the subscription of the instance. After the identity is created, the credentials are provisioned onto the instance.
- User-assigned managed identity is created as a standalone Azure resource. Through a create process, Azure creates an identity in the Azure AD tenant that’s trusted by the subscription in use. After the identity is created, the identity can be assigned to one or more Azure service instances.

5) Prevent Unintended Transfer
Preventing unintended data transfer requires information discovery, classification and labeling. Azure Information Protection (AIP) provides a Scanner feature with policy to scan and identity target information within your on-premises and cloud resources. You can classify sensitive information via the steps outlined in the next section. AIP provides the protections outlined below to protect your information from unauthorized disclosure or storage. For more information, see How to configure a label for Rights Management protection.
- Only users within your organization can open the company-confidential document or email.
- Only users in a specific department can edit and print the document or email, while all other users in your organization can only read this document or email.
- Users cannot forward an email or copy information from it that contains sensitive data.
- A document cannot be opened after a specified date.
6) Permit Traffic by Exception
Permitting traffic by exception and denying anything not permitted is a foundational approach to network security. Azure network security is enforced with both Network Security Groups and Azure Firewall. Network Security Groups are generally used internally whereas Azure Firewall is deployed at the network boundary. You can configure NAT rules, network rules, and applications rules on Azure Firewall. The rules are processed according to the rule type and traffic is dropped by default if it’s not permitted.
- Outbound: If you configure network rules and application rules, then network rules are applied in priority order before application rules. The rules are terminating. So, if a match is found in a network rule, no other rules are processed. If there is no network rule match, and if the protocol is HTTP, HTTPS, or MSSQL, then the packet is then evaluated by the application rules in priority order. If still no match is found, then the packet is evaluated against the infrastructure rule collection. If there is still no match, then the packet is denied by default.
- Inbound: Inbound Internet connectivity can be enabled by configuring Destination Network Address Translation (DNAT) as described in Tutorial: Filter inbound traffic with Azure Firewall DNAT using the Azure portal. NAT rules are applied in priority before network rules. If a match is found, an implicit corresponding network rule to allow the translated traffic is added. You can override this behavior by explicitly adding a network rule collection with deny rules that match the translated traffic.
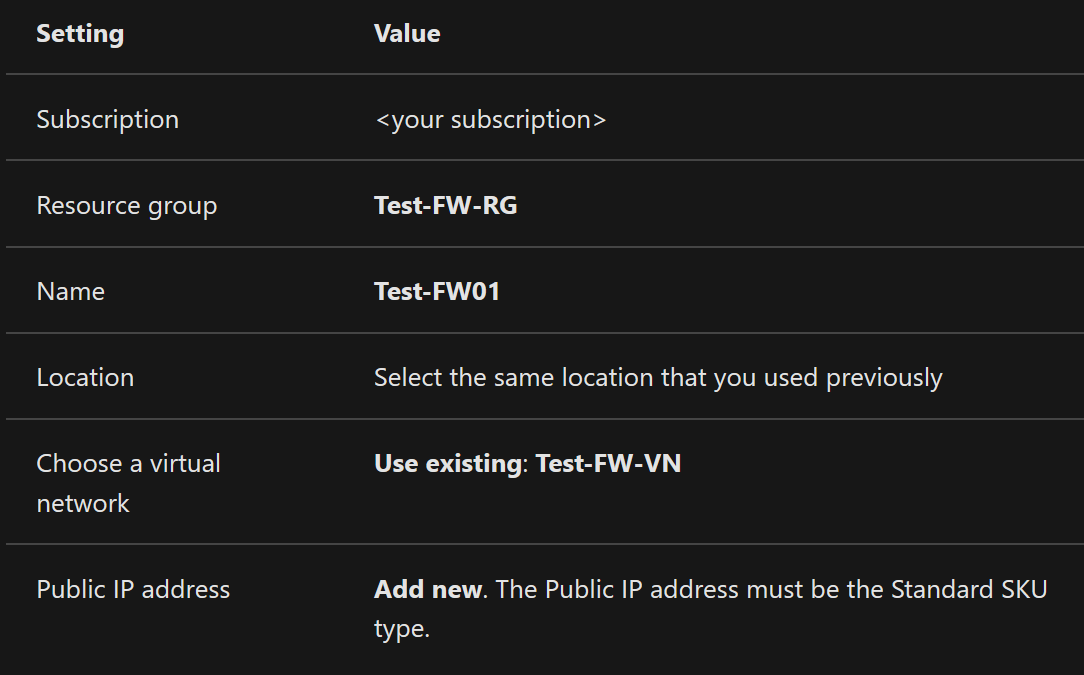
Deploy and configure Azure Firewall via the steps below. For more information, see Tutorial: Deploy and configure Azure Firewall using the Azure portal.
- On the Azure portal menu or from the Home page, select Create a resource.
- Type firewall in the search box and press Enter.
- Select Firewall and then select Create.
- On the Create a Firewall page, use the following table to configure the firewall:

- Select Review + create.
- Review the summary, and then select Create to create the firewall.
- Select the Network rule collection tab to establish respective external resource blocking policies.
7) Prevent Split Tunneling

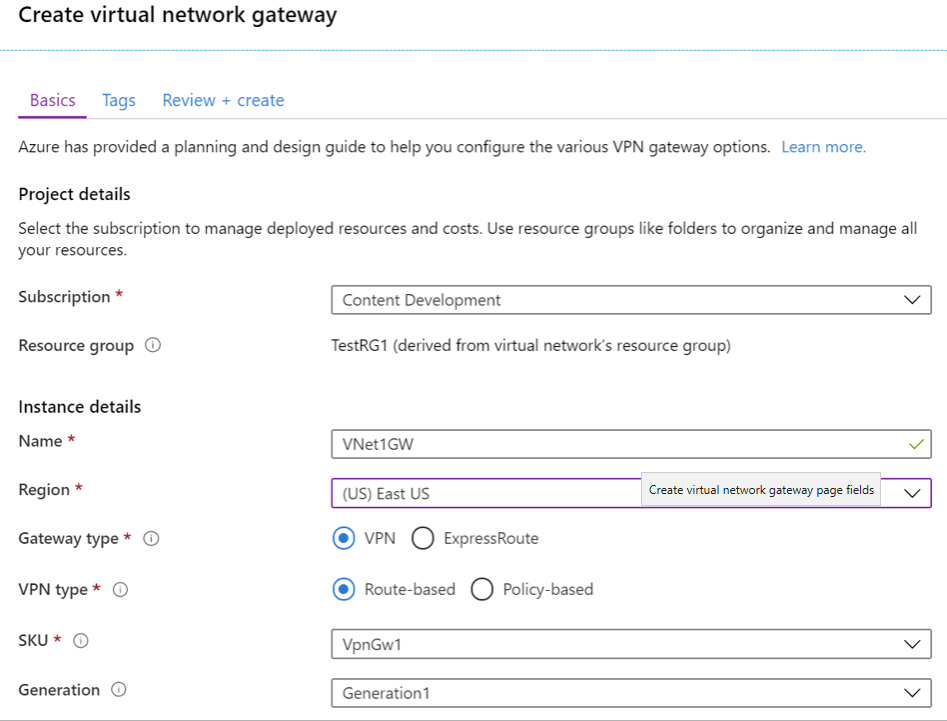
Split tunneling occurs when a there are multiple access to different security domains for access. A mobile device is a good example as it might have internal internet access via WIFI and external internet access via cellular network simultaneously. This can create security gaps as a user could bypass security controls. Forced tunneling lets you redirect or “force” all Internet-bound traffic back to your on-premises location via a Site-to-Site VPN tunnel for inspection and auditing. This is a critical security requirement for most enterprise IT policies. Without forced tunneling, Internet-bound traffic from your VMs in Azure always traverses from Azure network infrastructure directly out to the Internet, without the option to allow you to inspect or audit the traffic. Unauthorized Internet access can potentially lead to information disclosure or other types of security breaches. Create a VPN Gateway via the steps below. For more information, see Configure forced tunneling using the Azure Resource Manager deployment model.
- From the Azure portal menu, select Create a resource.
- Locate Virtual network gateway and select Create.
- On the Basics tab, fill in the values for your virtual network gateway.

- Select Review + create to run validation. Once validation passes, select Create to deploy the VPN gateway. A gateway can take up to 45 minutes to fully create and deploy. You can see the deployment status on the Overview page for your gateway.
8) Prevent Unauthorized Disclosure
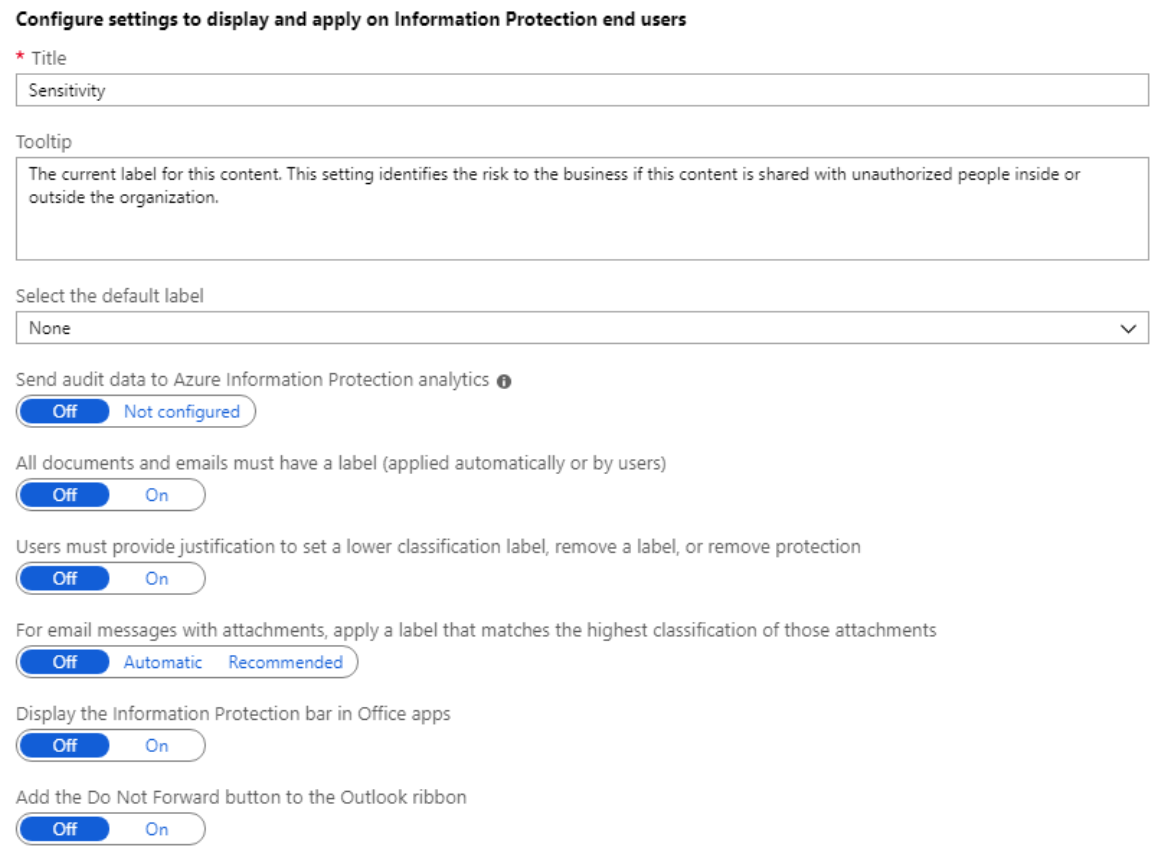
You can secure confidential data and control information flows with Azure Information Protection. Azure Information Protection (sometimes referred to as AIP) is a cloud-based solution that helps an organization to classify and optionally, protect its documents and emails by applying labels. Labels can be applied automatically by administrators who define rules and conditions, manually by users, or a combination where users are given recommendations. Configure an AIP policy via the steps below. For more information, see How to configure the policy settings for Azure Information Protection.
- Sign into the Azure portal.
- Navigate to the Azure Information Protection pane.
- From the Classifications > Policies menu option: On the Azure Information Protection – Policies pane, select Global if the settings that you want to configure will apply to all users.
- On the Policy pane, configure the settings:

- Select the default label: When you set this option, select the label to assign to documents and emails that do not have a label. You cannot set a label as the default if it has sublabels.
- Send audit data to Azure Information Protection analytics: Before you create an Azure Log Analytics workspace for Azure Information analytics, the values for this setting display Off and Not configured. When you create the workspace, the values change to Off and On.
- All documents and emails must have a label: When you set this option to On, all saved documents and sent emails must have a label applied. The labeling might be manually assigned by a user, automatically as a result of a condition, or be assigned by default (by setting the Select the default label option). In this example we’ll select Confidential.

- Select additional policy settings based on use case and select Save to implement.
9) Manage Cryptographic Keys
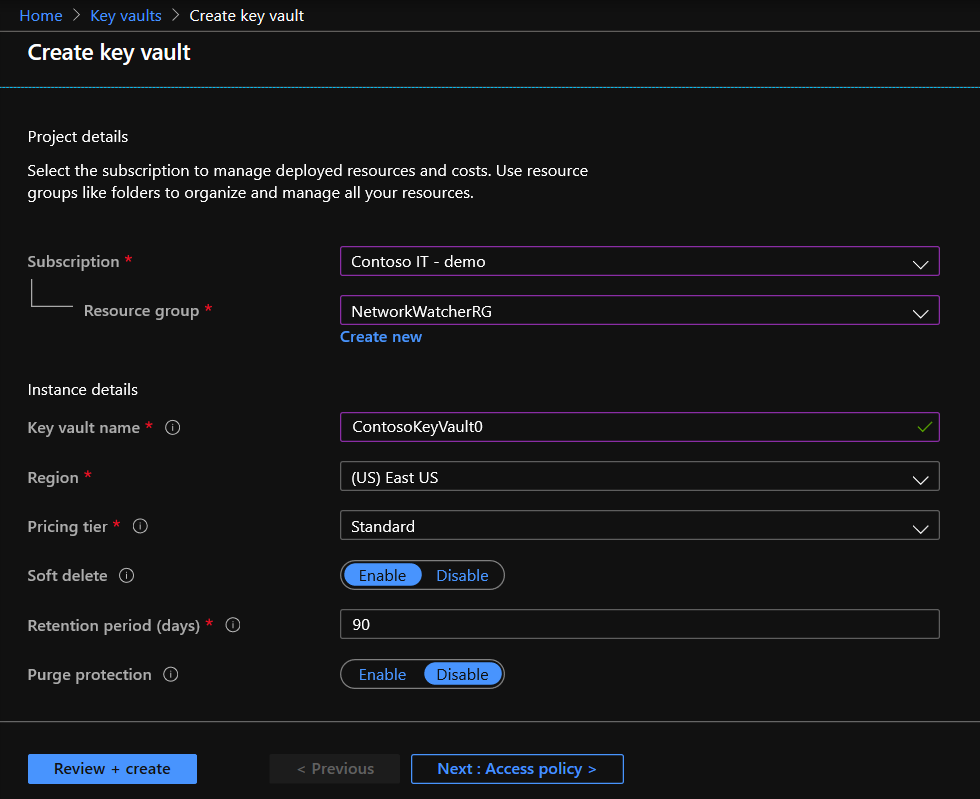
Secure key management is essential to protect data in the cloud. Use Azure Key Vault to encrypt keys and small secrets like passwords that use keys stored in hardware security modules (HSMs). For more assurance, import or generate keys in HSMs, and Microsoft processes your keys in FIPS 140-2 Level 2 validated HSMs (hardware and firmware). With Key Vault, Microsoft doesn’t see or extract your keys. Monitor and audit your key use with Azure logging—pipe logs into Azure HDInsight or your security information and event management (SIEM) solution for more analysis and threat detection. Create a Key Vault via the steps below. For more information, see Quickstart: Set and retrieve a secret from Azure Key Vault using the Azure portal.
- From the Azure portal menu, or from the Home page, select Create a resource.
- In the Search box, enter Key Vault.
- From the results list, choose Key Vault.
- On the Key Vault section, choose Create.
- On the Create key vault section provide the following information:
- Name: A unique name is required.
- Subscription: Choose a subscription.
- Under Resource Group, choose Create new and enter a resource group name.
- In the Location pull-down menu, choose a location.
- Leave the other options to their defaults.

- After providing the information above, select Create.
10) Protect Confidential Data at Rest
Data at rest includes information that resides in persistent storage on physical media, in any digital format. The media can include files on magnetic or optical media, archived data, and data backups. Microsoft Azure offers a variety of data storage solutions to meet different needs, including file, disk, blob, and table storage. Microsoft also provides encryption to protect Azure SQL Database, Azure Cosmos DB, and Azure Data Lake. Azure supports various encryption models for data at rest including client-side encryption, server-side encryption. Azure disk encryption, Azure Storage Service Encryption, Transparent Data Encryption and various database encryption models. Azure Security Center has a helpful feature to assess and implement encryption within your environment.
Azure Security Center recommends that you apply disk encryption if you have Windows or Linux VM disks that are not encrypted using Azure Disk Encryption. Disk Encryption lets you encrypt your Windows and Linux IaaS VM disks. Encryption is recommended for both the OS and data volumes on your VM.
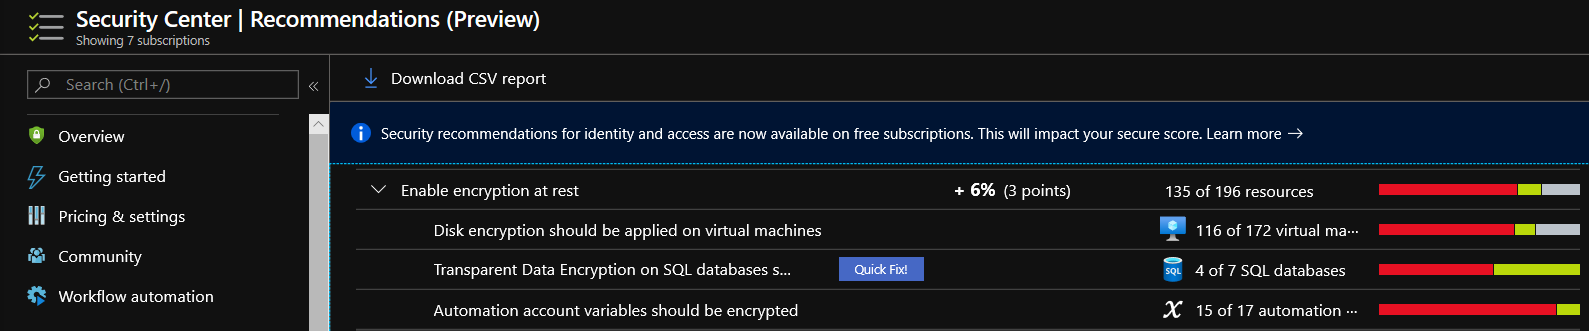
Disk Encryption uses the industry standard BitLocker feature of Windows and the DM-Crypt feature of Linux. These features provide OS and data encryption to help protect and safeguard your data and meet your organizational security and compliance commitments. Disk Encryption is integrated with Azure Key Vault to help you control and manage the disk encryption keys and secrets in your Key Vault subscription, while ensuring that all data in the VM disks are encrypted at rest in your Azure Storage. For more information, see Apply disk encryption in Azure Security Center.
11) Capture Packets
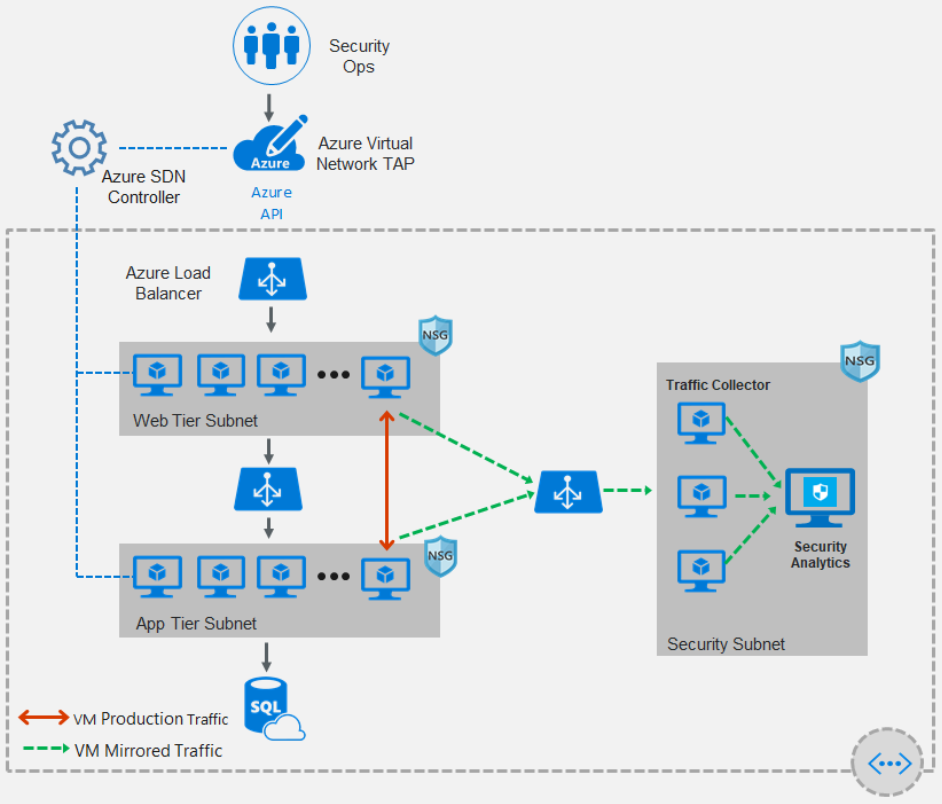
Capturing network traffic facilitates deep-packet inspection, auditing and forensic artifacts for investigation. Azure virtual network TAP (Terminal Access Point) allows you to continuously stream your virtual machine network traffic to a network packet collector or analytics tool. The collector or analytics tool is provided by a network virtual appliance partner. The following picture shows how virtual network TAP works. You can add a TAP configuration on a network interface that is attached to a virtual machine deployed in your virtual network. The destination is a virtual network IP address in the same virtual network as the monitored network interface or a peered virtual network. The collector solution for virtual network TAP can be deployed behind an Azure Internal Load Balancer for high availability. For more information, see Virtual network TAP.
Learn more about CMMC with Microsoft
Here are some of the best resource to learn more about CMMC in the cloud with Microsoft:
- Accelerating CMMC compliance for Microsoft cloud (in depth review)
- CMMC-AB Standards with Regan Edens – National Conversation
- Defense Federal Acquisition Regulation Supplement (DFARS)
- International Traffic in Arms Regulations (ITAR)
- Federal Risk and Authorization Management Program (FedRAMP)
- US Export Administration Regulations (EAR)
- NIST SP 800-171 Compliance
- Overview of the NIST SP 800-53 R4 blueprint sample
Bookmark the Security blog to keep up with our expert coverage on security matters and follow us at @MSFTSecurity or visit our website for the latest news and updates on cybersecurity.
Are you a federal government agency that needs help with cybersecurity? Reach out to TJ Banasik or Mark McIntyre for additional details on the content above, or if you have any other questions about Microsoft’s cybersecurity investments for the federal government.
0 comments