This is the third in a ten-part blog series where we’ll demonstrate principles of the Cybersecurity Maturity Model Certification aligned with Microsoft Azure. Subsequent blogs in the series will delve into identification & authentication, incident response, maintenance & media protection, recovery & risk management, security assessment & risk management, system & communications protection and system & information integrity. In this third blog of the series we will explore how to leverage Microsoft Azure for asset and configuration management.
Please note that the information cutoff date for this post is October 2020, and that as of the date of this writing, CMMC developments and guidance are in progress. Additionally, as of the date of this writing, the CMMC Accreditation Body has not certified any the third-party assessors and guidance on the formal assessment process is still under development. As a result, the information herein, including our CMMC related offerings, may be enhanced in the future to align with future guidance from the DoD and CMMC Accreditation Body. Microsoft is closely tracking developments related to the CMMC.
Stay tuned for the published and upcoming CMMC blogs in the series:
- Access Control Maturity – live
- Audit & Accountability Maturity – live
- Asset & Configuration Management Maturity – this blog
- Identification & Authentication Maturity – live
- Incident Response Maturity – live
- Maintenance & Media Protection Maturity – live
- Recovery & Risk Management Maturity – live
- Security Assessment & Situational Awareness Maturity – live
- System & Communications Protection Maturity – live
- System & Information Integrity Maturity (5/28)
What is Cybersecurity Maturity Model Certification (CMMC)?
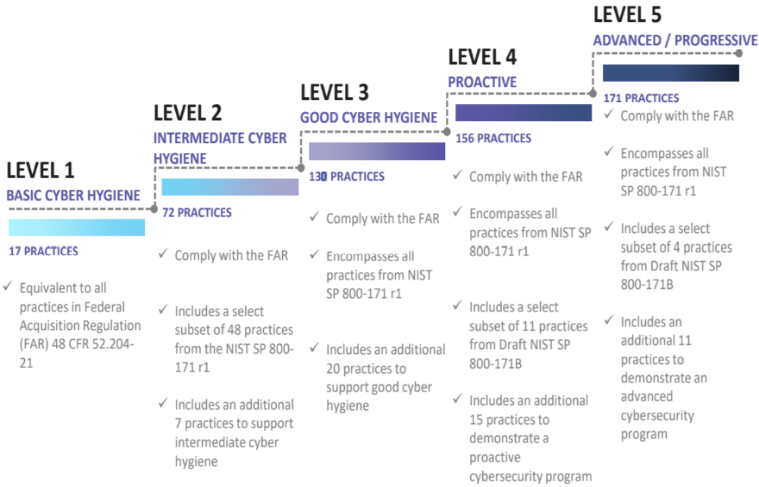
The Defense Industrial Base (DIB) is charged with implementing Defense Federal Acquisition Regulation Supplement (DFARS) 252.204-7012. DFARS requires organizations supporting the Department of Defense (DoD) to implement NIST SP 800-171 and FedRAMP Moderate Impact level controls. DoD has mandated CMMC with periodic assessments in order to strengthen cybersecurity across the DIB. CMMC builds upon DFARS 7012 by verifying an organization’s readiness to protect Federal Contract Information (FCI) and Controlled Unclassified Information (CUI) such as International Traffic in Arms Regulation (ITAR) and Export Administration Regulations (EAR) export-controlled data.
CMMC extends beyond the parent organization into sub-contractors, partners, and suppliers. The framework is intended to enforce critical thinking approaches for comprehensive security. The CMMC framework specifies 5 levels of maturity measurement from Maturity Level 1 (Basic Cyber Hygiene) to Maturity Level 5 (Proactive & Advanced Cyber Practice). The Certification levels will be determined through audits from independent, third-party assessment organizations (C3PAO).
What preparation is required for CMMC alignment to access & configuration management?

It’s important to understand that compliance is a shared responsibility between the customer and the Cloud Services Provider (CSP). The graphic on the left demonstrates the CSP responsibility in respective cloud models (On-Prem, IaaS, PaaS, SaaS) with dark blue aligning with customer responsibility and light blue aligning with CSP responsibility. For example, CMMC requirements such as Physical Protection (PE) for limiting physical access (C028) is managed by the CSP. Establishment of respective policies and procedures are the customer’s responsibility. It’s important to note that this blog series is aligned with setting the foundation of controls for CMMC Maturity Levels 1 & 2. Once C3PAOs are identified by the CMMC Accreditation Body, customers are advised to work with their respective C3PAO for guidance on comprehensive alignment of controls, audit and certification.
The administrative controls for the CMMC Asset Management Maturity Capability (AM-MC) and Configuration Management Maturity (CM-MC) are listed here. These controls fall within the customer’s responsibility. This starts with establishing polices to include asset & configuration management (ML2) and progresses to a documented approach across all applicable organizational units (ML5). These controls should be formally created, documented in the System Security Plan (SSP) and implemented within the organization.

Microsoft Azure Security Controls Aligned to CMMC: Asset & Configuration Management
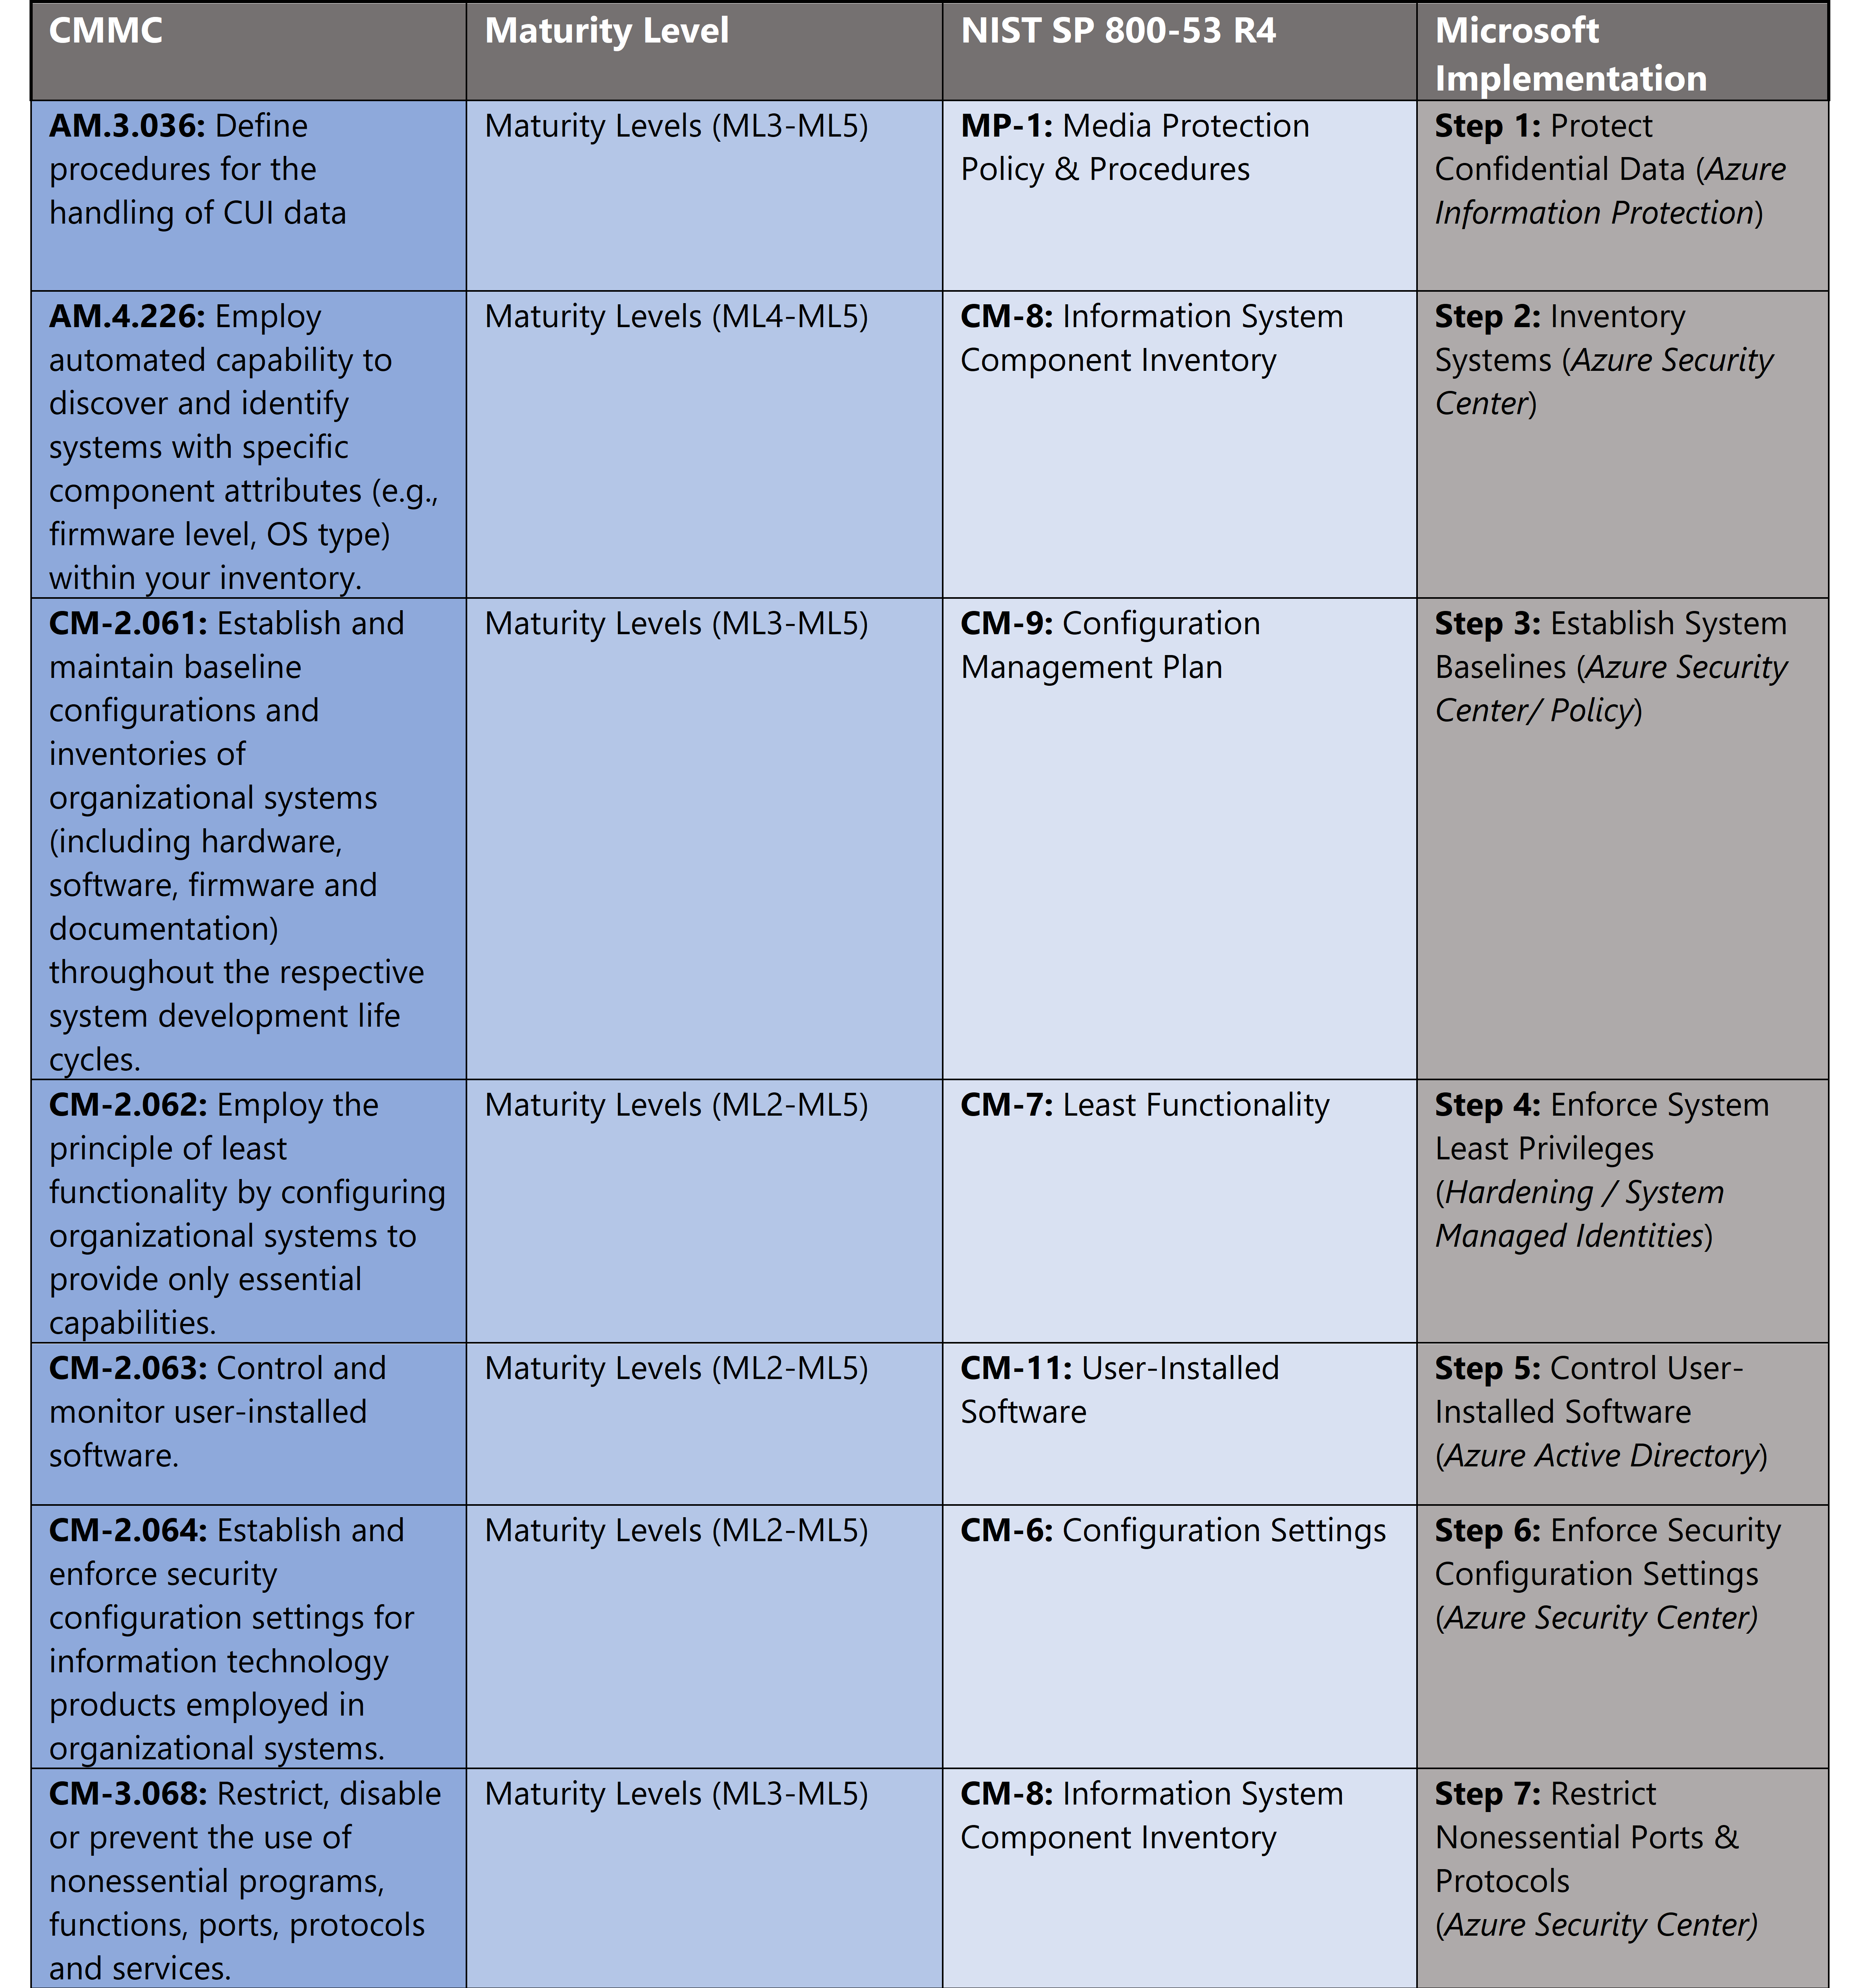
Azure Security Controls Aligned to CMMC: Asset & Configuration Management
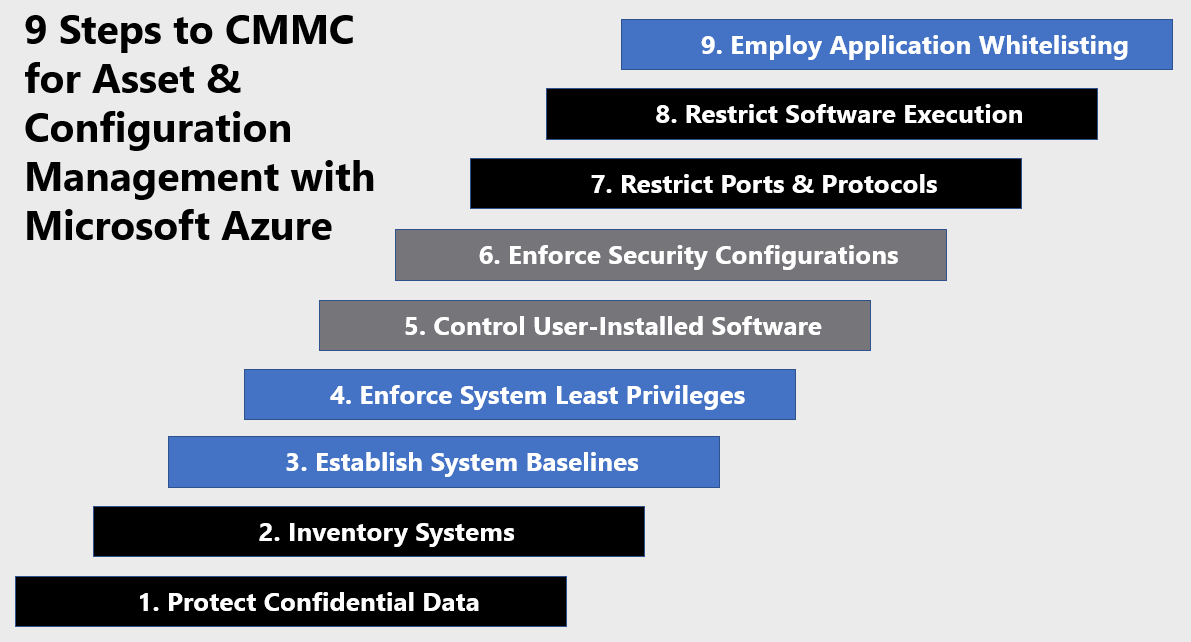
Microsoft Azure Government has developed a 9-step process to facilitate asset & configuration management with the security principles within CMMC, NIST SP 800-53 R4 and NIST SP 800-171 standards. Note this process is a starting point, as CMMC requires alignment of people, processes, policy and technology so refer to organizational requirements and respective standards for implementation. Azure has several offerings to facilitate asset & configuration management including Azure Security Center, Azure Active Directory, Azure AD Privileged Identity Management, Azure Policy and Azure Information Protection
- Azure Security Center is a unified infrastructure security management system that strengthens the security posture of your data centers and provides advanced threat protection across your hybrid workloads in the cloud – whether they’re in Azure or not – as well as on premises.
- Azure Active Directory is an identity and access management-as-a-service (IDaaS) solution that combines single-on capabilities to any cloud and on-premises application with advanced protection.
- Azure AD Privileged Identity Management is a service that enables you to manage, control, and monitor access to important resources in your organization. These resources include resources in Azure AD, Azure, and other Microsoft Online Services like Office 365 or Microsoft Intune.
- Azure Policy helps you manage and prevent IT issues with policy definitions that enforce rules and effects for your resources.
- Azure Information Protection helps secure email, documents, and sensitive data that you share outside your company.
9 Steps to CMMC for Asset & Configuration Management with Microsoft Azure
1) Protect Confidential Data
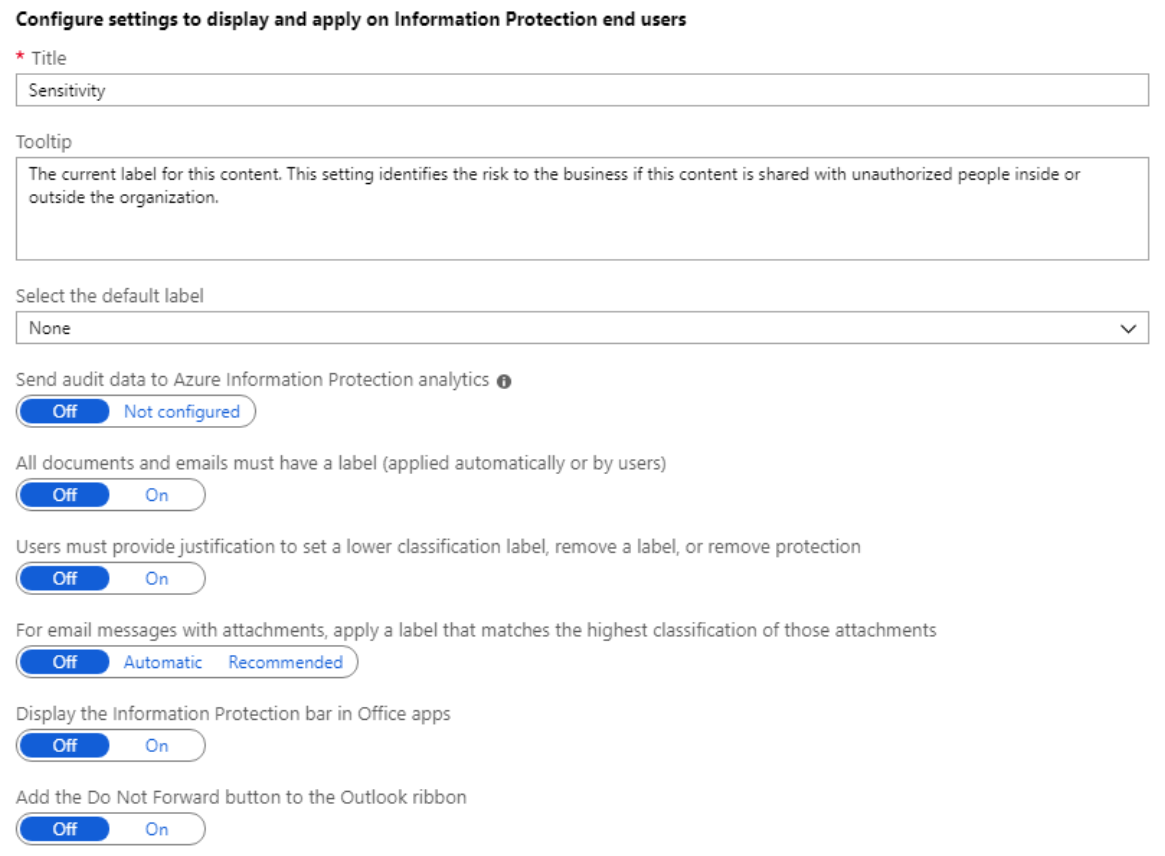
You can secure confidential data and control information flows with Azure Information Protection. Azure Information Protection (sometimes referred to as AIP) is a cloud-based solution that helps an organization to classify and optionally, protect its documents and emails by applying labels. Labels can be applied automatically by administrators who define rules and conditions, manually by users, or a combination where users are given recommendations. Configure an AIP policy via the steps below. For more information, see How to configure the policy settings for Azure Information Protection.
- Sign into the Azure portal.
- Navigate to the Azure Information Protection pane.
- From the Classifications > Policies menu option: On the Azure Information Protection – Policies pane, select Global if the settings that you want to configure will apply to all users.
- On the Policy pane, configure the settings:

- Select the default label: When you set this option, select the label to assign to documents and emails that do not have a label. You cannot set a label as the default if it has sublabels.
- Send audit data to Azure Information Protection analytics: Before you create an Azure Log Analytics workspace for Azure Information analytics, the values for this setting display Off and Not configured. When you create the workspace, the values change to Off and On.
- All documents and emails must have a label: When you set this option to On, all saved documents and sent emails must have a label applied. The labeling might be manually assigned by a user, automatically as a result of a condition, or be assigned by default (by setting the Select the default label option). In this example we’ll select Confidential.

- Select additional policy settings based on use case and select Save to implement.
2) Inventory Systems
There are several methods to inventory your systems and software in Azure. One of the most straightforward methods is navigating to Azure and selecting All resources to display a list of all the assets within your tenants and subscriptions. This blade provides reporting by selecting the Export to CSV icon at the top of the page.
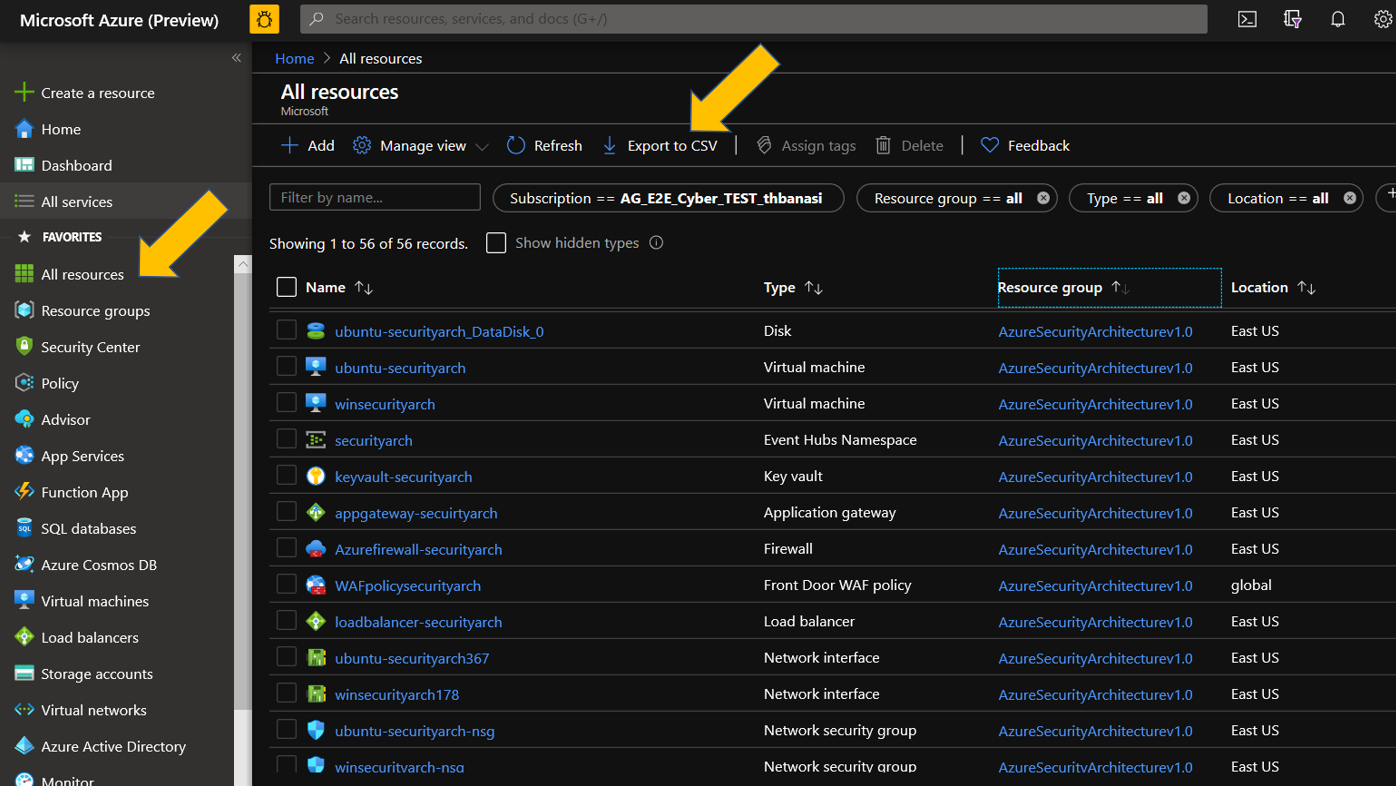
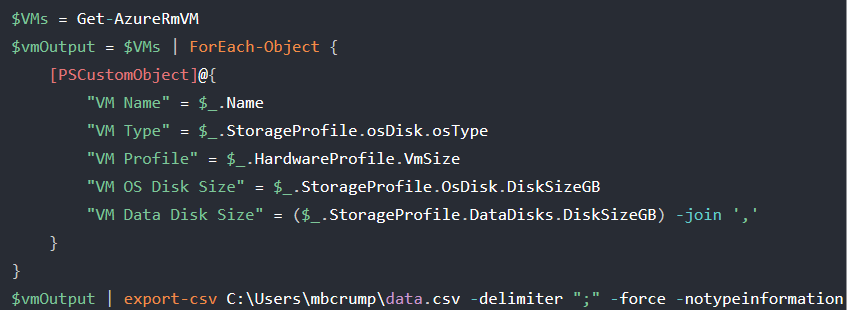
You can also export this report with Azure Command Line Interface (ACLI) or Powershell for operations at scale. Below is a snapshot of the Powershell Command, for more information see Export Azure Resources to CSV Files with Powershell.
3) Establish System Baselines
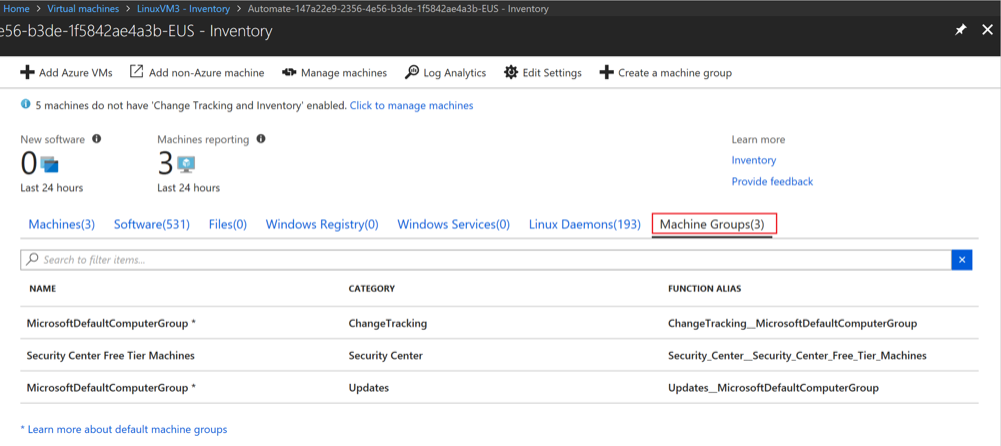
You can establish and maintain system baselines with Azure virtual machine with inventory collection. You can enable inventory tracking for an Azure virtual machine from the virtual machine’s resource page. You can collect and view the following inventory information on your computers:
- Windows software (Windows applications and Windows updates), services, files, and Registry keys
- Linux software (packages) daemons, and files
This method provides a browser-based user interface for setting up and configuring inventory collection. Enable inventory collection via the steps below. For more information, see Manage an Azure virtual machine with inventory collection.
- In the left pane of the Azure portal, select Virtual machines.
- In the list of virtual machines, select a virtual machine.
- On the Resource menu, under Operations, select Inventory.
- Select a Log Analytics workspace for storing your data logs. If no workspace is available to you for that region, you are prompted to create a default workspace and automation account.
- To start onboarding your computer, select Enable.

- In the Inventory view, select the Edit Settings button at the top of the window.
- To add a new collection setting, go to the setting category that you want to add by selecting the Windows Registry, Windows Files, and Linux Files tabs.
- Select the appropriate category and click Add at the top of the window.

4) Enforce System Least Privileges
Maintaining system privileges and enforcing least privilege in on-premises networks is a challenging endeavor. Managed identities are a feature in Azure Active Directory (Azure AD) which solves this problem. The feature provides Azure services with an automatically managed identity in Azure AD. You can use the identity to authenticate to any service that supports Azure AD authentication, including Key Vault, without exposing credentials. The managed identities for Azure resources feature is free with Azure AD for Azure subscriptions and there’s no additional cost. There are two types of system managed identities and below is a diagram detailing how Azure role-based access is applies to these accounts. For more information, see What are managed identities for Azure resources?
- A system-assigned managed identity is enabled directly on an Azure service instance. When the identity is enabled, Azure creates an identity for the instance in the Azure AD tenant that’s trusted by the subscription of the instance. After the identity is created, the credentials are provisioned onto the instance. The lifecycle of a system-assigned identity is directly tied to the Azure service instance that it’s enabled on. If the instance is deleted, Azure automatically cleans up the credentials and the identity in Azure AD.
- A user-assigned managed identity is created as a standalone Azure resource. Through a create process, Azure creates an identity in the Azure AD tenant that’s trusted by the subscription in use. After the identity is created, the identity can be assigned to one or more Azure service instances. The lifecycle of a user-assigned identity is managed separately from the lifecycle of the Azure service instances to which it’s assigned.

5) Control User-Installed Software
There are several methods to controlling user-installed software in Azure. Step 8 (Restrict Software Execution) details how to apply adaptive application controls with Azure Security Center and Step 9 (Employ Application Whitelisting) details how to apply application whitelisting configurations with Azure Policy. One of the most effective methods for controlling user-installed software is enforcing least privilege, role-based access control (RBAC) and tightly controlling administrative rights. Azure Active Directory Privileged Identity Management allows you to manage administrator access for users and groups. Administrative rights can be time bound for change windows and eligibility periods. They can also enforce conditional access requirements such as multi-factor authentication (MFA) and trusted locations. Apply Azure AD Privileged Identity Management via the steps below. For more information, see Deploy Azure AD Privileged Identity Management (PIM).
- Navigate to the Azure Active Directory Blade.
- Select Identity Governance.
- Select Manage Role Assignments under Privileged Identity Management.
- Select Manage under Manage Access.
- Select +Add Member.
- Set Scope, this can be tailored to Directory (Default) or more granular to assets based on your requirements.

- Select a role based on RBAC groups. For this example, we’ve selected Application Administrator rights. Under Select a member, we’ve selected user John Doe.
- Select a role based on RBAC groups. For this example, we’ve selected Application Administrator rights. Under Select a member, we’ve selected user John Doe.

- Set membership settings, in this example John Doe will be temporarily eligible to request Application Administrator rights within the notional change window of 8-10PM.
- Click Save to deploy PIM configuration.
6) Enforce Security Configurations
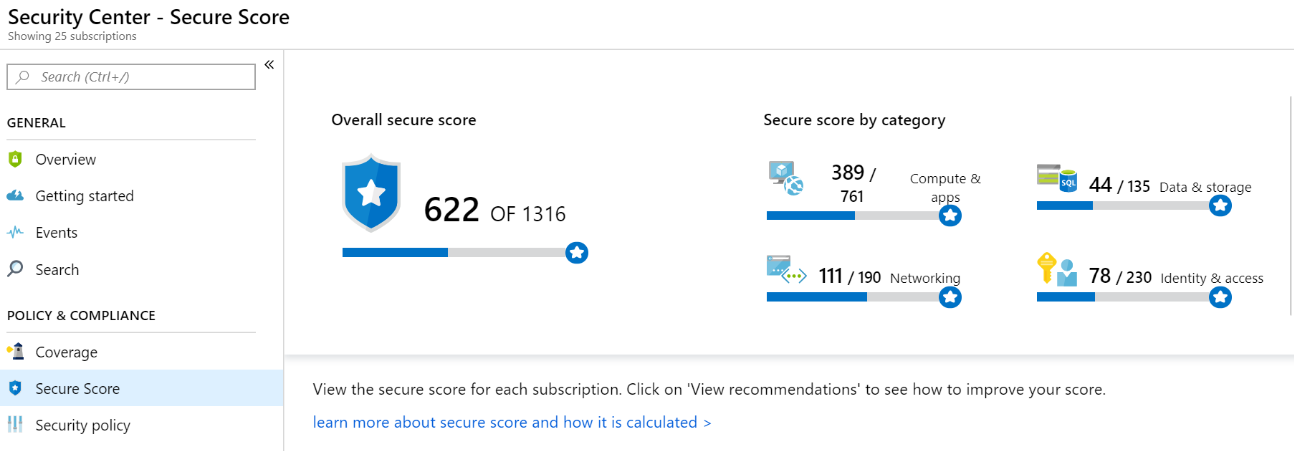
Azure Security Center provides the Secure Score calculation to provide visibility and management of your security configurations. This is another offering included in the Azure Security Free SKU. Security Center mimics the work of a security analyst, reviewing your security recommendations, and applying advanced algorithms to determine how crucial each recommendation is. Azure Security center constantly reviews your active recommendations and calculates your Secure Score based on them, the score of a recommendation is derived from its severity and security best practices that will affect your workload security the most. Security Center also provides you with an Overall Secure Score.
Overall Secure Score is an accumulation of all your recommendation scores. You can view your overall Secure Score across your subscriptions or management groups, depending on what you select. The score will vary based on subscription selected and the active recommendations on these subscriptions. To check which recommendations impact your Secure Score most, you can view the top three most impactful recommendations in the Security Center dashboard or you can sort the recommendations in the recommendations list blade using the Secure Score impact column. View your overall Secure Score via the steps below. For more information, see Improve your secure score in Azure Security Center.
- In the Azure dashboard, click Security Center and then click Secure Score.
- At the top you can see Secure Score highlights:
- The Overall Secure Score represents the score per policies, per selected subscription
- Secure Score by category shows you which resources need the most attention
- Top recommendations by Secure Score impact provides you with a list of the recommendations that will improve your Secure Score the most if you implement them.

- In the table below, you can see each of your subscriptions and the overall Secure Score for each.
- Click View recommendations to see the recommendations for that subscription that you can remediate to improve your Secure Score.
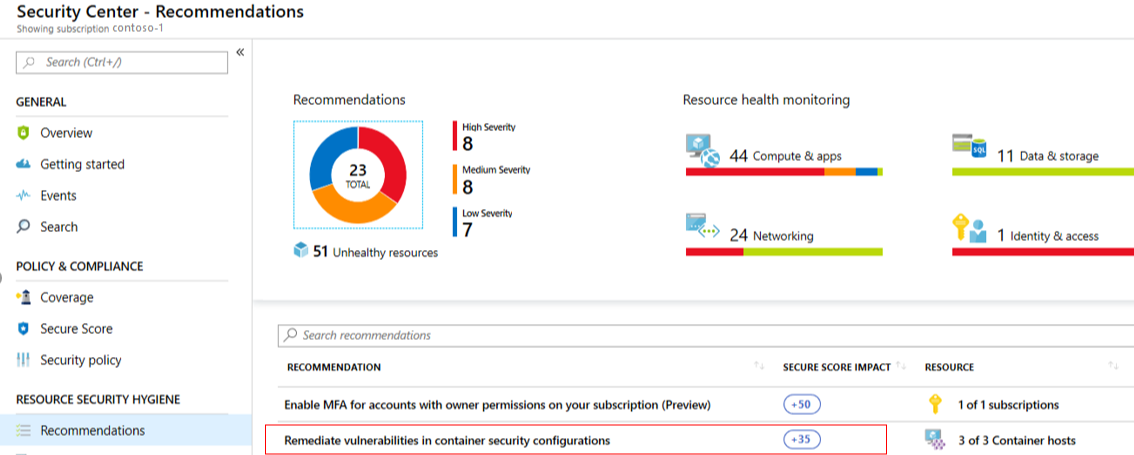
- In the list of recommendations, you can see that for each recommendation there is a column that represents the Secure Score impact. This number represents how much your overall Secure Score will improve if you follow the recommendations. For example, in the screen below, if you Remediate vulnerabilities in container security configurations, your Secure Score will increase by 35 points.

7) Restrict Ports & Protocols
Azure Security Center (ASC) provides numerous recommendations for both monitoring, auditing, and restricting your environments ports and protocols. These recommendations provide both visibility and steps for remediation. The recommendations roll up into your Overall Secure Score which is detailed in the previous step. Below are commonly enforced network security controls in ASC. For a complete listing of Azure Security Center Recommendations, see Security recommendations – a reference guide.

8) Restrict Software Execution
Restricting software execution is a critical requirement for meeting cybersecurity maturity models. Adaptive application control is an intelligent, automated, end-to-end solution from Azure Security Center which helps you control which applications can run on your Azure and non-Azure machines (Windows and Linux). Among other benefits, this helps harden your machines against malware. Security Center uses machine learning to analyze the applications running on your machines and creates an allow list from this intelligence. This capability greatly simplifies the process of configuring and maintaining application allow list policies, enabling you to:
- Block or alert on attempts to run malicious applications, including those that might otherwise be missed by antimalware solutions.
- Comply with your organization’s security policy that dictates the use of only licensed software.
- Avoid unwanted software to be used in your environment.
- Avoid old and unsupported apps to run.
- Prevent specific software tools that are not allowed in your organization.
- Enable IT to control the access to sensitive data through app usage.
Enable adaptive application controls via the steps below. For more information, see Adaptive application controls.
- Sign into the Azure portal.
- Open the Security Center dashboard.
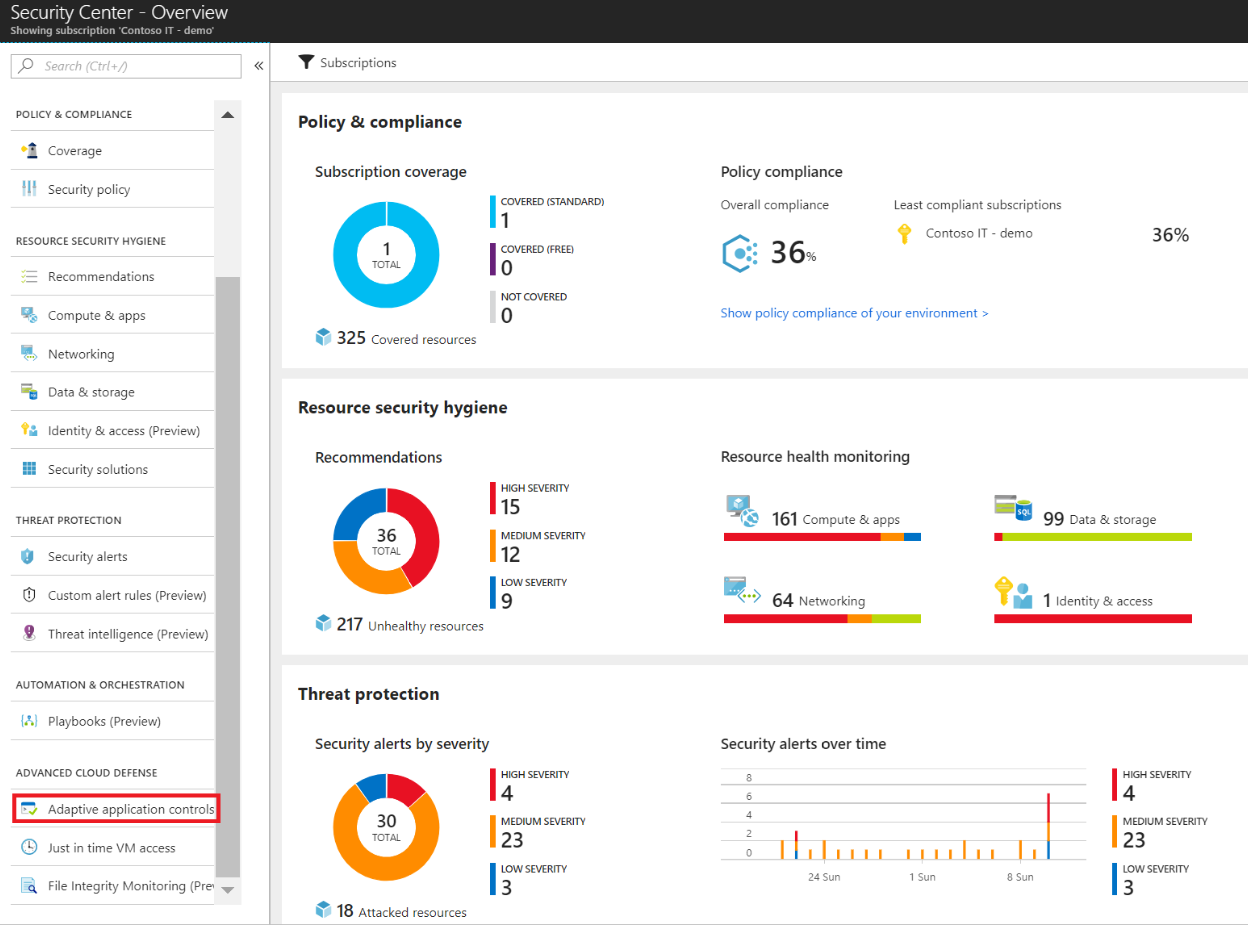
- In the left pane, select Adaptive application controls located under Advanced cloud defense.

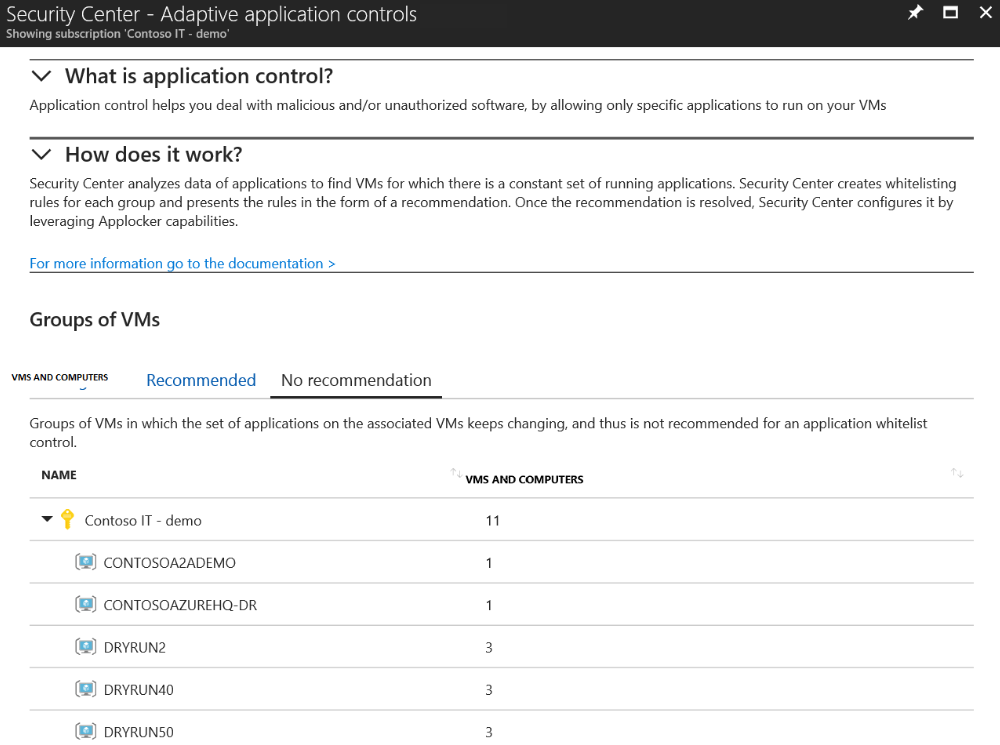
- The adaptive application controls page appears with respective recommendations:

9) Employ Application Whitelisting
Applying application whitelisting is an effective control to prevent malicious application execution. The previous step outlined the process of applying adaptive application control in Azure Security Center, but this configuration is also enforceable with Azure Policy. This configuration assigns an Azure Policy definition that helps you monitor virtual machines where an application whitelist is recommended but has not yet been configured:
- Adaptive Application Controls should be enabled on virtual machines
Azure Policy is highly versatile and can be created with the Azure portal, Azure CLI, Powershell and Azure Resource Manager (ARM) templates. Creating an Azure Policy in the portal is accomplished via the following steps:
- In the Policy portal, select Assignments
- Select Assign Policy from the top of the Policy – Assignments page.

- On the Assign Policy page, select the Scope by clicking the ellipsis and selecting either a management group or subscription.
- Select the Policy definition ellipsis, search for the desired policy definition and click Select.
- Set an Assignment name, Description, and set Policy Enforcement to Enabled.
- Click Assign.
It’s important to note that Azure Policies can be active for automated enforcement or passive for auditing requirements. It is recommended to test all policies with the AuditIfNotExists effects prior to moving to automated policy enforcement with the DeployIfNotExists effect. For automated policy enforcement check Create a Managed Identity from the Assign Policy blade and set a DeployIfNotExists Effect in the policy parameters. For more information, see Quickstart: Create a policy assignment to identify non-compliant resources.
Learn more about CMMC with Microsoft
Here are some of the best resource to learn more about CMMC in the cloud with Microsoft:
- Accelerating CMMC compliance for Microsoft cloud (in depth review)
- CMMC-AB Standards with Regan Edens – National Conversation
- Defense Federal Acquisition Regulation Supplement (DFARS)
- International Traffic in Arms Regulations (ITAR)
- Federal Risk and Authorization Management Program (FedRAMP)
- US Export Administration Regulations (EAR)
- NIST SP 800-171 Compliance
- Overview of the NIST SP 800-53 R4 blueprint sample
Bookmark the Security blog to keep up with our expert coverage on security matters and follow us at @MSFTSecurity or visit our website for the latest news and updates on cybersecurity.
Are you a federal government agency that needs help with cybersecurity? Reach out to TJ Banasik or Mark McIntyre for additional details on the content above, or if you have any other questions about Microsoft’s cybersecurity investments for the federal government.






0 comments