


If you want to perform advanced analytics on your data and create stunning reports in Power BI, you should consider using Microsoft Fabric. Microsoft Fabric is a solution that combines the best Lakehouse and Warehouse technologies to provide a scalable, secure, and cost-effective platform for data analytics. With Microsoft Fabric, you can store your data in Fabric Lakehouses or Warehouses. Both options are optimized for fast query performance and easy integration with Power BI. However, if your data is in other databases, such as Azure SQL Managed Instance, you would need to find a way to copy data into Fabric to analyze it.
In the previous blog post, I explained how to export data from your Azure SQL Managed Instance to Fabric Warehouse, where you can run analytics queries on it. But sometimes you may want to do some data engineering with Spark before you analyze the data. That’s why Fabric offers Lakehouse, an artifact that combines Spark, Fabric One Lake, the built-in unified storage layer for your data, and Warehouse endpoint for analytics.
In this blog post, I will show how to export data from Managed Instance and store it directly in the One Lake that is linked to the Lakehouse.
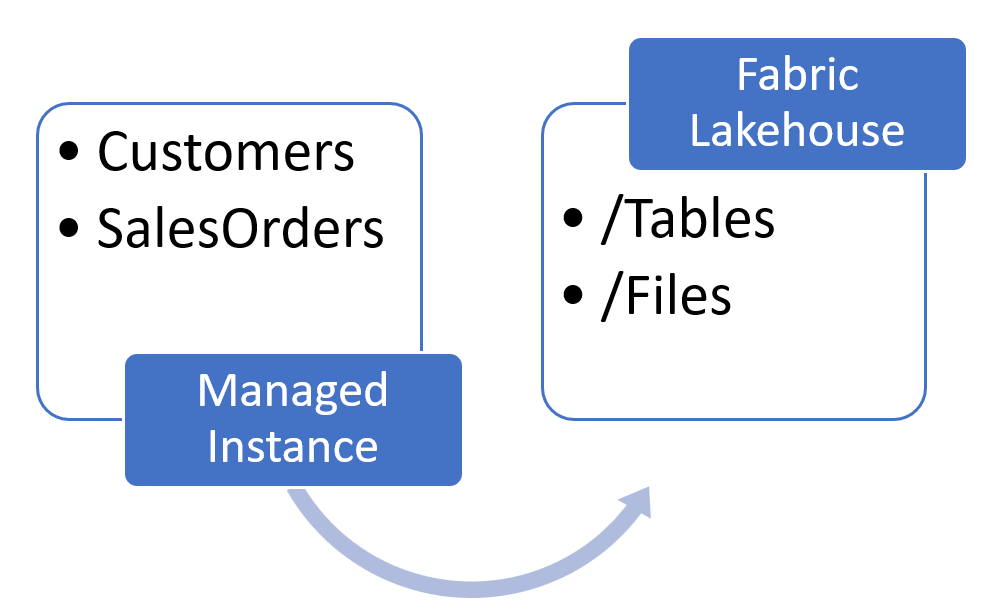
Every Lakehouse artifact has its own part of One Lake, separated into two locations:
- /Tables where you store the files in Delta format that are ready for analytics (gold layer).
- /Files where you store the files that need Spark processing before you convert them to Delta and use them in the reports.
You can choose either one as the destination for your export process, depending on your needs. In this article, we will use /Files.
We will use the CETAS T-SQL command to export table data from Managed Instance to One Lake and then the Spark script to transform data and convert it to Delta format.
The steps we will follow are:
- Enable data export functionality on Azure SQL Managed Instance using PowerShell (if it is not already enabled).
- Find a path in the Lakehouse where we will store the data and enable Azure SQL Managed Instance to write to that location.
- Create external data source that points to One Lake, database scoped credential that uses Managed instance identity for authentication to One Lake storage, and Parquet file format for exporting data.
- Run the CETAS command on Managed Instance that will export the table data to One Lake.
- Transform the exported Parquet files to Delta format so they can be accessed with SQL endpoint and Fabric Warehouse.
Enable export functionality on Managed Instance
Managed Instance enables you to export the content of tables to the external lake storage using CETAS command. However, this option is not enabled by default.
To enable data exporting on Managed Instance using PowerShell, you need to install the Az.Sql module using this command Install-Module -Name Az.Sql.
After installing the module, you need a PowerShell script that will login to your Azure account, select the subscription that contains your Managed Instance, and set the server configuration option with name “allowPolybaseExport” to 1. You can use the following PowerShell commands to do that:
$SubscriptionID = "<your-subscription-id>" Login-AzAccount -SubscriptionName $SubscriptionID Set-AzSqlServerConfigurationOption -ResourceGroupName "<your-resource-group-name>"-InstanceName "<your-managed-instance-name>" -Name "allowPolybaseExport" -Value 1
Replace <your-subscription-id> with your actual subscription ID, <your-resource-group-name> and <your-managed-instance-name> with your actual resource group name and the Managed Instance name.
This option enables the export of data from Managed Instance to external data sources using the CETAS T-SQL command.
Setup external access
Now you need to set up external data sources, database scoped credentials, and Parquet file format on Managed Instance to export data as Parquet files to Azure storage.
To set up these objects, you need to execute some T-SQL commands in your database. These commands will create the necessary objects to access and write data to Lakehouse’s One Lake location using the identity of Managed Instance:
CREATE MASTER KEY
      ENCRYPTION BY PASSWORD = '<put your master password here>'

CREATE EXTERNAL FILE FORMAT MigrationDemoFileFormat
WITH(
      FORMAT_TYPE=PARQUET,
      DATA_COMPRESSION = 'org.apache.hadoop.io.compress.SnappyCodec'
)

CREATE DATABASE SCOPED CREDENTIAL MigrationDemoMiCredential
      WITH IDENTITY = 'Managed Identity'

CREATE EXTERNAL DATA SOURCE MigrationDemoDataSource
WITH (
      LOCATION = '<your-one-lake-url>',
      CREDENTIAL = MigrationDemoMiCredential
)
Replace <your-one-lake-url> with the path to One Lake location where you will export the data. To get this path, open your Fabric Lakehouse, select /Files or /Tables and open the properties you will see the One Lake path that you can use as a <your-one-lake-url> value in the location:
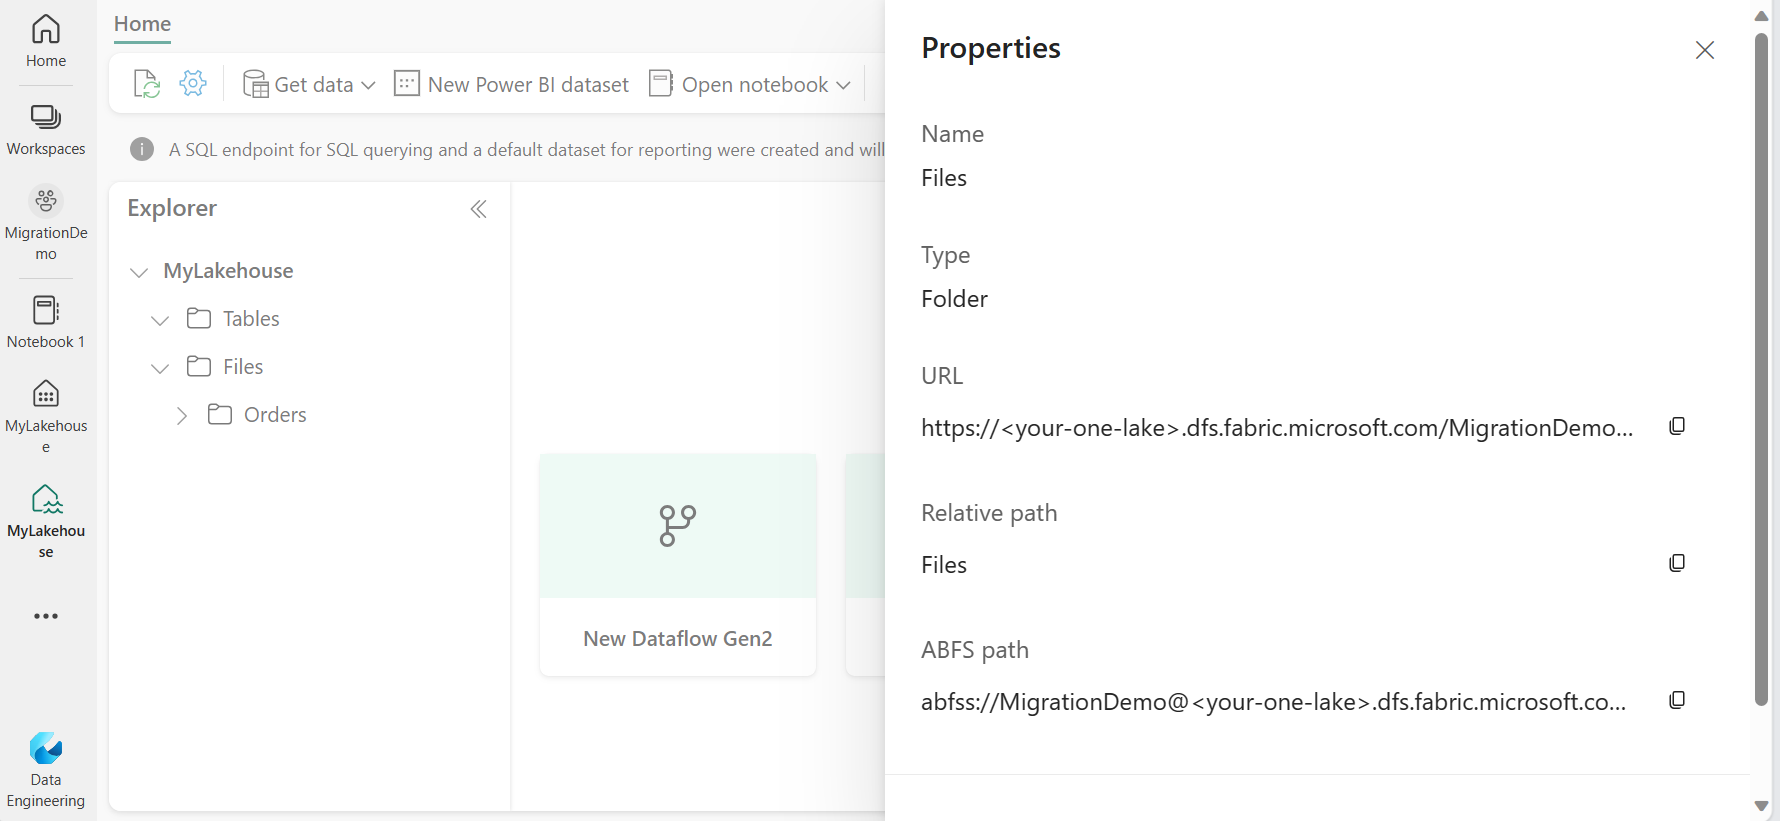
ABFS path points to the folder that you selected in the Explorer.
Update your ABFS path!
To make this work, you cannot simply copy the ABFS path. You must make some modifications:- Instead of abfss:// prefix use abs:// prefix that is available on Managed Instance
- Replace .dfs. with .blob.
For example, if the ABFS path to your One Lake location is abfss://MigrationDemo@<your-one-lake>.dfs.fabric.microsoft.com/MyLakehouse.Lakehouse/Files, you should convert it to abs://MigrationDemo@<your-one-lake>.blob.fabric.microsoft.com/MyLakehouse.Lakehouse/Files
At the time of writing this article I could not export data using .dfs. in URI.
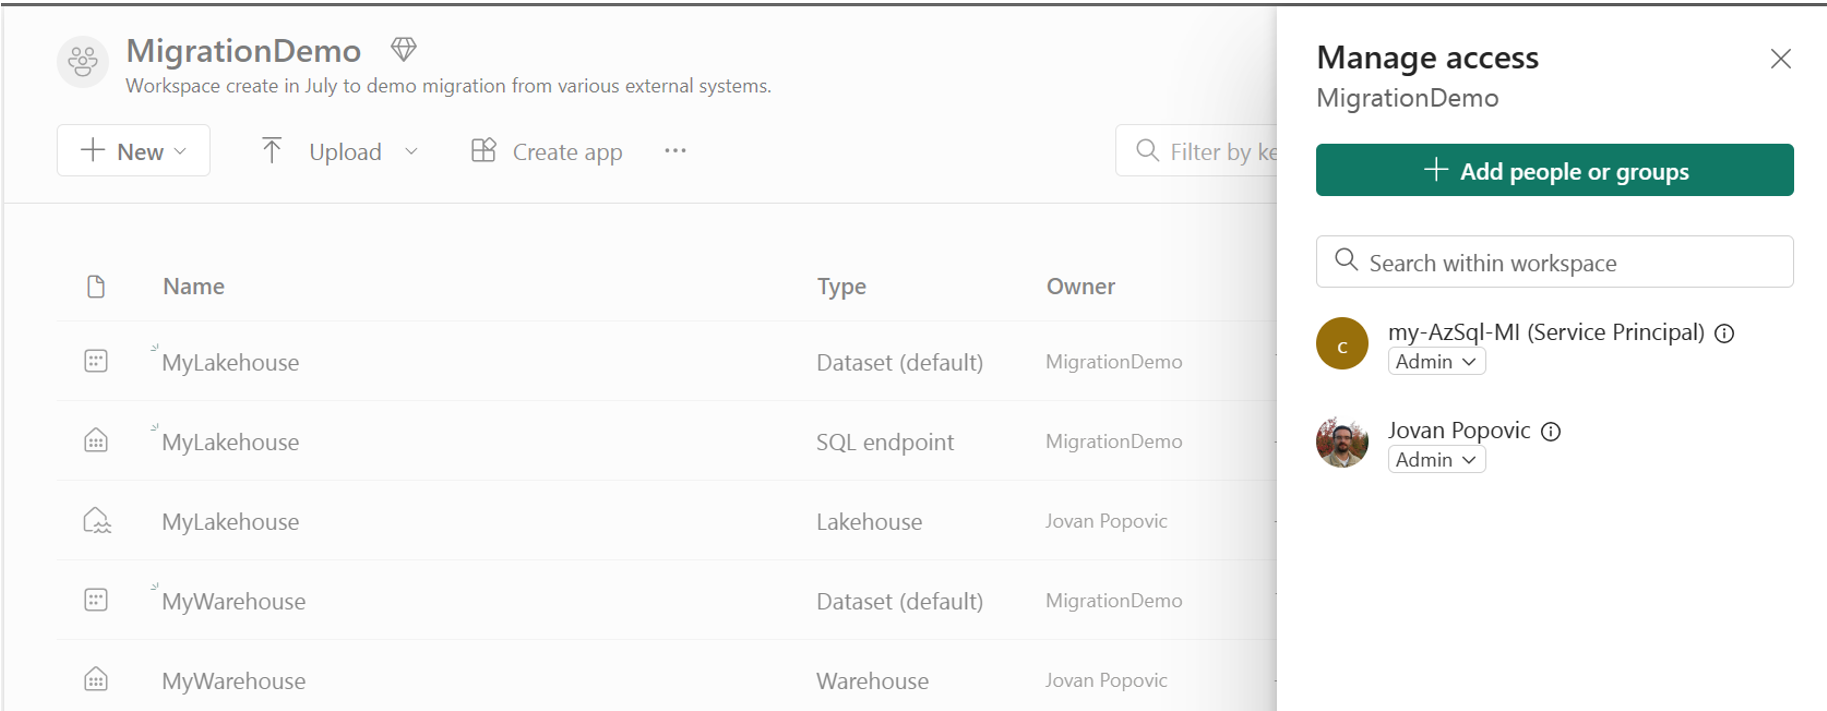
Another important step is to enable your Azure SQL Managed Instance to write data into your One Lake. You should find the name of your Managed Instance – for example, “my-AzSQL-mi”. Then you should go to your Fabric Workspace, choose “Manage access” option and add this name as a service principal.
SAS is not supported
At the time of writing this article I could not use SAS key to access One Lake. Check the Fabric documentation to see if this is possible.Now you are ready to export your data to Fabric Lakehouse.
Exporting data to Lakehouse
To export the content of a table in Managed Instance database to Fabric One Lake, you can use the CREATE EXTERNAL TABLE AS SELECT (CETAS) command. This command will create an external table that points to a folder in your Fabric One Lake and write the result of a query to that folder in Parquet files. The command will also create the folder if it does not exist.
The following command will export the data from the [Sales].[SalesOrderHeader] table to a folder named SalesOrders in your One Lake container that is referenced with MigrationDemoDataSource. It will use the external data source and file format that you created before.
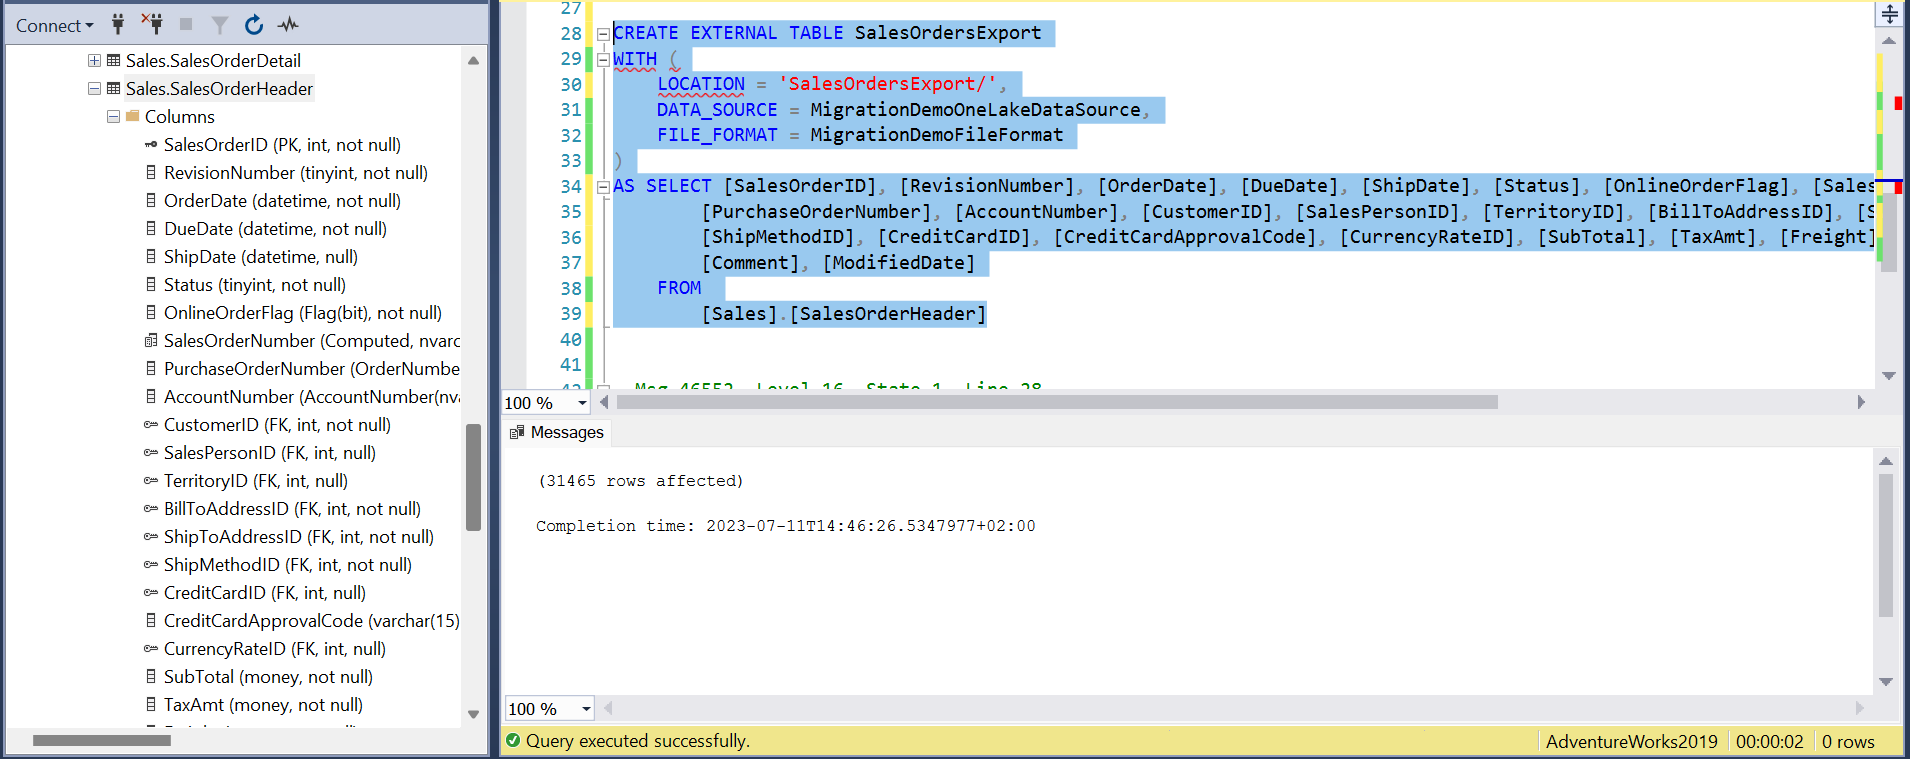
You can see that it exported 30K records in 2 seconds. After executing the command, you can verify that the content is exported on One Lake storage by browsing the Lakehouse files. You should see one or more Parquet files with the data from the table.
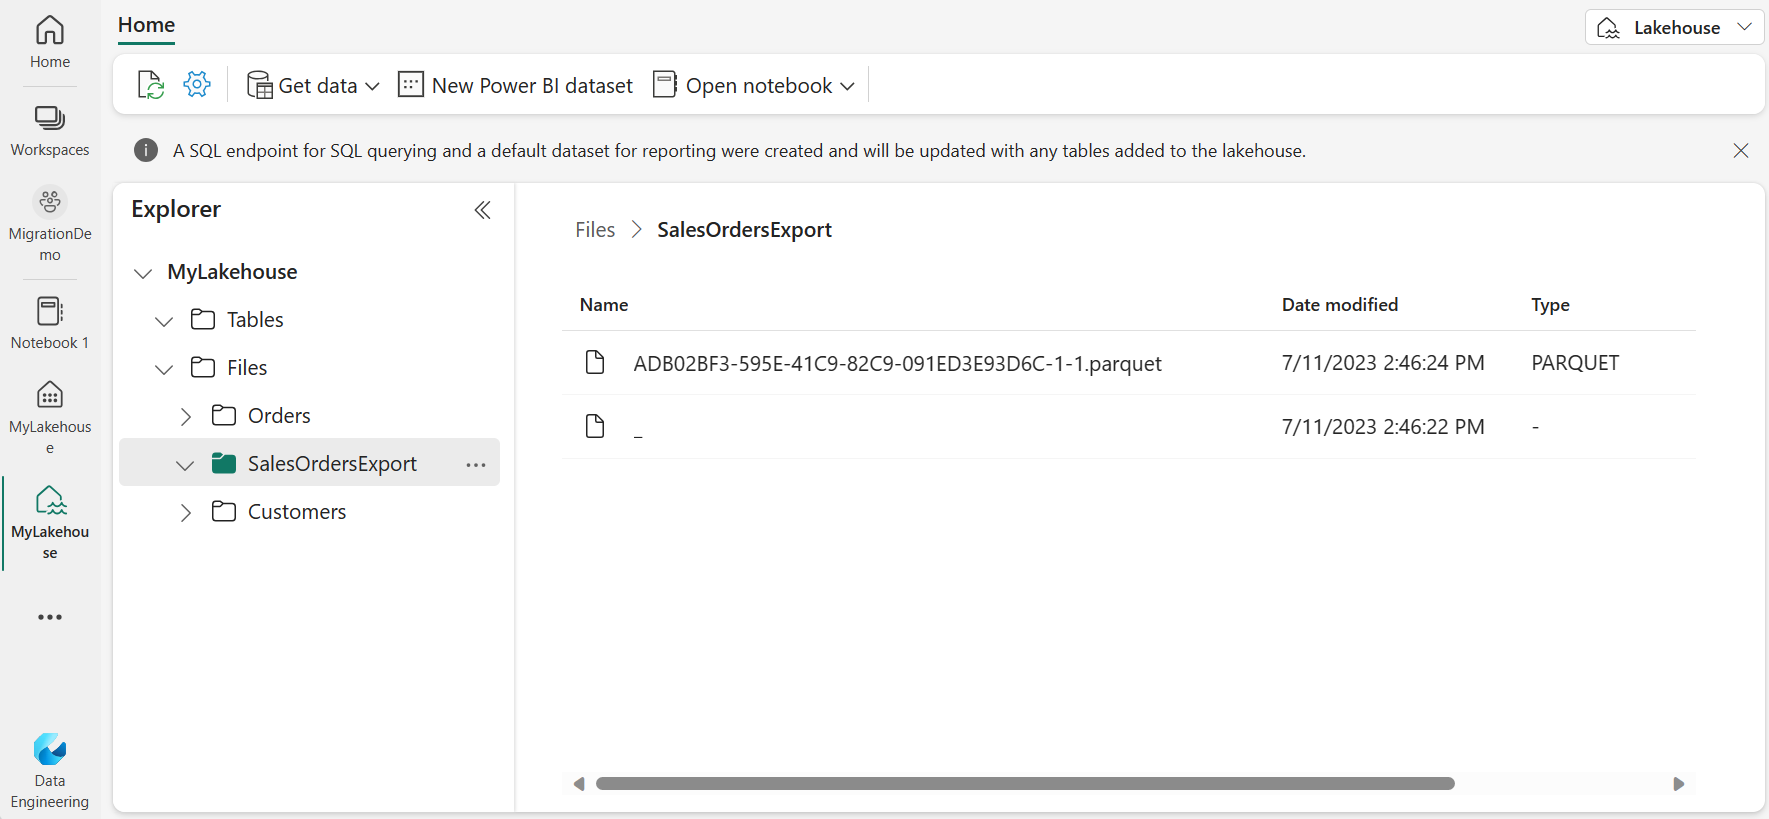
Now your files are in the Lakehouse staging area, and you can convert them to Delta table or transform/clean data before conversion.
Convert Parquet to Delta
When you export data from Managed Instance to One Lake, you may use Parquet as the intermediate format. However, this format is not ideal for analytics in Fabric. That’s why you should convert your Parquet files to Delta, the recommended format for Fabric.
To convert your Parquet files to Delta, you need to consider where you exported data in One Lake. If you have exported your data to the /Tables location, you should convert the files right away because /Tables should only have Delta files. This location is where you store the files that are ready for analytics (gold layer) and should not contain other types.
If you exported your data to the /Files location, which is more suitable for staging/bronze/silver layer, you can combine them with other files, clean data and then move them to Delta in /Tables. This location is where you store the files that require Spark processing before analytics.
Make sure that the final Delta table is in the /Tables location to be visible in the SQL endpoint for Lakehouse and to enable Fabric Warehouse to access it via SQL endpoint. The SQL endpoint allows you to run SQL queries on your data in Lakehouse using any SQL client.
The easiest way to convert Parquet to Delta is to choose the folder and pick an option load to table. This action will load the Parquet files into a Lakehouse table that will be available in Warehouse and ready for analytics.
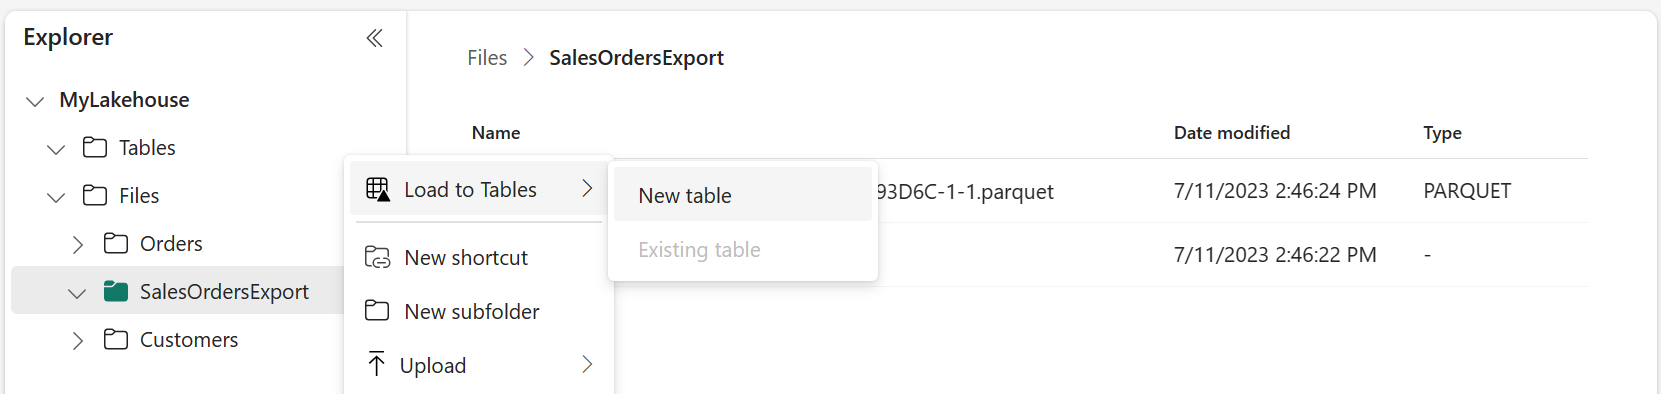
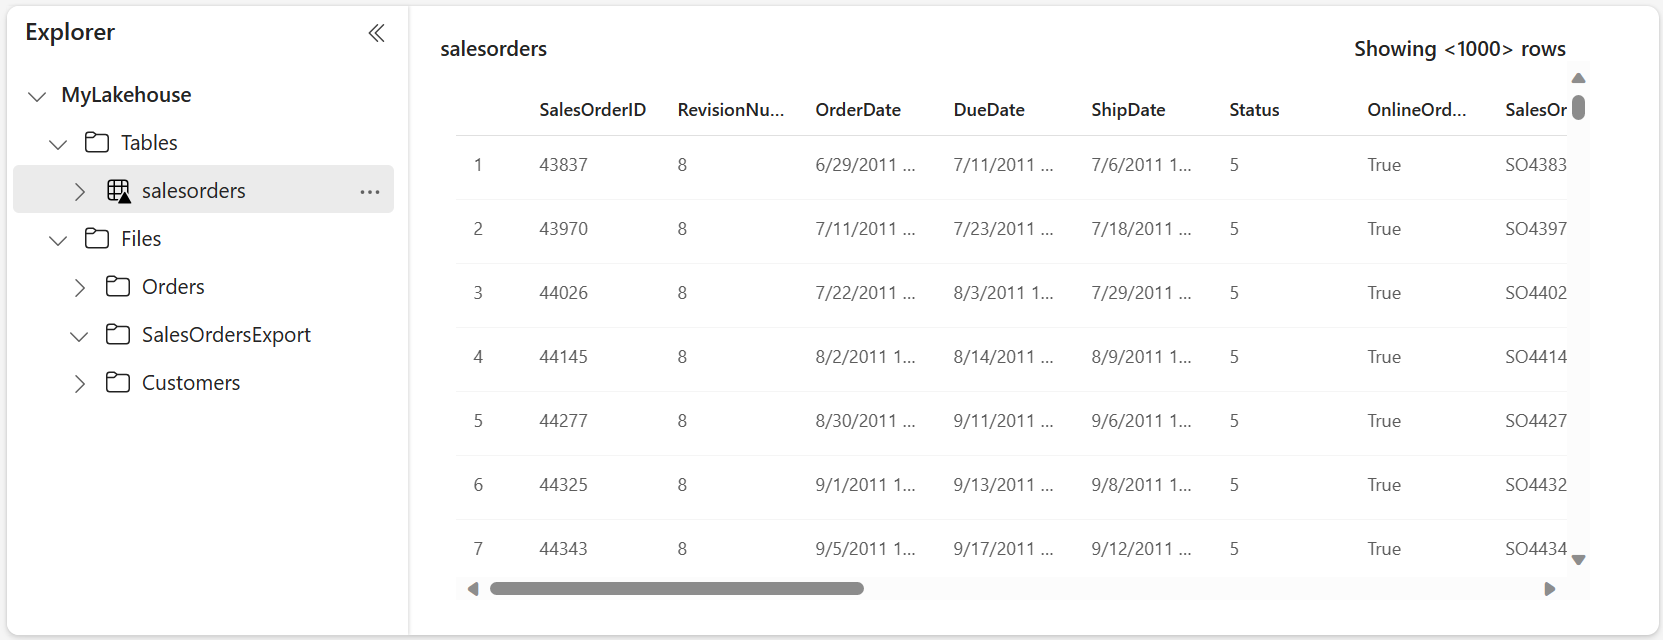
As a result, you will see the delta table in the /Tables area.
Alternatively, you can create a Spark notebook that will convert Parquet to Delta or do some cleaning before conversion. Using a Spark notebook is also a straightforward way to transform data because even if you don’t make any changes, because you just need to run the following code as the last step:
from delta.tables import *

DeltaTable.convertToDelta(spark,
   "parquet.`abfss://<one-lake-location>/MyLakehouse.Lakehouse/Files/ExportedFiles`")
See more details in this blog post.
Use the notebooks if the default conversion doesn’t work and you need to convert data types or clean data to Delta. For example, you might export some SQL column types that are available in Parquet but not in Delta. In this case, you might get errors like UUID column is not supported. In that case, you can either remove the columns in CETAS, cast them in CETAS to a supported type, or transform your Parquet column using a notebook before you convert it to Delta.
Query the table in Fabric warehouse
After you convert the files to Delta in the /Tables folder, you can access the table from the SQL endpoint for the Fabric Lakehouse. You can see the table name in the list of tables in the SQL endpoint UI.
If you want to use the Lakehouse table data in a warehouse, you don’t need to copy data from Lakehouse to Warehouse. You can query the Lakehouse data from the warehouse using the 3-part name convention <lakehouse name>.dbo.<table name>.
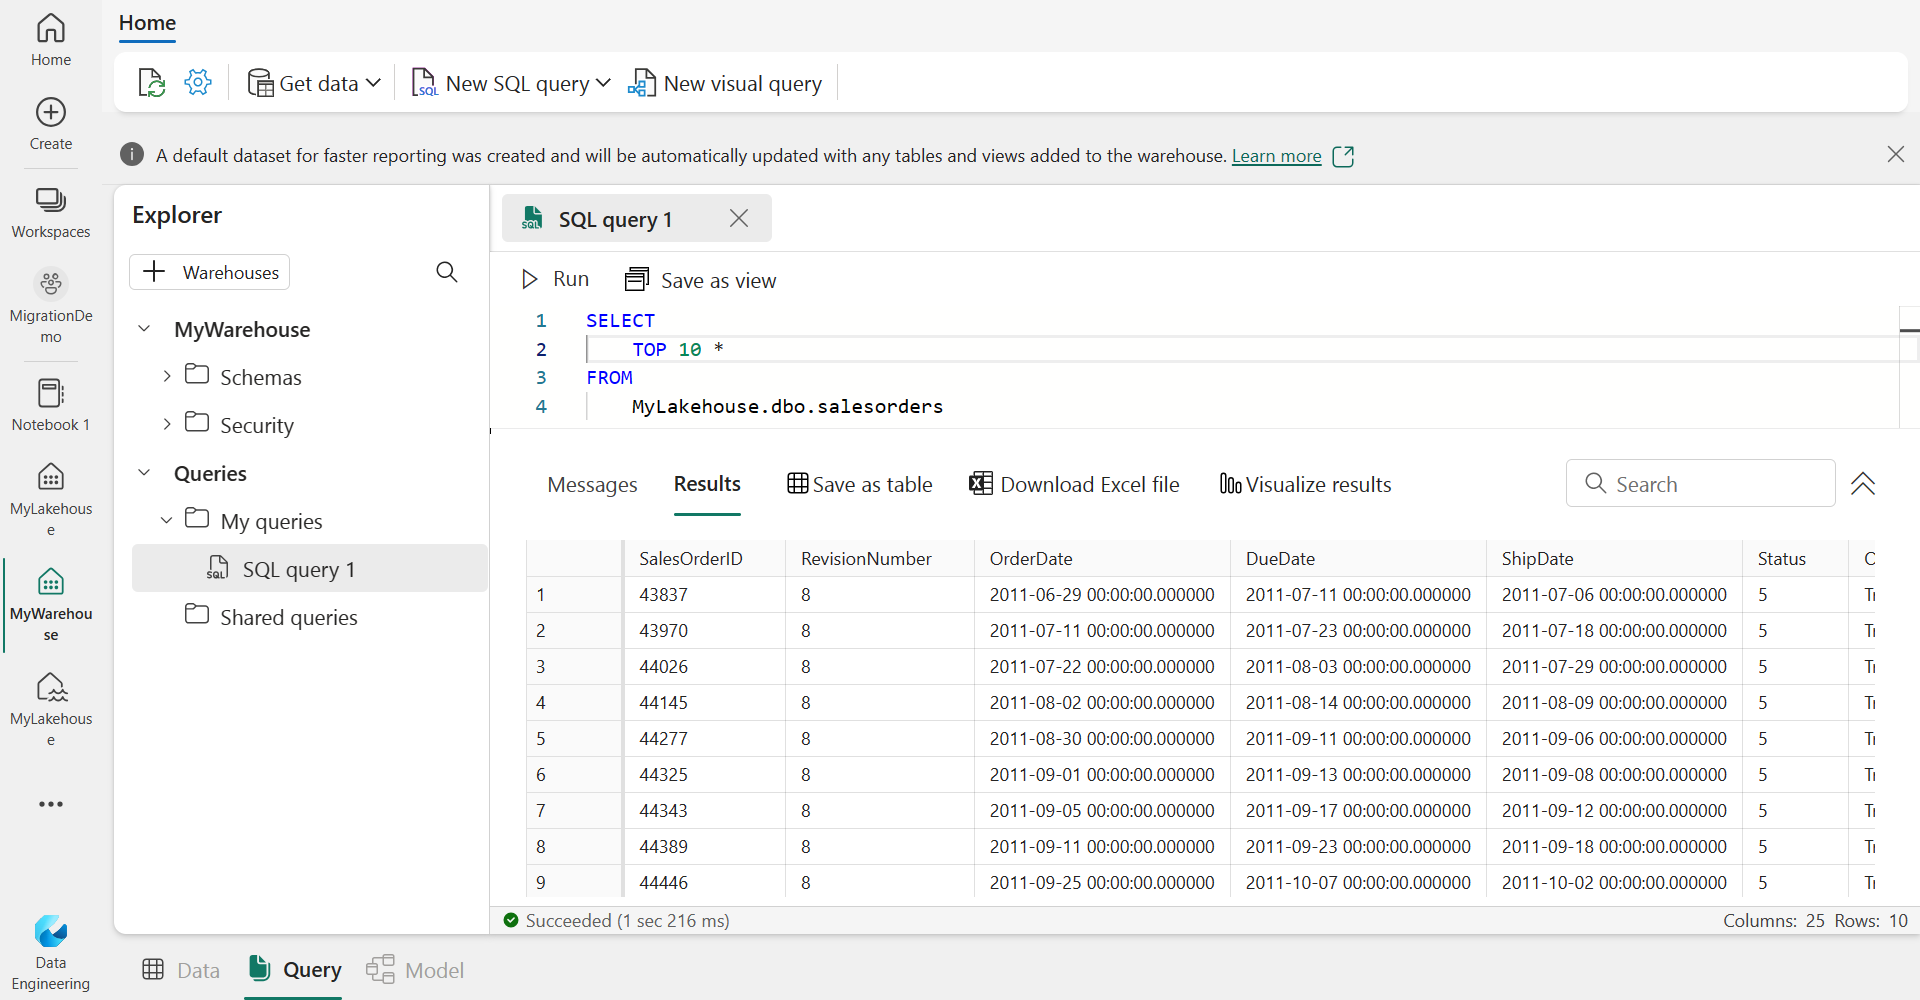
You can see that I’m connected to a Fabric Warehouse named MyWarehouse, and I’m querying the table in the Fabric Lakehouse named MyLakehouse.
This works if the Fabric Warehouse and the Fabric Lakehouse are in the same workspace.
Conclusion
This blog post shows you how to export data from Azure SQL Managed Instance to Microsoft Fabric Lakehouse using the CETAS command. This is a great solution for SQL developers who want a simple and performant way to transfer data using SQL scripts. The transfer is done using Parquet format, which is highly compressed and reduces the export time even for large tables. You can easily automate this process using code or T-SQL script and export multiple tables from your Managed Instance. Exporting to Lakehouse also allows you to refine your data further before you analyze it. You can use either SQL endpoint to access the data directly or access the exported data from Fabric Warehouse without copying the data.
0 comments