

If you want to perform advanced analytics on your data and create stunning reports in Power BI, you should consider using Microsoft Fabric. Microsoft Fabric is a solution that combines the best data warehousing and data lake technologies to provide a scalable, secure, and cost-effective platform for data analytics. With Microsoft Fabric, you can store your data in Fabric Warehouses or Lakehouses, which are optimized for fast query performance and easy integration with Power BI. However, if your data is stored in another database system, such as Azure SQL Managed Instance, you would need to find a way to copy data into Fabric to analyze it.
In this blog post, you will learn how to export data from Azure SQL Managed Instance into the Microsoft Fabric Datawarehouse via Azure storage.

In this process, we will export the content of the tables from Managed Instance and store data as Parquet files in Azure storage. Then we will import the Parquet files into the Fabric Warehouse.
We will use the CETAS T-SQL command for exporting table data from Managed Instance to Azure storage and then COPY INTO for importing data from Azure storage to Fabric Warehouse.
We will go through the following steps in this tutorial:
- Prepare an Azure storage container and generate an SAS key with a write access.
- Enable data virtualization on Azure SQL Managed Instance using PowerShell (if it is not already enabled).
- Set up external data sources, database scoped credentials and Parquet file format on Managed Instance.
- Execute CETAS command on Managed Instance that will export the table content to Azure storage.
- Run COPY INTO on Microsoft Fabric DW to load the exported Parquet files.
SQL Server as a source
CETAS T-SQL statement is also available on SQL Server 2022 and Synapse dedicated SQL pools, so you might use these instructions to export data from these sources and import the content into the Fabric Warehouse. This article is focused on Managed Instance as a source, so you might need to make some changes to apply it on SQL Server and Synapse dedicated SQL pool due to potential differences in CETAS functionalities.Preparing Azure storage account
To prepare an Azure storage container and generate an SAS key with write access, you need to have an Azure storage account and a container. If you don’t have an Azure storage account, you can follow this tutorial to create one: https://learn.microsoft.com/en-us/azure/storage/common/storage-account-create
Once you have an Azure storage account and a container, you should create a SAS key for the container using this tutorial: https://learn.microsoft.com/en-us/azure/cognitive-services/translator/document-translation/how-to-guides/create-sas-tokens
An SAS key is a shared access signature that grants limited access to your container for a specified period of time (make sure that the time is as short as possible). For this scenario, you need to grant a write access to the container so that you can export data from Azure SQL Managed Instance to the container. You also need to copy the SAS key and the container URL for later use.
Enable data export on Managed Instance
Data virtualization in Managed Instance is a feature that enables you to access Azure storage using T-SQL. Data virtualization is enabled by default on Managed Instance in the scenarios where you need to read data from Azure storage, but the part for exporting data should be explicitly enabled.
To enable data exporting on Managed Instance using PowerShell, you need to install the Az.Sql module that provides cmdlets for managing Azure SQL resources. You can install the Az.Sql module using this command:
Install-Module -Name Az.SqlAfter installing the module, you need to login to your Azure account and select the subscription that contains your Managed Instance. You can use the following commands to do that:
Login-AzAccount
$SubscriptionID = "<your-subscription-id>"
Select-AzSubscription -SubscriptionName $SubscriptionID
Replace <your-subscription-id> with your actual subscription ID.
Next, you need to set the server configuration option with the name “allowPolybaseExport” to 1. This option enables the export of data from Managed Instance to external data sources using the CETAS T-SQL command. You can use this PowerShell command to set the option:
Set-AzSqlServerConfigurationOption
     -ResourceGroupName "<your-resource-group-name>"
     -InstanceName "<your-managed-instance-name>"
     -Name "allowPolybaseExport" -Value 1
Replace <your-resource-group-name> and <your-managed-instance-name> with your actual resource group name and the Managed Instance name.
Setup external access
Now you need to set up external data sources, database scoped credentials, and Parquet file format on Managed Instance to export data as Parquet files to Azure storage.
To set up these objects, you need to execute some T-SQL commands in your database. These commands will create the necessary objects to access and write data to your Azure storage container using the SAS key and the container URL that you prepared earlier.
The first command will create a master key encryption by password in your database.
CREATE MASTER KEY
ENCRYPTION BY PASSWORD = '<put your master password here>'
This key is used to encrypt the database scoped credential that you will create.
The second command will create a database scoped credential with the identity of SHARED ACCESS SIGNATURE and the secret containing your SAS key. This credential is used to authenticate to your Azure storage container. You need to replace <your-sas-key> with your actual SAS key that you obtained when you setup the container.
CREATE DATABASE SCOPED CREDENTIAL MigrationDemoSASCredential
WITH IDENTITY = 'SHARED ACCESS SIGNATURE',
SECRET = '<your-sas-key>'
The third command will create an external data source with the location of your Azure storage container and the credential that you created before. This data source is used to specify the destination of your data export. You need to replace <your-container-url> with your actual container URL.
CREATE EXTERNAL DATA SOURCE MigrationDemoDataSource
WITH (
LOCATION = '<your-container-url>',
CREDENTIAL = MigrationDemoSASCredential
)
Azure storage protocol
See the available URI formats in the CREATE EXTERNAL DATA SOURCE documentation page. At the time of writing this article the following protocols are supported in Managed Instance:- Azure Blob Storage – abs://<container>@<storage_account>.blob.core.windows.net/<path>
- ADLS Gen2 – adls://<container>@<storage_account>.dfs.core.windows.net/<path>
CREATE EXTERNAL FILE FORMAT MigrationDemoFileFormat
WITH(
FORMAT_TYPE=PARQUET,
DATA_COMPRESSION = 'org.apache.hadoop.io.compress.SnappyCodec'
)
Now you are ready to export your data to Azure storage.
Exporting data to storage
To export the content of a table in Managed Instance database to Azure storage, you can use the CREATE EXTERNAL TABLE AS SELECT (CETAS) command. This command will create an external table that points to a folder in your Azure storage container and write the data from a query to that folder in Parquet files. The command will also create the folder if it does not exist.
The following command will export the data from the [Sales].[SalesOrderHeader] table to a folder named SalesOrders in your Azure storage container that is referenced with MigrationDemoDataSource. It will use the external data source and file format that you created before.
CREATE EXTERNAL TABLE SalesOrdersExternal
WITH (
LOCATION = 'SalesOrders/',
DATA_SOURCE = MigrationDemoDataSource,
FILE_FORMAT = MigrationDemoFileFormat
)
AS
SELECT *
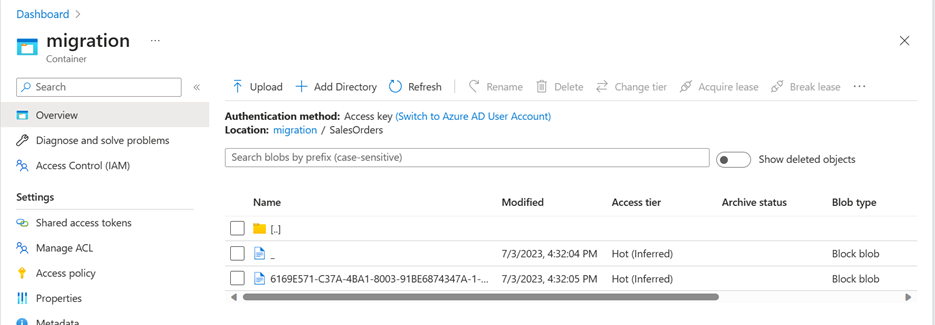
FROM [Sales].[SalesOrderHeader]After executing the command, you can verify that the content is exported on Azure storage by browsing the SalesOrders folder in your container. You should see one or more Parquet files with the data from the table.
Once you verify that the content is on Azure storage, you can delete the external table using this command:
DROP EXTERNAL TABLE SalesOrdersExternalThis command will only delete the external table definition in Managed Instance, but not the data in Azure storage. You can keep the data in Azure storage for later use or delete it manually if you want.
Import your Parquet data into the Fabric DW
To import Parquet data into the Fabric DW using COPY INTO statement from Parquet files, you need to follow these steps:
- Create a table in Fabric DW that matches the schema of the Parquet files. You can use the same table definition as the source table in managed instance, or modify it as needed.
- Execute a COPY INTO statement in Fabric DW that copies the data from the Azure storage to the table.
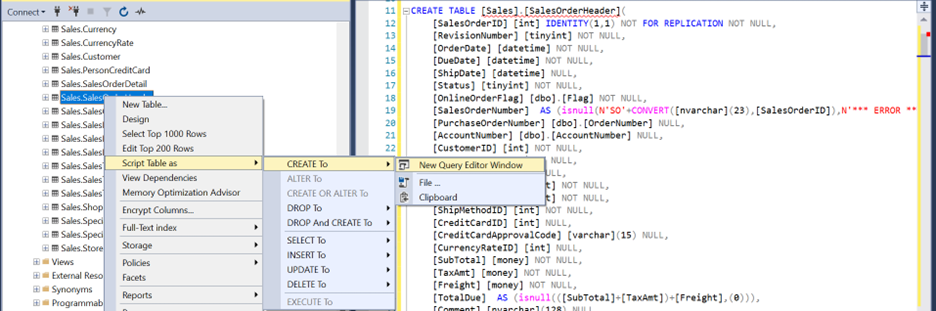
First you need to prepare the destination table. Probably the easiest way would be to script the original table on Azure SQL Managed Instance, adjust and apply this script in Fabric Warehouse.
How to adjust the types?
Since Azure SQL Managed Instance and Fabric Datawarehouse use the same T-SQL language, the table definitions should be compatible. You would probably need minor changes in the script (for example, replace NVARCHAR with VARCHAR, TINYINT with SMALLINT, DATETIME/DATETIME2 with DATETIME2(6), MONEY with DECIMAL(19,4), replace computed column expressions with the resulting types, etc.)The following script shows an example of how to import Parquet data into Fabric DW using COPY INTO statement:
COPY INTO SalesOrders
FROM '<parquet-files-url>'
WITH (
FILE_TYPE = 'PARQUET',
CREDENTIAL = (IDENTITY = 'SHARED ACCESS SIGNATURE',
SECRET = '<your-sas-key>')
)
This command will read the content of exported Parquet files and load them into Warehouse tables.
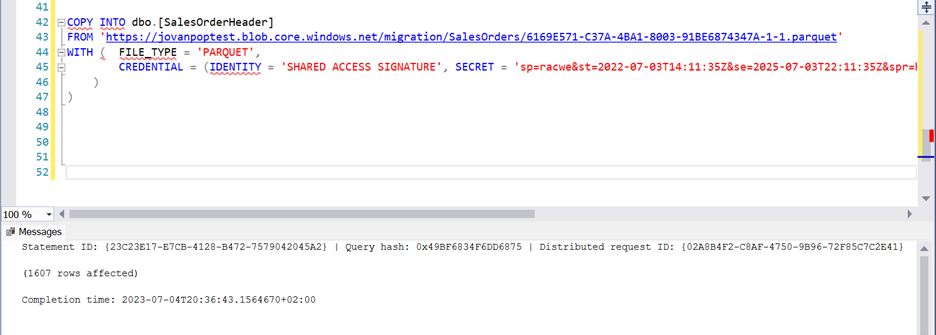
If everything is fine, you will see the copy of your Managed Instance data in the Fabric Datawarehouse artifact and you will finish this data movement.
Conclusion
In this blog post, you learned how to export data from Azure SQL Managed Instance to Microsoft Fabric Warehouse using CETAS and COPY INTO commands. As you can see, copying data from Managed Instance into Fabric Warehouse is easy and efficient. It works well even with large tables because the intermediate data is stored as Parquet files that are compressed and optimized for analytical queries. You can easily automate this process and export multiple or all tables from your Managed Instance into Fabric DW. This way, you can leverage the power of Fabric to perform advanced analytics on your data that was originally stored in Managed Instance.
When you implement your own copy process, you might need to make some changes based on your requirements such as using Managed Identity for authentication, opening VNet to access storage, etc. If you need to modify this approach to better fit your scenario, read the following articles that will help you understand how to customize CETAS and COPY INTO statements:
- Export capability (CETAS) for data virtualization in Azure SQL Managed Instance
- Ingest your data in Fabric Warehouse using COPY INTO statement
0 comments