


Guest Post
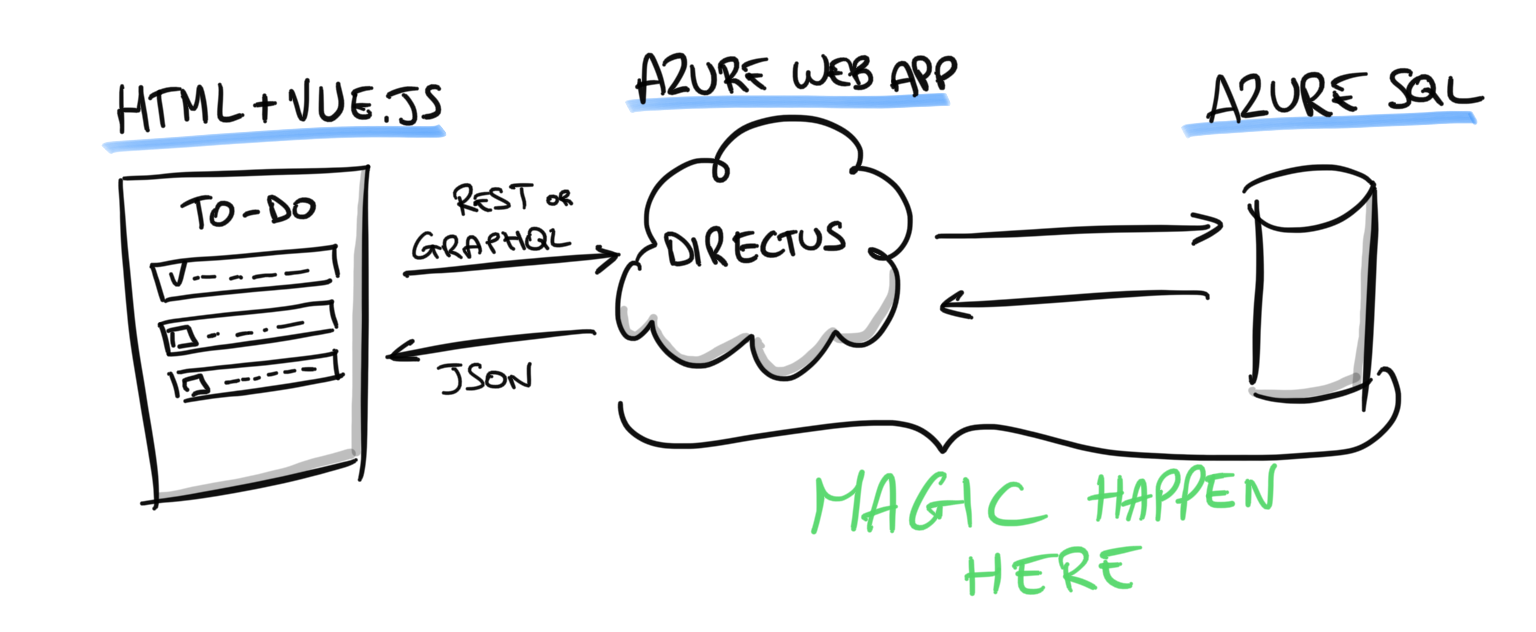
This post has been originally written by Rijk van Zanten (@rijkvanzanten), CTO & Co-Founder @Directus. Thanks Rijk!Extremely performant and built entirely on Node.js, Directus is an open-source Data Platform that enables anyone in an organization — from developers to data scientists to business users — to access and manage the database content that powers all your applications and digital experiences. It installs as a layer on top of your existing SQL database, mirroring its content and schema, so there is no need to migrate or alter your data. Once installed, you instantly get a dynamic API (REST and GraphQL) and no-code app that democratizes data so you can extract maximum value from it across your organization.
Sounds interesting? Good!
So, now you’ve decided to get Directus up and running on Azure SQL, but don’t have a lot of time to spend messing around with the installation. The good news is there’s a quick and easy way to deploy and get started with Directus, and in this post, I’ll show you how.
The fastest way to get up and running with Directus is by using this sample implementation. To make it even easier, in this post, I’ll demonstrate how to spin up a Directus instance running on Azure SQL and Azure App Service, beginning with setting up a local project working directory and configuring the connection to Azure SQL. Then, I’ll show you how to host Directus itself on Azure App Service, making your app and APIs accessible from anywhere!
Prerequisites
To get started, you’ll need Node.js version 12.20 or later, and an Azure SQL database server that’s accessible from your local machine.
Creating the Database
Here’s how to create a Directus compatible Azure SQL database using CLI commands.
Create a resource group to hold the resources for this project:
az group create --location eastus --name {GROUP_NAME}
Create the database server:
az sql server create -l eastus -g {GROUP_NAME} --name {DB_SERVER_NAME} --admin user {DB_ADMIN_USER} --admin-password {DB_PASSWORD} --enable-public-network true
Make sure to note the database name, username and password somewhere safe.
Create the database:
az sql db create --resource-group {GROUP_NAME} --server {DB_SERVER_NAME} --name {DB_NAME} --service-objective Basic
Allow your computer to access the database:
az sql server firewall-rule create --resource-group {GROUP_NAME} --server {DB_SERVER_NAME} --name allow-local-access --start-ip-address {YOUR_PUBLIC_IP} --end-ip-address {YOUR_PUBLIC_IP}
Creating the Project & Installing Directus
Create a project directory, and install Directus by running:
npm init directus-project ./directus-example
Then, in the prompts, enter:
- Database Client: Microsoft SQL Server
- Database host: {DB_SERVER_NAME}.database.windows.net
- Port: 1433 (default)
- Database Name: {DB_NAME}
- Database User: {DB_ADMIN_USER}
- Database Password: {DB_ADMIN_PASSWORD}
- Encrypt Connection: Yes
Next, enter any email address/password combination you’d like for the first user.
Once that’s done, you can navigate into the project folder and run npx directus start to start Directus.
By default, Directus will run on port 8055. Once you’ve started Directus, you can navigate to localhost:8055 to open the admin app. Log in with the admin email and password combination you’ve configured.
Creating the Data Model
I’ll keep it brief for this intro example. (For more in-depth information on what Directus has to offer, please refer to the Directus Documentation.)
In Directus, collections and fields correspond directly to tables and columns in the database. Every collection you create in Directus creates a table in the database and, similarly, every field you create will be a column in the database.
When you open the admin app without having any existing collections, you’ll be prompted to create your first collection. I’ll go with a collection named “articles,” but feel free to use whatever you’d like!
Once the collection is created, it’s time to add some fields. Go to Settings > Data Model > [Articles] and click “Create Field”. I’ll stick to a regular input for now, but don’t hesitate to try out some of the other fields if you’re curious. Let’s give this field a key of “title”, and hit Save.
Configuring Permissions
Now that you have spun up a very basic data model, you need to make sure only the correct people can access it. In this demo, I’ll show you how to give public read/write access to the “articles” table you’ve created.
To set up permissions for the public role, head to Settings > Roles & Permissions > Public. Using the checkbox icons in the table, set both Create (plus) and Read (eye) to “All Access”. This will allow anybody outside of the service to create and read items from your “articles” table.
Directus has a powerful rule-based permissions system that you can use to fine-tune access control for your exact needs. The example above is only the tip of the iceberg! (For more information, refer to the Directus Documentation on permissions.)
Connecting Data
Now that you have a basic data model in place, with permissions for the outside world to save and retrieve the data, you can start using the API. Directus ships with powerful RESTful and GraphQL APIs that beautifully wrap the raw power of Azure SQL, to let you interact with the data for your apps, websites, kiosks or whatever else you can think of!
With your local server running, you can start querying the API using curl or any other local request development tool you prefer.
Use this command to create an article:
curl localhost:8055/items/articles \
-X POST \
-H "Content-Type: application/json" \
-d "{\"title\": \"Hello World!\"}"
Use this command to retrieve all articles:
curl localhost:8055/items/articles
Or if GraphQL, using, for example the GraphQL endpoint:
localhost:8055/graphql
is more of your taste:
query {
 articles {
 title
 }
}
(You can use any desktop GraphQL client or the online interactive client: https://graphiql-online.com/graphiql)
The actions above are just a sample of what the APIs have to offer. For the sake of brevity in this quick introduction, I’m skipping over the powerful query parameters that let you search, filter, sort, limit and nest relational data. To learn more about all the flexibility Directus’s APIs provide, refer to the Directus Documentation API Reference.
Going Live
Directus runs on basically anything that can run Node. For the easiest deployment, I recommend using Azure App Service running the official Directus Docker Image. This allows you to run a highly available installation of Directus, without having to deal with server maintenance or any other manual intervention.
Take these steps to get started:
Allow Azure services to reach the database:
az sql server firewall-rule create --resource-group {GROUP_NAME} --server {DB_SERVER_NAME} --name allow-azure-services --start-ip-address 0.0.0.0 --end ip-address 0.0.0.0
Create an App Service plan:
az appservice plan create --name {APP_PLAN_NAME} --resource-group {GROUP_NAME} --is-linux
Create the web app:
az webapp create --resource-group {GROUP_NAME} --plan {APP_PLAN_NAME} --name {APP_NAME} --deployment-container-image-name directus/directus:latest
Configure Azure to use port 8055 for Directus:
az webapp config appsettings set --resource-group {GROUP_NAME} --name {APP_NAME} --settings WEBSITES_PORT=8055
Import the environment variables from your local project installation:
az webapp config appsettings set --resource-group {GROUP_NAME} --name {APP_NAME} --settings DB_CLIENT=mssql

DB_HOST={DB_SERVER_NAME}.database.windows.net DB_PORT=1433

DB_DATABASE={DB_NAME} DB_USER={DB_ADMIN_USER} DB_PASSWORD={DB_ADMIN_PASSWORD} DB_OPTIONS__ENCRYPT=true KEY={KEY} SECRET={SECRET}
(See your local .env file for the correct values to use above.)
You now have your Directus installation running on the web! You can access it directly on {APP_NAME}.azurewebsites.net. Try executing some of the requests from earlier to this new address!
Summary
You have now created a production-ready installation of Directus on top of your own Azure SQL database. Explore more of Directus by adding more collections, fields, roles and permissions, and by taking a look at Insights, modifying files, and more.
If you’re looking for a one-click ready-to-go deployment of everything we went over in this post, check out this article and GitHub Repo to learn how to complete an end-to-end setup.
Photo by Nathan Salt from Pexels
0 comments