
CMakePresets.json was released in CMake 3.19 and 3.20 and allows users to specify common configure, build, and test options and share them with others. We have added support for CMakePresets.json in Visual Studio and the CMake Tools extension for Visual Studio Code. You can now invoke CMake with the same CMakePresets.json file in Visual Studio, in Visual Studio Code, in a Continuous Integration pipeline, and from the CLI on Windows, Linux, and macOS.
Our CMake Presets integration is now available in preview in Visual Studio 2019 version 16.10 Preview 2 and CMake Tools version 1.7.
Why should I use CMake Presets?
CMake released support for Configure Presets in CMake 3.19. Our team at Microsoft contributed support for Build Presets and Test Presets in CMake 3.20. We’re excited to adopt CMake Presets to address some common problems related to CMake configuration and build.
- Move seamlessly between Visual Studio and Visual Studio Code. With the adoption of CMakePresets.json, the same file can be used to drive CMake in both Visual Studio and Visual Studio Code. This makes it easier for developers on your team to hop between Visual Studio and Visual Studio Code and work in the development environment that best suits their needs.
- Project-specific information can always be checked in. CMake supports two files: CMakePresets.json and CMakeUserPresets.json. CMakePresets.json is intended to save project-wide presets, while CMakeUserPresets.json is intended for developers to save their own local presets. This ensures project-specific information can always be checked into source control and makes it easier for new team members to get up-and-running. It also makes it easier for teams to synchronize changes to their CMake builds across the entire team. Both CMakePresets.json and CMakeUserPresets.json are supported in Visual Studio and Visual Studio Code.
- Reproduce builds in Visual Studio and Visual Studio Code from the CLI. Since CMakePresets.json is supported by CMake itself, the same CMakePresets.json file can be used to invoke CMake in Visual Studio, in Visual Studio Code, in a Continuous Integration pipeline, and from the CLI on Windows, Linux, and macOS. CMake 3.20 or higher is required to build with CMakePresets.json from the CLI.
- Streamline build instructions for open source CMake projects. You can pull down any project that has a CMakePresets.json file at the root of the repository and build and test it locally using the instructions encoded in a preset. All command arguments that can be passed to CMake or CTest from the command line can be specified in a Configure, Build, or Test Preset.
For more information on CMake Presets, you can check out my recent session at ACCU where I demonstrate how to use CMakePresets.json in Visual Studio, from the CLI, and in a GitHub Actions pipeline. You can also view a sample CMakePresets.json file, register for Pure Virtual C++, or read the official CMake documentation. More information on CMake Presets integration in Visual Studio and VS Code is below.
CMake Presets in Visual Studio
The best resource to learn about our CMake Presets integration in Visual Studio is our documentation. CMake Presets integration in Visual Studio is still in preview.
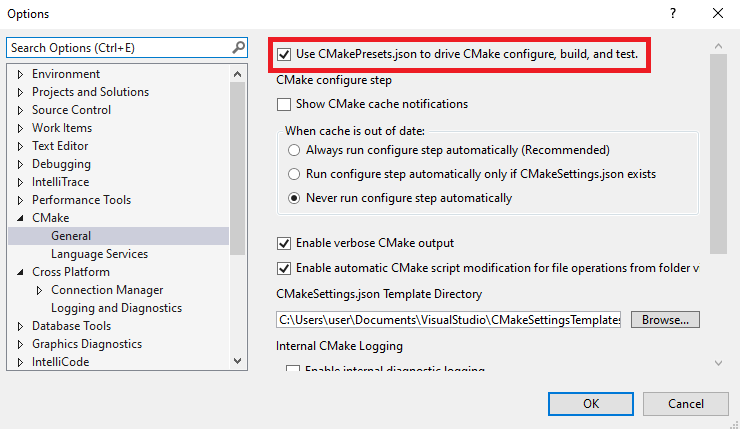
CMakePresets.json will be a recommended alternative to CMakeSettings.json. Visual Studio will never read from both CMakePresets.json and CMakeSettings.json at the same time. You can enable CMake Presets integration for all projects in Tools > Options > CMake > General. You must close and reopen the folder in Visual Studio to activate the integration.
 You can enable CMake Presets integration for a single project by adding a CMakePresets.json file to the root of the open folder. Again, you must close and reopen the folder to activate the integration. See Enable CMake Presets integration in Visual Studio 2019 for more information.
Once CMake Presets integration is enabled, you will see three dropdowns across the menu bar.

The dropdown on the left indicates the active Target System. This is the system where CMake will be invoked to configure and build the project. This dropdown lists your local machine, all SSH connections in the Connection Manager by host name, and all Windows Subsystem for Linux (WSL) installations that Visual Studio can find.
The dropdown in the middle indicates the active Configure Preset. This is the Configure Preset that will be used when CMake is invoked to generate the project build system. This dropdown lists the union of non-hidden Configure Presets defined in CMakePresets.json and CMakeUserPresets.json that apply to the active Target System. The active Configure Preset in the image above is ninja-debug.
The dropdown on the right indicates the active Build Preset. This is the Build Preset that will be used when CMake is invoked to build the project. This dropdown lists the union of non-hidden Build Presets defined in CMakePresets.json and CMakeUserPresets.json that apply to the active Configure Preset. The active Build Preset in the image above is verbose-build. Check out our documentation on CMake configuration and build to learn more.
With Visual Studio you can edit, build, and debug your CMake targets on Windows, WSL, and remote systems from the comfort of a single IDE. Visual Studio will automatically copy your source code to the specified target system, but your build tools (CMake, generator, compilers), rsync, zip, and gdb must be already installed. See Creating a Linux environment for more information.
For more information on adding presets, editing presets, running tests, and more, see our documentation on CMake Presets integration in Visual Studio.
CMake Presets in the CMake Tools extension for Visual Studio Code
The best resource to learn about CMake Presets integration in the CMake Tools extension is our documentation. CMake Presets integration in the CMake Tools extension is still in preview.
CMakePresets.json will be a recommended alternative to kits and variants files. CMake Tools will never read from both CMakePresets.json and kits and variants files at the same time. You can enable CMake Presets integration by modifying the value of cmake.useCMakePresets in settings.json.
|
Setting |
Description |
Accepted values |
Default value |
| cmake.useCMakePresets | Use CMakePresets.json to drive CMake configure, build, and test | always, never, auto | auto |
auto evaluates to always if there’s a CMakePresets.json in the cmake.sourceDirectory of the active folder. It evaluates to never if there isn’t a CMakePresets.json file in the cmake.sourceDirectory of the active folder. Set cmake.useCMakePresest to always or never to explicitly enable or disable CMake Presets integration for all CMake projects. See Enable CMake Presets in the CMake Tools extension for more information.
Once CMake Presets integration is enabled, you can run several new commands.
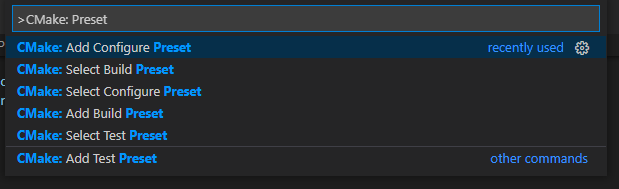
Use the commands CMake: Select Configure Preset, CMake: Select Build Preset, and CMake: Select Test Preset to select your active presets. Your active presets are displayed in the status bar.
![]()
In the image above, [active-configure-preset] indicates the active Configure Preset, [active-build-preset] indicates the active Build Preset, and [active-test-preset] indicates the active Test Preset.
For more information on adding presets, editing presets, running CMake, and more, see our documentation on CMake Presets integration in Visual Studio Code.
What’s next?
CMake Presets integration in Visual Studio and Visual Studio Code is still in preview. We’ll continue to add to our integration and address your feedback in future release of Visual Studio and the CMake Tools extension for VS Code.
In Visual Studio, the best way to file a bug or suggest a feature is with the Send Feedback button in the upper right-hand corner of the IDE. See Visual Studio feedback options for more information.
In VS Code, the best way to file a bug or suggest a feature is by creating (or upvoting) an issue in the extension’s GitHub repository.
We’d love to learn how your team is adopting CMakePresets.json. If you have feedback or a success story to share, you can contact us at cmake@microsoft.com. You can also reach us on Twitter (@VisualC).
I want to compile my code with a 3rd party cross compiler on the host using CMake configuration. May I ask for some reference material?
Does Visual Studio only use the ability to compile on remote machines with copied source code?
Visual Studio supports cross-compiling locally. Normally this is done with a CMake toolchain file – documentation
Toolchain files can be set in CMakePresets.json with cacheVariables.CMAKE_TOOLCHAIN_FILE, which is equivalent to passing -D CMAKE_TOOLCHAIN_FILE= to CMake from the command line.
Thinking about remote Linux builds, am I correct in thinking that the non-CMake parameters in CMakeSettings.json (such as remoteBuildRoot, remoteCopySourcesExclusionList, remoteCopyExcludeDirectories etc.) will be supported by the “Visual Studio Remote Settings vendor map” in CMakePresets.json?
It seems that only one map is allowed per Configure Preset. I am wondering if what is really needed is to associate the map with the connection rather than with the preset (as such parameters are build machine related not CMake related).
Hi there, thanks for the feedback. Some remote options that were a duplicate of local options (like remoteBuildRoot and remoteInstallRoot) have been deprecated. You can use binaryDir and cacheVariables.CMAKE_INSTALL_PREFIX for all Configure Presets.
remoteBuildMachine has also been deprecated. Instead, you can invoke any Configure Preset on any system (local machine, WSL, or a remote system) using the "Target System" dropdown in the IDE (docs). Target system is not encoded in the preset.
You're correct that the remaining remote options live in the Visual Studio Remote Settings vendor map. Hopefully most of these options are project or preset specific. If you...
Hi Erika
I was looking at one of your articles involving WSL and VS2019 and couldn’t ask my question there. Could you please tell us how to switch the integer variables in C++ to be shown in decimal as if debugging locally instead of default hex values as returned by the GDB debugger?
Thanks
-fg
Integer variables should always be shown in decimal format unless you have explicitly turned on “hexadecimal display” via the locals window context menu.
If you have turned on hexadecimal display, then in the watch window you can specify formatting for an integer variable by using the ‘,’ (comma) operator, e.g., “i,d” will display the value of integer variable “i” in decimal format.
After this I guess the next big thing that probably everybody is waiting for is CMake + C++20 modules support. As I understand it it should be a combined effort of compiler writers and CMake developers. Is there any chance that something will happen anytime soon?