
Implementing DevOps for Quantum Applications
Quantum computing continues to evolve and software applications containing quantum components get more complex. Quantum parts need to be embedded in classical software. Developer teams desire to automatically build, test, and deploy both quantum and classical components in a repeatable and reliable way. In one of my previous blogs, I described on an abstract level how DevOps principles could be applied to the development lifecycle of hybrid quantum applications. In this blog, I’d like to show how implementing DevOps for quantum applications can look like with tools from the Quantum Development Kit (QDK), GitHub Actions and various Azure services.
The following picture illustrates the different steps of the application lifecycle of a hybrid quantum application.
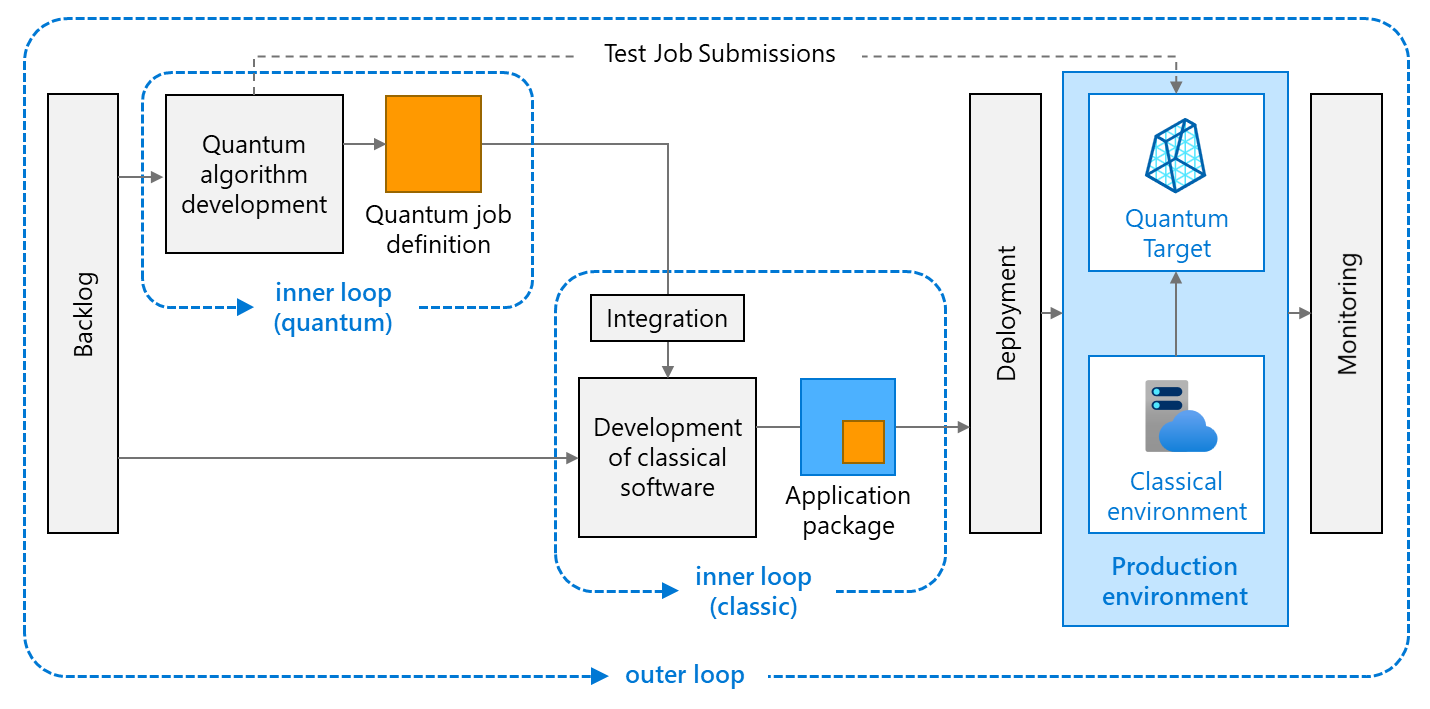
The inner loop for the quantum components comprises everything happening in a quantum developer’s environment (coding, debugging, local testing, etc.). Similarly, the inner loop for the classic components includes all the development steps in a classical developer’s environment. The outer loop brings everything together. It automates building, testing, deploying, and monitoring the whole software system in a production environment.
The sample application
I’ll illustrate implementation of DevOps for quantum computing via a very simple hybrid quantum application. It’s a simplified version of the loosely coupled quantum computing reference architecture. If you’d like to have a more detailed description of its implementation, have a look at the blog Hybrid Quantum Applications with Azure Functions. Two Azure Functions act as the interface between the classic components (e.g., a classic console app, a web application, …) and the Azure Quantum service.
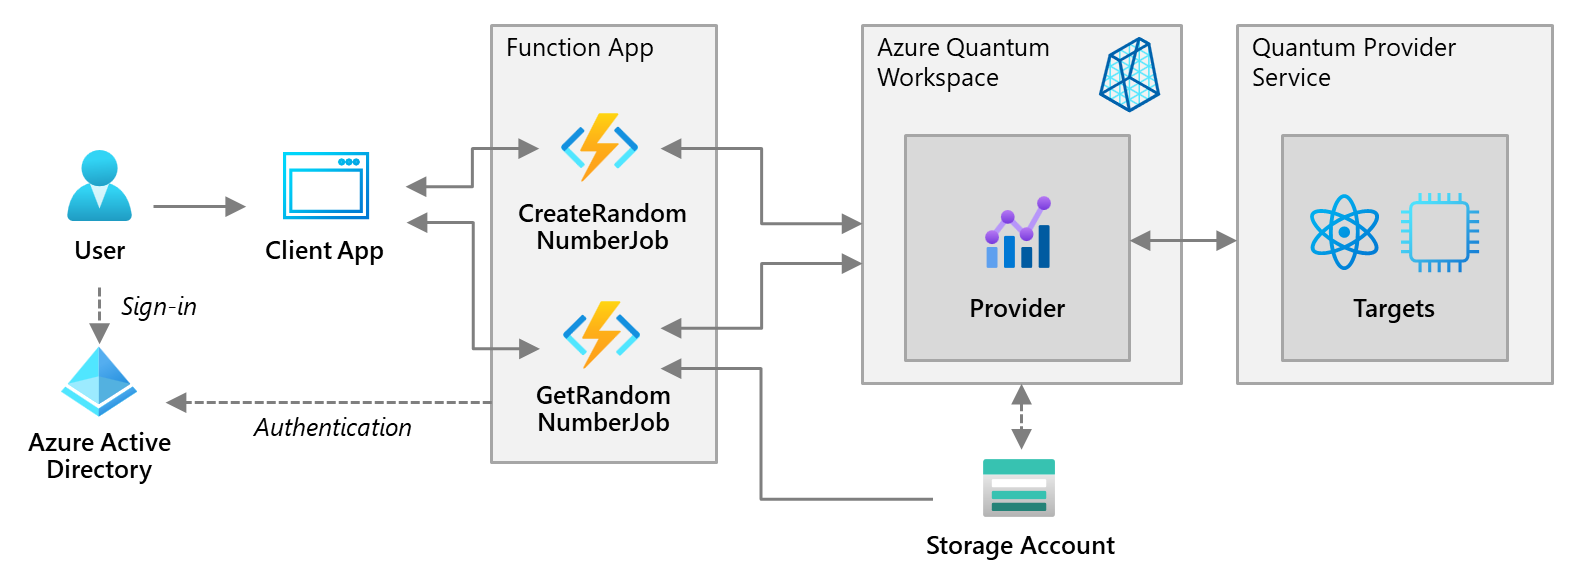
The CreateRandomNumberJob function submits the quantum job and returns a job ID. You can pass this job ID to the GetRandomNumberJob function. That function returns the generated random number or the job status, if the job hasn’t successfully completed yet.
The random number generation runs the following code:
namespace QApp.Qsharp {
  open Microsoft.Quantum.Intrinsic;
  open Microsoft.Quantum.Canon;
  open Microsoft.Quantum.Measurement;

  @EntryPoint()
  operation SampleRandomNumberInRange(nQubits : Int) : Result[] {
    use qubits = Qubit[nQubits];
    ApplyToEach(H, qubits);
    return MultiM(qubits);
  }
}
The SampleRandomNumberInRange operation takes an integer representing the desired bit-length as input and returns a random number of corresponding length. The application and all technical DevOps artifacts are publicly available on GitHub (https://github.com/hsirtl/devops-for-quantum-computing-azure-function).
The inner quantum loop
The inner quantum loop involves several steps enabled by the Quantum Development Kit (QDK). First, you write quantum code. This typically involves use of libraries included in the QDK.
Next, you can test your code on the local QDK simulator. Q# supports creating unit tests for quantum programs, which can run as tests within the xUnit unit testing framework. As an example, following test verifies that the random number generating operation returns a number of specified length. The test runs on the local simulator.
@Test("QuantumSimulator")
operation BeOfSpecifiedLength() : Unit {
    let specifiedLength = 8;
    let value = SampleRandomNumberInRange(specifiedLength);
    let length = Length(value);

    Fact(length == specifiedLength, "Expected a result of specified length.");
}
The tests will create an output similar to the following:
Starting test execution, please wait...
A total of 1 test files matched the specified pattern.

Passed!  - Failed:     0, Passed:     2, Skipped:     0, Total:     2, Duration: 4 ms
After testing your code, you should estimate the resources required to run it on quantum hardware to ensure that you choose a target environment suitable for this. The resources estimator runs on your local machine and can be thought of as another type of simulation target. The estimator will output an estimation result as follows:
Metric          Sum     Max
CNOT            0       0
QubitClifford   3       3
R               0       0
Measure         3       3
T               0       0
Depth           0       0
Width           3       3
QubitCount      3       3
BorrowedWidth   0       0
This result shows the types and amounts of resources needed for running the random number generation. Implementing the resource estimation via the xUnit framework allows automating the estimation step. There you can make use of the fact that the estimator provides programmatic access to the estimated data. That way, we can use the estimation as a test gate that must succeed before a pipeline deploys code to a target environment.
[Fact]
public void UseMinimumQubitCount()
{
  int specifiedLength = 3;
  ResourcesEstimator estimator = new ResourcesEstimator();
  SampleRandomNumberInRange.Run(estimator, specifiedLength).Wait();
  var data = estimator.Data;
  int qubitCount = Convert.ToInt32(data.Rows.Find("QubitCount")["Max"]);
  Assert.True(qubitCount <= specifiedLength);
}
In this example the test fails, if more qubits than requested are used by the algorithm.
The inner classic loop
The inner loop for the classic component includes activities for building, debugging, and testing classical components. For hybrid quantum applications there is an additional step for integrating the quantum component. In case of the loosely coupled approach this is the integration of the quantum code together with the Functions. In our example, this is the packaging and calling of the APIs implemented via the CreateRandomNumberJob function, which submits the quantum job to the Azure Quantum service. As an additional testing step, you can test Azure Functions in the local environment. To avoid unnecessary waiting times caused by long-running operations in the quantum environment, you could use mock implementations of the functions.
The outer loop
So far, developers execute all tasks (build, unit test, etc.) manually. In the outer loop CI/CD-pipelines automate these tasks by taking all infrastructure and application code artifacts stored in the source code repository, and perform unit tests and deploy the overall application (including the necessary Azure services).
Source Code Repository
You should store both the quantum and the classical parts in a source code repository like GitHub or Azure Repos. This not only enables versioning, tagging, and keeping versions of different components in sync. It also opens the possibility of automatically testing and deploying the overall system.
Infrastructure as Code (IaC)
Next to your application code, you should store a machine-readable infrastructure description in the repository. This way, you can keep your source code with the different runtime environments in sync. By describing infrastructure as code, you can automatically provision the infrastructure components needed for your applications, which is an important piece of the DevOps practice called continuous delivery.
Azure offers two native mechanisms for describing infrastructure as code: Azure Resource Manager (ARM) templates and Azure Bicep. You can use both mechanisms to create instances of following Azure services the sample application requires:
- Azure Quantum workspace
- Azure Storage account
- App Service plan
- Function App
- Application Insights
The infrastructure creation is idempotent, i.e., the deployment always sets the target environment into the same configuration, regardless of the environment’s starting state. This ensures that the environment is always in the same state for the application to successfully run.
Continuous Integration (CI) with Automated Testing
Every time a developer commits a change to the source code, automatic building and testing should ensure quality and integrity of the overall system. This process is called Continuous Integration (CI). In the sample application this mechanism is implemented via GitHub Actions. One action is triggered each time a developer commits changes to either the quantum or classic code. Here is the relevant section of the GitHub Actions specification.
      # Checkout code
    - name: 'Checkout code'
      uses: actions/checkout@main

      # Build the Quantum Component
    - name: 'Build the Quantum Component'
      shell: pwsh
      run: |
        pushd '${{ env.AZURE_QUANTUM_PACKAGE_PATH }}'
        dotnet restore
        dotnet build --configuration Release --output ./output
        popd

      # Test the Quantum Component
    - name: 'Unit Test the Quantum Component'
      shell: pwsh
      run: |
        pushd '${{ env.AZURE_QUANTUM_UNIT_TEST_PACKAGE_PATH }}'
        dotnet test --verbosity normal
        popd

      # Estimate Quantum Resources
    - name: 'Estimate Quantum Resources'
      shell: pwsh
      run: |
        pushd '${{ env.AZURE_QUANTUM_ESTIMATION_PACKAGE_PATH }}'
        dotnet test --verbosity normal
        popd
The action automatically performs the following steps:
- Check out the code
- Build the application
- Run unit tests
- Run resource estimation
The action stops a deployment, if one of these steps fails. The unit tests ensure correct behavior of the tested components. The GitHub action references and executes the unit tests implemented in the inner quantum loop. The next step verifies that there is no excessive resource consumption in the quantum component. The GitHub action performs an automated resource estimation checking whether the number of qubits used is not more than the requested qubit length. It references the estimation code implemented in the inner quantum loop.
Continuous Delivery (CD)
Continuous Delivery (CD) is the process to build, test, configure, and deploy from a build to a production environment. After successful local build and testing, the sample implementation uses the infrastructure specification realized via an ARM template to perform an infrastructure deployment.
The Infrastructure deployment GitHub Action executes the following steps:
- Check out the code (both infrastructure and application code)
- Log in to Azure
- Create an Azure Resource group (if it doesn’t exist)
- Deploy the infrastructure (quantum workspace, storage account, App Service plan, Function App, etc.)
- Configure role-based access control (RBAC)
The action makes two role assignments:
- The quantum workspace gets Contributor-rights to use the storage account for storing quantum job data.
- The Azure Function App gets Contributor-rights at the quantum workspace, which allows them to submit and monitor quantum jobs.
After infrastructure provisioning completes, the Application Deployment GitHub Action continues with deploying the application. This includes
- Building the Function App
- Deploying the Azure Functions (containing the packages for the quantum logic)
- Executing an end-to-end test to validate that the overall application works as expected.
Future extensions of the sample implementation will include integration tests. These will check whether the Functions can be called via API and return expected results. The checks will run against provider simulator and provider hardware.
The following picture illustrates how the different GitHub Actions work together to implement the overall CI/CD-flow.

Application Monitoring
For monitoring the deployed application, you can use familiar tools provided by Azure:
- Azure Monitor – delivers a comprehensive solution for collecting, analyzing, and acting on telemetry from your infrastructure and application
- Application Insights – analyzes application behavior based on application metrics and logging
- Log Analytics with Log Alerts, Metrics Alerts – notifies you when events specified via custom queries occur.
Conclusion
Azure Quantum offers a lot of integration points that allow building comprehensive CI/CD-pipelines covering the full lifecycle of hybrid quantum applications: from building the app, automated testing, resource estimating up to provisioning the target environment and deployment of the application. Implementing DevOps for quantum applications this way leads to a repeatable, high-quality process for building, deploying, and monitoring hybrid quantum applications.
 Light
Light Dark
Dark
2 comments
Thanks for this excellent article! At Pivotport we are currently working with the Azure Quantum Workspace and Azure DevOps to develop a quantum detector for cardiovascular events using the IonQ Provider. We look forward to engaging the CICD approach described here. It would be terrific to have a thorough walkthrough of Azure DevOps using all its capabilities in Agile planning with Azure Boards, through Azure Repos with a DevOps Workspace using Azure Repo.
One quirk I discovered while making this work was to connect to an established DevOps Workspace with an Azure Repo via VS EE and create a local copy on my dev workstation. My repo contains Jupyter Notebooks for the Azure jobs to execute on IonQ hardware through the IonQ provider.
Since VS EE cannot run Jupyter Notebooks, but VS Code or a local Anaconda based Jupyter server install can execute Notebooks, the local copy of the workspace is useful for testing the notebook code.
However, for large jobs it would be terrific to be able to submit jobs in Azure DevOps with the input folder and output folder established in the Azure Repo and able to provide the input dataset and capture the output dataset as part of the CICD automation. A demo with a codebase using a simple quantum problem would be good for such a start to end “Quantum Project” tutorial for an Azure Quantum Workspace
Hi Rajiv,
thank you very much for your comment. Your project sounds highly interesting.
Regarding your challenge with integrating a job submission in a CI/CD-pipeline: One implementation option (hope you’re not afraid of doing a litte bit of coding) might be via handling your job submission, monitoring and result handling via Azure Functions. I’ve published another blog describing how to implement this. The blog also has a reference to a GitHub-repo containing a sample implementation. When you have your job handling accessible via APIs, you could integrate the API calling via an ADO-PowerShell task. I found a sample on StackOverflow. I haven’t tried it myself, but that looks promising.
Let me know, if this sounds like a suitable approach for your problem. If not, we’ll find an alternative solution.
Best,
Holger