
Quantum software development using the QDK
In this blog we often focus on a specific tool included in the Quantum Development Kit, a new feature, or a concrete application. This time let’s take a step back and look at the end-to-end quantum software development workflow, the stages through which a quantum program goes from idea to complete implementation, and the tools offered by the QDK for each stage.
Here is a diagram that shows the steps of quantum software development in one picture.
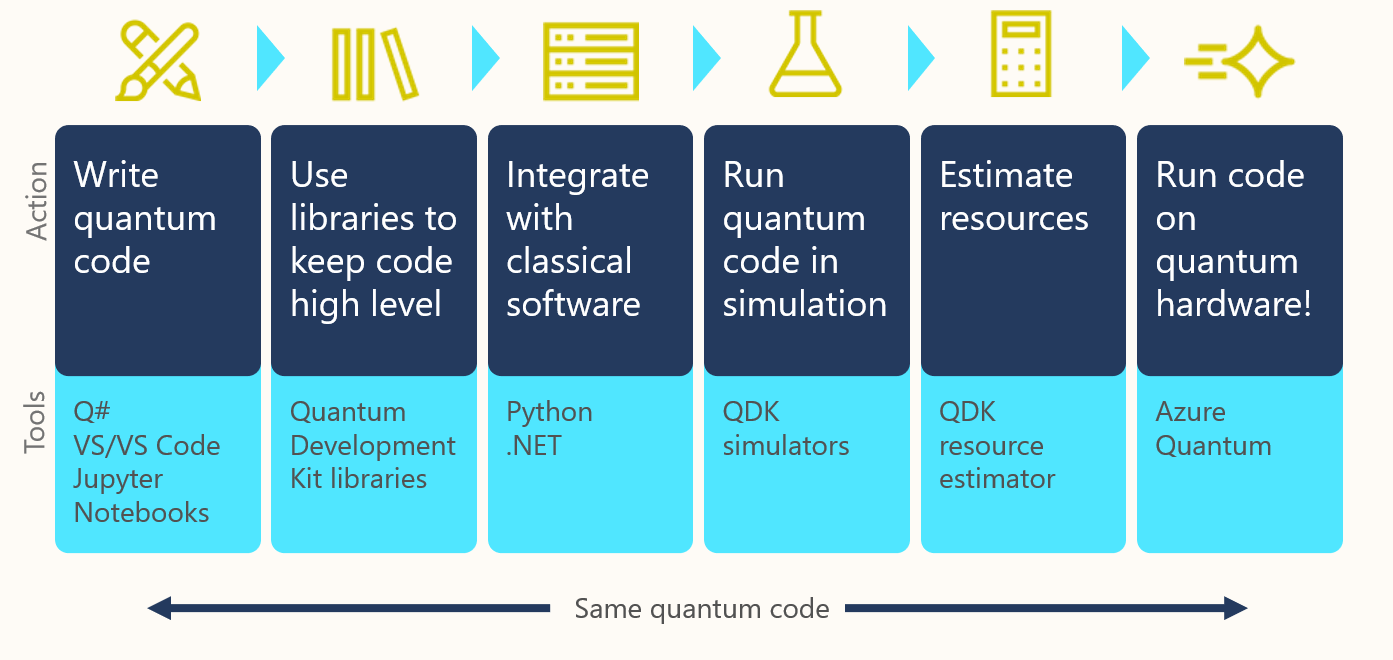
Let’s look at each step in more detail.
Write quantum code
The most recognizable part of the QDK is probably Q# – the domain-specific programming language we created to express quantum programs. (Check out the blog in which we discuss why we decided to create Q# for a bit of background.)
QDK includes extensions for Visual Studio and VS Code. Though they are not required to write and run Q# programs, they make the experience much smoother, offering nice features such as syntax highlighting and IntelliSense.
QDK also includes the Q# version of Jupyter Notebooks – an interactive development environment that offers, among other convenient features, a rich set of program visualization tools.
Use libraries to keep the code high-level
The quantum libraries that are part of the Quantum Development Kit help you keep your code high-level, doing a lot of the heavy lifting in implementation for you so that you can focus on the logic of your algorithms.
They include both “standard” libraries that implement patterns common for a lot of quantum algorithms, and domain-specific libraries such as Microsoft.Quantum.Numerics and Microsoft.Quantum.Chemistry that drill down into more specific applications.
Integrate with classical software
Quantum programs don’t exist in a vacuum; they are typically parts of hybrid workflows that combine classical libraries and tools with using quantum computers to accelerate solving specific sub-problems that are well suited for quantum computing. For example, quantum development tools for chemistry rely heavily on classical chemistry simulation packages such as NWChem to compute the inputs to the quantum part of the program.
The Quantum Development Kit allows you to integrate Q# programs with Python and .NET, enabling a quantum software developer to take advantage of a lot of the advances made in classical computing in the past 70 years.
Run quantum code in simulation
The previous steps look pretty similar to the classical software development workflow, but there are some steps that are very specific for quantum computing. Once you’ve written your program, you’ll want to use simulators – classical programs that simulate the behavior of a quantum system, so that you can run a small instance of your program and see what it does without actual hardware access.
QDK includes a variety of simulators, from the full-state simulator that imitates a quantum system perfectly to the new experimental simulators designed to simulate noisy systems.
The simulators are limited in the size and/or the capabilities of the programs they can simulate. However, they are very helpful for testing your quantum programs and experimenting with things such as error correction.
Estimate the required resources
Of course, eventually you’re going to need to run your quantum programs on quantum hardware to enjoy the benefits of quantum computing. Before you do that, though, you’ll need to figure out whether your program can run on existing hardware. You can use QDK resource estimators to tell you how many qubits you need and how long your program will take.
You can use resources estimation in a slightly different manner as well: when applied to algorithms we know are not suitable for NISQ devices, it informs us about the viability of these algorithms in the long run, allowing to validate and optimize them years before sufficiently powerful quantum hardware becomes available.
Run code on quantum hardware!
Finally, you’ve validated the correctness of your program and estimated that it is fit to run on the hardware you have access to. The last step is using Azure Quantum to run your program on quantum hardware!
Most importantly, you use the same Q# code for all steps of the workflow. In the short term you might have to tweak some portions of the code to account for the current hardware limitations. You can think of it as rewriting portions of high-level code in Assembly to speed up a part of a classical program. But in the long run you’ll be able to switch between various simulators and hardware providers without any code modifications.
Workflow in action
Curious to see this workflow in action? Check out the recent Azure Friday episode in which I show all the steps of quantum software development in a live demo, culminating in running Q# code on Azure Quantum!
 Light
Light Dark
Dark
0 comments