In the second part of her SonarQube series, Premier Developer Consultant Sana Noorani builds on top of SonarQube technology and explains how SonarLint can be added in Visual Studio to track real time code quality.
What is SonarLint?
SonarLint an extension you can add to an IDE such as Visual Studio that can provide developers real-time feedback on the quality of the code. It can detect issues in seconds, which can improve productivity. SonarSource describes SonarLint as a capability that can work like a spell checker for text since it detects issues in your code as you go.
In a previous post, I showed how you can integrate SonarQube into your VSTS build/release pipeline. However, one major drawback is that you must wait to get feedback on code which you will only receive when code is pushed and a build is triggered. This can be limiting. However, SonarLint provides a better option for checking code quality since SonarLint integrates directly to Visual Studio, and code can be checked as a developer hacks away.
In this post, we will be discussing how you can enable SonarLint in Visual Studio to get real time feedback on the quality of your code. This project assumes that you already having a running instance of SonarQube on a server.
Adding SonarLint to Visual Studio
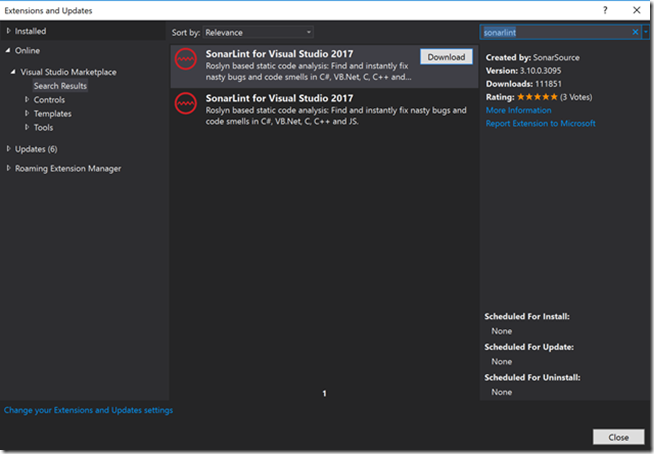
In Visual Studio, SonarLint is an extension that can be installed by going to the following:
Tools -> Extensions and Updates -> Online
Then in the search box, search for “SonarLint”. Once you see SonarLint, press “Download”.
You must now sign out of Visual Studio to let the changes save properly. VSIX Installer will prompt you to allow for it to modify Visual Studio. After this is completed, you can now use SonarLint for your project.
Using SonarLint in your project
To connect an existing project with SonarQube, click on the following:
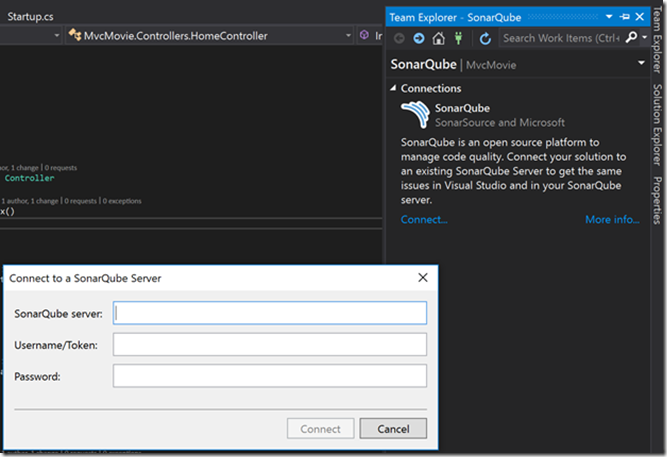
Analyze -> Manage SonarQube Connections
Then you will need to press “Connect” to connect to your SonarQube Server. Add in the SonarQube server, username, and password information.
Once you connect, you will see SonarLint connect to the SonarQube server. Then you will see a screen that will ask you to select a SonarQube project to bind your solution to. When you do this, your changes in SonarQube will now be synced to Visual Studio.
Analyzing your code
You can now analyze your code. You can do this with the following:
Right click solution -> Analysis -> Run Code Analysis
If there are any errors or issue with your code, you will see it in the “Error List” box built into Visual Studio. Moreover, you will be able to see the UI line items directly in Visual Studio. Normally, you would need to log into the SonarQube web application directly to get this information.
Another benefit of SonarLint in Visual Studio is that you will see a helper notify you with errors or warnings as you write code. This allows you to fix code right away in real time. This can drastically improve efficiency for developers and it will help reduce time needed for code checks.
Which tools will SonarQube work best with?
Overall, SonarLint will catch issues in code on an IDE such as Visual Studio. However, it will not catch issues when your code is integrated with other pieces of the project. Having SonarQube in the VSTS build step is very important to ensure that code smells and issues are being detected when code integration occurs. In summary, it is important to have both the VSTS extension and SonarLint to allow for an efficient bug-free DevOps pipeline.


How can I find analysis option?
Could you please share steps to install SonarScanner for MSBuild on Azure Web app After installing sonarqube on web app. Can we install it on same web app service. I need sonarscanner installed for running code scan locally using sonarlint.
What should be used as the SonarQube server address if using SonarCloud?