

Looking for ways to empower your UWP app beyond what you thought was possible? Today, we’re going to show you how to leverage the AppServices library we built for the Microsoft Store to unlock the power of Win32 APIs. Plus, we have a new source generator which makes using app services a piece of cake! 🍰
This is part of our new “Microsoft Store Open Source Series” of blog posts, expanding on our prior posts about the new Microsoft Store for Windows — reducing binary size with trimming, and migrating from C++/WinRT to C#.
The Microsoft Store Open Source Series
In our previous blog posts, we used the Microsoft Store itself as a case study to introduce general .NET concepts and explain how we solved some problems while working on the app. But of course, we could only share some very small bits of our actual code, as the Microsoft Store app itself is not open source.
With this new series, we want to try something new. While working on the Microsoft Store, we’re constantly pushing the boundaries of what native app development on Windows can do. In doing so, we often find ourselves building some new libraries or APIs that we can then reuse in the rest of the application. Because everyone in our team loves open source software, and thanks to our close collaboration with the CommunityToolkit teams, we’re also always looking into ways to make all these new bits of functionality public, so that everyone in the community can leverage them in their own applications as well.
We’ve already open sourced several features that were first implemented for the Microsoft Store, like:
ConstrainedBox- Attached XAML shadows
ShimmerTransitionHelperAsyncRelayCommandand other MVVM Toolkit improvements- And more!
So with this blog post we’re starting a new “Microsoft Store Open Source Series”, where we will go through examples of these APIs and libraries we built for the Microsoft Store. We’ll look at what problems they’re solving, how we designed and put them together, how we open sourced them, and finally how you can also leverage them to solve the same problems we faced, but without having to reinvent the wheel! 🙌
Let’s take a deep dive into our first episode: AppServices! 🍿
Escaping the sandbox
Before going into the details of how the library itself is structured or how it works, let’s start from what problem it is trying to solve: allowing UWP applications (like the Microsoft Store) to escape the sandbox and execute some code with full trust permission.
“Why does the Microsoft Store even need full trust in the first place?”
You might ask. Good question! For the most part, the Microsoft Store fully runs within the standard “UWP sandbox” (ie. it’s a base trust application running inside AppContainer). Most of its functionality works just fine from there. In fact, we often just build and run the Microsoft Store this way when locally debugging it. Doing so makes builds a bit faster, and there’s no difference in terms of functionality if we’re not testing anything that needs full trust anyway.
The base trust mode is the default for UWP applications, as it gives users the maximum level of control and security. Applications can only use permissions you explicitly allow them to access, and which you can revoke at any time from the Windows settings. For instance, they can’t do things such as accessing files from arbitrary locations on your disk, edit the global system registry, etc.
However, there are special cases where these restrictions get in the way of functionality an application may need. For instance, there are legitimate cases where an app might need access to all files on the file system (e.g. if the app in question is a file manager), or to use some. If that happens, UWP developers have two options:
- Add one or more restricted capabilities to their application manifest. These are special capabilities (like
broadFileSystemAccess) that allow packaged applications to “unlock” additional features that would otherwise be blocked by default. - Leverage Desktop Bridge to bundle a full trust Desktop component into the application package (we’ll explain what this is in more detail and how it works in a moment).
The Microsoft Store is actually using a combination of both. In some cases, we’re using restricted capabilities to execute code requiring them directly from the main UWP app. This is the easiest solution (when it is sufficient), as there’s no code changes or extra complexity required other than adding the capability to the application manifest. In other cases, we’re using Desktop Bridge to fully escape the sandbox and perform some actions from a full trust component. For instance, we’re doing this when we need to trigger a system restart after enabling the virtualization platform for the Windows Subsystem for Android™️, or when configuring the pop-up Store.
Let’s take a closer look at what Desktop Bridge is, how exactly we’re using it in the Microsoft Store, and where does the new AppServices library fit into all of this.
Full trust Desktop components
Desktop Bridge (which some of you might have first heard of as “Project Centennial”) was first announced at Microsoft Build 2016, and it’s an SDK and accompanying set of tools to allow classic Win32 Desktop apps to integrate UWP functionality into them without having to fully migrate to UWP in a single step. Crucially, you can also use it to go “the other way around”, ie. by integrating full trust Win32 functionality into a package that contains a UWP application. In this scenario, the UWP app and its full trust Win32 “companion” are bundled together, and the UWP app can freely invoke this extension and delegate some functionality to it when needed, in a way that’s transparent to users.
Here’s the migration steps that Desktop Bridge was meant to support:

You can see how this “reverse” mode aligns with the second to last “Migrate” step in this sequence: most of the functionality only lives in the UWP application, and the Desktop app is only triggered on demand. The UWP app and the Desktop app can then communicate by exchanging messages via UWP (er, WinRT) APIs. And this is where AppServices comes in.
When UWP and Win32 want to have a chat
The AppServices library builds over the AppServiceConnection WinRT API. This API allows different applications to communicate together by exchanging messages. You can think of it as a WinRT abstraction for what is essentially a pipe between two processes. This is how the Microsoft Store is “waking up” the Win32 extension, and asking it to perform some work on its behalf. The diagram for when this happens looks like this:
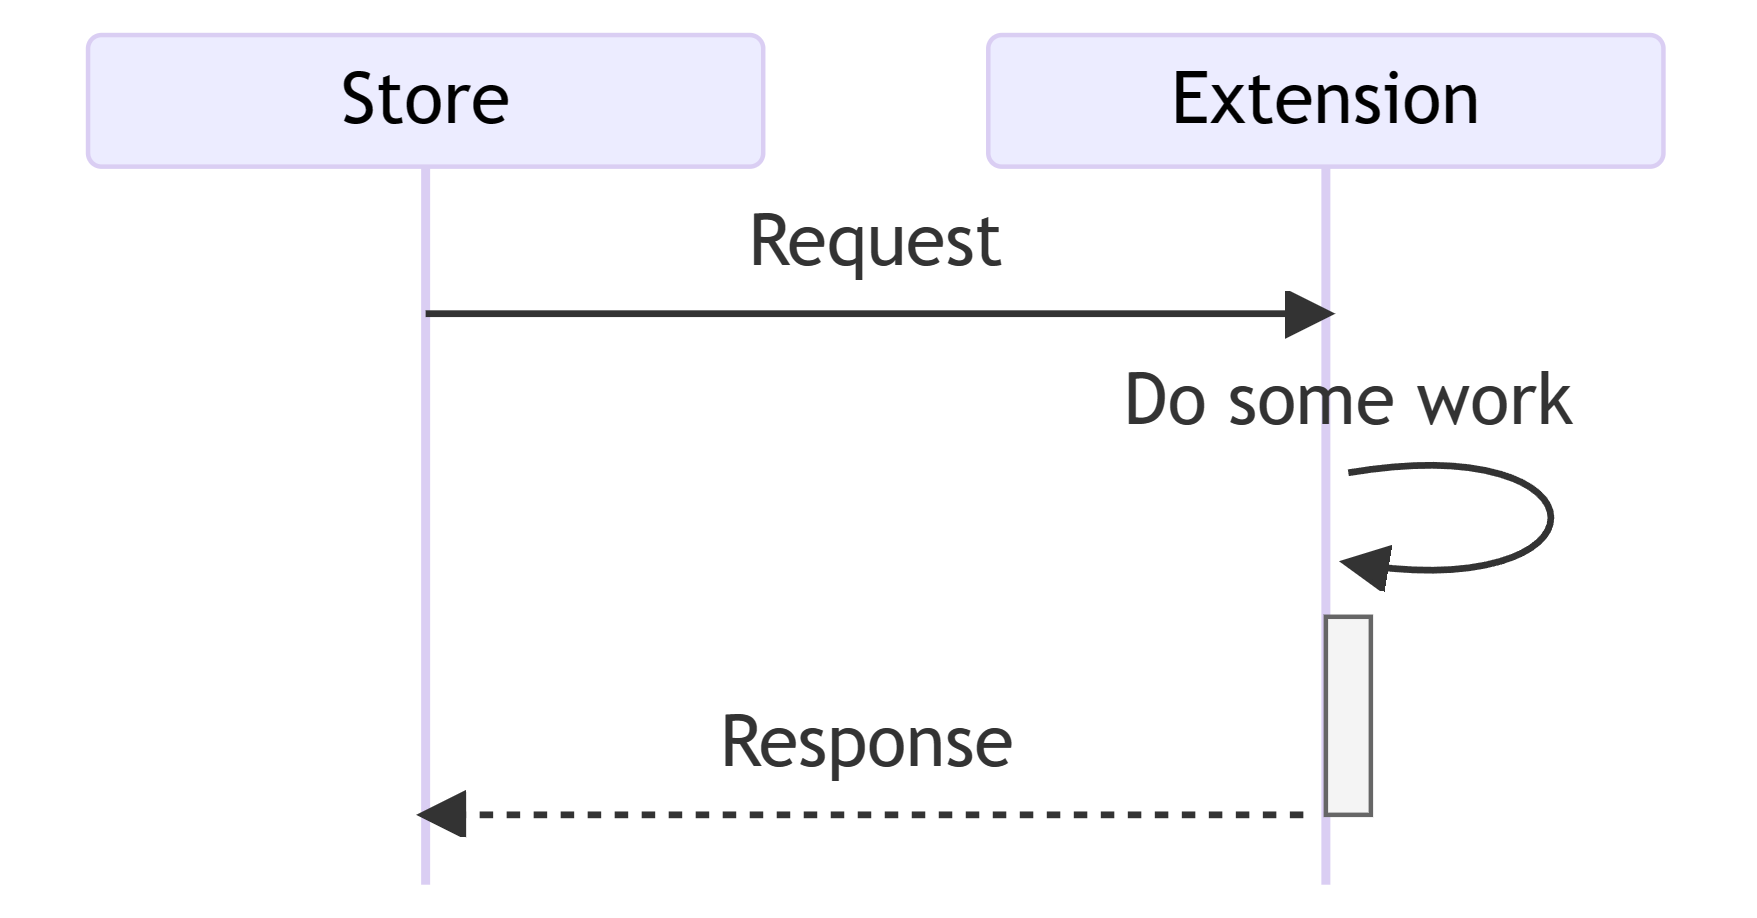
You can see how conceptually, this is very simple. Where the complexity lies is in all the additional code and infrastructure that’s needed to be able to leverage these APIs effectively. You will need to:
- Declare the app service in the app manifest
- Check whether the app service can be used (eg. this is only supported on Desktop devices, and not on Xbox, HoloLens, and others).
- Launch the Win32 app, if not already running. The
FullTrustProcessLaunchertype can be used for this. - From the UWP side, prepare and send a message. This also includes preparing all arguments into a WinRT
ValueSetobject. Primitive types are handled automatically, but for any custom or complex object, manual serialization is required. - On the Desktop extension, code is needed to listen for messages, and when one is received, to handle that request. Things can get particularly complicated if the extension needs to support multiple commands, as you’ll also need some way to encode the request type, and then have the extension recognize that and delegate to the appropriate logic, along with the correct deserialization of all parameters for that request.
- Finally, the response has to be sent back and deserialized from the client.
This can already require a lot of error prone and verbose code, especially as the number of possible requests goes up. Things then quickly can get out of hand if you would also like to support things such as cancellation tokens (to be able to cancel long running operations), or progress reporting (eg. to display a progress ring from the client side).
The AppServices library is designed to solve all of these issues, while at the same time making working with app services much easier than before! ✨
Using AppServices to build an app service
Let’s go over how the AppServices library works and how it’s structured, and how you can use it to design and implement your own app services. At a high level, AppServices has 3 components:
- A runtime library, providing abstractions for all the common functionality for both app service hosts (ie. UWP clients) and components (ie. Desktop extensions). These APIs also include all handling of things like marshalling cancellation tokens and progress callbacks, as well as the infrastructure to launch Desktop extension processes and managing app service connections.
- A source generator, which takes care of generating all marshalling code from both ends of the connection, as well as registering all proxy stubs for the available commands from the component side.
- A set of analyzers, which provide a rich set of custom diagnostics to detect any mistakes in the declared app services. These are meant to make the code much more robust, and to guide developers towards success when using the library.
These are all bundled together into the AppServices NuGet package, which is CommunityToolkit.Labs.AppServices. You can find it in the Windows Community Toolkit Labs preview feed (here). If you’re not familiar with the Labs for Windows project, feel free to check out our previous blog post about this awesome project!
To get started, you can refer to this guide to see how you can setup a simple app service from scratch. The basic setup you will have in your own solution will be something like this:
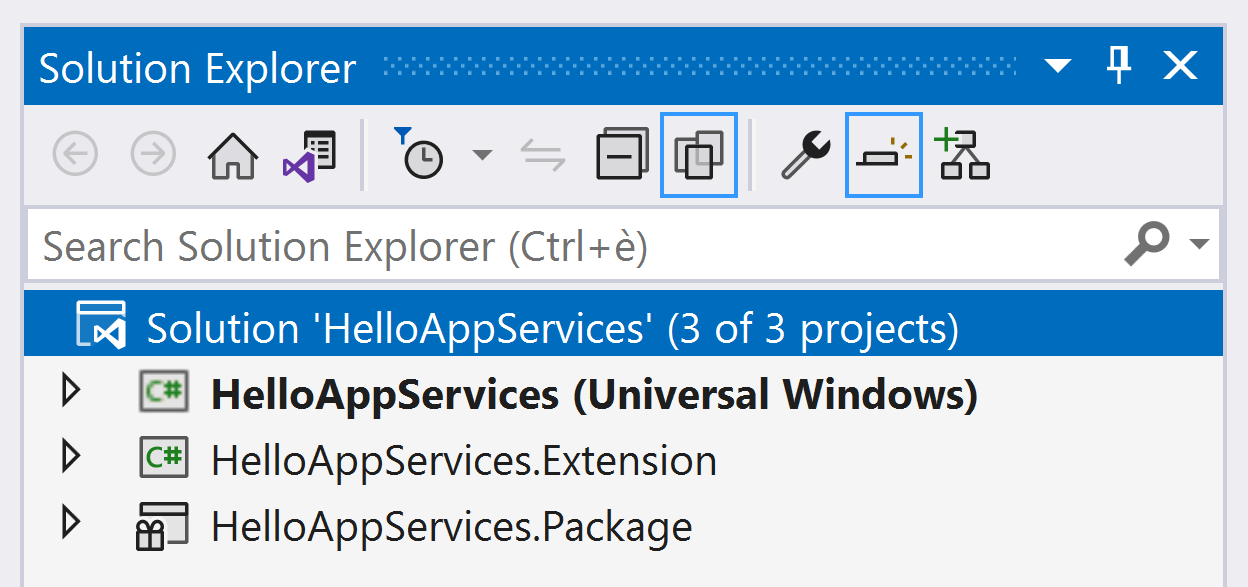
We have 3 projects to work with:
HelloAppServicesis the main UWP app.HelloAppServices.Extensionis the Desktop extension (Win32, full trust).HelloAppServices.Packageis a packaging project, referencing bothHelloAppServicesandHelloAppServices.Extension. Note that the UWP app will be set as the entry point. That is, the UWP app will be launched whenever the user tries to launch the package.
NOTE: if you’re not familiar with the project types above, here’s how to add them. Right click on Solution Explorer > Add > New Project. For the UWP app, select “Blank App (Universal Windows), C#”. For the Desktop extension, select “Console App (.NET Framework), C#”. Lastly, for the packaging project, select “Windows Application Packaging Project”. Note that picking .NET Framework for the Desktop extension is intentional here: because .NET Framework is included in Windows, we don’t have to increase our binary size by bundling a whole self-contained .NET runtime with our Desktop extension. Of course, if you did want to use modern .NET in your Desktop extension, you do have the option of doing so as well.
The first thing we need to do in the packaging project is to add a project reference to our UWP app and Desktop extension. We can do so by right clicking on its “Dependencies” node in Solution Explorer, and then selecting “Add Project Reference”. From there, we can select the two other projects. As we mentioned, the UWP project will be our entry point (ie. the application executed when deploying the package). The Win32 project, on the other hand, will be our Desktop extension.
Next, let’s open our package manifest in an editor (right click on Package.appxmanifest > View Code). Here, we need to declare our Desktop extension, as well as our app service. To do this, we’ll add 2 new extensions under our <Application> section. Before doing so, let’s make sure these two XML namespaces are declared in our root <Package> section:
<Package
    xmlns:uap="http://schemas.microsoft.com/appx/manifest/uap/windows10"
    xmlns:desktop="http://schemas.microsoft.com/appx/manifest/desktop/windows10">
Both uap and desktop should also be added to the IgnorableNamespaces list right below. Now, we can declare the extensions:
<Extensions>
    <desktop:Extension
        Category="windows.fullTrustProcess"
        Executable="HelloAppServices.Extension\HelloAppServices.Extension.exe" />
    <uap:Extension Category="windows.appService">
        <uap:AppService Name="MyFancyAppService" />
    </uap:Extension>
</Extensions>
Here’s what the two extensions are doing, and why we need them:
- The
<desktop:Extension>node is declaring the full trust process component for the application package. That is, the full trust process that will be launched by the UWP app when using the FullTrustProcessLauncher.LaunchFullTrustProcessForCurrentAppAsync() API. This is invoked internally by the AppServices library, and it’s how the Desktop extension is launched when first requested. In this case, you can see that the executable path is set to the .exe for our extension project. - The
<uap:Extension>node is declaring the app service connection that the UWP app and the full trust component will use to communicate. Each application can have multiple app service connections, so each one has a name which acts as identifier for it (in this case, “MyFancyAppService”).
And with this, we’re ready to bring the AppServices library into our workflow! 🚀
Defining and implementing the app service contract
Let’s define an interface in our Desktop extension project, with the APIs we want to expose:
[AppService("MyFancyAppService")]
public interface IMyFancyAppService
{
    Task<int> SumAsync(int x, int y);
}
In this first example, we just have a simple SumAsync method, computing the sum of two values. Note how the return has to be a Task type, as communication over app services is asynchronous. We’ve added [AppService] over the interface to mark it as an app service “contract”, and also to trigger the source generator. Let’s implement this interface as well (still in the Desktop extension):
public sealed partial class MyFancyAppService : IMyFancyAppService
{
    public async Task<int> SumAsync(int x, int y)
    {
        return x + y;
    }
}
Here we’ve created an implementation for the IMyFancyAppService interface, with no other extra logic related to app services. We’re just implementing an interface as usual, and we don’t have to worry about the fact that this method (and any other present) is part of the RPC contract for our app services. The AppServices library will take care of all that for us.
NOTE: you might notice that the method is
async, even though it’s not doing any asynchronous work. This is convenient for app service APIs, since they all have to be asynchronous regardless of the work they need to do. Making methodsasyncmakes them easier and less verbose to write (no need to have multipleTask.FromResultorTask.FromExceptioncalls, etc.), and it’s not a problem for performance in this context since these methods are not on hot paths. In fact, AppServices ships with a custom diagnostic suppressor specifically for this, which automatically suppresses any warnings about thatasyncmodified not being needed on app service methods.
With the contract implemented, all that’s left is to initialize this service when our Desktop extension is launched. To do that, we can simply call the AppServiceComponent.RunAsync method, which will handle all our initialization and additional logic for us, right from our entry point. That is, our Program.cs file can be just this:
using CommunityToolkit.AppServices;
using HelloAppServices.Extension;

await AppServiceComponent.RunAsync<MyFancyAppService>();
And with that, our Desktop extension is ready to go! ✈️
Customizing the AppServices component startup
Of course, if we also need more advanced logic in our Desktop extension, we can also create, initialize and manage our app service component manually. We can do so by using the InitializeAppServiceAsync() method instead (the method is implemented by the base AppServiceComponent type, which the generator will add as a base type on the app service implementation). We can do so during startup, and we can then use the ConnectionFailed and ConnectionClosed events to decide when to shut down our process (optionally, with some logging). Here’s a simplified example (ignoring namespaces for brevity):
MyFancyAppService myFancyAppService = new();
TaskCompletionSource taskCompletionSource = new();

// Handle connection failures
myFancyAppService.ConnectionFailed += (s, e) =>
{
    Trace.WriteLine("The app service connection failed.");

    taskCompletionSource.TrySetResult();
};

// Handle the connection being closed
myFancyAppService.ConnectionClosed += (s, e) =>
{
    Trace.WriteLine("The app service connection was closed.");

    taskCompletionSource.TrySetResult();
};

// Initialize the app service
await myFancyAppService.InitializeAppServiceAsync();

// Keep running until there is an active connection
await taskCompletionSource.Task;
Finally, let’s go to Solution Explorer once again, right click on the Desktop extension project > Properties, and change the output type from “Console Application” to “Windows Application”. This will make it so that the extension will not show a console when launched, and it will instead be invisible. That is exactly what we want here, as the Desktop extension simply needs to be remain active in the background and execute work for us.
With this done, the Desktop extension is completed!
Consuming an app service from UWP
Let’s move over to the UWP app now. Here, we need to do two things. First, we need to add the same IMyFancyAppService interface from the Desktop extension. We can do so by just right clicking on our UWP project and selecting Add > Existing Item, then picking the source file with the interface, and selecting “Add as Link”. Doing so will add the file to the UWP project as well, but just as a reference, so without duplicating the file on disk. Perfect!
Next, all we need to do is to override the Application.OnBackgroundActivated method to invoke the AppServices functionality. This is needed because when a connection is established, the OS will activate the UWP app passing an instance of AppServiceConnection as input to this method. Let’s add code as follows (typically in our App class):
private readonly MyFancyAppService _myFancyAppService = new();

protected override void OnBackgroundActivated(BackgroundActivatedEventArgs args)
{
    base.OnBackgroundActivated(args);

    _myFancyAppService.OnBackgroundActivated(args);
}
And we’re done! AppServices will take care of all the rest, and we can just invoke our methods from the IMyFancyAppServices interface from that _myFancyAppService field. If you like using dependency injection (see docs here for more info), you can also inject the IMyFancyAppService interface into your service provider, and easily use it from anywhere (and mock it from unit tests as well!). It might look something like this:
public sealed class MyViewModel
{
    private readonly IMyFancyAppService _myFancyAppService;

    // Constructor handling dependency injection
    public MyViewModel(IMyFancyAppService myFancyAppService)
    {
        _myFancyAppService = myFancyAppService;
    }

    // Some method using the service like any other service
    public async Task PerformComputationAsync(int x, int y)
    {
        int result = await _myFancyAppService.SumAsync(x, y);

        Console.WriteLine($"{x} + {y} = {result}!");
    }
}
Thanks to the AppServices library and with just a few lines of code, we now have a full app service setup working! And we needed no manual code whatsoever for managing the Desktop extension, handling the connection or marshalling parameters! 🎉
We can see the result of code just like this in this screenshot:
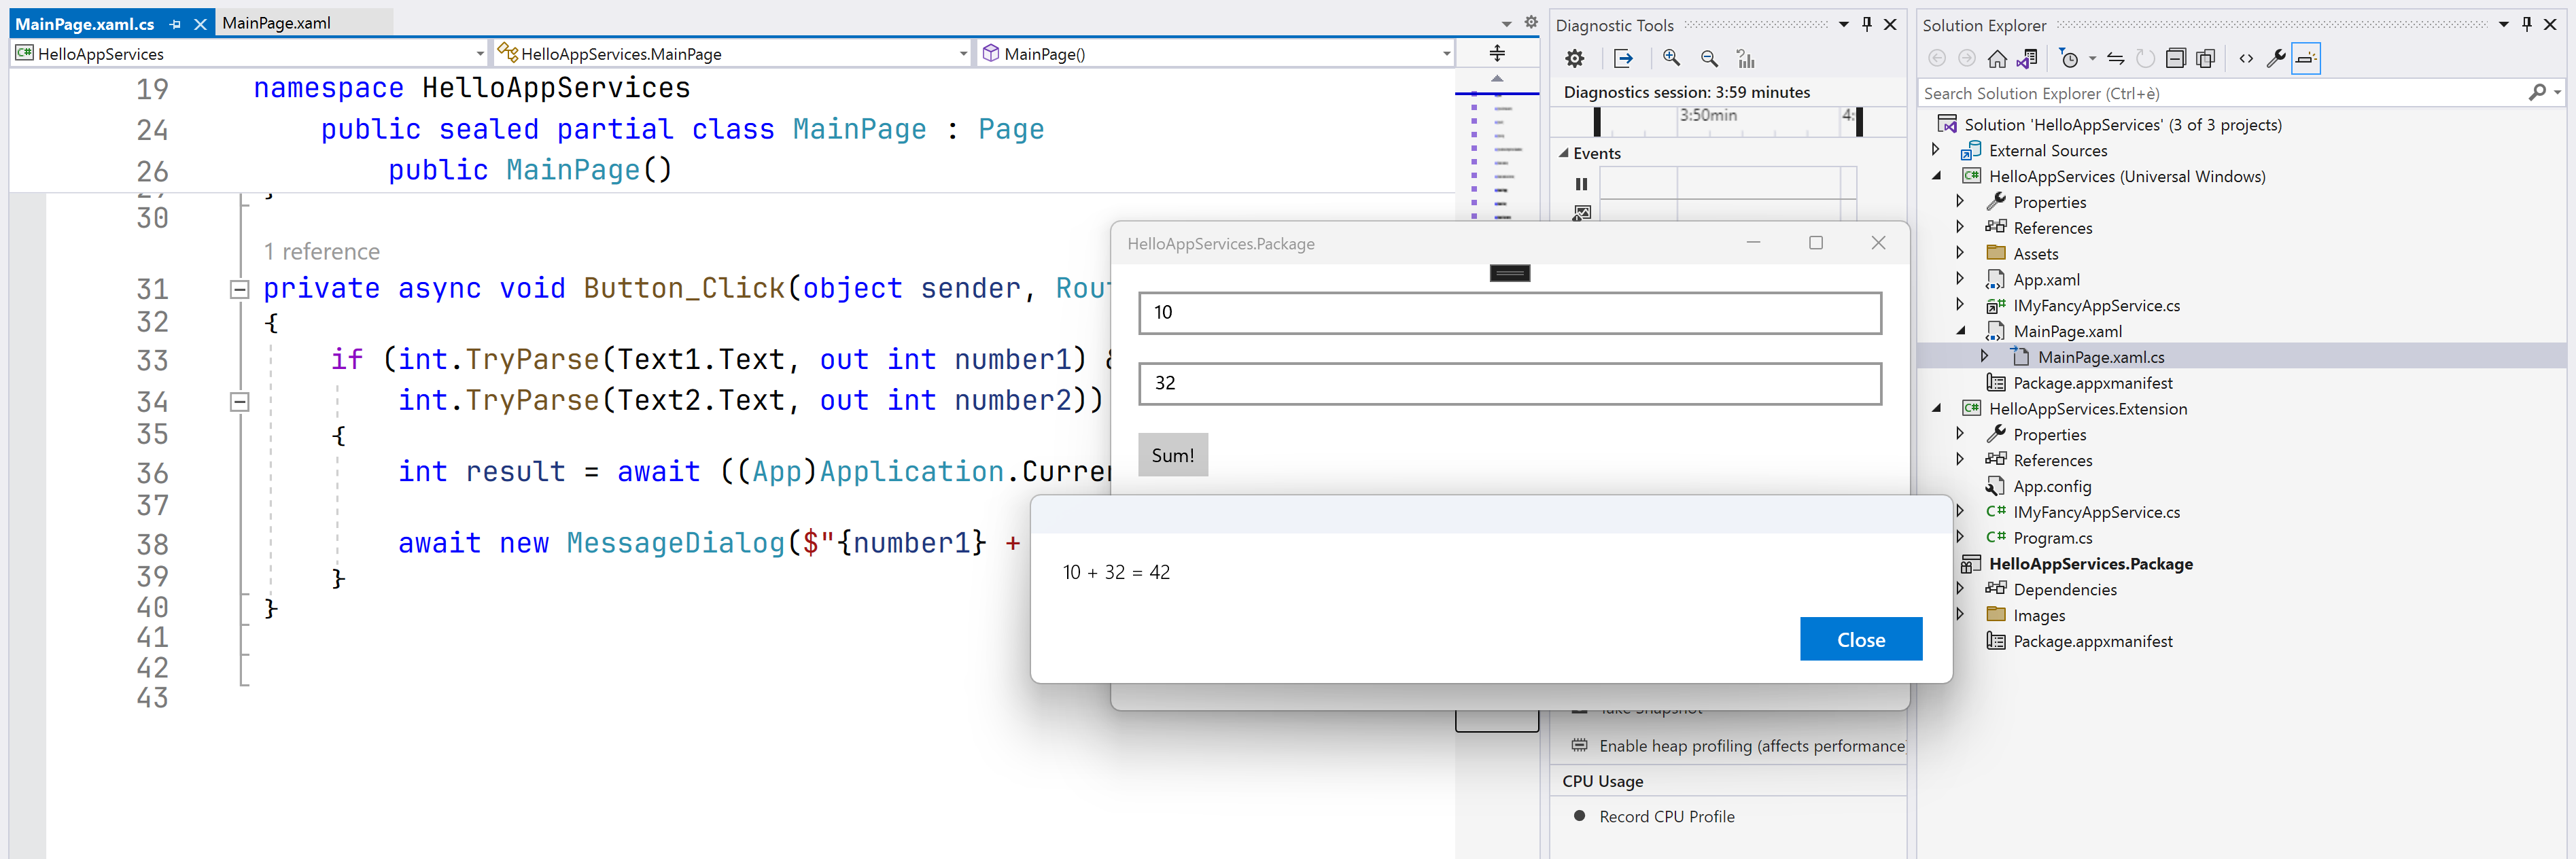
Here we have two TextBox controls where we entered two numbers, and a simple handler for the Button.Click event parsing those numbers. Those values are then passed to the Desktop extension to compute the sum, and the result is displayed in a MessageDialog. Of course, this is just a minimal example, but you can see how the same approach can easily be generalized to implement all sorts of advanced functionality as well! 🧰
Handling progress and cancellation
What if we wanted to also use cancellation tokens or progress callbacks? We can just add more parameters! The AppServices library and generators have special support for CancellationToken and IProgress<T> parameters. Let’s add a new method in IMyFancyInterface using these two features as well, and implement it in our extension:
// App service contract
[AppService("MyFancyAppService")]
public interface IMyFancyAppService
{
    // Other methods...

    Task DoSomeExpensiveWorkAsync(IProgress<double> progress, CancellationToken token);
}

// App service implementation in the Desktop extension
public sealed partial class MyFancyAppService : IMyFancyAppService
{
    // Other methods...

    public async Task DoSomeExpensiveWorkAsync(IProgress<double> progress, CancellationToken token)
    {
        // Simulate some expensive work
        for (int i = 0; i <= 100; i++)
        {
            token.ThrowIfCancellationRequested();

            await Task.Delay(100);

            progress.Report(i / 100.0);
        }
    }
}
That’s it! AppServices will take care of everything needed here:
- Handling
OperationCanceledException-s thrown by thatThrowIfCancellationRequested()call, and reporting cancellation back to the UWP host with an appropriate exception. - Handling bidirectional communication to report progress back to the UWP client.
Make sure to also check out all the XML docs on the public APIs, there’s lots of additional documentation there! 📖
What about complex types?
There might be cases where you need some custom type to be passes as a parameter to an app service methods, or returned as a result. In those cases, the automatic serialization won’t be sufficient, and you’ll need to manually handle serializing these objects to and from ValueSet instances. Thankfully, AppServices comes bundled with special support for these scenarios, to make them easily integrate with the rest of the app service architecture.
First, let’s define a simple model (in a shared file between the UWP app and the Desktop extension):
public sealed record Person(string FirstName, string LastName);NOTE: UWP and .NET Framework projects default to C# 7.3, which means record types are not available. However, you can use PolySharp to enable support for more recent C# language features, such as records, in these project types as well (we’re doing the same in the Microsoft Store). If you prefer to stick to C# 7.3, feel free to use a normal class with auto-properties instead.
Next, we’ll want to implement our custom serializer for this Person type:
public sealed class PersonSerializer : IValueSetSerializer<Person>
{
    Person IValueSetSerializer<Person>.Deserialize(ValueSet valueSet)
    {
        return new((string)valueSet[nameof(Person.FirstName)], (string)valueSet[nameof(Person.LastName)]);
    }

    ValueSet IValueSetSerializer<Person>.Serialize(Person value)
    {
        return new()
        {
            [nameof(Person.FirstName)] = value.FirstName,
            [nameof(Person.LastName)] = value.LastName,
        };
    }
}
As you can see, a serializer is just a custom type that implements the IValueSetSerializer<T> interface, which is provided by *AppServices**. This interface provides methods to convert between T objects and ValueSet objects. With this, we can now declare our custom app service API using our custom type and serializer:
// App service contract
[AppService("MyFancyAppService")]
public interface IMyFancyAppService
{
    // Other methods...

    [return: ValueSetSerializer(typeof(PersonSerializer))]
    Task<Person> LoadPersonFromIdAsync(string id);
}

// App service implementation in the Desktop extension
public sealed partial class MyFancyAppService : IMyFancyAppService
{
    // Other methods...

    public async Task<Person> LoadPersonFromIdAsync(string id)
    {
        // Fetch the person from some database, etc.
        return FetchPersonByIdAsync(id);
    }
}
You can see how here we used [return: ValueSetSerializer] to declare a custom serializer for the return value of an app service methods. You can also use [ValueSetSerializer] to annotate parameters. The advantage of being able to explicitly annotate return values and parameters is that this allows you to implement your own serializers for types you don’t own (that is, for types you couldn’t modify to add support for app services directly).
This is really all that’s needed to get your new app services up and running! Let the AppServices library take care of all the extra work and complexity, and just enjoy writing your own RPC methods abstracting over the underlying WinRT app services infrastructure! 🧙♂️
How does this work behind the scenes?
We’ve seen how easy it is to use the AppServices library to create custom app services, and how little code is required to use them. Now, let’s peek behind the curtain and take a look at the code that the AppServices source generators are generating for you to make all this possible.
As we mentioned, there’s two different types of produced source files, one for the UWP client and one for the Win32 Desktop extension:
- The UWP client will have the generator produce a full implementation type for the referenced app service interfaces. The app can instantiate this and use it, without any extra code being needed. This generated class will use the base
AppServiceHosttype from the AppServices library, which provides a set of APIs to invoke app service APIs, as well as all necessary internal infrastructure to manage connections, launching the Desktop extension process, sending requests and receiving responses. - The Desktop extension will instead have the generator produce a partial declaration of the implementation type for the app service interface, which will register all entry points for the declared methods, and forwards those calls to the implemented interface methods. In practice, this is what allows the implementation service to just implement all the available methods, with the base
AppServiceComponenttype taking care of managing connections and invoking the correct method when a request message is received.
Let’s take a look at the generated code for the UWP client first:
// <auto-generated/>
#pragma warning disable
#nullable enable
namespace HelloAppServices.Extension
{
    /// <summary>A generated host implementation for the <see cref="global::HelloAppServices.Extension.IMyFancyAppService"/> interface.</summary>
    public sealed class MyFancyAppService : global::CommunityToolkit.AppServices.AppServiceHost, global::HelloAppServices.Extension.IMyFancyAppService
    {
        /// <summary>Creates a new <see cref="MyFancyAppService"/> instance.</summary>
        [global::System.CodeDom.Compiler.GeneratedCode("CommunityToolkit.AppServices.SourceGenerators.AppServiceGenerator", "1.0.0.0")]
        [global::System.Diagnostics.CodeAnalysis.ExcludeFromCodeCoverage]
        public MyFancyAppService() : base("MyFancyAppService")
        {
        }

        /// <inheritdoc/>
        [global::System.CodeDom.Compiler.GeneratedCode("CommunityToolkit.AppServices.SourceGenerators.AppServiceGenerator", "1.0.0.0")]
        [global::System.Diagnostics.CodeAnalysis.ExcludeFromCodeCoverage]
        public global::System.Threading.Tasks.Task<int> SumAsync(int x, int y)
        {
            var request = base.CreateAppServiceRequest();
            request = request.WithParameter(x, "x");
            request = request.WithParameter(y, "y");
            return request.SendAndWaitForResultAsync<int>();
        }
    }
}
Here you can see the generated MyFancyAppService type (which we also instantiated before in the UWP app, right before overriding OnBackgroundActivated), and the public implementation of SumAsync which is taking care of marshalling all input parameters, sending the request and returning the response. Other app service methods would generate similar code, with small differences in cases a method also had a cancellation token or a progress callback.
Here instead is what the Desktop extension will generate:
// <auto-generated/>
#pragma warning disable
#nullable enable
namespace HelloAppServices.Extension
{
    /// <inheritdoc/>
    partial class MyFancyAppService : global::CommunityToolkit.AppServices.AppServiceComponent
    {
        /// <summary>Creates a new <see cref="MyFancyAppService"/> instance.</summary>
        [global::System.CodeDom.Compiler.GeneratedCode("CommunityToolkit.AppServices.SourceGenerators.AppServiceGenerator", "1.0.0.0")]
        [global::System.Diagnostics.CodeAnalysis.ExcludeFromCodeCoverage]
        public MyFancyAppService() : base("MyFancyAppService")
        {
            base.RegisterEndpoint(async parameters =>
            {
                parameters.GetParameter(out int x, "x");
                parameters.GetParameter(out int y, "y");
                return await this.SumAsync(x, y);
            }, "SumAsync");
        }
    }
}
You can see how the endpoints are being registered when the app service implementation is instantiated, and how the registered callback is also taking care of unwrapping all parameters to pass to the interface method that we manually implemented. This will also handle all the correct marshalling (including using custom serializers) for all of those parameters. Similarly, if a cancellation token or a progress callback is present, extra boilerplate code will be generate to handle those parameters as well.
This is just a part of the supporting infrastructure that the AppServices library handles for you, so you can only focus on writing the code that matters for you! Everything else is taken care by the runtime library and source generator! 🎊
What about the analyzers?
We also mentioned that the AppServices package includes a collection of analyzers, so let’s go through some of them. These analyzers are easily visible from the solution explorer in Visual Studio, by right clicking on References > Analyzers:
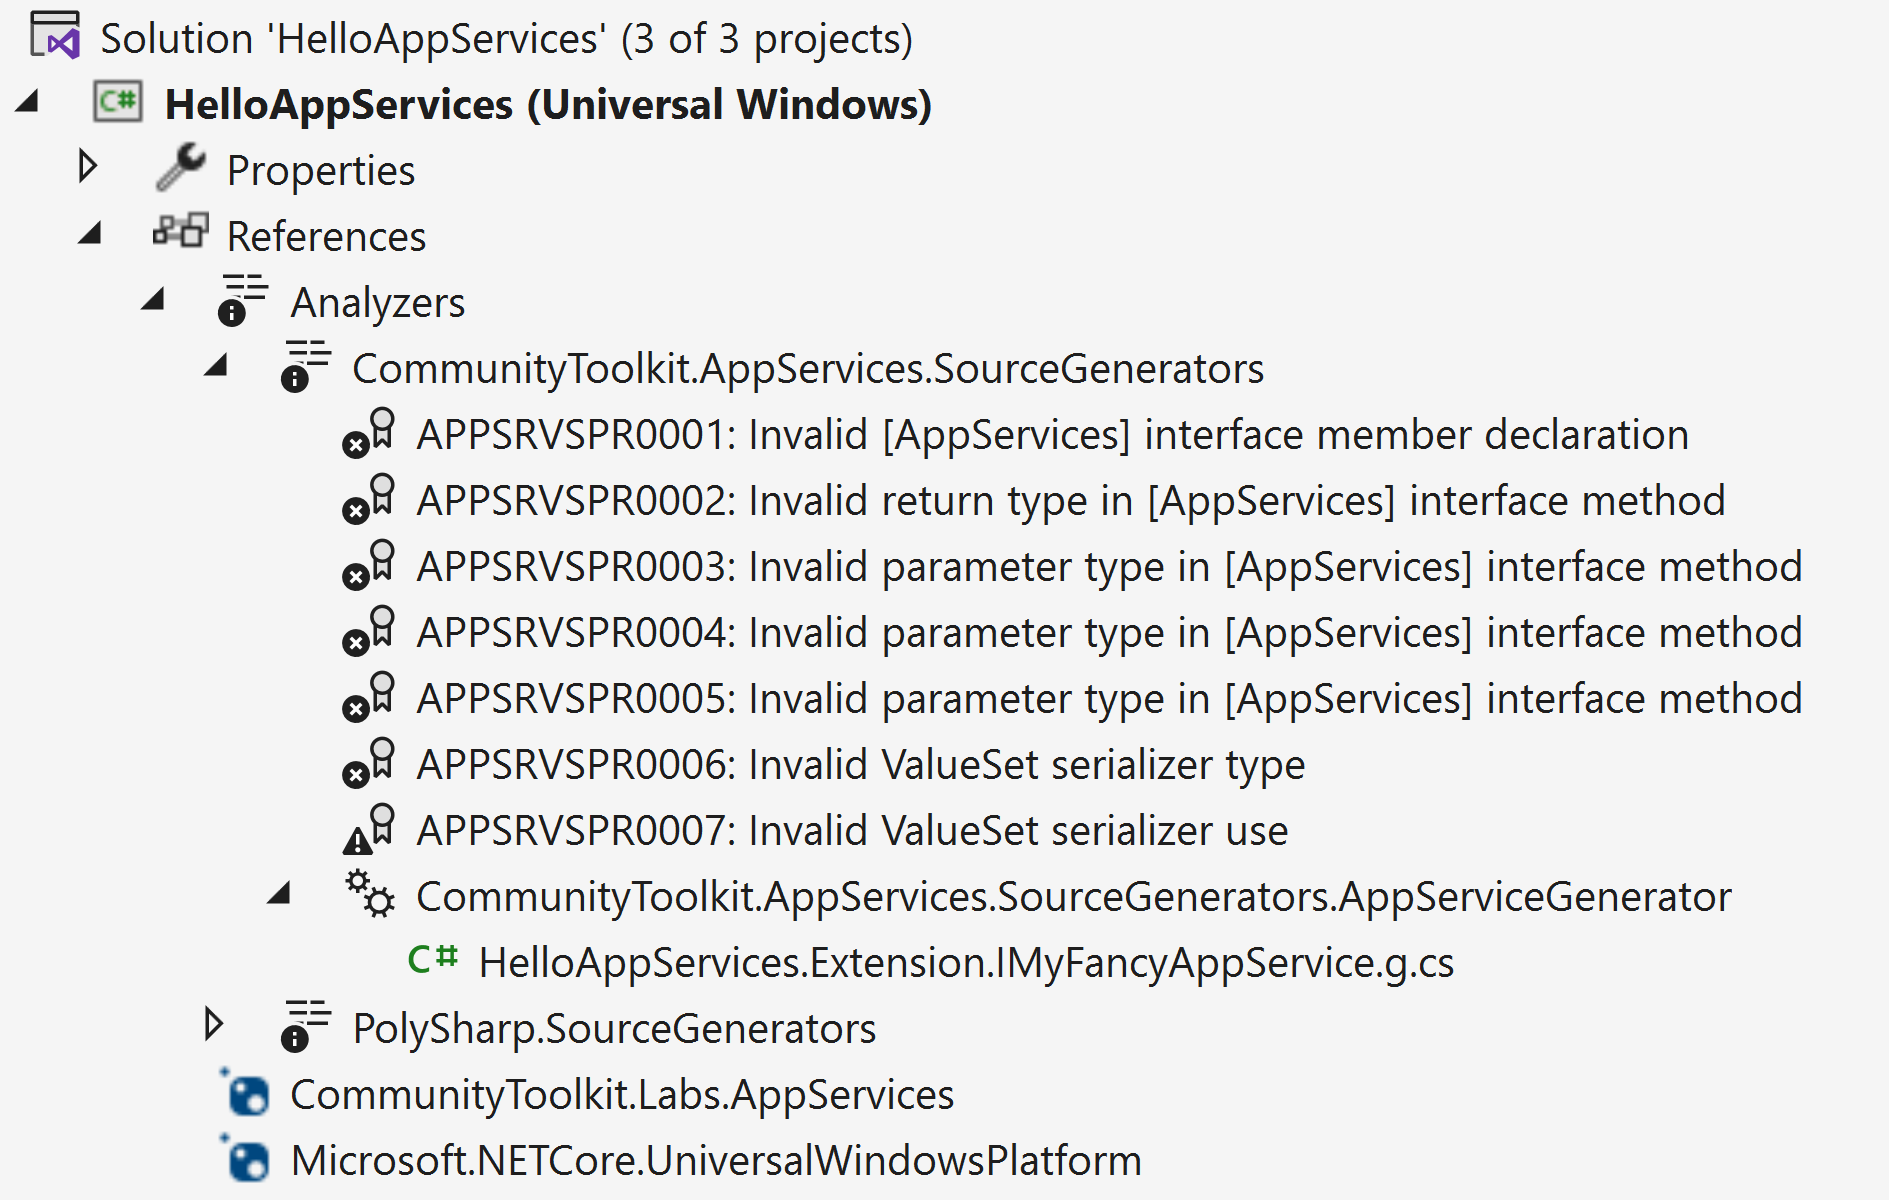
These will run in real time as you type, and will produce useful diagnostics in case you write any code using AppServices that’s unsupported and that’s determined to result in errors or runtime crashes. This gives you the peace of mind of knowing that if you can build a project using AppServices without any errors or warnings, that app service is guaranteed to work correctly at runtime! 🎯
For instance, here’s an example of the same IMyFancyAppServices interfaces, but with several mistakes intentionally introduced. For instance, we changed the return of SumAsync to no longer be a Task, we used an unsupported object parameter (polymorphism for parameters isn’t supported without a custom serializer), we made a method use two cancellation tokens, and lastly we removed the custom serializer from LoadPersonFromIdAsync.
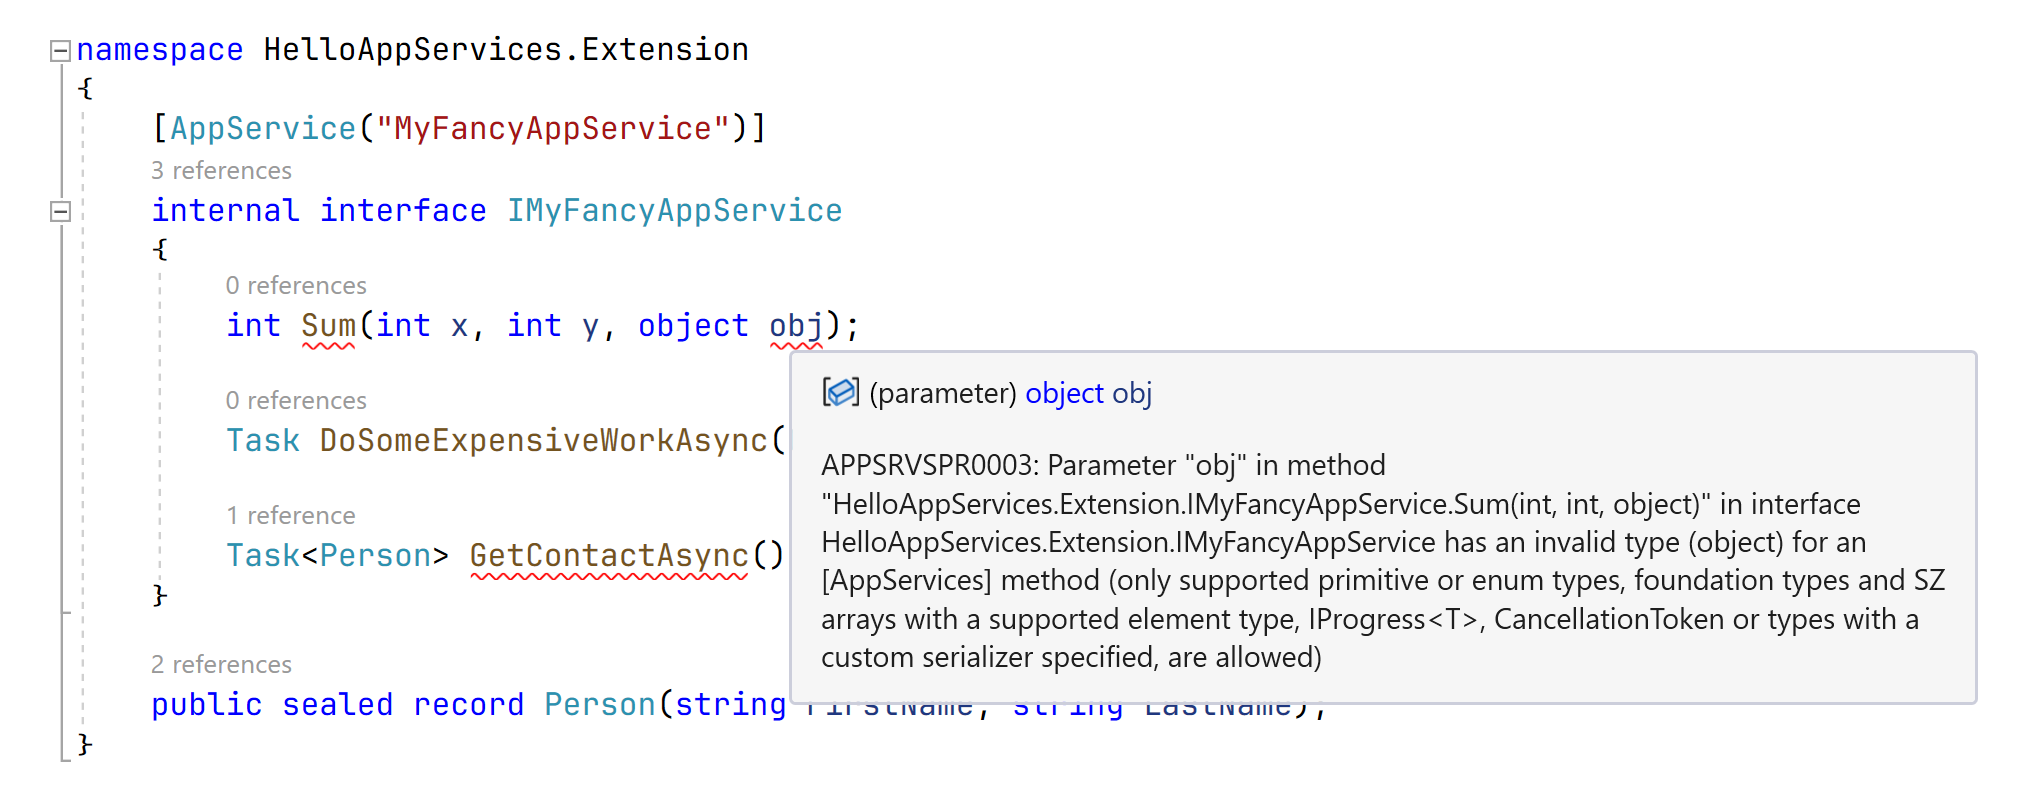
You can see how the AppServices analyzers could spot all of these mistakes, and produce the correct diagnostic over each one of them, along with a useful diagnostics explaining exactly what’s wrong, and how you can fix it! 🔮
Final thoughts
We’ve seen what WinRT app services are and how UWP and Win32 applications can leverage them to communicate with each other. We also saw how building app services manually can be very verbose and error prone, and how AppServices makes all of this effortless and also uses analyzers to guide developers towards success. We’re relying on this library a lot in the Microsoft Store, and we hope it will be useful for you as well in your native Windows applications! 🧰
We also want to give a shoutout to the Windows Community Toolkit Labs team, as once the necessary supporting infrastructure was in place there, open sourcing AppServices was incredibly easy! We managed to move it out of the Microsoft Store repo, into the Labs repo, and get the first preview packages published on the Labs feed on NuGet in just a matter of hours! 🏎️
As we mentioned, you can find the AppServices package on the preview feed for Labs for now, but we plan on eventually migrating this into the Windows Community Toolkit and publish it in the public NuGet feed as well! If you try it out, let it know how it goes!
- You can reach out to us by opening an issue in the Labs repository
- Or you can find us in the
#microsoft-storechannel on Discord!
Happy coding! 💻
Great work. Making the Desktop extension native C++ instead of .net would have enabled additional scenarios, like compiling the extension to target ARM64EC so it could host an x64 DLL when running on ARM64.
move to WASDK so you dont need this!😕
Considering the current status of WASDK and the speed on how they improve/fix it… maybe in couple of years.
Cool write-up, thanks for sharing. What is the advantage of using an app service over plain old out-of-proc com extensions?
Thank you very much for continuing to provide improvements for those we develop in UWP ❤️