


This guide is intended for developers who want to get started developing games that use the Agility SDK. It covers:
- What is the Agility SDK and how does it work?
- Setting up your machine
- How to use the Agility SDK
- Troubleshooting
- Known Issues
Be sure to also see our Announcement blog, Downloads Page, Game Stack Live talk and spec.
Visit the DirectX Landing Page for more resources for DirectX developers.
What is the Agility SDK and how does it work?
The DirectX team used to rely solely on Windows 10 OS Updates to get DirectX feature updates onto gamer machines. Even though shipping with the OS means that all DirectX 12 features eventually reach a large audience of gamers, this also meant that DirectX features were gated on an OS upgrade.
With an OS version often taking take 1-2 years for a given feature to reach a critical mass of users before developers can justify adopting this feature, this meant that OS rollout used to be a bottleneck for the latest DirectX innovation.
With the Agility SDK model, the DirectX team fixes this problem by allowing any application to light up newer DirectX 12 functionality than what’s on a given OS. The Agility SDK model lets this happen while also ensuring that there are no interruptions to existing games that rely on the System32 DirectX 12 runtime, D3D12.dll.
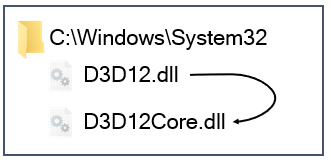
This works through an OS change, where the DirectX team split D3D12.dll into two:
- D3D12.dll, which is now just a thin loader
- D3D12Core.dll, which now contains the bulk of what used to be the old DirectX 12 runtime
For existing games that don’t opt to use the Agility SDK, D3D12.dll simply loads in D3D12Core.dll:
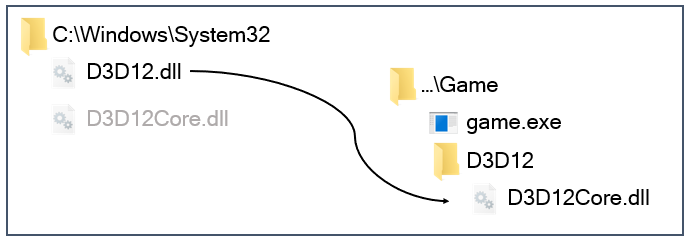
For a developer using the Agility SDK, D3D12.dll can load a newer D3D12Core.dll than the one in System32, one that this developer will include with their app:
The DirectX team is going to carry on shipping updates to DirectX by including the latest version of D3D12Core.dll with each new version of Windows 10.
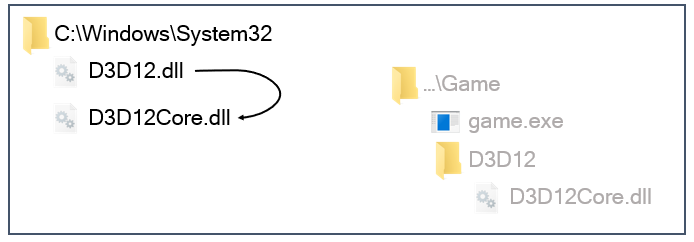
When an OS has a more recent D3D12Core than what a game shipped with, the OS version of D3D12Core gets loaded instead:
This model means that the DirectX team gets to keep on shipping DirectX 12 updates with the latest Windows 10 OS, while also giving developers who want newer functionality the option to do just that.
It also means that game developers using the Agility SDK don’t have to worry about getting their game using the latest version of DirectX – once they’ve shipped their game, this will happen automatically once later versions of DirectX roll out with the OS.
Developers looking for more detail can find it in the spec.
Setting up your machine
Here’s a handy little checkbox to make sure your machine is ready to start developing:
| OS with Agility SDK support | Check |
| Drivers with support for the features you’re targeting | Check |
| Visual Studio (we recommend VS 2019) | Check |
| PIX | Check |
| The DirectX Shader Compiler you want to use | Check |
OS with Agility SDK support
Go into Settings > System > About to check your OS Version and Revision Number
In the About menu, scroll down to the section, Windows specifications
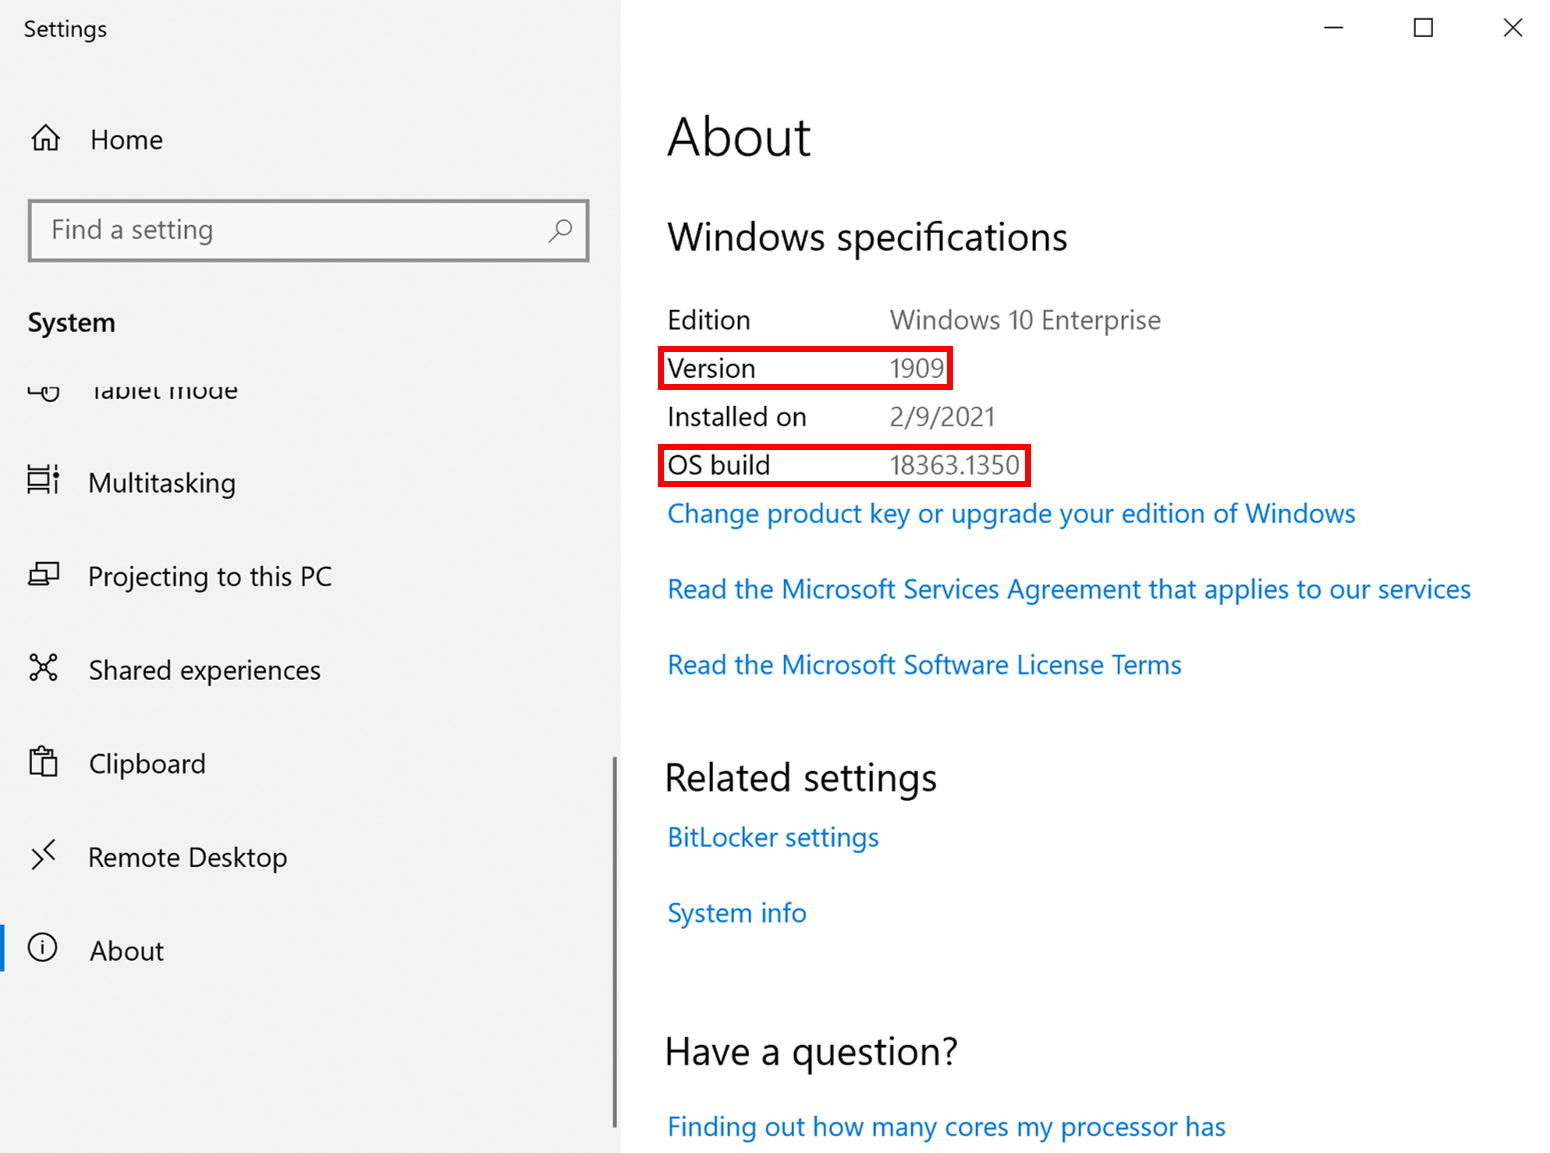
OS Version
The number next to Version is your OS Version. As long as this number is equal to or greater than 1909, your machine has support for Agility SDK.
Revision Number
If your OS Version is 1909, 2004 or 20H2, you also want to check your Revision Number.
For subsequent OSes this check will not be necessary.
The number appended to your OS build number, the Revision Number, gets incremented with each KB patch that your OS gets.
- For Windows 10 Version 1909, the revision number should exceed or be equal to .1350 (as in the image above)
- For Windows 10 Version 2004 and 20H2, the revision number should exceed or be equal to .789
More info on the specific KB patches that bring support for the Agility SDK are here and here.
Another check to see if your machine has support for the Agility SDK is to go into your machine’s System32 folder (usually in C:\Windows\System32; you can also type in %systemroot%\system32 into the file explorer).
The existence of D3D12Core.dll in System32 means that your system has received the Agility SDK-enabling loader change explained in the section above.
Note that Windows Server 2022, which is already in preview, has support for the Agility SDK. All subsequent server builds will also have support for the Agility SDK.
See the Troubleshooting section for more info about getting an OS with support for the Agility SDK.
Drivers with support for the features you’re targeting
The DirectX team has been working with our IHV partners to ensure that drivers work as intended with the Agility SDK, lighting up features newer than what’s on a given OS.
As before, developers need to make sure that they use drivers with support for the features they are targeting. For the new features that our first SDK is enabling (the full DirectX 12 Ultimate feature set and Shader Model 6.6), be sure to get:
- A developer driver from AMD; see here to download it.
- For NVIDIA, it’s any driver 466.11 and above, see here to download it
Visual Studio
We recommend using Visual Studio 2019, but Visual 2017 also works. The free Community version works if you don’t already have the Professional or Enterprise editions.
PIX on Windows
PIX, our Graphics debugger, has native support for the Agility SDK, DirectX 12 Ultimate and Shader Model 6.6
Go to Download | PIX on Windows to get the latest version of PIX
The DirectX Shader Compiler you want to use
The Windows 10 SDK already comes with a copy of the DirectX Shader Compiler.
But, if you’re using Shader Model 6.6, you also want to grab the correct DirectX Shader Compiler release, to allow you to compile and run shaders that make use of our latest shader model.
How to use the Agility SDK
This section covers:
- Install the Agility SDK of your choice from NuGet.org
- Set Agility SDK parameters
- Build and ship your game
1. Install the Agility SDK of your choice from NuGet.org
You now need to grab the Agility SDK of your choice and install it.
Method a: Use Visual Studio’s NuGet UI is for developers who are using stock .vcxproj as their build system, and who want to use Visual Studio’s UI to install an Agility SDK NuGet package.
Method b: Manually include the Agiliy SDK is for developers on a different build system, who cannot use Visual Studio’s built-in NuGet installation UI.
Method c: Extract the contents of the Agility SDK .nupkg is for developers who want to avoid using NuGet.
Method a: Use Visual Studio’s NuGet UI
In Visual Studio, this can be done as follows: right click on your project and go to Manage NuGet Packages. Once here, search for the Agility SDK from nuget.org (type “Microsoft.Direct3D.D3D12” or “DirectX 12 Agility”). Once you’ve found the version you’re looking for, hit install.
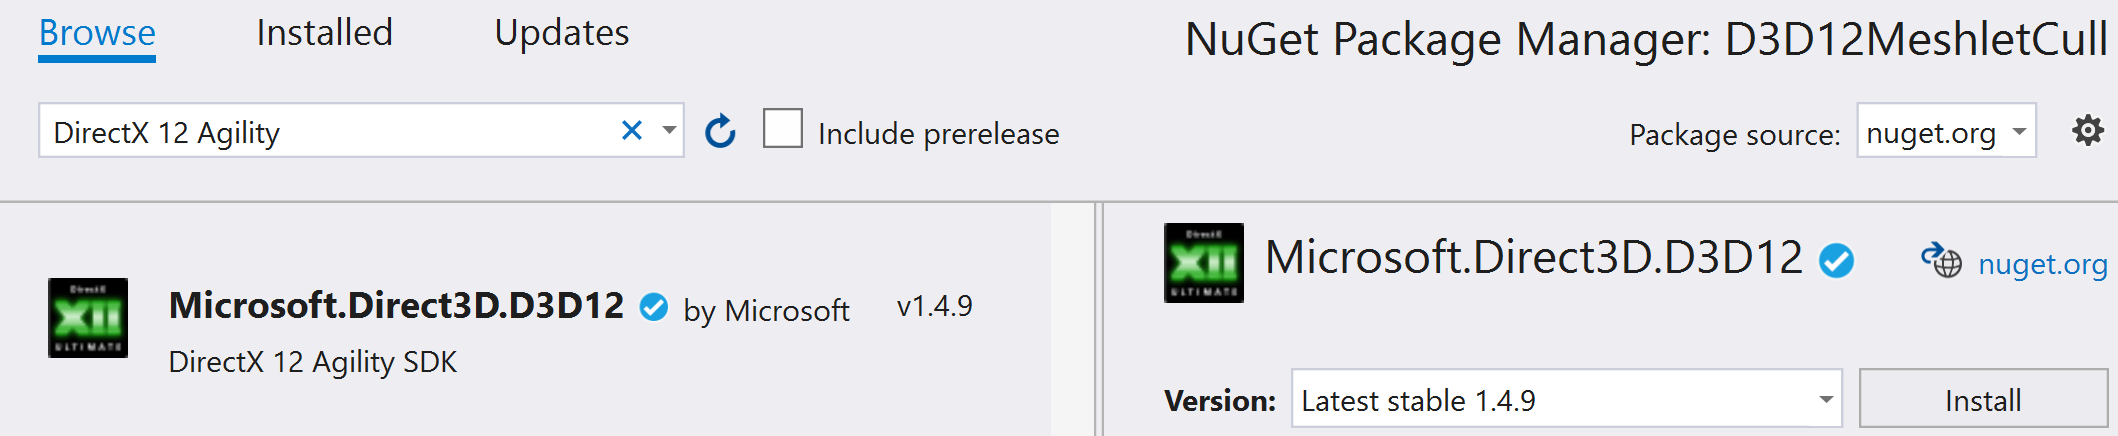
As of the writing of this post, there is only one Agility SDK available, but see the Agility SDK Downloads Page for the latest information.
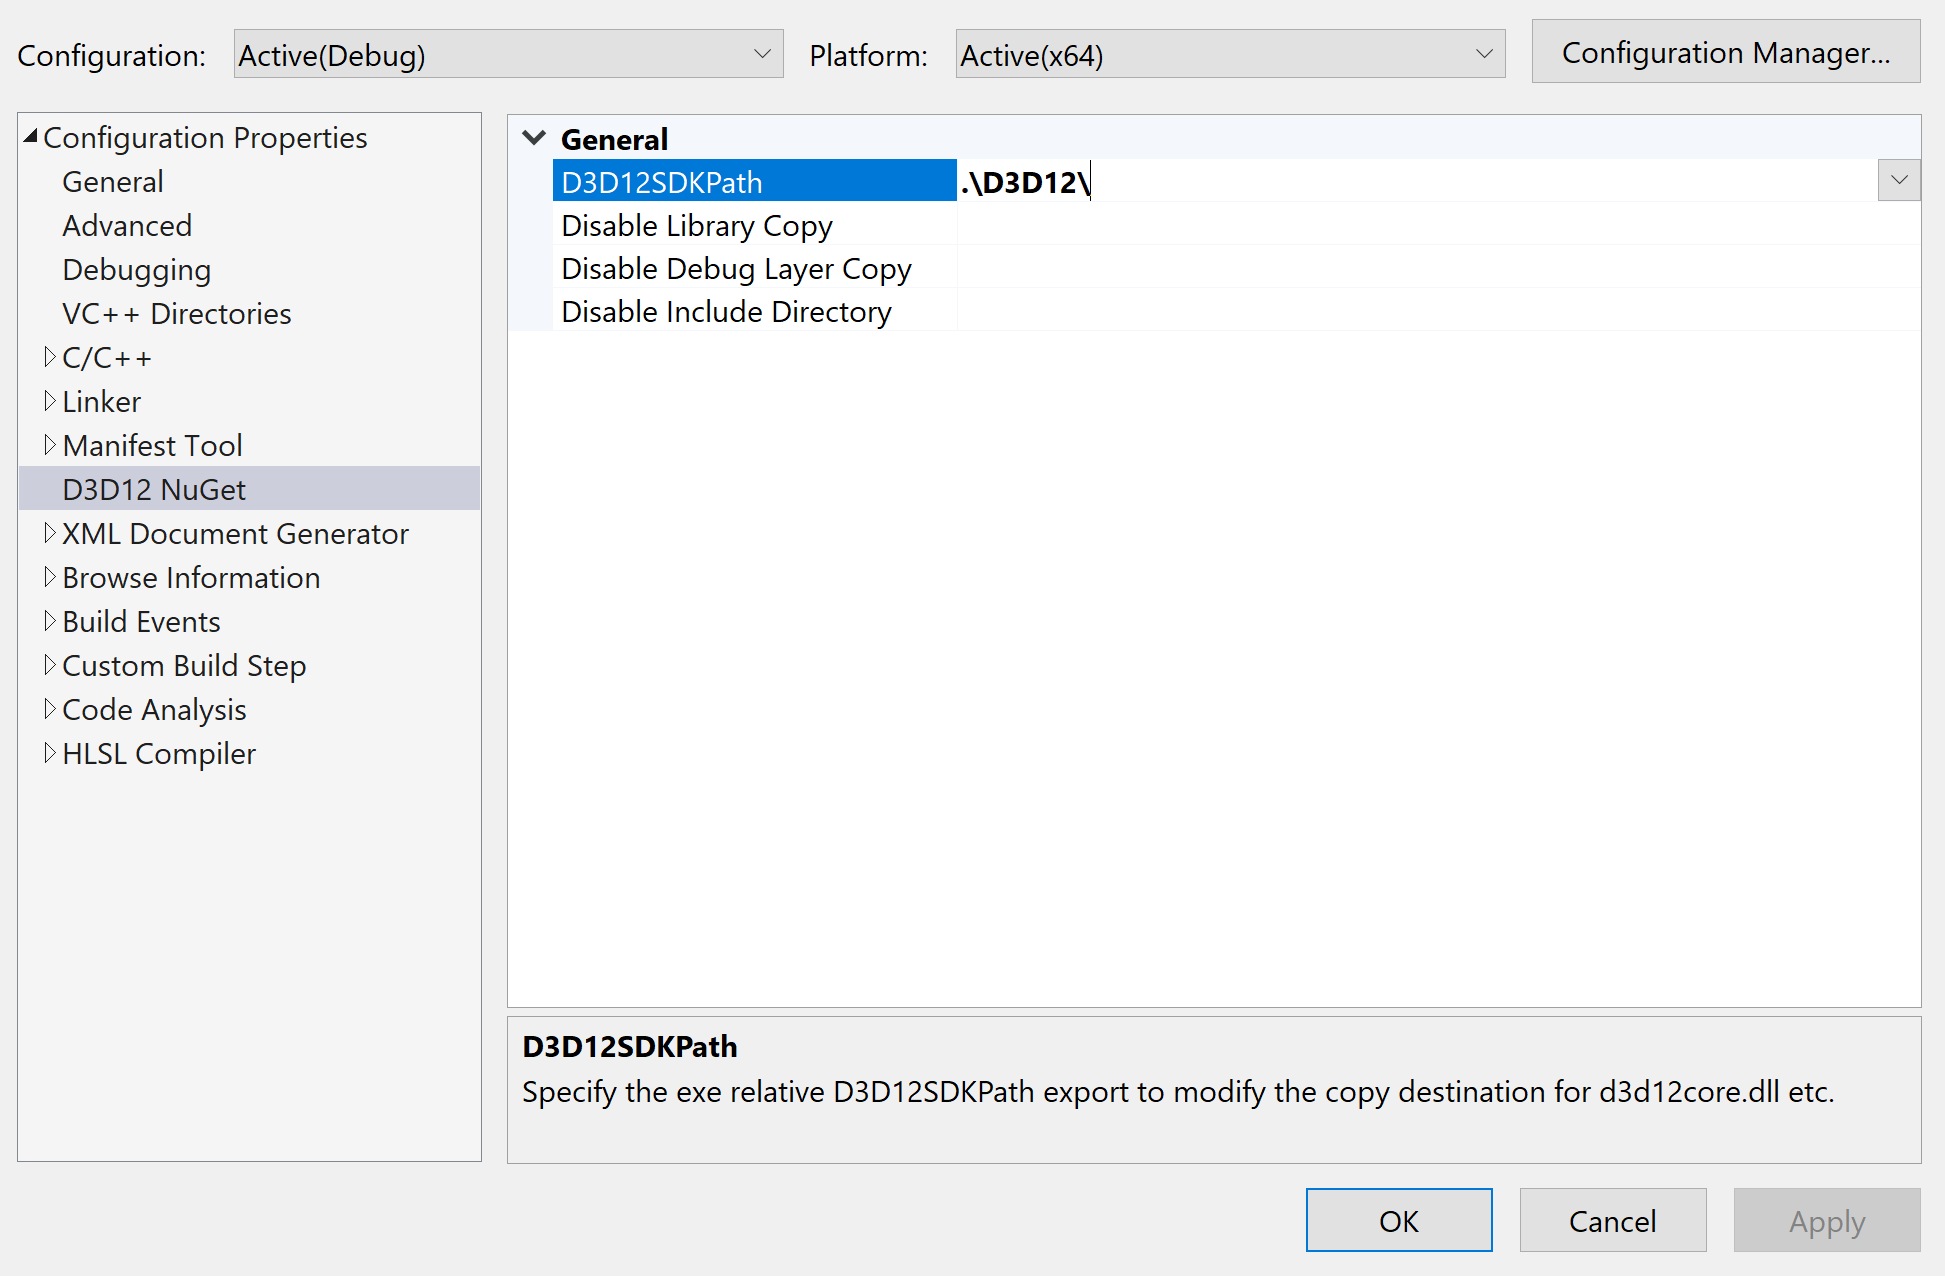
By default the path to components in the Agility SDK (D3D12SDKPath) gets set as “.\D3D12\”. This means that the Agility SDK components needed to build your project will be put in a subdirectory called D3D12, in the same folder as your application exe.
However, you can also right click project and choose properties to set a custom path D3D12SDKPath:
 .
.
The DirectX team recommends that developers avoid having Agility SDK components in the same directory as their application exe, to avoid mismatching D3D12SDKLayers with the D3D12SDKVersion of D3D12Core.dll (see Known Issues for more detail)
Method b: Manually include the Agility SDK
Developers on a different build system can download our NuGet package and unzip it. To unzip any NuGet package, simply change its extension form .nupkg to .zip before extracting the files.
Other options are to use NuGet to install from nuget.org:
NuGet.exe install Microsoft.Direct3D.D3D12 -Source https://api.nuget.org/v3/index.json -OutputDirectory <DestinationFolder>
Developers can also use NuGet to install from a folder:
NuGet.exe install Microsoft.Direct3D.D3D12 -Source <FolderWith.nupkg> -OutputDirectory <DestinationFolder>
Be sure to place D3D12Core.dll and the other SDK components you want to use into the appropriate app local directory. The code in Set Agility SDK parameters below expects Agility SDK components to be in a folder called D3D12 in the same directory as the application exe, a good option for developers to avoid a known issue.
Method a automatically updates your include path to use new headers. This must be done manually here, i.e. include directory order should have the NuGet include directory before the Windows SDK include directories.
With Method b, we also recommend using the d3d12.lib from the Windows SDK.
Method c: Extract the contents of the Agility SDK .nupkg
Developers who want to extract the contents of any Agility SDK can do so with two PowerShell commands. The first command fetches an Agility SDK NuGet package and saves it as a .zip file. The second command extracts the contents of this zip file.
See below for an example:
PS C:\Users\user\Desktop> Invoke-WebRequest -Uri https://www.nuget.org/api/v2/package/Microsoft.Direct3D.D3D12/1.4.10 -OutFile agility.zip
PS C:\Users\user\Desktop> Expand-Archive agility.zip -DestinationPath d3d
Note that this example is grabbing SDK version 1.4.10; be sure to specify the version you are looking to extract. The latest version and information about it can be found on the Downloads Page.
Note that -DestinationPath in the second command specifies that the contents of the package should be extracted to a directory called d3d. Be sure to move D3D12Core.dll to the correct app local directory that you intend to be the D3D12SDKPath (see below).
2. Set Agility SDK parameters
You’re almost ready to build your project, but first you need to register some data to allow the inbox D3D12.dll loader to make its choice about whether it will load the inbox System32 D3D12Core.dll or the app local D3D12Core.dll that you’re using with the Agility SDK.
Specifically, you will need to export constant data via two well-known symbols, D3D12SDKVersion and D3D12SDKPath.
Note that these parameters need to be exported from the main .exe for the process.
D3D12SDKVersion is the SDK version of the D3D12Core.dll from the Agility SDK you are using to build your application.
Note that this will be equal to 4 for our first Agility SDK. This will be incremented with subsequent SDKs; the D3D12SDKVersion of each Agility SDK is noted in the table in the Downloads Page.
Note also that D3D12CreateDevice will fail if the D3D12SDKVersion you export does not match the SDK version of D3D12Core.dll.
D3D12SDKPath is the path to the Agility SDK binaries you are using relative to the application exe.
If you used Visual Studio’s NuGet UI to install the SDK (Method a) and didn’t set a custom D3D12SDKPath, this will be “.\\D3D12\\”
You can export D3D12SDKVersion and D3D12SDKPath with Method a: the__declspec(dllexport) keyword or Method: via a module-definition file.
Method a: __declspec(dllexport) keyword
A can export these constants as follows using the __declspec(dllexport) keyword:
extern "C" { __declspec(dllexport) extern const UINT D3D12SDKVersion = n;}

extern "C" { __declspec(dllexport) extern const char* D3D12SDKPath = u8".\\D3D12\\"; }
Here n corresponds to the D3D12SDKVersion you’re using. For our first Agility SDK, this value is 4.
Method b: Module-definition file
Another option is to export these constants via a .def file:
EXPORTS

  D3D12SDKVersion DATA PRIVATE

  D3D12SDKPath DATA PRIVATE
And then to declare the constants in code as follows:
extern "C" extern const uint32_t D3D12SDKVersion = n;

extern "C" extern LPCSTR D3D12SDKPath = ".\\D3D12\\";
Here n corresponds to the D3D12SDKVersion you’re using. For our first Agility SDK, this value is 4.
3. Build and ship your game
If you have set and exported these parameters, you should be ready to build your executable.
To ship your game, you must include the D3D12Core.dll you used to build your game and use the same folder structure that you declared with D3D12SDKPath.
Remember to also remove the debug layer (D3D12SDKLayers.dll) from your application’s installer. The DirectX team highly recommends using the debug layer for development, but it’s not necessary to ship a game with it.
Troubleshooting
I went into About and I have an older OS Version or Revision Number
Every Windows 10 OS Version 1909 (November 2019 Update) and above has support for the Agility SDK.
As of the writing of this guide, OSes older than Version 1909 have fallen out of servicing support. We recommend upgrading to an in-service OS not just to get support for the Agility SDK but also to ensure that you’re getting security updates.
See here for more info on Microsoft’s support timeline.
To get onto a more recent OS version and/or to find the latest Windows Updates, go into Settings > Windows Update and click on Check for Updates.
If clicking on Check for Updates does not work on your machine and your machine is managed by an IT department, there’s a chance that your IT department has blocked updates to your machine. If this is the case, please work with your organization’s IT department to get onto a more recent OS.
More info on the specific KB patches that bring support for the redist are here and here.
Note that Windows Server 2022, which is already in preview, has support for the Agility SDK. All subsequent server builds will also have support for the Agility SDK.
Note that the Agility SDK is not supported on OSes before Windows 10.
I hit D3D12_ERROR_INVALID_REDIST – 887e0003 … Missing D3D12GetInterface Export from D3D12Core
This error message means that D3D12Core.dll was not found in the location specified for D3D12SDKPath. Be sure to include a trailing slash!
In the next OS version that Microsoft ships, this error message will be clearer: “Unable to load D3D12Core.dll. Verify D3D12SDKPath is correct.”
I hit D3D12_ERROR_INVALID_REDIST – 887e0003 … D3D12SDKVersion from D3D12Core != requested D3D12SDKVersion
This error message means there’s a mismatch between the D3D12SDKVersion you are requesting and the D3D12SDKVersion of the D3D12Core.dll from the Agility SDK you’ve installed.
You can check the D3D12SDKVersion of the Agility SDK you’ve installed by right-clicking on your project and going into Manage NuGet Packages. The NuGet package minor version number is the same as the D3D12SDKVersion e.g. in 1.4.9, the middle number indicates that D3D12SDKVersion is equal to 4.
This is also embedded in the dll version. Right click on D3D12Core.dll, go to Properties, Details tab, to see the File Version. Again, minor version is the D3D12SDKVersion and will match the NuGet package it came from.
I hit D3D12_ERROR_INVALID_REDIST – 887e0003 …. D3D12 SDKLayers dll does not match the D3D12SDKVersion of D3D12 Core dll
A mismatch between D3D12SDKLayers (the debug layer) and the D3D12SDKVersion of D3D12Core.dll can happen if the System32 D3D12Core.dll is loaded instead of the app local copy of D3D12Core.dll. This issue can be avoided by ensuring that all Agility SDK components are not in the same directory as the application exe, but a subdirectory instead.
I have the correct hardware and exports, but new features are not lighting up as expected
Please be sure to query CheckFeatureSupport if you’re not doing so already. If you have supported hardware for new features you are trying to light up and you aren’t hitting any errors related to D3D12SDKPath or D3D12SDKVersion, be sure to check you have the correct drivers.
I hit another issue
Please let us know! Go to discord.gg/directx to ask questions and/or give us feedback.
Known issues
D3D12SDKPath should not be the same directory as the application exe
If the components in Agility SDK are in the same directory as the application exe, this might cause issues – we recommend putting Agility SDK components in a subdirectory of your application exe directory.
A mismatch between D3D12SDKLayers (the debug layer) and D3D12Core.dll will cause CreateDevice to fail and can happen if the app local D3D12SDKLayers is used when the System32 D3D12Core.dll is loaded.
This is prone to happen if the Agility SDK components are in the same directory as the application exe.
Header Include Order
Headers in the Agility SDK may conflict with the headers from the Windows SDK, depending on include ordering. The DirectX team is working on a fix, but in the meantime please be sure to include Agility SDK headers before you include headers from the Windows 10 SDK.
Common symptoms may include missing D3D_FEATURE_LEVEL_12_2 or any of these shader feature defines:
D3D_SHADER_FEATURE_ATOMIC_INT64_ON_TYPED_RESOURCE
D3D_SHADER_FEATURE_ATOMIC_INT64_ON_GROUP_SHARED
D3D_SHADER_FEATURE_DERIVATIVES_IN_MESH_AND_AMPLIFICATION_SHADERS
D3D_SHADER_FEATURE_RESOURCE_DESCRIPTOR_HEAP_INDEXING
D3D_SHADER_FEATURE_SAMPLER_DESCRIPTOR_HEAP_INDEXING
D3D_SHADER_FEATURE_WAVE_MMA
D3D_SHADER_FEATURE_ATOMIC_INT64_ON_DESCRIPTOR_HEAP_RESOURCE
WACK (Windows App Certification Kit) Support
Agility SDKs do not pass WACK at the moment, but Microsoft is working to enable this.
This means that developers building UWP apps will need to wait until this issue is fixed.
Why not introduce D3D12CreateDevice1 function taking D3D12_SDK_VERSION as a parameter, like it was in Direct3D 11, in addition to external symbols? It would be used to test the supported SDK version before creating Direct3D 12 device, allowing a gracefull fallback to the inbox version instead of failing D3D12CreateDevice when the required redistributable is not included with the app or in the OS.
Makes more sense to me, since multiple versions of D3D12Core.dll would be serviced through Windows Update.