Visual Studio 2017 introduces a new “Game development with C++” workload, making it easy to get tools you need for building high-quality games with C++. Whether you’re using DirectX or powerful game engines such as Unreal Engine or Cocos2d, Visual Studio can install everything you need all at once to get you started quickly.
In this blog post, we will talk about how to install Visual Studio for four different C++ game development scenarios: DirectX games for desktop, DirectX games for Universal Windows Platform (UWP), games with the Unreal Engine, and games with the Cocos2d engine.
Install Visual Studio for DirectX desktop development
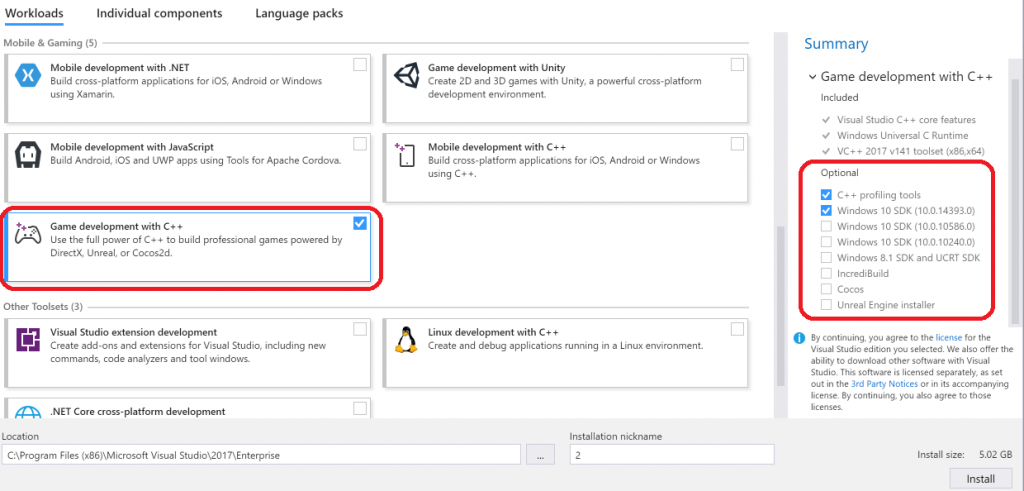
First, download Visual Studio 2017. In the Visual Studio installer, choose the “Game development with C++” workload under the “Mobile & Gaming” category. This workload gives you the core tools to build DirectX games for desktop and includes the Visual Studio core editor, Visual C++ compiler, Windows Universal C Runtime, and Visual Studio debugger.
The Optional component list on the right side of the installer lets you choose additional components that are useful for building DirectX games. The checked components are highly recommended:
- C++ profiling tools: includes Graphics Diagnostics for DirectX and a set of profiling tools for memory, CPU and GPU. Selected by default.
- Windows 10 and Windows 8.1 SDK: The Windows 10 SDK for the latest Windows 10 OS release. Selected by default.
- IncrediBuild: installs IncrediBuild from incredibuild.com, a distributed computing solution for code builds, data builds and development tasks.
- Cocos: installs Cocos Creator from cocos2d-x.org, the editor for building Cocos2d games. We will get to more details in the Cocos development section.
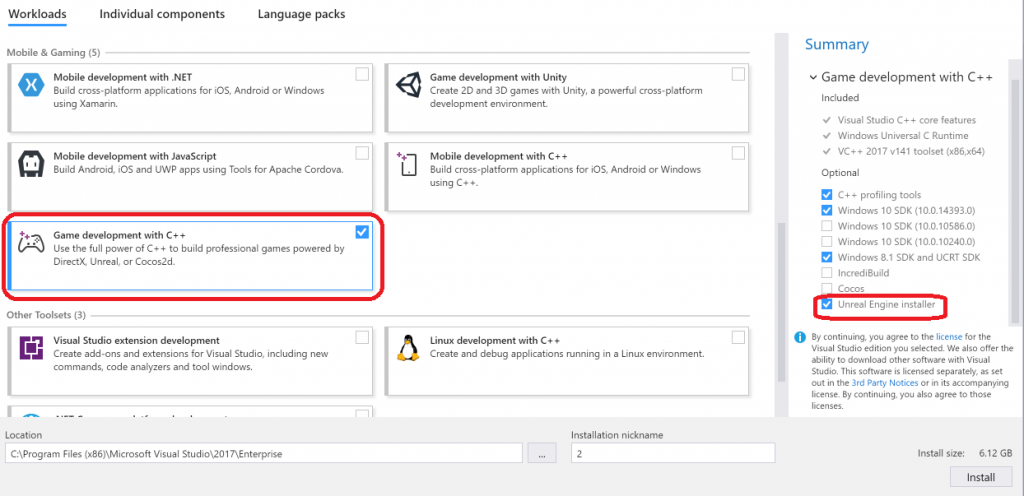
- Unreal Engine installer: installs Epic Games Launcher from unrealengine.com, which you can use to download and install the Unreal Engine. We will get to more details in the Unreal development section.
Install Visual Studio for DirectX UWP development
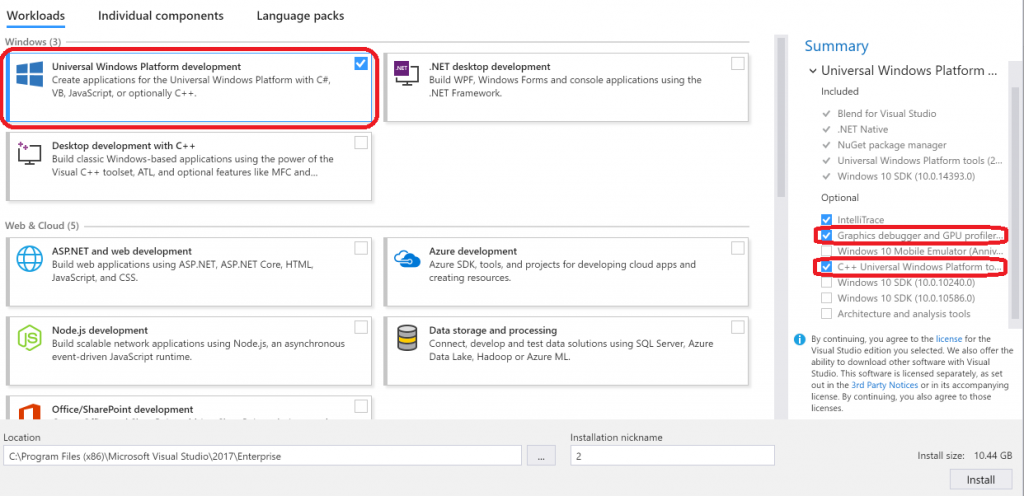
You can build DirectX games for the Universal Windows Platform to run a variety of devices in the Windows family, including desktops, tablets, and phones. If this interests you, download Visual Studio 2017 and in the Visual Studio installer select the “Universal Windows Platform development” workload under the “Windows” category with the “C++ Universal Windows Platform tools” option selected. The C++ UWP component adds the core C++ UWP support and 3 DirectX project templates for DirectX11 and DirectX12 to get you started quickly. The “Graphics debugger and GPU profiler” component is highly recommended for DirectX development, as it brings in the Graphics Diagnostics feature for DirectX graphics debugging and GPU Usage feature for profiling GPU and CPU usage in DirectX games.
Install Visual Studio for building games with Unreal Engine 4
Unreal Engine 4 is a complete suite of creation tools designed to meet ambitious artistic visions while being flexible enough to ensure success for teams of all sizes. From 2D mobile games to console blockbusters and VR, Unreal Engine 4 gives you everything you need to start, ship, grow and stand out from the crowd. Use the full power of Visual Studio to edit, build, and debug your Unreal games in C++ to boost your productivity.
First, download Visual Studio 2017. In the Visual Studio installer, choose the “Game development with C++” workload under the “Mobile & Gaming” category. This workload gives you the core tools to build C++ games for desktop, including Visual Studio core editor, Visual C++ compiler, Windows Universal C Runtime, and Visual Studio debugger. For building games with the Unreal Engine, check the “Unreal Engine Launcher” option on the right. This will download and install the Epic Game Launcher from the Unreal Engine site.
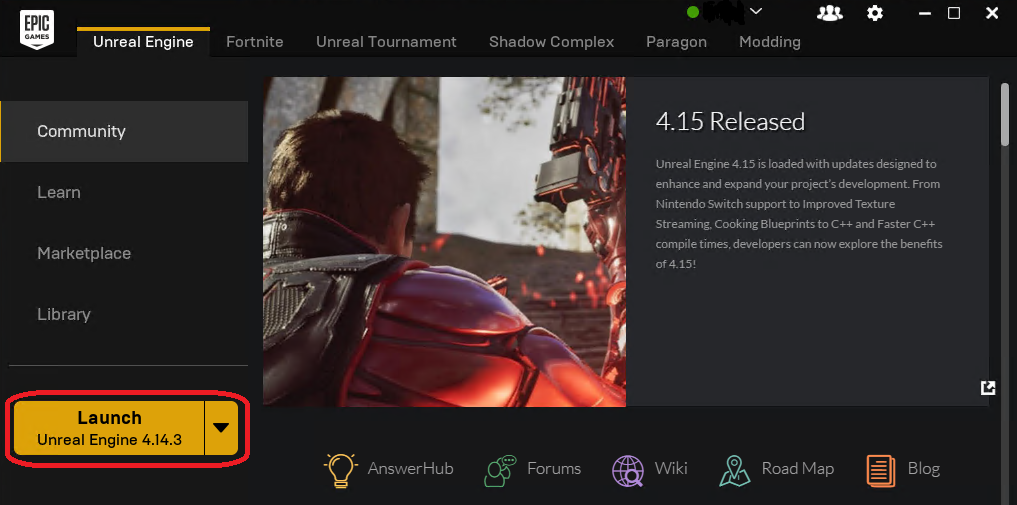
Once the installation is complete, you will find a shortcut for “Epic Games Launcher” on your desktop. In the Epic Games Launcher, you can download and install different versions of the Unreal Engine. After the Unreal Engine is installed, you are all set to start building your Unreal games! Launch the Unreal Engine from within the Epic Games Launcher and start creating new C++ Unreal projects in the Unreal Editor.
Write code with the full Visual Studio IntelliSense and source code browsing capabilities and debug your Unreal games with the powerful Visual Studio debugger. More on Visual Studio for UE4.
Install Visual Studio for building games with Cocos2d
Cocos is an open-source professional development toolkit for building games that provides a streamlined workflow for developers. With Cocos, you can quickly create projects, design games and animation clips, package and publish games for distribution. Use Visual Studio to edit and debug your Cocos games efficiently with confidence.
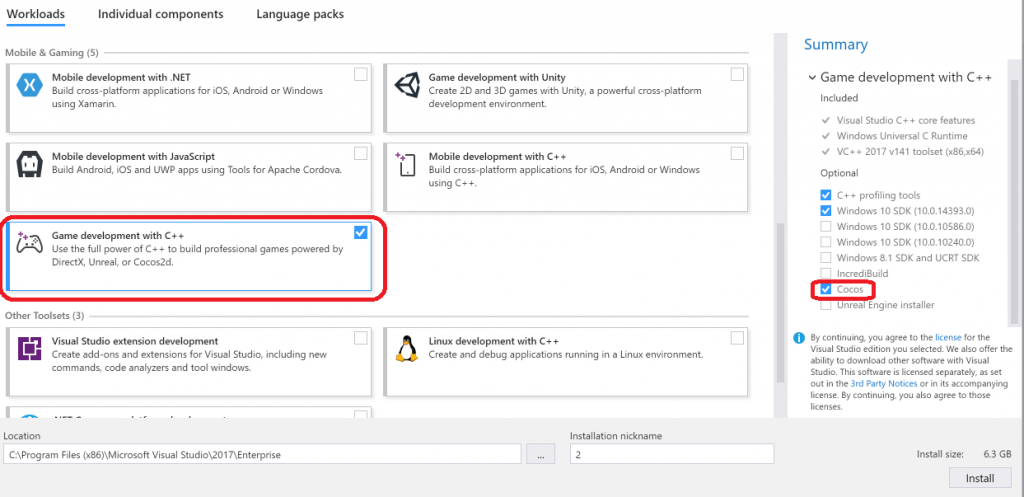
First, download Visual Studio 2017. In the Visual Studio installer, choose the “Game development with C++” workload under the “Mobile & Gaming” category. This workload gives you the core tools to build C++ games for desktop, including Visual Studio core editor, Visual C++ compiler, Windows Universal C Runtime, and Visual Studio debugger. For building games with the Cocos2d engine, check the “Cocos” option on the right. This will download and install the Cocos Creator editor from the Cocos2d-x site.
Once the installation is complete, you will find a shortcut for “Cocos Creator” on your desktop and you can start creating new Cocos projects in the Cocos Creator. Write code with the full Visual Studio IntelliSense and browsing capabilities and debug your Cocos games with the powerful Visual Studio debugger.
Tell us what you think
Download Visual Studio 2017, try out the C++ game workload, and let us know what you think. For problems, let us know via the Report a Problem option in the upper right corner of the VS title bar. Track your feedback on the developer community portal. For suggestions, let us know through UserVoice. We look forward to hearing from you!



0 comments