
This is the sixth in a ten-part blog series where we’ll demonstrate principles of the Cybersecurity Maturity Model Certification aligned with Microsoft Azure. Subsequent blogs in the series will delve into recovery & risk management, security assessment & risk management, system & communications protection and system & information integrity. In this sixth blog of the series we will explore how to leverage Microsoft Azure for maintenance & media protection.
Please note that the information cutoff date for this post is October 2020, and that as of the date of this writing, CMMC developments and guidance are in progress. Additionally, as of the date of this writing, the CMMC Accreditation Body has not certified any the third-party assessors and guidance on the formal assessment process is still under development. As a result, the information herein, including our CMMC related offerings, may be enhanced in the future to align with future guidance from the DoD and CMMC Accreditation Body. Microsoft is closely tracking developments related to the CMMC.
Stay tuned for the upcoming CMMC blogs in the series:
- Access Control Maturity – live
- Audit & Accountability Maturity – live
- Asset & Configuration Management Maturity – live
- Identification & Authentication Maturity – live
- Incident Response Maturity – live
- Maintenance & Media Protection Maturity – this blog
- Recovery & Risk Management Maturity – live
- Security Assessment & Situational Awareness Maturity – live
- System & Communications Protection Maturity – live
- System & Information Integrity Maturity (5/28)
What is Cybersecurity Maturity Model Certification (CMMC)?
The Defense Industrial Base (DIB) is charged with implementing Defense Federal Acquisition Regulation Supplement (DFARS) 252.204-7012. DFARS requires organizations supporting the Department of Defense (DoD) to implement NIST SP 800-171 and FedRAMP Moderate Impact level controls. DoD has mandated CMMC with periodic assessments in order to strengthen cybersecurity across the DIB. CMMC builds upon DFARS 7012 by verifying an organization’s readiness to protect Federal Contract Information (FCI) and Controlled Unclassified Information (CUI) such as International Traffic in Arms Regulation (ITAR) and Export Administration Regulations (EAR) export-controlled data.
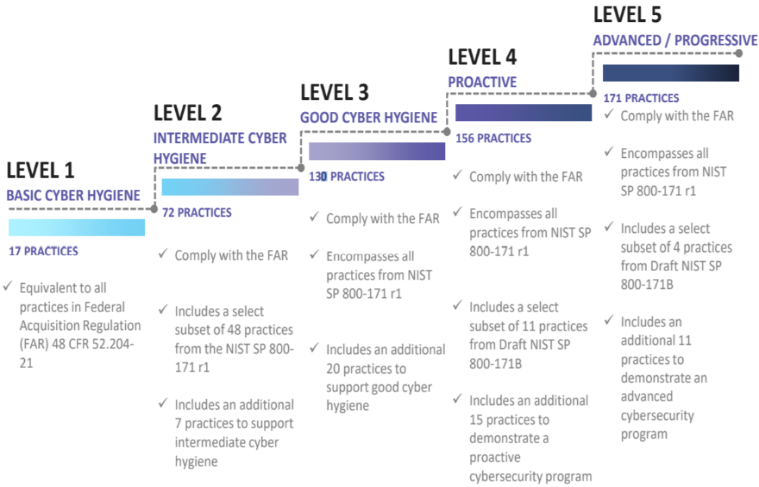
CMMC extends beyond the parent organization into sub-contractors, partners, and suppliers. The framework is intended to enforce critical thinking approaches for comprehensive security. The CMMC framework specifies 5 levels of maturity measurement from Maturity Level 1 (Basic Cyber Hygiene) to Maturity Level 5 (Proactive & Advanced Cyber Practice). The Certification levels will be determined through audits from independent, third-party assessment organizations (C3PAO).
What preparation is required for CMMC alignment to maintenance & media protection management?

It’s important to understand that compliance is a shared responsibility between the customer and the Cloud Services Provider (CSP). The graphic on the left demonstrates the CSP responsibility in respective cloud models (On-Prem, IaaS, PaaS, SaaS) with dark blue aligning with customer responsibility and light blue aligning with CSP responsibility. For example, CMMC requirements such as Physical Protection (PE) for limiting physical access (C028) is managed by the CSP. Establishment of respective policies and procedures are the customer’s responsibility. It’s important to note that this blog series is aligned with setting the foundation of controls for CMMC Maturity Levels 1 & 2. Once C3PAOs are identified by the CMMC Accreditation Body, customers are advised to work with their respective C3PAO for guidance on comprehensive alignment of controls, audit and certification.
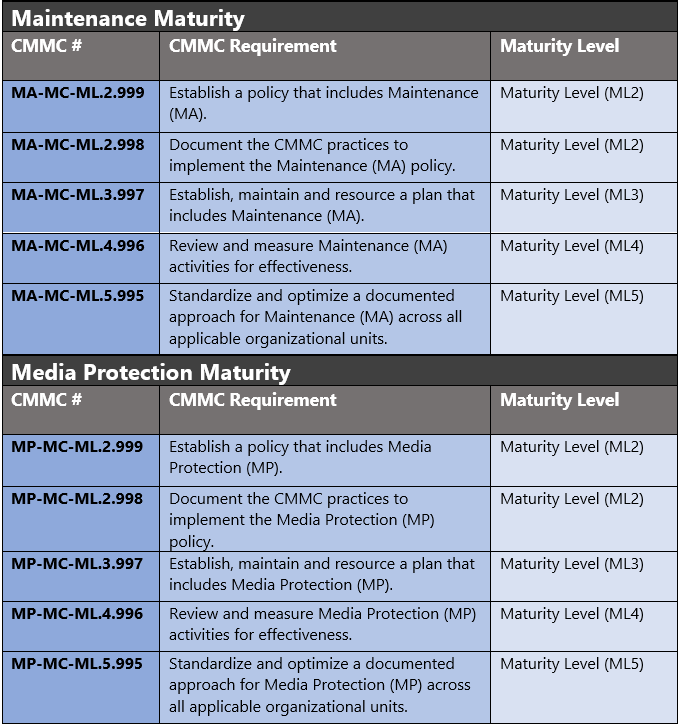
The administrative controls for the CMMC Maintenance Maturity Capability (AM-MC) and Media Protection Maturity (MP-MC) are listed here. These controls fall within the customer’s responsibility. This starts with establishing polices to include maintenance & media protection management (ML2) and progresses to a documented approach across all applicable organizational units (ML5). These controls should be formally created, documented in the System Security Plan (SSP) and implemented within the organization.
Microsoft Azure Security Controls Aligned to CMMC: Maintenance & Media Protection
Azure Security Controls Aligned to CMMC: Maintenance & Media Protection Maturity
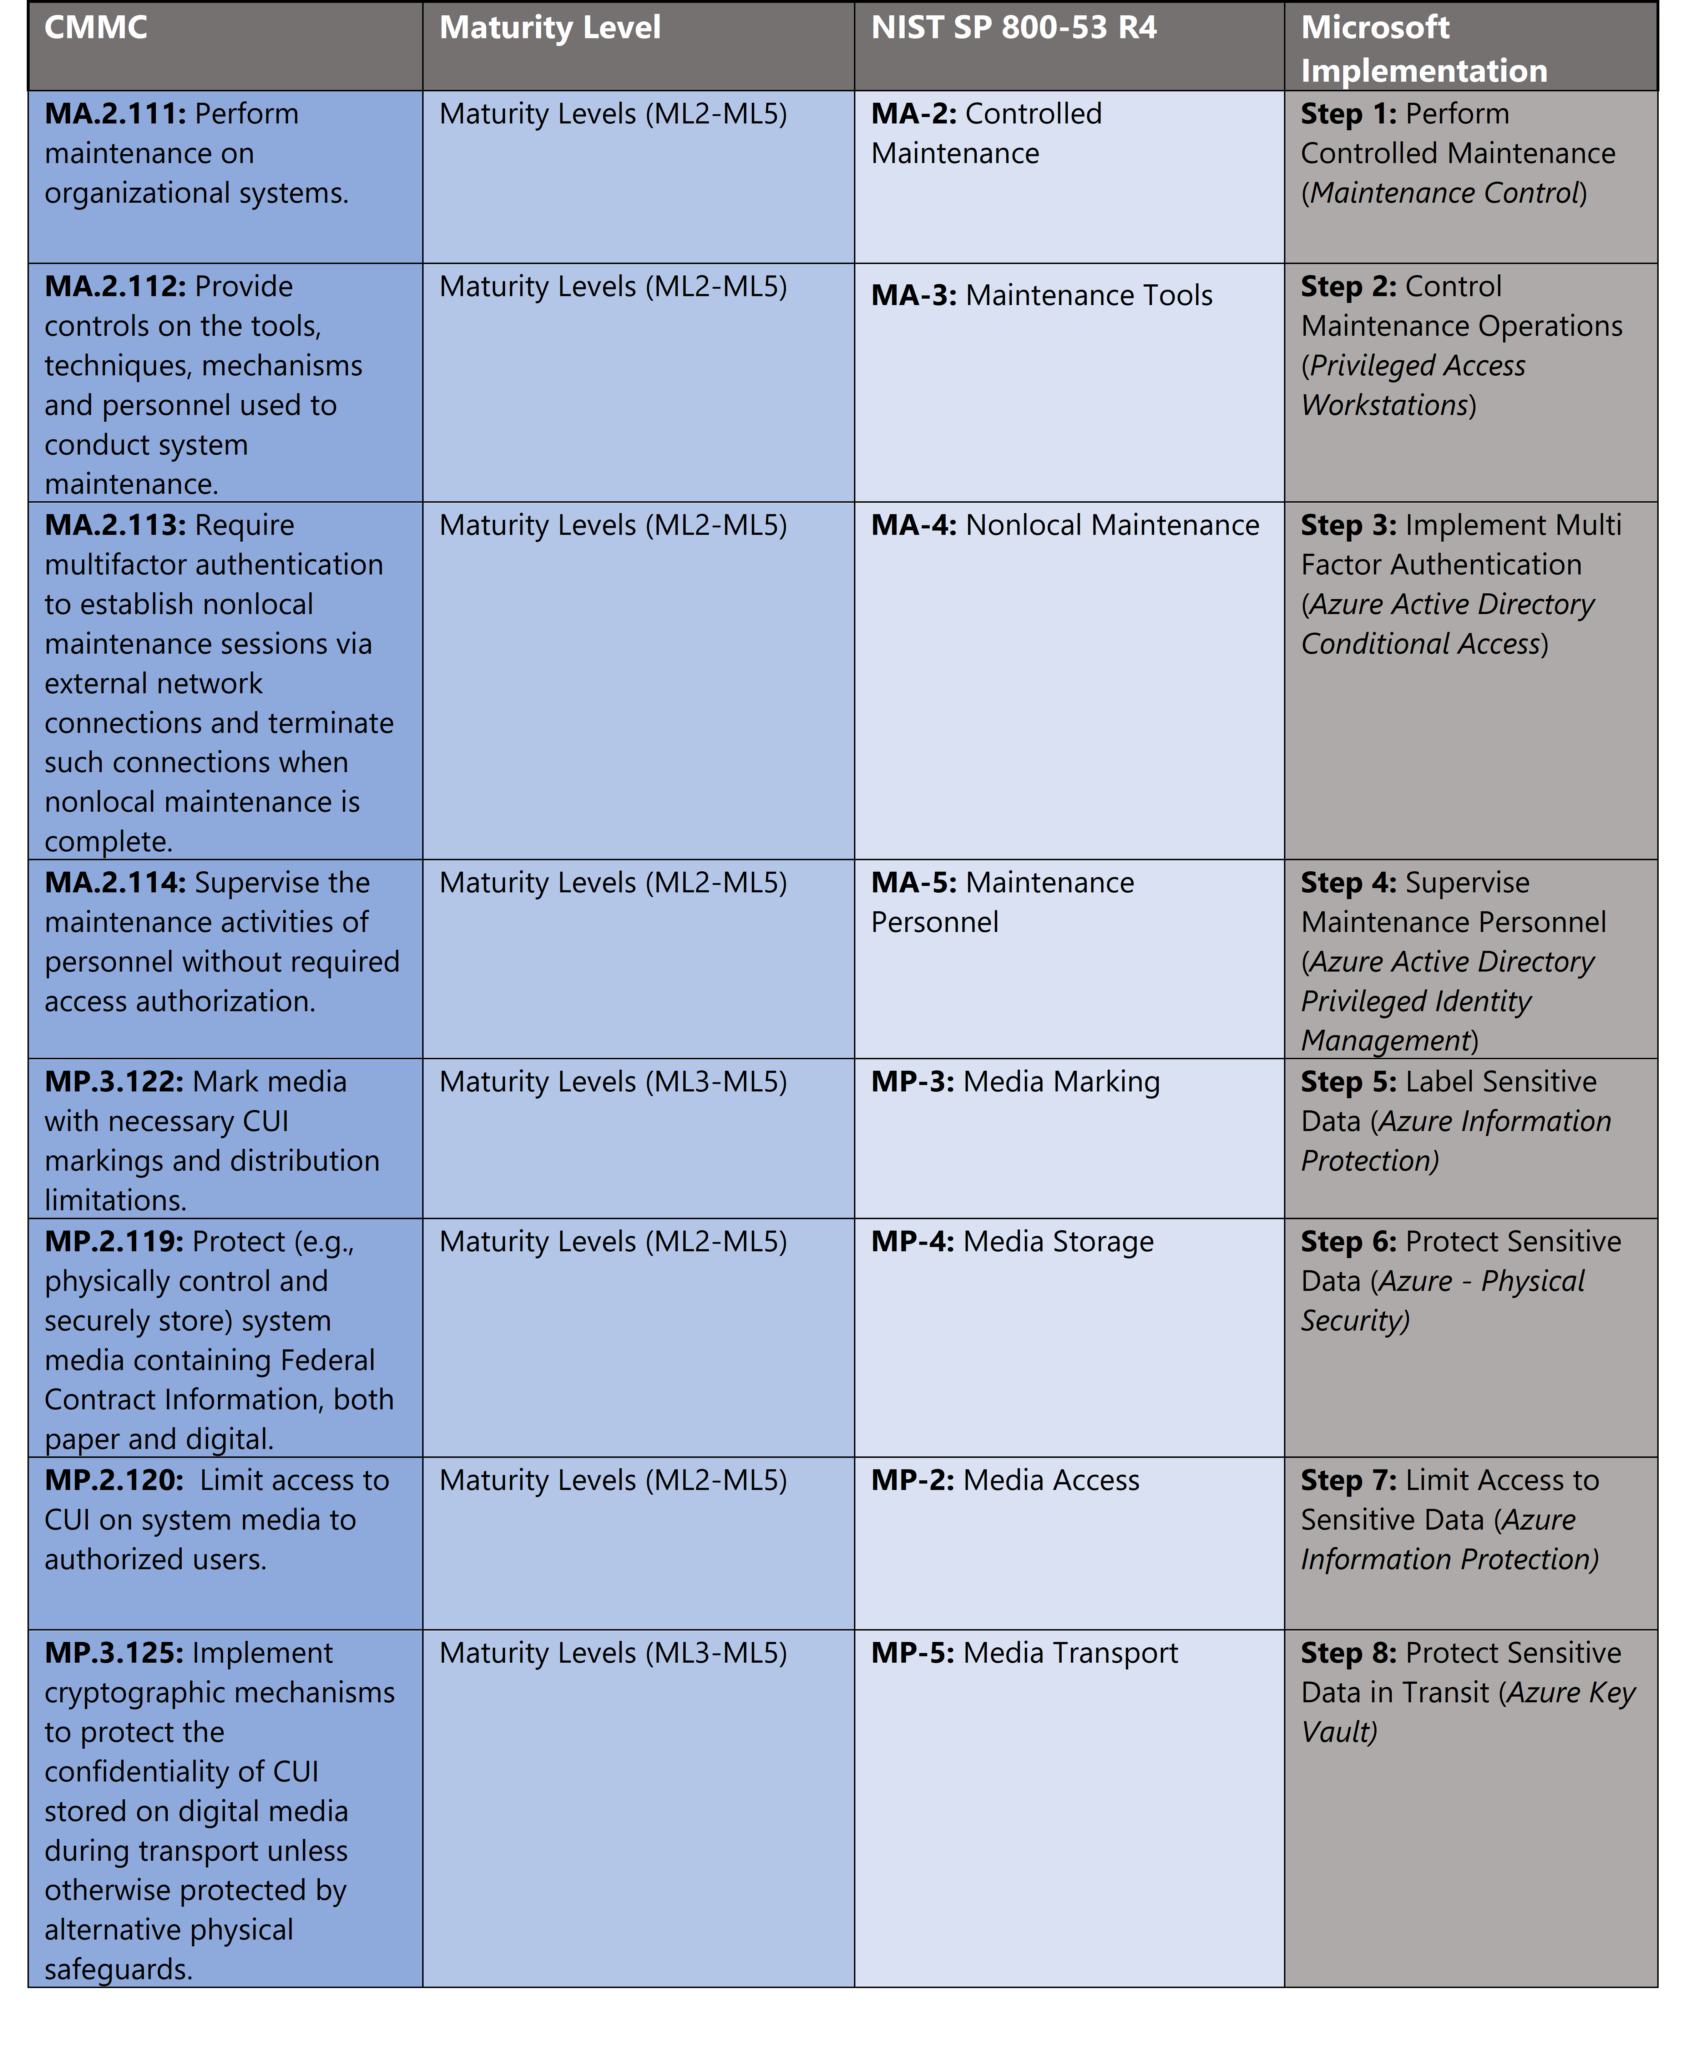
Microsoft Azure Government has developed an 8-step process to facilitate maintenance & media protection with the security principles within CMMC, NIST SP 800-53 R4 and NIST SP 800-171 standards. Note this process is a starting point, as CMMC requires alignment of people, processes, policy and technology so refer to organizational requirements and respective standards for implementation. Azure has several offerings to facilitate maintenance & media protection including Azure Active Directory, Azure AD Privileged Identity Management, Privileged Access Workstations, Maintenance Control, Key Vault and Azure Information Protection
- Azure Active Directory is an identity and access management-as-a-service (IDaaS) solution that combines single-on capabilities to any cloud and on-premises application with advanced protection.
- Azure AD Privileged Identity Management is a service that enables you to manage, control, and monitor access to important resources in your organization. These resources include resources in Azure AD, Azure, and other Microsoft Online Services like Office 365 or Microsoft Intune.
- Privileged Access Workstations provide a dedicated operating system for sensitive tasks that is protected from Internet attacks and threat vectors.
- Maintenance Control lets you decide when to apply updates to your isolated VMs while controlling updates, applying automation and scheduling reboot times.
- Key Vault is a service to centralize storage of secrets allowing you to control their distribution. Key Vault greatly reduces the chances that secrets may be accidentally leaked.
- Azure Information Protection helps secure email, documents, and sensitive data that you share outside your company.
8 Steps to CMMC for Maintenance & Media Protection Maturity with Microsoft Azure
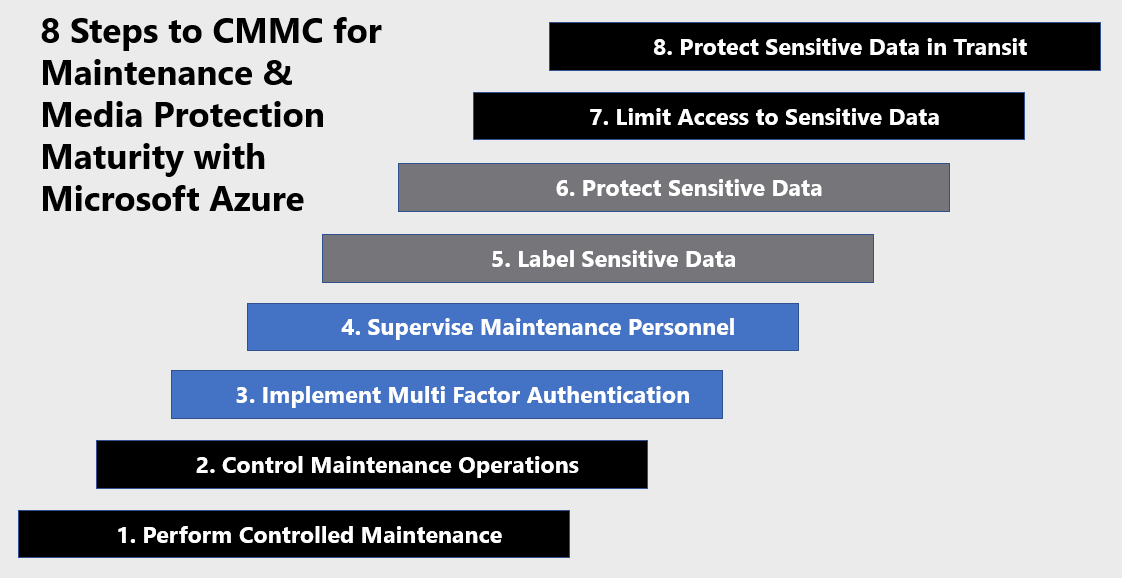
1) Perform Controlled Maintenance
Performing controlled maintenance ensures uptime through established processes such as change and configuration management. Maintenance windows are an important time to apply critical security updates and patches. Maintenance windows also incur risk as systems could crash without proper testing or authorized time windows. Azure Maintenance Control facilitates control of maintenance operations in the platform.
Manage platform updates, that don’t require a reboot, using maintenance control. Azure frequently updates its infrastructure to improve reliability, performance, security or launch new features. Most updates are transparent to users. Some sensitive workloads, like gaming, media streaming, and financial transactions, can’t tolerate even few seconds of a VM freezing or disconnecting for maintenance. Maintenance control gives you the option to wait on platform updates and apply them within a 35-day rolling window.
Maintenance control lets you decide when to apply updates to your isolated VMs. With maintenance control, you can:
- Batch updates into one update package.
- Wait up to 35 days to apply updates.
- Automate platform updates for your maintenance window using Azure Functions.
- Maintenance configurations work across subscriptions and resource groups.
To apply maintenance control to an Azure VM, the VM must be on a dedicated host or created with an isolated VM size. After 35 days, an update will be automatically applied. The controlling user must have resource contributor access. For more information, see Control updates with Maintenance Control and Azure PowerShell.
2) Control Maintenance Operations
Controlling maintenance operations ensures confidentiality of data during maintenance operations. Maintenance windows incur risk not only to downtime, but also to unauthorized users obtaining rights to systems. One option for controlling maintenance operations is centralizing administrative functions through a hardened administrative workstation. Privileged Access Workstations (PAWs) provide a dedicated operating system for sensitive tasks that is protected from Internet attacks and threat vectors. Separating these sensitive tasks and accounts from the daily use workstations and devices provides very strong protection from phishing attacks, application and OS vulnerabilities, various impersonation attacks, and credential theft attacks such as keystroke logging, Pass-the-Hash, and Pass-The-Ticket. The diagram below depicts a separate “channel” for administration which is created by maintaining a separate dedicated administrative accounts and workstations.

This architectural approach builds on the protections found in the Windows 10 Credential Guard and Device Guard features and goes beyond those protections for sensitive accounts and tasks.
This methodology is appropriate for accounts with access to high value assets outlined below. For more information, see Privileged Access Workstations.
- Administrative Privileges – PAWs provide increased security for high impact IT administrative roles and tasks. This architecture can be applied to administration of many types of systems including Active Directory Domains and Forests, Microsoft Azure Active Directory tenants, Office 365 tenants, Process Control Networks (PCN), Supervisory Control and Data Acquisition (SCADA) systems, Automated Teller Machines (ATMs), and Point of Sale (PoS) devices.
- High Sensitivity Information workers – The approach used in a PAW can also provide protection for highly sensitive information worker tasks and personnel such as those involving pre-announcement Merger and Acquisition activity, pre-release financial reports, organizational social media presence, executive communications, unpatented trade secrets, sensitive research, or other proprietary or sensitive data. This guidance does not discuss the configuration of these information worker scenarios in depth or include this scenario in the technical instructions.
3) Implement Multi Factor Authentication
Multi Factor Authentication (MFA) is one of the strongest security controls in a cloud computing environment. MFA is an important conditional access requirement for maintenance personnel. We’ve covered MFA implementation in previous blogs in this series so this section will explore planning for MFA deployments.
People are connecting to organizational resources in increasingly complicated scenarios. People connect from organization-owned, personal, and public devices on and off the corporate network using smart phones, tablets, PCs, and laptops, often on multiple platforms. In this always-connected, multi-device and multi-platform world, the security of user accounts is more important than ever. Passwords, no matter their complexity, used across devices, networks, and platforms are no longer sufficient to ensure the security of the user account, especially when users tend to reuse passwords across accounts. Sophisticated phishing and other social engineering attacks can result in usernames and passwords being posted and sold across the dark web.
MFA helps safeguard access to data and applications. It provides an additional layer of security using a second form of authentication. Organizations can use Conditional Access to make the solution fit their specific needs. Azure MFA is deployed by enforcing policies with Conditional Access. A Conditional Access policy can require users to perform multi-factor authentication when certain criteria are met such as:
- All users, a specific user, member of a group, or assigned role
- Specific cloud application being accessed
- Device platform
- State of device
- Network location or geo-located IP address
- Client applications
- Sign-in risk (Requires Identity Protection)
- Compliant device
- Hybrid Azure AD joined device
- Approved client application
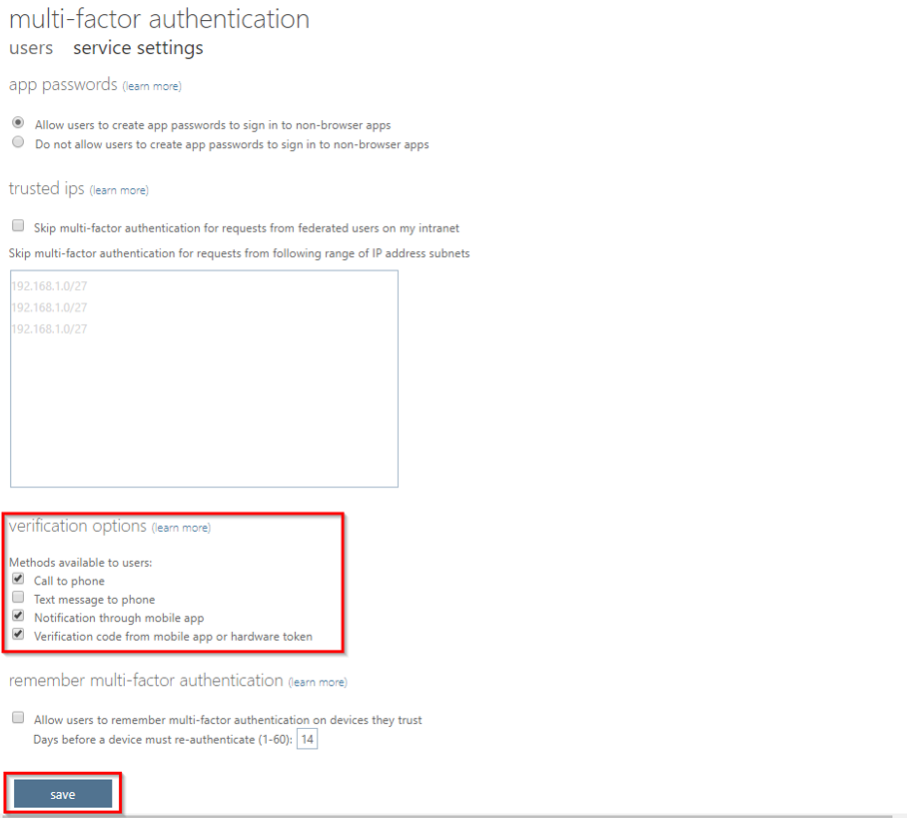
Administrators can choose the authentication methods that they want to make available for users. It is important to allow more than a single authentication method so that users have a backup method available in case their primary method is unavailable. Select MFA verification options via the steps below. For more information, see Planning a cloud-based Azure Multi-Factor Authentication deployment.
- Browse to Azure Active Directory > Users > Multi Factor Authentication.
- In the new tab that opens browse to service settings.
- Under verification options, check all the boxes for methods available to users.

- Click Save.
4) Supervise Maintenance Personnel
You can supervise maintenance personnel with Azure Active Directory Privileged Identity Management. This feature provides tight control over administrative rights including conditional access, eligibility windows, global admin approvals, admin time windows and logging. Deploy Azure AD Privileged Identity Management via the steps below. For more information, see Deploy Azure AD Privileged Identity Management (PIM).
- Navigate to the Azure Active Directory Blade.
- Select Identity Governance.
- Select Manage Role Assignments under Privileged Identity Management.
- Select Manage under Manage Access.
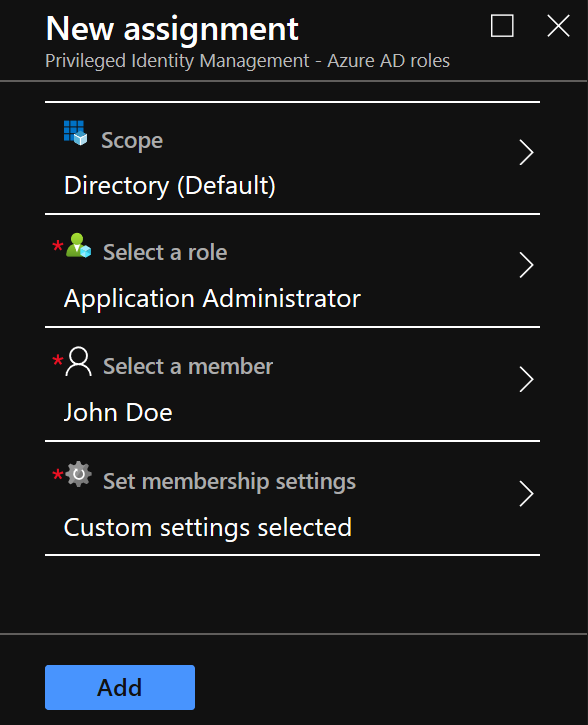
- Select +Add Member.
- Set Scope, this can be tailored to Directory (Default) or more granular to assets based on your requirements.

- Select a role based on RBAC groups. For this example, we’ve selected Application Administrator rights. Under Select a member, we’ve selected user John Doe.
- Select a role based on RBAC groups. For this example, we’ve selected Application Administrator rights. Under Select a member, we’ve selected user John Doe.

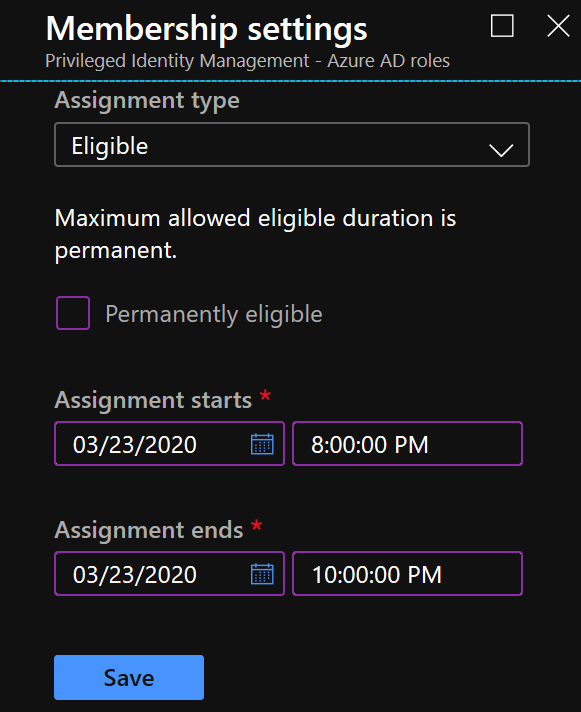
- Set membership settings, in this example John Doe will be temporarily eligible to request Application Administrator rights within the notional change window of 8-10PM.
- Click Save to deploy PIM configuration.
5) Label Sensitive Data
Discovery and labeling sensitive data are the first steps to controlling data security. Labeling sensitive data is something organizations should implement across both physical and logical media. Government regulations such as NIST SP 800-171 (Protecting Controlled Unclassified Information in Nonfederal Systems and Organizations) implicitly specify controls for protecting controlled unclassified information (CUI). This requirement spans across all industries and geographies. The European Union requires secure handing of personally identifiable information (PII) in the General Data Protection Regulation (GDPR) and California has recently implemented a similar regulation with the California Consumer Privacy Regulation (CCPA).
In previous blogs in this series, we’ve covered how to enable Azure Information Protection (AIP). AIP provides a capability to enable data discovery called scanner. Scanner searches for what sensitive information you have in files that are stored in an on-premises data store or within your cloud environment. For example, a local folder, network share, or SharePoint Server. For more information, see Quickstart: Find what sensitive information you have.
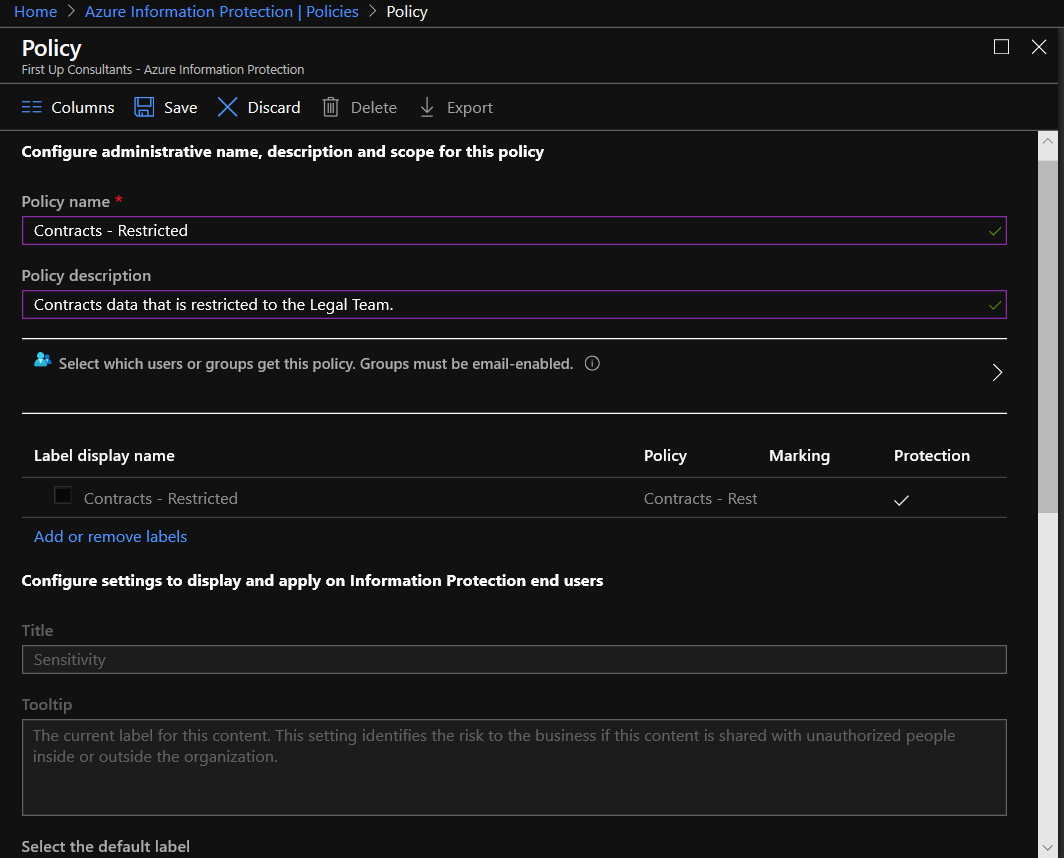
In previous blogs in this series, we’ve also covered applying data sensitivity labels with Azure Information Protection. We can take this capability a step further by configuring new labels to protect sensitive data such as federal contracts information and controlled unclassified information (CUI). This policy is configurable to scope to a set of users who are more likely to interact with this data such as a business group. Create a new label and assign to a group via the steps below. For more information, see Quickstart: Create a new Azure Information Protection label for specific users.
- If you haven’t already done so, open a new browser window and sign into the Azure portal. Then navigate to the Azure Information Protection pane.
- From the Classifications > Labels menu option: On the Azure Information Protection – Labels pane, click Add a new label.
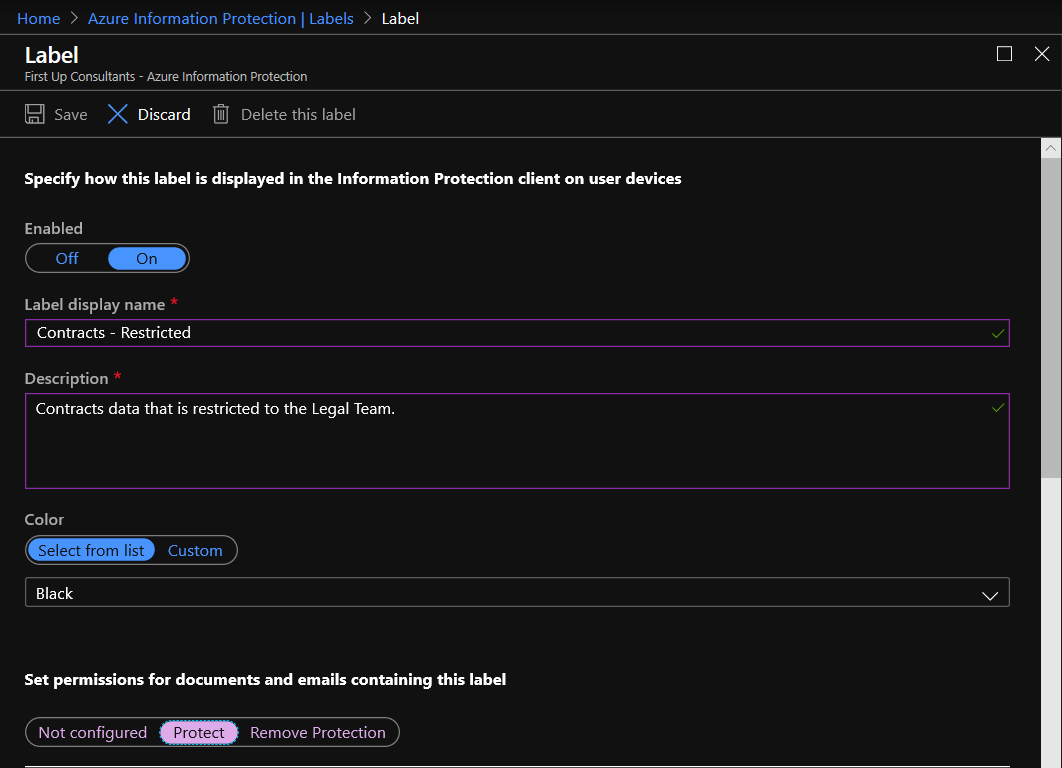
- On the Label pane, specify at least the following:
- Label display name: A name for the new label that users will see, and that identifies the classification for the content. For example: Contracts – Restricted.
- Description: A tooltip to help users identify when to select this new label. For example: Contracts data that is restricted to the Legal Team.

- Make sure that Enabled is set to On (the default), and select Save.
6) Protect Sensitive Data
This control aligns with physically protecting sensitive media and logical data in storage. One of the major advantages of cloud computing over on-premises networks is the Cloud Services Provider (CSP) maintains strict security controls over physical access to data centers.
Microsoft designs, builds, and operates datacenters in a way that strictly controls physical access to the areas where your data is stored. Microsoft understands the importance of protecting your data and is committed to helping secure the datacenters that contain your data. We have an entire division at Microsoft devoted to designing, building, and operating the physical facilities supporting Azure. This team is invested in maintaining state-of-the-art physical security.
Microsoft takes a layered approach to physical security, to reduce the risk of unauthorized users gaining physical access to data and the datacenter resources. Datacenters managed by Microsoft have extensive layers of protection: access approval at the facility’s perimeter, at the building’s perimeter, inside the building, and on the datacenter floor. Layers of physical security are outlined below. For more information, see Azure facilities, premises, and physical security.
- Access request and approval. You must request access prior to arriving at the datacenter. You’re required to provide a valid business justification for your visit, such as compliance or auditing purposes. All requests are approved on a need-to-access basis by Microsoft employees. A need-to-access basis helps keep the number of individuals needed to complete a task in the datacenters to the bare minimum. After Microsoft grants permission, an individual only has access to the discrete area of the datacenter required, based on the approved business justification. Permissions are limited to a specific window and then expire.
- Facility’s perimeter. When you arrive at a datacenter, you’re required to go through a well-defined access point. Typically, tall fences made of steel and concrete encompass every inch of the perimeter. There are cameras around the datacenters, with a security team assigned for continuous monitoring.
- Building entrance. The datacenter entrance is staffed with professional security officers who have undergone rigorous training and background checks. These security officers also routinely patrol the datacenter and monitor cameras inside the datacenter.
- Inside the building. After you enter the building, you must pass two-factor authentication with biometrics to continue moving through the datacenter. If your identity is validated, you can enter only the portion of the datacenter that you have approved access to. You can stay there only for the duration of the time approved.
- Datacenter floor. You are only allowed onto the floor that you’re approved to enter. You are required to pass a full body metal detection screening. To reduce the risk of unauthorized data entering or leaving the datacenter without our knowledge, only approved devices can make their way into the datacenter floor. Additionally, video cameras monitor the front and back of every server rack. When you exit the datacenter floor, you again must pass through full body metal detection screening. To leave the datacenter, you’re required to pass through an additional security scan.
7) Limit Access to Sensitive Data
Limiting access to sensitive data with least privilege reduces the risk of spillage or unauthorized access. After classifying data and applying labeling, Azure Information Protection allows you to configure which users or groups have access to that data. Apply an access policy with AIP via the steps below. For more information, see Quickstart: Create a new Azure Information Protection label for specific users.
- From the Classifications > Policies menu option: On the Azure Information Protection – Policies pane, select Add a new policy.
- On the Policy pane, for the Policy name box, enter a name that identifies the group of users who will see your new created label. For example, Legal.
- Select the option Select which users or groups get this policy.
- On the AAD users and Groups pane, select Users/Groups. Then on the new Users/Groups pane, search for and select the group that you identified in the prerequisites. For example, Legal Team. Click Select on that pane, and then OK.
- Back on the Policy pane, select Add or remove labels.
- On the Policy: Add or remove labels pane, select the label that you created, for example, Legal – Restricted, and then select OK.

- Back on the Policy pane, select Save.
8) Protect Sensitive Data in Transit
Protecting sensitive media and logical data in transit is another critical control to ensure confidentiality of data. Azure provides numerous levels of encryption for data in transit. Azure Key Vault provides a capability to securely store your application keys, certificates and secrets. This capability reduces risk of key exposure while providing role-based access control (RBAC) for key usage and audit logging of key usage.
- In-transit data protection: Customers can enable encryption for traffic between their own VMs and end users. Azure protects data in transit to or from outside components and data in transit internally, such as between two virtual networks. Azure uses the industry-standard Transport Layer Security (TLS) 1.2 or later protocol with 2,048-bit RSA/SHA256 encryption keys, as recommended by CESG/NCSC, to encrypt communications between:
- The customer and the cloud.
- Internally between Azure systems and datacenters.
- Encryption: Encryption of data in storage and in transit can be deployed by customers as a best practice for ensuring confidentiality and integrity of data. It is straightforward for customers to configure their Azure cloud services to use SSL to protect communications from the internet and even between their Azure-hosted VMs.
We’ve covered enabling Azure Key Vault in previous blogs in this series. We’ll take this a step further by adding secrets to your vault. You can use Key Vault to create multiple secure containers, called vaults. These vaults are backed by HSMs. Vaults help reduce the chances of accidental loss of security information by centralizing the storage of application secrets. Key vaults also control and log the access to anything stored in them. Azure Key Vault can handle requesting and renewing Transport Layer Security (TLS) certificates. It provides features for a robust solution for certificate lifecycle management. Generate and add a certificate to Azure Key Vault via the steps below. For more information, see Quickstart: Set and retrieve a secret from Azure Key Vault using the Azure portal.
- Sign into the Azure Portal, search for and select Key Vaults.
- Select your keyvault.
- Select Certificates under the Settings section.

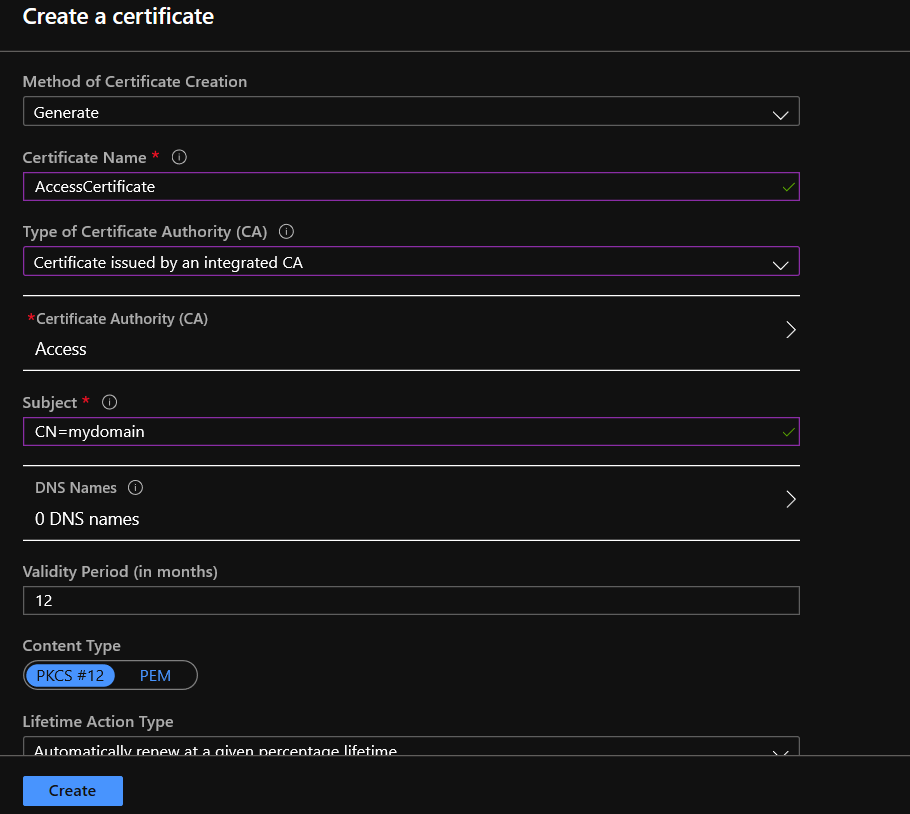
- Select +Generate/Import.
- Configure the following options:
- Method of Certificate Creation: Generate
- Certificate Name: Provide Unique Certificate Name
- Type of Certificate Authority (CA): Certificate issued by an integrated (or non-integrated CA) Note: Self-signed certificates are also an option, but these should never be used outside a test/dev environment. If you don’t have an integrated certificate authority (CA) you can create one here.
- Subject: Provide Unique Canonical Name Record (CName).
- Validity: Configure a Validity Period in Months
- Content Type: PKCS#12 (or PEM).

- Select Create.

Learn more about CMMC with Microsoft
Here are some of the best resource to learn more about CMMC in the cloud with Microsoft:
- Accelerating CMMC compliance for Microsoft cloud (in depth review)
- CMMC-AB Standards with Regan Edens – National Conversation
- Defense Federal Acquisition Regulation Supplement (DFARS)
- International Traffic in Arms Regulations (ITAR)
- Federal Risk and Authorization Management Program (FedRAMP)
- US Export Administration Regulations (EAR)
- NIST SP 800-171 Compliance
- Overview of the NIST SP 800-53 R4 blueprint sample
Bookmark the Security blog to keep up with our expert coverage on security matters and follow us at @MSFTSecurity or visit our website for the latest news and updates on cybersecurity.
Are you a federal government agency that needs help with cybersecurity? Reach out to TJ Banasik or Mark McIntyre for additional details on the content above, or if you have any other questions about Microsoft’s cybersecurity investments for the federal government.
0 comments