
This is a guest blog by Daniel Hindrikes. Daniel is a Microsoft MVP, Speaker, and Xamarin + Cloud Solution Architect at tretton37.
Image Classification allows our Xamarin apps to recognize objects in a photo.
Being able to take a photo and recognize its contents is becoming more and more common. We experience it in our banking apps when making a mobile deposit, in our photo apps when adding filters, and in our HotDog apps to determine whether or not our meal is a hotdog.
Thanks to Azure Custom Vision Service, we don’t have to learn complex machine learning algorithms to implement image classification.
This article will walkthrough how to implement it using Azure’s Custom Vision Service, TensorFlow Lite (an open source machine learning platform) and Xamarin.Android.
Note: For Xamarin.iOS, we can also use Azure’s Custom Vision Service with CoreML, but we’ll save that for another blog post.
Image Classification Libraries
We’ll be leveraging Azure Custom Vision Service and TensorFlow Lite to implement our image classification.
1. Azure Custom Vision Service
Azure’s Custom Vision Service makes it easy to create and train machine learning models – no previous Artificial Intelligence (AI) or Machine Learning (ML) experience is necessary.
Using the Custom Vision Service Web Portal, we can do the following without writing any AI/ML code:
- Upload a training image
- Tag / Label the object(s) in the image
- Repeat (the model gets better with more training data)
- That’s it – Custom Vision Service takes care of the rest!
2. TensorFlow Lite
TensorFlow Lite is an open source machine learning platform that allows us to use TensorFlow on IoT and Mobile devices.
Both TensoryFlow Lite and TensorFlow are completely open-source on GitHub.
Implementing Image Classification with Azure + Xamarin.Android
The completed Image Classification sample app is available here on GitHub: https://github.com/dhindrik/MushroomDetector/
1. Training the Model
Using the Custom Vision Service Web Portal, we will first train models for image classification.
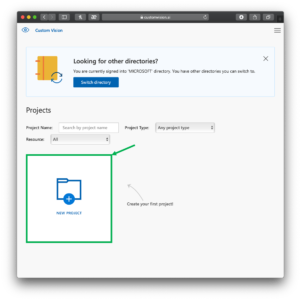
- In the Custom Vision Service Web Portal, click New Project
- Name: XamarinImageClassification
- Description: Identify Objects in Images
- Resource: [Create a new resource]
- Project Type: Classification
- Classification Types: Multilabel (Multiple tags per image)
- Domains: General (compact)
- Export Capabilities: Basic platforms
-
In the Create new project window, click Create project
-
In the XamarinImageClassification window, click Add images
-
Select images that contain the object to identify
-
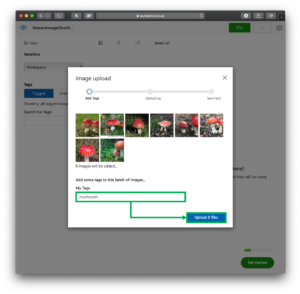
In the Image Upload window, add a tag
Note: In this example, we are tagging images of mushrooms
- In the Image upload window, click Upload
Note: Continue uploading images until you have at least 5 images for each tag
-
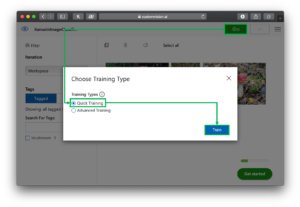
In the Choose Training Type window, select Quick Training
-
In the Choose Training Type window, select Train
2. Export Trained Models from Azure Custom Vision Service
Now that we’ve trained our model, let’s export it for use in our mobile app.
This allows us to use the model without an internet connection which improves the user’s privacy because their photos will never leave their mobile device.
To export our model, lets do the following:
-
On the XamarinImageClassifcation window, on the top of the page, select the Performance tab
-
On The Performance tab, tap the Export button (the downward-pointing arrow)
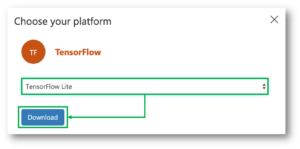
3. On the Choose your platform window, select TensorFlow
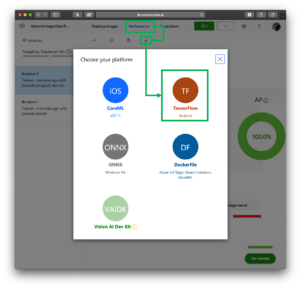
- In the Choose your platform window, select Download
3. Import TensorFlowLite into our Xamarin.Android App
- In our Xamarin.Android project, install the TensorFlow Lite NuGet Package
Note: This NuGet Package is an open-source project created by the Xamarin team at Microsoft. It contains C# bindings for the orginal TensorFlow Lite library which makes it possible to use in our Xamarin.Android app

Note: Inside the zip-file, are labels.txt and model.tflite:
- labels.txt contains the image tags created during the training preparation at the Custom Vision website
- models.tflite is the machine learning model that we use to make our predictions
-
In Visual Studio, in the Xamarin.Android project, right-click on the Assets folder
-
On the right-click menu, select Add > Existing Item…
-
In the Add Existing Item menu, select both of the recently unzipped files:
- models.tflite
- labels.txt
-
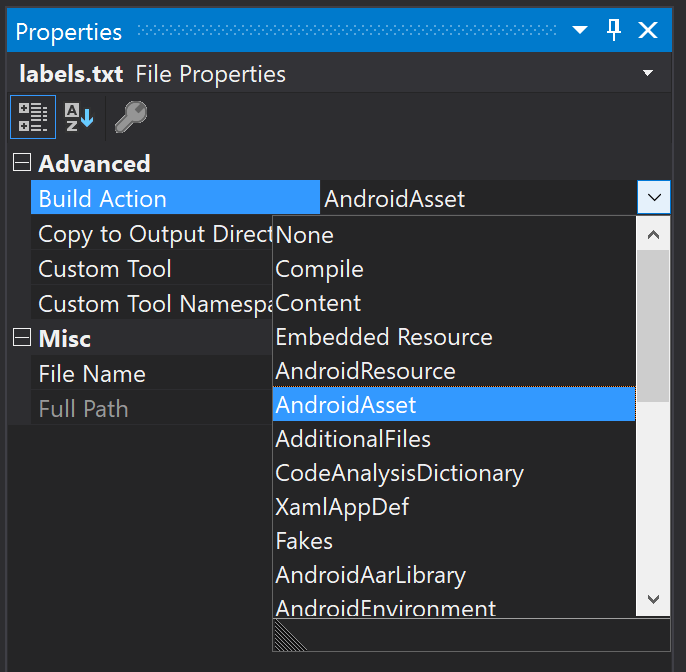
In Visual Studio, in the Xamarin.Android > Assets folder, right-click on labels.txt
-
In the right-click menu, select Properties
-
In the Properties window, select Build Action > Android Asset
-
In Visual Studio, in the Xamarin.Android > Assets folder, right-click on models.tflite
-
In the right-click menu, select Properties
-
In the Properties window, select Build Action > Android Asset
4. Implement Image Classification Code for Xamarin.Android
Now that we’ve imported the model, it is time to write code.
The completed Image Classification sample app is available here on GitHub: https://github.com/dhindrik/MushroomDetector/
In the Xamarin.Android project, add both ImageClassifcationModel.cs and TensorflowClassifier.cs:
ImageClassificationModel.cs
public class ImageClassificationModel
{
    public ImageClassificationModel(string tagName, float probability)
    {
        TagName = tagName;
        Probability = probability;
    }

    public float Probability { get; }
    public string TagName { get; }
}
TensorflowClassifier.cs
using System.Collections.Generic;
using System.IO;
using System.Linq;
using Android.App;
using Android.Graphics;
using Java.IO;
using Java.Nio;
using Java.Nio.Channels;

public class TensorflowClassifier
{
    //FloatSize is a constant with the value of 4 because a float value is 4 bytes
    const int FloatSize = 4;
    //PixelSize is a constant with the value of 3 because a pixel has three color channels: Red Green and Blue
    const int PixelSize = 3;

    public List<ImageClassificationModel> Classify(byte[] image)
    {
        var mappedByteBuffer = GetModelAsMappedByteBuffer();
        var interpreter = new Xamarin.TensorFlow.Lite.Interpreter(mappedByteBuffer);

        //To resize the image, we first need to get its required width and height
        var tensor = interpreter.GetInputTensor(0);
        var shape = tensor.Shape();

        var width = shape[1];
        var height = shape[2];

        var byteBuffer = GetPhotoAsByteBuffer(image, width, height);

        //use StreamReader to import the labels from labels.txt
        var streamReader = new StreamReader(Application.Context.Assets.Open("labels.txt"));

        //Transform labels.txt into List<string>
        var labels = streamReader.ReadToEnd().Split('\n').Select(s => s.Trim()).Where(s => !string.IsNullOrEmpty(s)).ToList();

        //Convert our two-dimensional array into a Java.Lang.Object, the required input for Xamarin.TensorFlow.List.Interpreter
        var outputLocations = new float[1][] { new float[labels.Count] };
        var outputs = Java.Lang.Object.FromArray(outputLocations);

        interpreter.Run(byteBuffer, outputs);
        var classificationResult = outputs.ToArray<float[]>();

        //Map the classificationResult to the labels and sort the result to find which label has the highest probability
        var classificationModelList = new List<ImageClassificationModel>();

        for (var i = 0; i < labels.Count; i++)
        {
            var label = labels[i]; classificationModelList.Add(new ImageClassificationModel(label, classificationResult[0][i]));
        }

        return classificationModelList;
    }

    //Convert model.tflite to Java.Nio.MappedByteBuffer , the require type for Xamarin.TensorFlow.Lite.Interpreter
    private MappedByteBuffer GetModelAsMappedByteBuffer()
    {
        var assetDescriptor = Application.Context.Assets.OpenFd("model.tflite");
        var inputStream = new FileInputStream(assetDescriptor.FileDescriptor);

        var mappedByteBuffer = inputStream.Channel.Map(FileChannel.MapMode.ReadOnly, assetDescriptor.StartOffset, assetDescriptor.DeclaredLength);

        return mappedByteBuffer;
    }

    //Resize the image for the TensorFlow interpreter
    private ByteBuffer GetPhotoAsByteBuffer(byte[] image, int width, int height)
    {
        var bitmap = BitmapFactory.DecodeByteArray(image, 0, image.Length);
        var resizedBitmap = Bitmap.CreateScaledBitmap(bitmap, width, height, true);

        var modelInputSize = FloatSize * height * width * PixelSize;
        var byteBuffer = ByteBuffer.AllocateDirect(modelInputSize);
        byteBuffer.Order(ByteOrder.NativeOrder());

        var pixels = new int[width * height];
        resizedBitmap.GetPixels(pixels, 0, resizedBitmap.Width, 0, 0, resizedBitmap.Width, resizedBitmap.Height);

        var pixel = 0;

        //Loop through each pixels to create a Java.Nio.ByteBuffer
        for (var i = 0; i < width; i++)
        {
            for (var j = 0; j < height; j++)
            {
                var pixelVal = pixels[pixel++];

                byteBuffer.PutFloat(pixelVal >> 16 & 0xFF);
                byteBuffer.PutFloat(pixelVal >> 8 & 0xFF);
                byteBuffer.PutFloat(pixelVal & 0xFF);
            }
        }

        bitmap.Recycle();

        return byteBuffer;
    }
}
That’s it! Now we can pass an image into TensorflowClassifier.Classify to retrieve our ImageClassificationModel.
Learn More
Check out the links below:
- Completed Code on GitHub
- Azure Custom Vision Service
- Azure Cognitive Services
- The Community AI Show: Custom Vision, Xamarin and Simpsons
- Microsoft’s AI April
-
App In The Cloud – Build an app powered by Custom Vision in Azure Cognitive Services