
Augment Reality and ARKit with Xamarin and iOS 11
One of the showcase features of iOS 11 is ARKit, an augmented-reality mode available on devices powered by A9 and newer chips (basically, 6S and better iPhones, 2017 iPads, and iPad Pros). With ARKit, users hold up the device and view a composite of the video feed and computer-generated imagery (either 2D SpriteKit or 3D SceneKit) that appears “attached” to horizontal surfaces in the real world.
Ultra-brief overview of ARKit
The lion’s share of work in ARKit is done behind-the-scenes on the device. Basically, a ARSession object combines device motion data, the camera’s physical characteristics (focal length, pixel size, etc.), and computational geometry to detect trackable “feature points” in the input video stream, locates them relative to a fixed world coordinate system, and creates ARAnchor objects that can be used to bridge between real-world and computer-generated imagery.
There are limitations. As mentioned previously, ARKit leaves behind older iOS devices. Also, ARKit can only detect horizontal surfaces (ARPlaneDetection is an enumeration that only defines Horizontal, but I have to believe that the limitation is due to some quirky behavior that Apple will fix sooner rather than later). Finally, the computer imagery in an AR scene is rendered above the video and appears above real-world objects that would occlude it.
The five critical concepts in ARKit are:
- Everything is defined in terms of the world coordinate system, which is initialized soon after the
ARSessionbegins running. - Image-processing finds high-contrast points in the real world that are stable from frame-to-frame. These “feature points” are intermediate results that are available to the developer, but mostly inform the system’s detection of
ARPlaneAnchorobjects. A good number of feature points are necessary for quite a few frames before ARKit detects a plane. Not surprisingly, bright lighting and textured surfaces seem to generate many more trackable feature points than evenly-illuminated matte surfaces. - Planes are created, removed, and coalesced as the image-processing continues. Their extent shifts, expands, and shrinks, depending on the world-tracking.
- Computer imagery is anchored to these planes and rendered on the screen as if at that location and orientation in the real world.
- Because AR processing occurs 60 times per second, for optimal performance you need to be careful about memory and disposing of no-longer-needed resources. Xamarin’s Profiler is your friend!
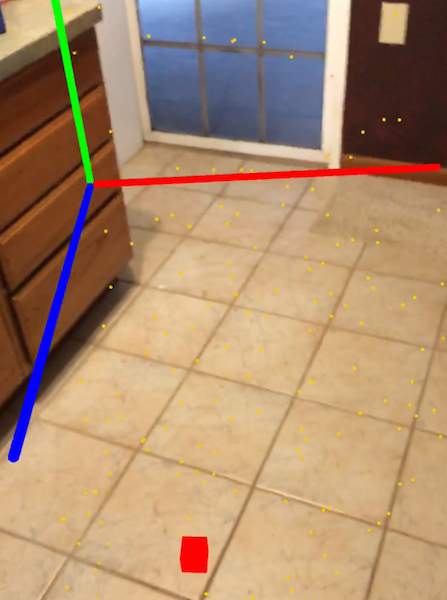
The following two images show these concepts. The first image shows the axes of the world origin “floating in space”, the current feature points as a set of yellow dots, and a small red cube where ARKit placed a ARPlaneAnchor.
The second image shows a conceptual view of the world coordinate system, camera / iOS device, and anchor, as well as showing the plane defined by the ARPlaneAnchor and a piece of 3D SceneKit geometry placed relative to the world coordinate system and the plane.

The Simplest ARKit That Could Work
Developers actually have complete control over rendering in ARKit but many scenarios will use the predefined ARSCNView and ARSKView that provide augmented-reality content based on SceneKit (3D) and SpriteKit (2D) respectively.
The following ARKit program allows you to place a piece of SceneKit geometry (a cube) so that it appears “attached to” a recognized horizontal plane. Before that happens, ARKit has to be initialized and run long enough to recognize a horizontal plane.
I initialize ARKit in two methods: ViewDidLoad and ViewWillAppear. The first to run is ViewDidLoad:
public class ARKitController : UIViewController
{
	ARSCNView scnView;
	public ARKitController() : base(){ }

	public override bool ShouldAutorotate() => true;
	public override void ViewDidLoad()
	{
		base.ViewDidLoad();
		scnView = new ARSCNView()
		{
			Frame = this.View.Frame,
			Delegate = new ARDelegate(),
			DebugOptions = ARSCNDebugOptions.ShowFeaturePoints | ARSCNDebugOptions.ShowWorldOrigin,
			UserInteractionEnabled = true
		};

		this.View.AddSubview(scnView);
	}
//... code continues ...
This is a typical iOS UIViewController subclass. It creates a new ARSCNView (the easy-to-use route towards SceneKit 3D geometry), sets its delegate-object to an instance of a class I wrote called ARDelegate (discussed later), turns on some debug visualizations, enables the view to respond to touches, and adds the ARSCNView to the view hierarchy.
The second part of initialization occurs during ViewWillAppear (it may be that this could be done during ViewDidLoad but I am always a little leery of the highly stateful view-initialization process in iOS):
public override void ViewWillAppear(bool animated)
{
	base.ViewWillAppear(animated);

	// Configure ARKit
	var config = new ARWorldTrackingConfiguration();
	config.PlaneDetection = ARPlaneDetection.Horizontal;

	// This method is called subsequent to ViewDidLoad so we know scnView is instantiated
	scnView.Session.Run(config, ARSessionRunOptions.RemoveExistingAnchors);
}
This simply configures the ARSession of the previously-created ARSCNView and begins its processing.
At this point, ARKit begins background processing. On the screen, the user will see the feed from their camera and, in a second or two, the debug visualizations will begin to show the feature cloud and world-coordinates origin (similar to the screenshot image shown previously).
At some point after that, ARKit will hopefully discover enough co-planar feature points to track a horizontal plane. When that happens, ARKit will automatically add an ARPlaneAnchor to its world-tracking. That addition triggers the DidAddNode method on the ARSCNView object’s delegate-object, which in our case is ARDelegate:
public class ARDelegate : ARSCNViewDelegate
{
	public override void DidAddNode(ISCNSceneRenderer renderer, SCNNode node, ARAnchor anchor)
	{
		if (anchor != null && anchor is ARPlaneAnchor)
		{
			PlaceAnchorNode(node, anchor as ARPlaneAnchor);
		}
	}

	void PlaceAnchorNode(SCNNode node, ARPlaneAnchor anchor)
	{
		var plane = SCNPlane.Create(anchor.Extent.X, anchor.Extent.Z);
		plane.FirstMaterial.Diffuse.Contents = UIColor.LightGray;

		var planeNode = SCNNode.FromGeometry(plane);

		//Locate the plane at the position of the anchor
		planeNode.Position = new SCNVector3(anchor.Extent.X, 0.0f, anchor.Extent.Z);

		//Rotate it to lie flat
		planeNode.Transform = SCNMatrix4.CreateRotationX((float) (Math.PI / 2.0));
		node.AddChildNode(planeNode);

		//Mark the anchor with a small red box
		var box = new SCNBox
		{
			Height = 0.1f,
			Width = 0.1f,
			Length = 0.1f
		};
		box.FirstMaterial.Diffuse.ContentColor = UIColor.Red;
		var anchorNode = new SCNNode
		{
			Position = new SCNVector3(0, 0, 0),
			Geometry = box
		};
		planeNode.AddChildNode(anchorNode);
	}

	public override void DidUpdateNode(ISCNSceneRenderer renderer, SCNNode node, ARAnchor anchor)
	{
		if (anchor is ARPlaneAnchor)
		{
			var planeAnchor = anchor as ARPlaneAnchor;
			System.Console.WriteLine($"The (updated) extent of the anchor is [{planeAnchor.Extent.X} , {planeAnchor.Extent.Y} , {planeAnchor.Extent.Z} ]");
		}
	}
}
DidAddNode is called any time a node is added to the view, but we are only interested in special processing if it’s an ARPlaneAnchor, indicating that ARKit is adding to its internal model of horizontal planes. We test for that condition and, if true, call this.PlaceAnchorCube. That method, in turn, creates some SceneKit geometry: a node that holds the plane’s geometry and is positioned in the same world coordinate as the anchor, and a small red box as a visual indicator of the ARPlaneAnchor. Note that because SceneKit uses a scene-graph architecture, the anchorNode position of [0,0,0] is relative to its parent’s position — the planeNode, whose position is based on the planeAnchor, whose position, in turn, is in world coordinates.
Once this method is called, the user will see something essentially identical to the screenshot above.
Hit-Testing
Once at least one plane is detected and tracked, the user can place additional geometry by touching on the screen. Back in the ViewController class:
// This snippet is part of:
public class ARKitController : UIViewController
{
	//… code shown previously …
	public override void TouchesBegan(NSSet touches, UIEvent evt)
	{
		base.TouchesBegan(touches, evt);
		var touch = touches.AnyObject as UITouch;
		if (touch != null)
		{
			var loc = touch.LocationInView(scnView);
			var worldPos = WorldPositionFromHitTest(loc);
			if (worldPos != null)
			{
				PlaceCube(worldPos.Item1);
			}
		}
	}
	private SCNVector3 PositionFromTransform(NMatrix4 xform)
	{
		return new SCNVector3(xform.M14, xform.M24, xform.M34);
	}

	(SCNVector3, ARAnchor) WorldPositionFromHitTest (CGPoint pt)
	{
		//Hit test against existing anchors
		var hits = scnView.HitTest(pt, ARHitTestResultType.ExistingPlaneUsingExtent);
		if (hits != null && hits.Length > 0)
		{
			var anchors = hits.Where(r => r.Anchor is ARPlaneAnchor);
			if (anchors.Count() > 0)
			{
				var first = anchors.First();
				var pos = PositionFromTransform(first.WorldTransform);
				return (pos, (ARPlaneAnchor)first.Anchor);
			}
		}

		return null;
	}

	private SCNMaterial[] LoadMaterials()
	{
		Func<string, SCNMaterial> LoadMaterial = fname =>
		{
			var mat = new SCNMaterial();
			mat.Diffuse.Contents = UIImage.FromFile(fname);
			mat.LocksAmbientWithDiffuse = true;		return mat;
		};

		var a = LoadMaterial("msft_logo.png");
		var b = LoadMaterial("xamagon.png");
		var c = LoadMaterial("fsharp.png");

		// This demo was originally in F# :-)
		return new[] { a, b, a, b, c, c };
	}

	SCNNode PlaceCube(SCNVector3 pos)
	{
		var box = new SCNBox
		{
			Width = 0.10f,
			Height = 0.10f,
			Length = 0.10f
		};

		var cubeNode = new SCNNode
		{
			Position = pos,
			Geometry = box
		};

		cubeNode.Geometry.Materials = LoadMaterials();
		scnView.Scene.RootNode.AddChildNode(cubeNode);
		return cubeNode;
	}
}
Skip to the TouchesBegan method and you can see that what we do is pretty straightforward at a high level: we grab the position of the touch and then perform a hit test for horizontal planes. If that hit-test is successful, we return the position on the first such plane as a tuple of type (SCNVector3, ARPlaneAnchor). The hit-testing is done using the built-in ARSceneView.HitTest(SCNVector3, ARHitTestResultType) method, which projects a ray outward into the augmented-reality “world” and returns an array containing anchors on any of the planes that it intersects, ordered nearest-to-furthest. If that array is not empty, we grab the first and return its position as an SCNVector3 (which we extract from the appropriate components of the anchor’s NMatrix4 matrix). (Historical note: During the iOS 11 beta period, the type used for these matrices switched between row-major and column-major in the Xamarin bindings. If you review code written during the beta period, rotations and translations may appear transposed.)
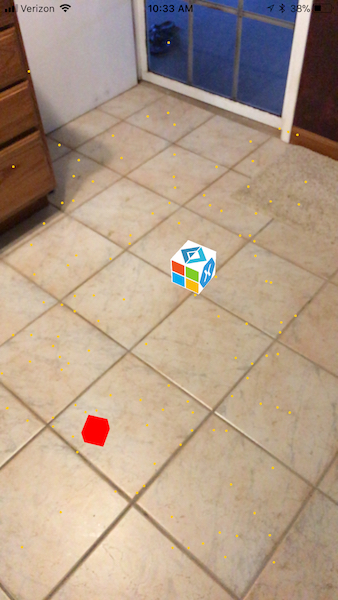
The PlaceCube method just creates a box 10cm on a side and places it in the augmented-reality “world” at pos, whose value is the SCNVector3 returned by WorldPositionFromHitTest as mentioned above.
The result is something like:
Learn More
The #MadeWithARKit hashtag on Twitter has been a great source of inspiration this Summer, with people demo’ing such great concepts as virtual portals, sound nodes located in space, and the combination of ARKit with video filters.
After the iPhone X launch announcement, Apple revealed some new APIs relating to face detection and mapping, including an ARFaceAnchor and ARFaceGeometry.
All the code for this sample is available at https://github.com/lobrien/ARKit_Csharp. Pull-requests and questions welcome! Make sure to also check out the Introduction to iOS 11 guide in the Xamarin Developer Center.
Discuss this post in the Xamarin Forums
 Light
Light Dark
Dark
2 comments
Could you provide step by step instructions on how to import ARkit into visual studio using Xamarin?
ARKit is a namespace that is included in the standard Xamarin.iOS and Xamarin.Mac bindings, so no special steps are needed to import it. You can get started from the sample project I posted at https://github.com/lobrien/ARKit_Csharp