Introduction
In Walkthrough– Publishing a Custom Web Control (Part 1 of 2) you learned to create and publish a custom web control. You created the extensibility project manually, a procedure with many steps. Now that you have an extensibility project template, you can publish it to the Visual Studio gallery. Anyone who wants to create and publish a custom web control can download and install your template and create the project in one step.
In the second part of this walkthrough, you will learn to
- Create a VSIX project template extension.
- Publish the project template to the Visual Studio Gallery.
- Install the project template from the Visual Studio Gallery.
- Test the installed project template.
- Remove the project template from the Visual Studio Gallery.
- Add a debug action to the project template.
Prerequisites
To follow this walkthrough, you must have a working knowledge of web controls, creating new projects, setting project properties, and using the Visual Studio experimental instance. You must have both Visual Studio 2010 and the Visual Studio 2010 SDK installed on your computer. In addition, you must have completed the first part of this walkthrough.
Creating and Publishing an Extensibility Web Control Template
To create an extensibility web control project template, start with the custom web control project that you created in the first part of this walkthrough. Because this project includes the ColorTextControl web control, you can use this template to create custom web controls that render as colored text.
To publish a project template to the Visual Studio gallery, you must create the project template as a VSIX extension and provide it with an icon and a screenshot. The easiest way to do this is to use the Export Template as VSIX wizard.
1. Open the MyWebControls project in Visual Studio.
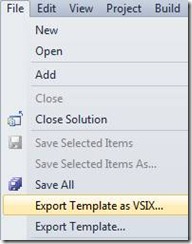
2. Use the Extension Manager to download the Export Template as VSIX wizard from the Visual Studio gallery. This adds the Export Template as VSIX … item to the File menu when a project is open.
3. Select the Export Template as VSIX menu item.
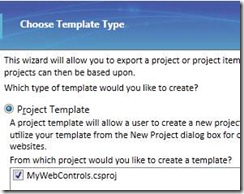
4. In the Choose Template Type page, make sure that Project Template is selected, and that the MyWebControls.csproj check box is checked. Click Next.
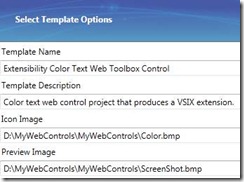
5. In the Select Template Options page, set the Template Name to Extensibility Color Text Web Toolbox Control and the Template Description to Color text web control project that produces a VSIX extension.
6. In the Icon Image text box, Browse to and select the Color.bmp file. You must set the file filter to All Files (*.*) to see this file.
7. In the Preview Image text box, Browse to and select the ScreenShot.bmp file. You must set the file filter to All Files (*.*) to see this file. Click Next.
8. In the Select VSIX Options page, change the Product Name to Extensibility Color Text Web Control Template.
9. Change the Company Name, and so forth, as desired.
10. Uncheck the Automatically import the template into Visual Studio check box, then click Finish.
In a moment, the Windows Explorer opens to display the Extensibility Color Text Web Control Template.vsix file in the <Users>My DocumentsVisual Studio 2010My Exported Templates folder.
Publishing the web control project template VSIX file
You are now ready to publish your project template to the Visual Studio gallery.
1. Launch your web browser and navigate to http://visualstudiogallery.msdn.microsoft.com.
2. Click the sign in link in the upper right-hand corner.
3. Sign in with your Windows Live ID. If you don’t have one, you can create one here.
4. Click the Upload button in the upper right-hand corner.
5. In Step 1: Extension Type, select Project or Item Template, then click Next.
6. In Step 2: Upload, click the Browse button and select the Extensibility Color Text Web Control Template.vsix file located in the My Exported Templates folder. Click Next.
7. In Step 3: Basic Information, the information you entered into the Export Template as VSIX wizard appears.
8. Set the Category to ASP.NET and the Tags to toolbox, web control, templates.
9. Read and agree to the Contribution Agreement, then type the text image into the text box.
10. Click Create Contribution, then click Publish.
11. Search the Visual Studio Gallery for extensibility color text web control template. The new template listing appears.
Installing the web control project template
Now that your web control project template is published, install it in Visual Studio and test it there.
1. Return to Visual Studio.
2. From the Tools menu, select Extension Manager.
3. Click Online Gallery, then search for extensibility color text web control template. The Extensibility Color Text Web Control Template listing appears.
4. Click the Download button. After the extension downloads, click the Install button. Your project template is now installed in Visual Studio.
Testing the web control project template
You no longer have to create a custom web control the manual way, as you did in the first part of this walkthrough. Instead, you can use the Extensibility Color Text Web Control project template. In this section, you use the template to create a BlueColorTextControl web control.
1. Select the File/New Project menu item, then click the Online Templates tag in the left pane.
2. Select the ASP.NET node, then click Extensibility Color Text Web Control Template in the middle pane.
3. Set the Name to MoreWebControls, then click OK.
4. Rename the ColorTextControl.cs file to be BlueColorTextControl.cs.
5. Open the BlueColorTextControl.cs file.
6. In the ToolboxData attribute, replace both occurrences of ColorTextControl with BlueColorTextControl.
These values specify the opening and closing tags generated for the control when it is dragged from the Toolbox into a web page at design time. They must match the name of the control class, which is also the name of the control that appears in the toolbox.
The start of the control class source code now looks like this:
namespace MoreWebControls
{
    [DefaultProperty("Text")]
    [ToolboxData("<{0}:BlueColorTextControl runat=server></{0}:BlueColorTextControl>")]
    [ProvideToolboxControl("MoreWebControls", false)]
    public class BlueColorTextControl : WebControl
    {
7. In the get method, Change the color “green” to “blue”.
get
{
    String s = (String)ViewState["Text"];
    return "<span style='color:blue'>' + s + "</span>";
}
This surrounds the text with a span tag that colors it blue.
8. Build the MoreWebControls project.
Testing the new web control
Do not press F5 to launch an experimental instance of Visual Studio. Instead, launch it by following the steps below. You will learn more about adding a debug action to a project template in a later section.
1. Launch an experimental instance of Visual Studio explicitly by selecting the menu item Start/All Programs/Microsoft Visual Studio 2010 SDK/Tools/Start Experimental Instance of Microsoft Visual Studio 2010. For convenience, you can create a shortcut to this executable.
2. Create a new web application project.
3. Open default.aspx in Source mode.
4. Open the toolbox. You should see BlueColorTextControl in the category MoreWebControls.
5. Drag a BlueColorTextControl to the body of the web page.
6. Add a Text attribute with the value Think Blue! to the BlueColorTextControl tag. The resulting tag should look like this:
<cc1:BlueColorTextControl ID="BlueColorTextControl1" Text="Think Blue!" runat="server" />
7. Press F5 to launch the ASP.NET Development Server.
The BlueColorTextControl should render something like this:
8. Close the ASP.NET Development Server.
9. Close the experimental instance of Visual Studio.
Removing the project template
To add a debug action to your project template, you must delete the current template and recreate it. To delete the project template and the project it generated, follow these steps.
1. Return to your web browser.
2. Click the My Contributions link in the upper left-hand corner. The Extensibility Color Text Web Control Template listing appears.
3. Click Delete to permanently remove your project template from the Visual Studio Gallery.
4. Close the browser and return to Visual Studio.
5. From the Tools menu, select Extension Manager.
6. Select Extensibility Color Text Web Control Template, then click Uninstall.
7. Close the Extension Manager.
8. Close the MoreWebControls solution.
9. Close Visual Studio.
10. Delete the MoreWebControls project folder.
11. Start Visual Studio to complete the uninstall process.
Adding a debug action to the project template
If you press F5 while the MoreWebControls solution is open, you will see the error message “A project with an Output Type of Class Library cannot be started directly”. Your project template does not set a debug action because the location of the experimental instance of Visual Studio is unknown until the project template is installed on the target machine.
Microsoft extensibility project templates include an invisible wizard that runs during project template installation. This wizard determines the location of the experimental instance of Visual Studio and sets the debug action accordingly. You can create your own wizard to do the same. You only need to create this wizard once. You can use the same wizard with every extensibility project template you create.
The extensibility project template wizard must have a public implementation of Microsoft.VisualStudio.TemplateWizard.IWizard, and must be signed with a strong assembly name.
Creating the wizard
1. Create a new Visual C#/Windows/Class Library project named MyWizard.
2. Rename the file class1.cs to be MyWizard.cs.
3. Replace the MyWizard.cs file content with the following code.
using System;
using System.Collections.Generic;
using System.Linq;
using System.Text;
using Microsoft.VisualStudio.TemplateWizard;
using System.Globalization;
using EnvDTE;
namespace MyWizard
{
    public class MyWizard : IWizard
    {
        public void BeforeOpeningFile(ProjectItem projectItem)
        {
        }
        public void ProjectFinishedGenerating(Project project)
        {
            foreach (Configuration config in project.ConfigurationManager)
            {
                //Set up the debug options to run "devenv /rootsuffix Exp";
                config.Properties.Item("StartAction").Value = 1;
                //Get the full path to devenv.exe through DTE.FullName
                config.Properties.Item("StartProgram").Value =
                    project.DTE.FullName;
                config.Properties.Item("StartArguments").Value =
                    "/rootsuffix Exp";
            }
        }
        public void ProjectItemFinishedGenerating(ProjectItem projectItem)
        {
        }
        public void RunFinished()
        {
        }
        public void RunStarted(object automationObject,
            Dictionary<string, string> replacementsDictionary,
            WizardRunKind runKind, object[] customParams)
        {
        }
        public bool ShouldAddProjectItem(string filePath)
        {
            return true;
        }
    }
}
4. Add the following references to the project. If there is more than one choice, choose the reference that has a path to Visual Studio 2010:
- EnvDTE
- Microsoft.VisualStudio.TemplateWizardInterface
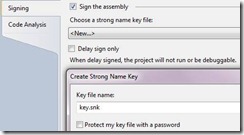
5. In the Signing tab of the project properties dialog box, check the Sign the assembly check box.
6. In the Choose a strong name key file dropdown list, select <New…>. The Create Strong Name Key dialog box appears.
7. Set the Key file name to key.snk and uncheck the Protect my key file with a password check box.
8. Click OK. The key.snk file is added to the project.
9. Build the MyWizard project as a Release build. Your wizard is now ready to use.
10. Close the MyWizard solution.
Incorporating the wizard into the project template.
To incorporate the wizard into the project template VSIX extension, you must backtrack and set the path to your wizard in the Export Template as VSIX wizard Wizard text box.
Follow the steps beginning with the section Creating and Publishing an Extensibility Web Control Template, with these exceptions:
- You do not have to download the Export Template as VSIX wizard again.
- In the Wizard text box of the Select VSIX Options page of the Export Template as VSIX wizard, Browse to and select the bin/Release/MyWizard.dll file you created in the section above.
- When asked to overwrite the existing VSIX extension output file, click Yes.
When you reach the section Testing the new web control, you can now launch the experimental instance of Visual Studio by pressing F5.
Summary
Congratulations! You have come full circle, from creating a web control project from scratch, to creating an extensibility web control project template.
Note that in this walkthrough, you use the Export Template as VSIX wizard to simplify the task of creating and publishing a project template. If you need more control of the project template, for example, to choose the icon that appears in the New Project dialog box, you must explicitly create the project template and wrap it in a VSIX extension. For more information, see Aaron Marten’s Creating and Sharing Project and Item Templates.
 Short Bio: Martin Tracy is a senior programmer writer for the Visual Studio Project and Build team. As part of VS 2010, he has documented numerous features of the MSBuild system and Visual Studio platform. His long term focus is on developing infrastructure to build richly featured web applications. Martin has a long career in real-time software development, from artificial hearts and smart prosthetics to adaptive aeronautic controls. Martin holds a Masters degree in Dance Ethnology from the University of California, Los Angeles (UCLA), and a Bachelors degree in Asian Culture from Brown University, Rhode Island. He lives in Snohomish, WA with his extended family and loves to play accordion and watch anime in his spare time.


0 comments