
When doing development for Azure IoT solutions, developers may want to test and debug their cloud solution with a real device. However, not every developer has a real device in their hand. With the Azure IoT Tools for Visual Studio Code, you can easily use Visual Studio Code as a device simulator to quickly interact with Azure IoT Hub. Let’s see how easy it is to send a D2C (device-to-cloud) message in Visual Studio Code! Say Hello to IoT Hub in Visual Studio Code in 1 minute!
Prerequisites
- If you don’t have an Azure subscription, create a free account before you begin.
- Install Visual Studio Code
- Install the Azure IoT Tools extension for Visual Studio Code
Create an IoT Hub
The first step is to create an IoT Hub in your subscription from Visual Studio Code.
- Click … > Create IoT Hub at AZURE IOT HUB tab, or type Azure IoT Hub: Create IoT Hub in Command Palette. (If you want to use an existing IoT Hub, click … > Select IoT Hub at AZURE IOT HUB tab)
- Choose your subscription, resource group, and the closest deploy location to you.
- For Pricing and scale tier, select the F1 – Free tier if it’s still available on your subscription.
- Enter the name of your IoT Hub.
- Wait a few minutes until the IoT Hub is created. you can see that your devices status become No device in ….
Register a device
A device must be registered with your IoT Hub before it can connect.
- Click … > Create Device at AZURE IOT HUB tab, or type Azure IoT Hub: Create Device in Command Palette.
- Enter device ID and press Enter.
- Wait a few seconds until the new device is created.

Say Hello to IoT Hub (Send D2C message)
Right-click your device and select Send D2C message to IoT Hub, then enter the message, results will be shown in OUTPUT > Azure IoT Hub view. Your ‘Hello World’ is sent to Azure IoT Hub!

Monitor IoT Hub D2C message in Visual Studio Code
While you could send message to your IoT Hub, it is also possible to monitor those messages in Visual Studio Code.
- Right-click your device and select Start Monitoring Built-in Event Endpoint.
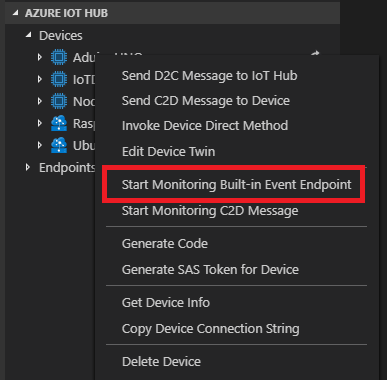
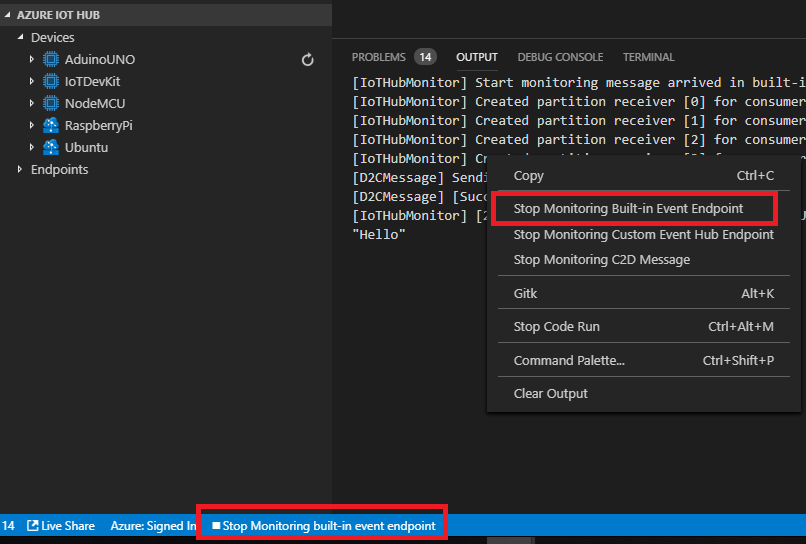
- The monitored messages will be shown in OUTPUT > Azure IoT Hub view.
- To stop monitoring, right-click the OUTPUT view and select Stop Monitoring Built-in Event Endpoint.
Is that cool? You could send and receive messages for Azure IoT Hub very easily in Visual Studio Code. Is that all? Not yet! Actually, you could use Azure IoT Tools extension to do lots of things when you develop with Azure IoT Hub! Checkout our Wiki Page to see the full list of features and tutorials. You could also use Azure IoT Tools to easily call Azure IoT Hub REST APIs or generate Azure IoT application with different languages such as C#, Java, Node.js, PHP, Python. For more IoT tooling announcements and tutorials, please check out our IoT Developer Blog. Azure IoT Tools make your Azure IoT development easier.
Useful Resources:
0 comments