Summary: Learn how to use the free PoshWSUS Windows PowerShell module to administer your WSUS server.
Microsoft Scripting Guy, Ed Wilson, is here. We wrap up the weekend and the week with guest blogger, Boe Prox. In case you missed them, here are links for Boe’s blogs:
Day 1: Introduction to WSUS and PowerShell
Day 2: Use PowerShell to Perform Basic Administrative Tasks on WSUS
Day 3: Approve or Decline WSUS Updates by Using PowerShell
Day 4: Use PowerShell to Find Missing Updates on WSUS Client Computers
Day 5: Get Windows Update Status Information by Using PowerShell
Day 6: Introduction to PoshWSUS, a Free PowerShell Module to Manage WSUS
Take it away, Boe…
We are at the final stopping point in our week of WSUS and this final blog is all about WSUS administration using my PoshWSUS module. The past week has seen us create a WSUS server and managing the server by using Windows PowerShell and the WSUS assemblies, but now we are going to look at this using fewer commands by using the PoshWSUS module. I will now show some examples that use the module to perform some of the exact commands that were done earlier in the week.
Initial use of PoshWSUS
To download the module, see PoshWSUS in CodePlex. Unzip the files to your Modules directory—in my case for Windows 7, it is C:\Users\Boe\Documents\WindowsPowerShell\Modules. I saved the modules to a folder named PoshWSUS. This location is shown here.
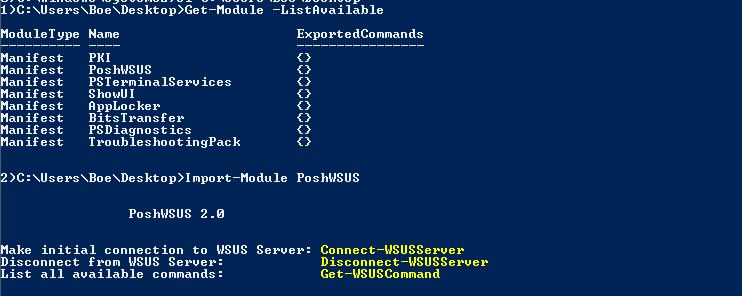
Load the module by using the Import-Module cmdlet. This command is shown here.
Import-Module PoshWSUS
The following image shows me using the Get-Module cmdlet to view the available cmdlets and using the Import-Module cmdlet to import the module.
Make your initial connection to the WSUS server. To do this, use the Connect-WSUSServer cmdlet as shown here.
Connect-WSUSServer -WsusServer DC1
The following image shows the connection to the WSUS server named DC1.
Now you are set to go!
Client and group management
Let’s start by looking at some basic client and group administration commands that you may find yourself using when you administer the server. The following example lists all clients that are registered in the WSUS Server.
Get-WSUSClient
The output from the Get-WSUSClient cmdlet is shown here.
If you only want to list a specific client that is registered on the WSUS server, you can run the following command to get the data.
Get-WSUSClient -Computer boe-pc
The following image shows the result of running the Get-WSUSClient cmdlet. Note that it provides lots of good information about the client computer.
For some extra fun, you can even use the Group-Object cmdlet to group all of your clients by operating system. A command to do this is shown here.
Get-WSUSClient | Group OSDescription | Select Count,Name
The command and associated output are shown in the image that follows.
If you want to display all of the target groups that are in the WSUS server, you can run use the Get-WSUSGroup command.
Get-WSUSGroup
If you want to add a client into a specific group, you can run this one-liner:
Get-WSUSClient boe-pc | Add-WSUSClientToGroup -Group TESTGROUP
Let’s verify that my client is actually in that group by using Get-WSUSClientGroupMembership.
Get-WSUSClientGroupMembership -Computer boe-pc
Looking at the returned data, it would appear that the client is in the TESTGROUP group.
Removing a WSUS client from a group is just as simple as using Remove-WSUSClientFromGroup. This command is shown here.
Remove-WSUSClientFromGroup -Computer boe-pc -Group TESTGROUP
One more check to see if my client is no longer in TESTGROUP. The results are shown here.
As you can see, my client is now a member of Unassigned Computers, meaning that it is not a member of any group in WSUS other than the default All Computers group.
Creating a new group on WSUS is made simple by using New-WSUSGroup. Here, I create a new group named MyGroup.
New-WSUSGroup “MYGROUP” –PassThru
The results of creating the new MyGroup group are shown in the following image.
In addition to creating new groups, I can remove a WSUS group. It is just as easy to remove a group, as it is to create a group. I use the Remove-WSUSGroup cmdlet. An example of doing this is shown here.
Get-WSUSGroup -Name MYGROUP | Remove-WSUSGroup
Update administration
Now for some more fun stuff: using PoshWSUS to work with Update administration. I have two commands (Approve-WSUSUpdate and Deny-WSUSUpdate) that make approving and declining updates easy to do. Besides that, you can use Get-WSUSUpdate to look for updates on the WSUS server. Unfortunately, “Decline” is not an approved verb in Windows PowerShell, so I went with “Deny” instead.
Using Get-WSUSUpdate without any parameters will return every single update on the WSUS server. In this case, I want to see all of the Windows 7 updates.
$updates = Get-WSUSUpdate ‘Windows 7’
$updates.count
$updates | Select -first 10
Approve-WSUSUpdate does take pipeline input from the Update object, so if you wanted to approve some updates that you queried, you could do the following:
$updates[1..10] | Approve-WSUSUpdate -Action Install -Group ‘All Computers’ –PassThru
In the same way, you can decline updates by piping the updates into Deny-WSUSUpdate. This command is shown here.
$updates[1..10] | Deny-WSUSUpdate
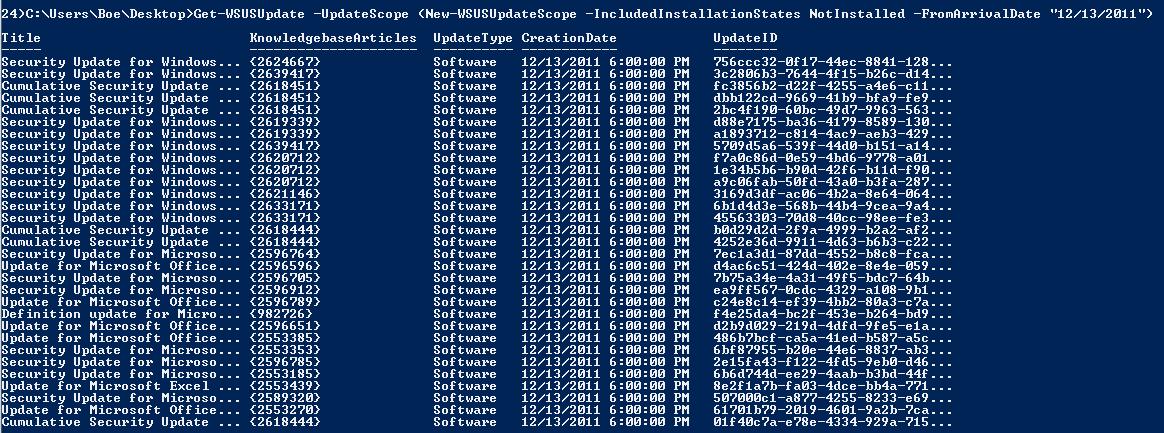
Here is a fun one! You can use Get-WSUSUpdate and New-WSUSUpdateScope to list all the updates that have been released on the last Patch Tuesday and are required by the clients, as shown here.
Get-WSUSUpdate -UpdateScope (New-WSUSUpdateScope -IncludedInstallationStates NotInstalled -FromArrivalDate “12/13/2011”)
You can then pipe this output into Approve-WSUSUpdate:
Get-WSUSUpdate -UpdateScope (New-WSUSUpdateScope -IncludedInstallationStates NotInstalled -FromArrivalDate “12/13/2011”) | Approve-WSUSUpdate -Action Install -Group ‘All Computers’ –PassThru
It is always a good idea to review each update to make sure that you want to approve it in your environment.
Reporting
So I have covered some administration examples that use this module, but what about some type of reporting capability? Well, I will show you some different types of reports that you can do with this module.
I can look for updates that have failed to install by using the following command:
Get-WSUSUpdatePerClient -UpdateScope (New-WSUSUpdateScope -IncludedInstallationStates Failed)
Fortunately for me (but unfortunate for this example), I do not have any updates that reported failures in the installation.
I can mimic what is shown in the following example of the Administration Console by using Get-WSUSUpdateSummaryPerClient.
Get-WSUSUpdateSummaryPerClient -ComputerScope (New-WSUSComputerScope) -UpdateScope (New-WSUSUpdateScope)
The output is shown here:
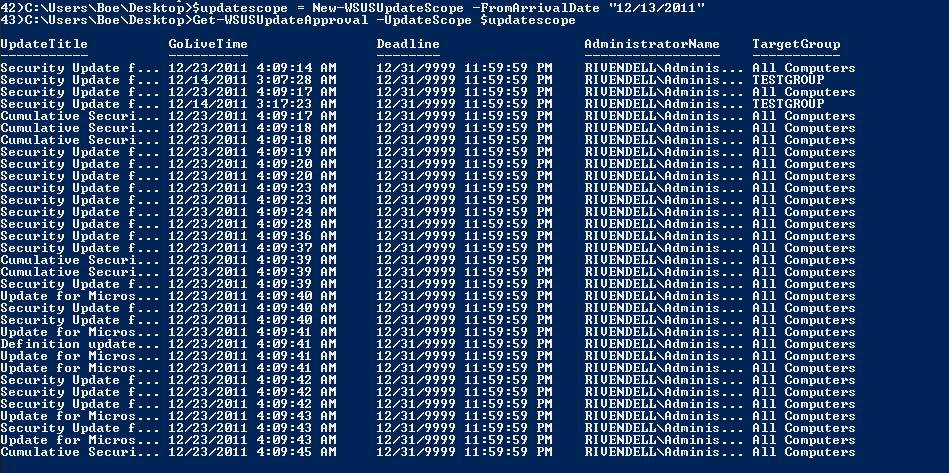
We can even generate a report of update approvals by using Get-WSUSUpdateApproval if you want to go back to see what has been approved and/or who approved a specific update. In this case, let’s go back and look at my update approvals for all of the updates from this Patch Tuesday.
$updatescope = New-WSUSUpdateScope -FromArrivalDate “12/13/2011”
Get-WSUSUpdateApproval -UpdateScope $updatescope
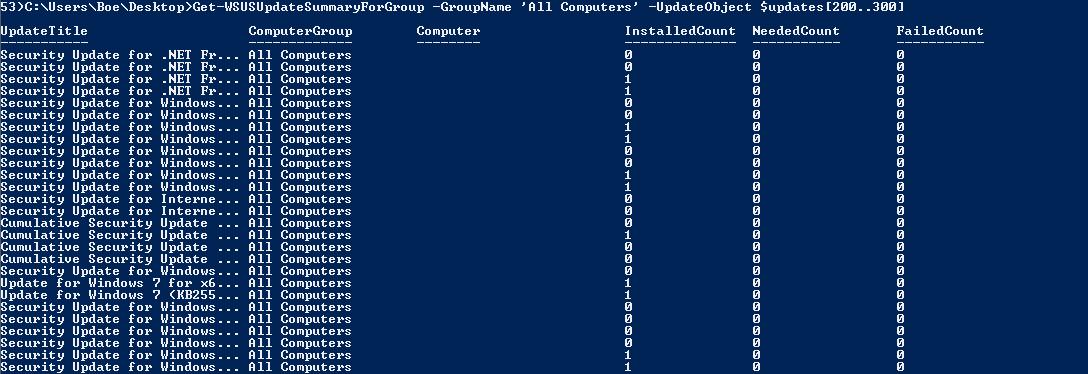
If you wanted to get a report of patches that are needed by clients in a specific group, you can give this command a run:
Get-WSUSUpdateSummaryForGroup -GroupName ‘All Computers’ -UpdateObject $updates[200..300]
Other commands to use
Besides the commands that I have shown in this blog post, there are other commands that you may find useful during your administration of a WSUS server. So, without further ado, here are some command examples:
Show the current synchronization schedule by using Get-WSUSSubscription:
Get-WSUSSubscription
Listing all Install Approval rules on your WSUS server is also easy by using Get-WSUSInstallApprovalRule. For those of you who are not familiar with Install Approval, basically it allow you set up automatic approvals of specific products for specific computer target groups. Pretty nice if you know that you want to approve critical security updates for all of your clients every month.
Get-WSUSInstallApprovalRule
In the same way, you can configure a new Install Approval rule by using New-WSUSApprovalRule and Set-WSUSApprovalRule.
$group = Get-WSUSGroup -Name ‘All Computers’
$class = Get-WSUSUpdateClassification | Where {$_.Title -eq “Updates”}
New-WSUSInstallApprovalRule -Name “Rule1” -Category $cat -Classification $class -Group $group –Enable –PassThru
You can even run the Install Approval rules by using Start-WSUSInstallApprovalRule.
Start-WSUSInstallApprovalRule -Name “Rule1”
If you wanted to locate the files for each update and their location on the server, you can run the Get-WSUSInstallableItem command.
$updates[0] | Get-WSUSInstallableItem
You can dig into the files a little deeper to see how many files and where exactly they are located:
$updates[0] | Get-WSUSInstallableItem | Select –Expand Files
That wraps it up for my week with WSUS and Windows PowerShell and also talking about my PoshWSUS module. I have more updates planned, including adding more commands (such as publishing non-Microsoft updates to WSUS) and updating existing commands. Remember that if you see something that you would like to see added to the module or you find a bug in it, please log your issues and ideas in the CodePlex Issue Tracker. Thank you everyone for checking out my blogs and thanks to Ed for allowing me to take over a week of Hey, Scripting Guy! to talk WSUS and Windows PowerShell!
~Boe
Thanks, Boe, for an awesome week of Windows PowerShell goodness. Join us tomorrow for a new week on the Hey, Scripting Guy! blog.
I invite you to follow me on Twitter and Facebook. If you have any questions, send email to me at scripter@microsoft.com, or post your questions on the Official Scripting Guys Forum. See you tomorrow. Until then, peace.
Ed Wilson, Microsoft Scripting Guy


0 comments