Summary: Part three in the series about replacing Windows PowerShell aliases with full cmdlet names uses a regular expression pattern and the tokenizer.
Weekend Scripter
Microsoft Scripting Guy, Ed Wilson, is here. With the final scripts uploaded for the 2011 Scripting Games, the judges are hard at work finishing the grading in preparation for revealing the final scores and declaring winners, which will take place on Monday April 25, 2011. Yep, the competition part of the games is over, but we still have a week’s worth of guest blogs by our expert commentators, and two week’s worth of wrap up by me. We will take a weeklong break from the games following our expert commentators in honor of SQL Rally in Orlando, Florida. I will be speaking at SQL Rally, and the Scripting Wife will be there with me as well. It will be a great event!
This is part three of my project to create a Windows PowerShell ISE add-on to replace aliases in a script with the actual Windows PowerShell cmdlet names. Interestingly enough, this should be a useful project. Jeffery Hicks, Microsoft PowerShell MVP, author, trainer, blogger, and 2011 Scripting Games judge has been running a one question survey about what script editor Scripting Games participants have been using. The survey says that the Windows PowerShell ISE is the most frequently used script editor by Scripting Games participants. It is not a scientific survey, but the results are interesting. By the way, if you have not taken the survey, it is available on Jeffery’s blog.
In the first part of this series of blogs, I talked about creating a hash table that contained all of the aliases and their associated definitions. It is a cool blog and worth a read. The following day, I continued this series with my second post. In that post I discussed using the Windows PowerShell tokenizer to parse a section of text and return all of the Windows PowerShell commands from that text. Now we arrive at the third blog in the series in which I extend the concept of parsing text to parsing all of the Windows PowerShell scripts that are contained in a folder. The idea is that you have a folder full of scripts and you would like to remove all of the aliases that are in all of the scripts and replace those aliases with the actual command names. I use the hash table of aliases to actual Windows PowerShell cmdlet names as a look up table, the tokenizer to parse the text contained in all of the scripts in the folders, and a regular expression pattern to perform the replacement.
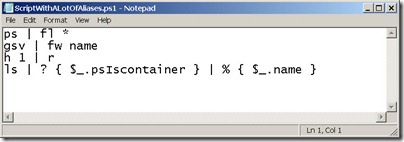
If one has a script with aliases in it, it can be pretty simple to replace those aliases. The image shown here is such a script.
In this image, each command is on its own line, and each line is terminated with a carriage return and a line feed (`r`n). As you can see, the code is a bit difficult to read unless you are familiar with the default aliases for working with variables in Windows PowerShell.
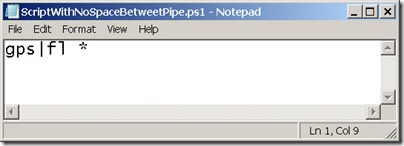
On the other hand, in the script shown in the following image, it is possible to write a Windows PowerShell script and not to put spaces between the commands. In fact, you do not even have to include a carriage return line feed (`r`n) at the ending line of code.
As you can see in this image, the code looks fine (and it does in fact run). This becomes a problem when writing a regular expression (regex) because how do I now tell the regex pattern the boundary between words? In fact, the usual “word boundary” is a space, but in this script the only space occurs after the two Windows PowerShell commands. The bar character (|) is the spacer…but the bar (|) is not a normal word spacer in regular expression patterns. In fact, the bar (|) is a special character in regular expressions that means or; and therefore, when using this as a Windows PowerShell pipeline character, it must be escaped in the regex pattern.
Another issue can arise when the Windows PowerShell aliases I want to replace happen to occur in words. An example of this is shown in the following image.
One approach for solving the problem that appears in the figure above is to state that I will replace a letter pattern if it occurs at the beginning of a line. The problem with this is all the code on the other side of the pipeline. If I let it replace all occurrences of the pattern, the property psIscontainer will be hopelessly mangled when ps is replaced with Get-Process and r is replaced with Invoke-History.
If I state that an alias needs to be separated by a space on either side of it, things get rather strange when faced with a script that is formatted in the manner of the one that is shown in the following image.
The script that is shown above is using spaces, tabs, and all sorts of other invisible “things” to separate the commands from one another. It is not a consistent spacing, and in some places the pipeline character (|) is not even separated by a space on the left. This once again presents a problem.
The complete Remove-AliasFromScripts1.ps1 is shown here.
Remove-AliasFromScripts1.ps1
Param(
[string]$path = “c:\testScripts”
) #end param
Get-Alias |
Select-Object name, definition |
Foreach-object -begin {$a = @{} } `
-process { $a.add($_.name,$_.definition)} `
-end {}
Foreach($script in Get-ChildItem -path $path -include *.ps1, *.psm1 -recurse)
{
$b = $errors = $null
$b = Get-Content -Path $script.fullname
[system.management.automation.psparser]::Tokenize($b,[ref]$errors) |
Where-Object { $_.type -eq “command” } |
ForEach-Object {
if($a.($_.content))
{
$b = $b -replace
(‘(?<=(\W|\b|^))’ + [regex]::Escape($_.content) + ‘(?=(\W|\b|$))’),
$a.($_.content)
} #end if content
} # end foreach-object
$newName = Join-Path -Path $script.Directory -ChildPath (“{0}_{1}{2}” -f
$script.BaseName, “noAlias”,$script.Extension)
$b | Out-File -FilePath $newName -Encoding ascii -Append
$b = $errors = $null
} #end foreach script
The first portion of the script is discussed in the first two blogs in this series. To obtain the scripts for parsing, I use a foreach command to walk through the collection of scripts that are returned by using the Get-ChildItem cmdlet. I could have used an intermediate variable to store my collection of fileinfo objects, but there is no real need to. I use the fullname property (a property that was added to the fileinfo object in Windows PowerShell version 2.0) so that the Get-Content cmdlet knows where to find the script with which I want to work. The fullname property returns the complete path to the script. Here is that portion of the script.
Foreach($script in Get-ChildItem -path $path -include *.ps1, *.psm1 -recurse)
{
$b = $errors = $null
$b = Get-Content -Path $script.fullname
I talked about using the tokenizer in the second blog in this series; and therefore, there is no need to cover that portion of the code here.
The portion of the code that appears here is actually one line of code. I have broken it into three lines to publish it to the blog.
$b = $b -replace
(‘(?<=(\W|\b|^))’ + [regex]::Escape($_.content) + ‘(?=(\W|\b|$))’),
$a.($_.content)
The heart of the command is the regular expression on the second line. The first part of the regular expression pattern is shown here.
(?<=(\W|\b|^))
Here is the translation.
|
(?<= |
( |
\W |
| |
\b |
| |
^ |
) |
) |
|
Look behind |
Open |
Non word character |
or |
Word boundary |
or |
Beginning of line |
Close grouping |
Close look behind |
It can be real annoying attempting to escape everything that can be used as a special character in a regular expression. This is where the escape static method from the System.Text.RegularExpressions.Regex .NET Framework class comes into play. This is a really cool trick because this method will parse a string and automatically escape any special characters it finds in the string. It greatly simplifies things. (I had no idea this method existed until Tome Tanasovski showed it to me when he was helping me with this part of my script). The code that is shown here illustrates how easy it is to use the escape method.
[regex]::Escape($_.content)
The last portion of our regular expression pattern appears here.
(?=(\W|\b|$))
Once again, I will translate it by using a table.
|
(?= |
( |
\W |
| |
\b |
| |
$ |
) |
) |
|
Look ahead |
Open grouping |
Non word character |
or |
Word boundary |
or |
end of line |
Close grouping |
Close look ahead |
The next portion of the script that needs to be examined is where I create the new file name. To do this, I use the Join-Path cmdlet to put together the script directory path portion with a file name that is comprised of the base file name, a noAlias tag, and the script extension. I create the actual file name by using the –f operator and parameter substitution. I then write the modified content that is in the $b variable to the file. This is shown here.
$newName = Join-Path -Path $script.Directory -ChildPath (“{0}_{1}{2}” -f
$script.BaseName, “noAlias”,$script.Extension)
$b | Out-File -FilePath $newName -Encoding ascii -Append
I uploaded the complete script to the Scripting Guys Script Repository. In addition, I attached the test scripts that I used (those shown in the images in this blog) so that you will have some files to play around with in your experimentation. One of the cool new features of the Scripting Guys Script Repository is the ability to include attachments with the script now. This makes it easier for people to upload modules, and other scripts that might require additional files.
Special thanks to Microsoft PowerShell MVP Tome Tanasovski, the regular expression guru for his help on the regular expression pattern that I used in this script. We have been fortunate to have several guest blogs written by Tome. They are worth re-reading if you have not seen them. I invite you to follow me on Twitter and Facebook. If you have any questions, send email to me at scripter@microsoft.com, or post your questions on the Official Scripting Guys Forum. See you tomorrow. Until then, peace.
Ed Wilson, Microsoft Scripting Guy


0 comments