Summary: In this weekend scripter blog, learn how to modify the Windows PowerShell ISE so that it automatically removes aliases from a script.
Weekend Scripter
Microsoft Scripting Guy, Ed Wilson, here. The PowerShell Deep Dive in Las Vegas, Nevada was a real treat. The Scripting Wife and I both enjoyed meeting all of the people in real life that we had been emailing, tweeting, and following on Facebook. The really cool thing was that with some people, as soon as they walked up I knew immediately who they were because they looked like their avatar on Twitter. Others, such as Glen Sizemore whose avatar is a football player for the New England Patriots, I did not recognize. After he said his name, I said, “Oh, yeah, now I get it,” because as it turned out he was wearing a shirt with the New England Patriots logo on it. Anyway, it was really a lot of fun to meet everyone. In addition, I was able to secure commitments for a few more guest blogger posts, as well as talk to people about starting Windows PowerShell users groups. It was a very productive conference.
The Scripting Wife received an invitation to the Don Jones preconference Windows PowerShell talk, and she came away from that talk just bubbling with excitement. Who knows, she might compete in the advanced category next year for the 2012 Scripting Games. She wrote a blog on WordPress about Don Jones’ talk.
Oh well, that is enough of all that. I could write an entire blog about the PowerShell Deep Dive, but I will resist that temptation for now, and get on with the fourth and final installment of my Remove-AliasesFromScript function.
In the first part of this series of blogs, I talked about creating a hash table that contained all of the aliases and their associated definitions. It is a cool blog and worth a read. The following day, I continued this series with my second post. In that post I discussed using the Windows PowerShell tokenizer to parse a section of text and return all of the Windows PowerShell commands from that text. In the third blog in the series, I extended the concept of parsing text to parsing all of the Windows PowerShell scripts that are contained in a folder. In this final installment, I modify the code that was used in the third blog to parse all of the scripts in a folder, so that that code will remove aliases from a script in the Windows PowerShell ISE.
To me, the best way to add the capability to remove aliases from a script, is to modify the script I used in the third blog. I want to put it into a function, and then I will use it inside the Windows PowerShell ISE. The complete Remove-AliasFromScript function is shown here.
Function Remove-AliasFromScript
{
Get-Alias |
Select-Object name, definition |
Foreach-object -begin {$a = @{} } `
-process { $a.add($_.name,$_.definition)} `
-end {}
$b = $errors = $null
$b = $psISE.CurrentFile.Editor.Text
[system.management.automation.psparser]::Tokenize($b,[ref]$errors) |
Where-Object { $_.type -eq “command” } |
ForEach-Object {
if($a.($_.content))
{
$b = $b -replace
(‘(?<=(\W|\b|^))’ + [regex]::Escape($_.content) + ‘(?=(\W|\b|$))’),
$a.($_.content)
} #end if content
} # end foreach-object
$ScriptWithoutAliases = $psISE.CurrentPowerShellTab.Files.Add()
$ScriptWithoutAliases.Editor.Text = $b
} #end function Remove-AliasFromScript
Rather than go line-by-line through the function, I will refer you to the three previous blogs (you should read them prior to jumping too deeply into this blog). I did delete a bit of code, but I only added five new lines of code to the script. The code and the associated changes are shown in the following image.
The first line of code (OK…so it is actually two lines) is the function declaration, and the opening brace (curly bracket). That code is shown here.
Function Remove-AliasFromScript
{
The second line of code is one of the most important —it obtains the code from the current file and stores it in the $b variable (the $b variable is the one that contains the Windows PowerShell code to be parsed by the tokenizer). In looking at the dotted notation, it makes sense: the $psISE, the CurrentFile, the Editor, and finally the Text. Each of those represent different objects, and you can use the Get-Member cmdlet to obtain the information needed to permit scripting against the Windows PowerShell ISE object model. It is also documented on TechNet, and in many of my own Hey Scripting Guy! blogs.
$b = $psISE.CurrentFile.Editor.Text
When I have the text of the current script stored in a variable, I pass it to the tokenizer by using the same code that I discussed in part 3 of the blog. This code is shown here—just for fun.
[system.management.automation.psparser]::Tokenize($b,[ref]$errors) |
Where-Object { $_.type -eq “command” } |
ForEach-Object {
if($a.($_.content))
{
$b = $b -replace
(‘(?<=(\W|\b|^))’ + [regex]::Escape($_.content) + ‘(?=(\W|\b|$))’),
$a.($_.content)
} #end if content
} # end foreach-object
In the third line of new code, I add a new tab to the Windows PowerShell ISE. I store a reference to that new tab in a variable called $ScriptWithoutAliases. The reason for creating the new tab is that I do not want to overwrite the existing script with my changes (removing aliases) until you have had a chance to test the script. As with the previous “ISE” command, the object model is well named, and it makes sense. We have the $psISE and then the CurrentPowerShellTab, and then we move to Files and finally call the Add method. This line of code is shown here.
$ScriptWithoutAliases = $psISE.CurrentPowerShellTab.Files.Add()
When I have a new tab, I call the editor object from my new tab, and I use the Text property to add the modified code from the $b variable to the new tab. The last thing I do is add the closing curly bracket. These two lines of code are shown here.
$ScriptWithoutAliases.Editor.Text = $b
} #end function Remove-AliasFromScript
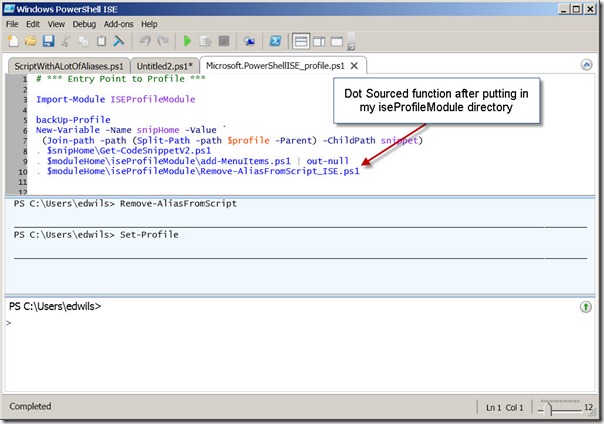
To use the function, all you need to do is to run it inside your Windows PowerShell ISE environment. After you have done that, the function is available. You put a script with aliases in it on the tab that has focus, call the Remove-AliasFromScript function, and it will open a new tab and populate it with your revised code. The easiest way to call this function inside your environment is to add it to your Windows PowerShell ISE profile. This is shown in the following image.
After I saved my function into a script (.ps1 file) I put it in my iseProfileModule directory (I talked about my project to clean up my Windows PowerShell profile in a Weekend Scripter blog last fall.) It is a good blog, and I talk about moving a lot of different functions into a single module for my profile.
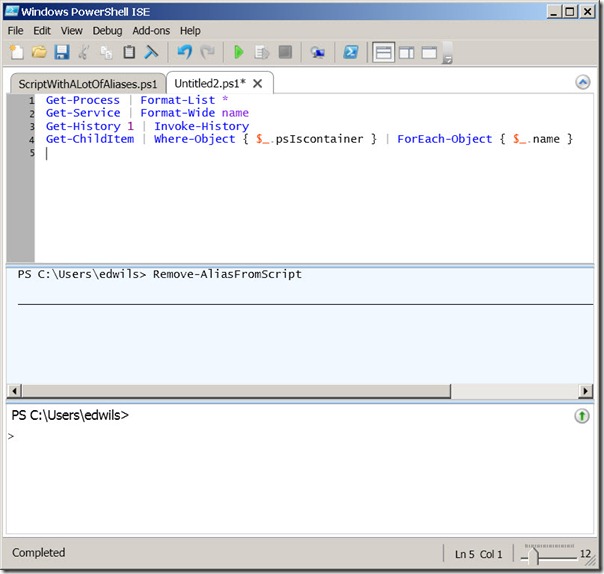
After I added the function to my profile, I closed the Windows PowerShell ISE, and then opened it back up. To test it, I open the ScriptWithALotOfAliases.ps1 script (this script is available in the .zip file that accompanies the ReplaceAliasesInScripts.ps1 script from the Scripting Guys Script Repository). This script is shown in the following image.
I then type the name of the function in the command window and press Enter. Instantly, the new tab is created, and the modified code appears on it. This is shown in the following image.
The next step, might be to perform a bit more cleanup work, but I will leave that to you for now. Hope this gets you on track to working with the Windows PowerShell ISE and removing those pesky aliases from your code.
I invite you to follow me on Twitter and Facebook. If you have any questions, send email to me at scripter@microsoft.com, or post your questions on the Official Scripting Guys Forum. See you tomorrow. Until then, peace.
Ed Wilson, Microsoft Scripting Guy


0 comments