Summary: Microsoft Scripting Guy, Ed Wilson, talks about using Windows PowerShell to explore his Office 365 tenant installation.
Microsoft Scripting Guy, Ed Wilson, is here. The Scripting Wife and I are sore from our weekend spent doing yard work. I am not much of an outdoor kind of geek, and so my excursions are normally limited to going to and from the mailbox, or to and from the woodworking shop. It has been years since I laid outside and worked on my tan, played in a summer softball league, or for that matter hit the links in pursuit of the elusive little white ball. But the Scripting Wife wanted some help—and I am after all, all about helping people. But I wish it was a script she needed help with and not the rose bushes!
Note This is the second in a series of Hey, Scripting Guy! Blog posts where I talk about using Windows PowerShell with Office 365. In the first post, Getting Started with Office 365 and PowerShell, I talked about setting up a demo environment and installing the prerequisite software to enable Windows PowerShell management of the demo environment. I also walked through the installation of the management module. In today’s post, I talk about using Windows PowerShell to explore the settings and capabilities of my Office 365 tenant installation.
It is now time to use some Windows PowerShell cmdlets to explore my Office 365 tenant installation. One of the things I figured out yesterday is that I do not want to always have to be typing my credentials. For one thing, I don’t remember them very well. For another thing, when I change the credentials to a nice long pass phrase, I will have an even harder time getting it right. Also, I tend to open and close the Windows PowerShell console on a routine basis—so that makes things that much harder. Therefore, my first order of business is to securely store my Office 365 credentials.
One of the neatest tricks I have ever run across, I got from Lee Holmes. Actually, I have gotten several really cool tricks from Lee, but this is one that I use routinely. I want to store my credentials for Office 365, so I first use the Get-Credential cmdlet to obtain my credentials and to turn the user name and password into a credential object. I then store the credential object in a file by using the Export-CliXML cmdlet. I can actually do this in a single line. The command is shown here (this is a single-line command that I broke at the pipeline character for readability on this blog):
Get-Credential "admin@ScriptingGuy.OnMicrosoft.Com" |
Export-Clixml c:\fso\ScriptingGuyCredential.xml
That is it. I have now saved my Scripting Guy credential to a file. Ah, but what about security? After all, I could have simply saved the password in a text file, and then used the ConvertTo-Secure string to help me recreate a credential object. But dude, that would not be very secure. So I asked Lee Holmes about this. Here is his reply…
The underlying security comes from the ConvertFrom-SecureString functionality, which Export-CliXml relies on to export secure strings to their serialized form.
The credentials are encrypted with the Windows Data Protection API (DPAPI), which means that you can literally share it with people, put it in untrusted storage, or put it on the billboard of Times Square. The reason you are allowed to encrypt it and decrypt it without typing any passwords is that they key is automatically generated from a combination of your user account and the current machine.
Because of that, even somebody else on your same machine can’t decrypt your credentials.
Cool, so I have stored my credentials in a secure fashion. Now what do I need to do to get them back so I can continue to work? Well, that is even simpler. I use the Import-Clixml cmdlet, and I store the returned credential object in a variable like I always do when doing when I am remoting or anything else. Here is the command I use:
$Cred = Import-Clixml C:\fso\ScriptingGuyCredential.xml
Next, I use the Connect-MsolService cmdlet like I did yesterday to connect to my tenant installation:
Connect-MsolService -Credential $cred
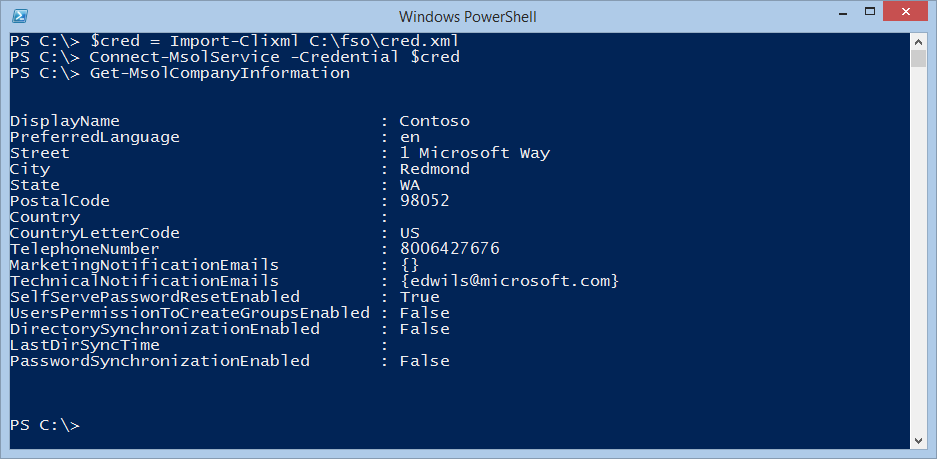
At this point, I can use any of the cmdlets from the MSOnline module. For example, one of the things I want to do is to look at the company information. It is easy. I use the Get-MsolCompanyInformation cmdlet. This command is shown here:
Get-MsolCompanyInformation
The command and the output from the command are shown here:
Next, I need to check to see how many active units I have, how many consumed units I have, and what kind of license pack I have. The command is simple. I use the Get-MsolAccountSku cmdlet, and it provides exactly what I need. The command and output are shown here:
PS C:\> Get-MsolAccountSku
AccountSkuId ActiveUnits WarningUnits ConsumedUnits
———— ———– ———— ————-
ScriptingGuy:ENTERPRISEPACK 25 0 25
Note It is important to remember to use Tab expansion when working with the MSOnline module because it does not export any cmdlet aliases. I checked it by using this command:
gcm -Module MSOnline | % { gal -Def $_.name -ea 0}
To find the contact for the Office 365 enterprise tenant installation, I use the Get-MsolContact cmdlet, as shown here:
PS C:\> Get-MsolContact
EmailAddress DisplayName
———— ———–
bobk@tailspintoys.com Bob Kelly (TAILSPIN)
That is all there is to using Windows PowerShell to explore the settings and capabilities of my Office 365 installation. Office 365 Week will continue tomorrow when I will talk about more cool stuff.
I invite you to follow me on Twitter and Facebook. If you have any questions, send email to me at scripter@microsoft.com, or post your questions on the Official Scripting Guys Forum. See you tomorrow. Until then, peace.
Ed Wilson, Microsoft Scripting Guy


0 comments