Summary: Learn how to use Windows PowerShell to discover what files are using up all the disk space on your computer.
Weekend Scripter
Microsoft Scripting Guy, Ed Wilson, here. I do not know about you, but it seems as if there is a disk space-eating gremlin on my computer. One day I have several hundred gigabytes of free disk space on my computer, and the next day I am getting low disk space warnings. If I were downloading and installing stuff all the time on my computer, I could sort of understand it, but I do not do those sort of things. I do take pictures when Dr. Scripto, the Scripting Wife, and I head out for a road trip, but I know where those pictures go—I store them on my storage area network (SAN), so that should not adversely impact the storage space on my computer.
The other day, when I was working on the code snippet project, I happened to notice that my profile was consuming a rather large amount of disk space. I was surprised that this was the case, because I configure Microsoft Outlook to store my .ost file in a data folder for ease of backup. In addition, I have Internet Explorer configured with a rather small temporary cache, and it is also set to delete browsing history on exit. With all of my user data going to a different folder, there should not be hardly anything in my user profile other than a few Microsoft Office scripting text files.
Dude (or Dudette), how much disk space does a simple .ini file require? In my case, it was over 20 gigabytes of space. If one has a laptop with a 100 gigabyte hard disk drive, that is a huge hit (not to mention the Windows Directory with its 10 gigabyte WinSxs folder. Add in space for virtual memory, Windows XP mode, and perhaps a hiberfile, and soon you are toast.
I decided to write a quick script to explore space-consuming files that are hiding in my profile. Interestingly enough, one reason that I attempt to keep everything in my \\data folder is to avoid this exact scenario. In addition to making it easy to access files from the command line, and to backup all my crucial data, it also helps me monitor file usage. Unfortunately, most applications store stuff in my home directory, and if I am not careful, stuff gets dumped and forgotten.
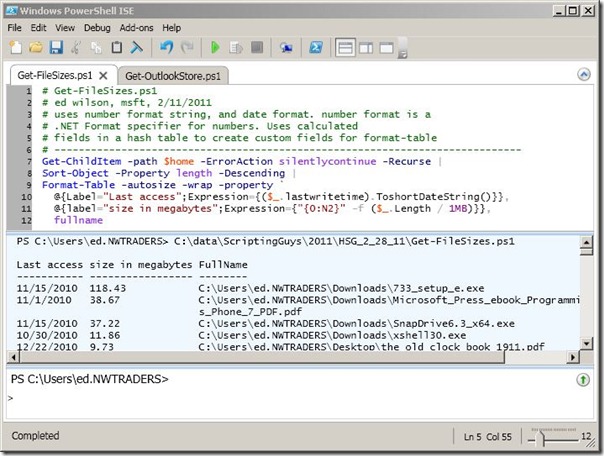
The complete Get-FileSizes.ps1 script appears here.
Get-FileSizes.ps1
Get-ChildItem -path $home -ErrorAction silentlycontinue -Recurse |
Sort-Object -Property length -Descending |
Format-Table -autosize -wrap -property `
@{Label=”Last access”;Expression={($_.lastwritetime).ToshortDateString()}},
@{label=”size in megabytes”;Expression={“{0:N2}” -f ($_.Length / 1MB)}},
fullname
The first thing I do is use the Get-ChildItem cmdlet to retrieve a recursive listing from my $home location. In Windows XP and Windows Server 2003, this location is the user’s folder in the Documents and Settings directory. Beginning with Windows Vista, the $home variable refers to the user’s personal folder in the Users directory.
Because there are some things, even in your personal profile folder, that you do not have access rights to, I use the SilentlyContinue error action to cause the script to continue past any access denied errors. The Recurse parameter is required to cause the script to traverse the deeply nested subfolder structure. This line of the script is shown here.
Get-ChildItem -path $home -ErrorAction silentlycontinue -Recurse |
I pipe the resulting system.io.fileinfo objects to the Sort-Object cmdlet, and I select the Length property from the piped FileInfo objects to use to perform a descending sort. This line of code is shown here.
Sort-Object -Property length -Descending |
The last thing I do is create a custom table to display the gathered information. Unfortunately, this is where things begin to get rather complicated. Creating a customized field by using the Format-Table cmdlet requires a hash table. The hash table contains two elements: Label and Expression. Label accepts a string that becomes the custom column header, and Expression accepts a script block to perform any custom calculations that may be required.
For a great introduction to using the Format-Table cmdlet see the Format PowerShell Output with an Easy-to-Use Table Scripting Wife blog. For more information, see all of the Scripting Wife displaying output articles and all of the Scripting Wife beginner articles.
In my Format-Table command, I use the AutoSize parameter, the Wrap parameter, and calculate two custom columns. I also use the standard FullName property from the FileInfo object. This portion of the script is shown here.
Format-Table -autosize -wrap -property `
@{Label=”Last access”;Expression={($_.lastwritetime).ToshortDateString()}},
@{label=”size in megabytes”;Expression={“{0:N2}” -f ($_.Length / 1MB)}},
Fullname
The output from the Get-FileSizes.ps1 script is shown in the following image.
That about wraps it up for today. I think I am going to play around with my Exchange Server 2010 machine for a while. Join me tomorrow for some more Windows PowerShell fun.
I invite you to follow me on Twitter and Facebook. If you have any questions, send email to me at scripter@microsoft.com, or post your questions on the Official Scripting Guys Forum. See you tomorrow. Until then, peace.
Ed Wilson, Microsoft Scripting Guy


0 comments