
CodePush is a service built by Microsoft, now incorporated into the Visual Studio App Center platform, which provides a way for React Native and Cordova developers to be more agile in delivering updates to their applications. Thanks to CodePush, you are able to deliver a new bundle (which might contain updated JavaScript files, new images, etc.) without having to fully redeploy a new package. This means, for example, that you can update the content of your application published on a Store without submitting a new package and waiting for the certification process to be completed; or that you can add a new feature in your LOB app without having to redeploy it via Intune or another MDM solution to all your employees.
The only caveat is that the feature works only for updates which involves the bundle, which means changes in the JavaScript code, a new asset, etc. If the update involves changes in the binary package (like adding a new capability in the manifest or integrating a new native module), then you are required to submit a new package using the standard approach.
Enabling Code Push requires to interact with three different layers:
- App Center, which is the cloud platform that will host and deliver your updates. You’re going to push new bundles to App Center using the App Center CLI.
- A native module, which must be integrated in the React Native application.
- A set of JavaScript APIs, which you must integrate in the JavaScript layer of your application to manage the update lifecycle.
CodePush initially supported only iOS and Android, but the native module has recently added support for the Windows implementation of React Native as well. However, App Center still lacks support for this technology on Windows and, today, when you create a new Windows application on App Center, React Native isn’t one of the available options. This means that the infrastructure needed to support CodePush won’t be available. In this article we’re going to see how we can configure our Windows application to use Code Push, even if it isn’t fully supported by App Center.
Setting up App Center
The first task is to create a new application in Visual Studio App Center. Thes starting point is the App Center website, where you can login to your dashboard. If you don’t already have an account, you can create a free one the first time you login using your Microsoft Account, work account, GitHub, Facebook or Google account. Once you are logged in, click on Add new and choose Add new app.
This is the first step where we have to apply a workaround. In this panel, you will be able to setup your application, by specifing the name and the target platform:
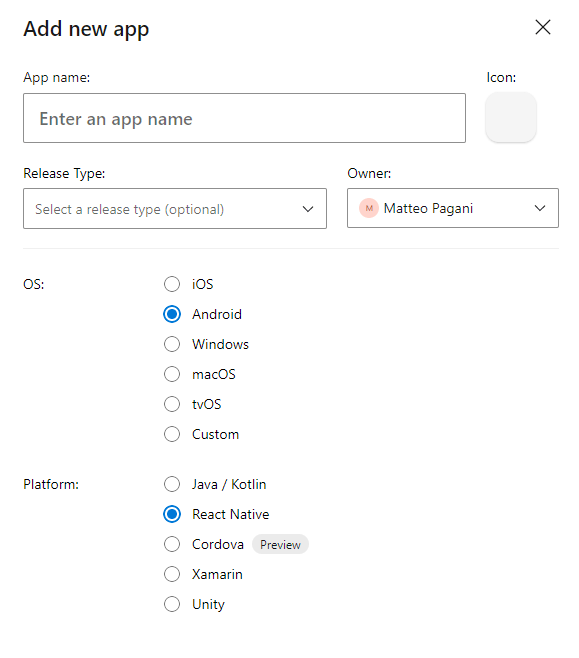
However, as previously mentioned, if you choose Windows you won’t see React Native as an option. As such, we have to trick App Center to think that our Windows application is actually an Android one.
The process will work also if you choose iOS. Since we won’t really use any specific Android or iOS SDK, it doesn’t really matter, as long as React Native is a supported platform.
As such, choose Android as OS and React Native as Platform, then create the application. Since you have chosen React Native, you should see now a section called CodePush in the Distribute section:
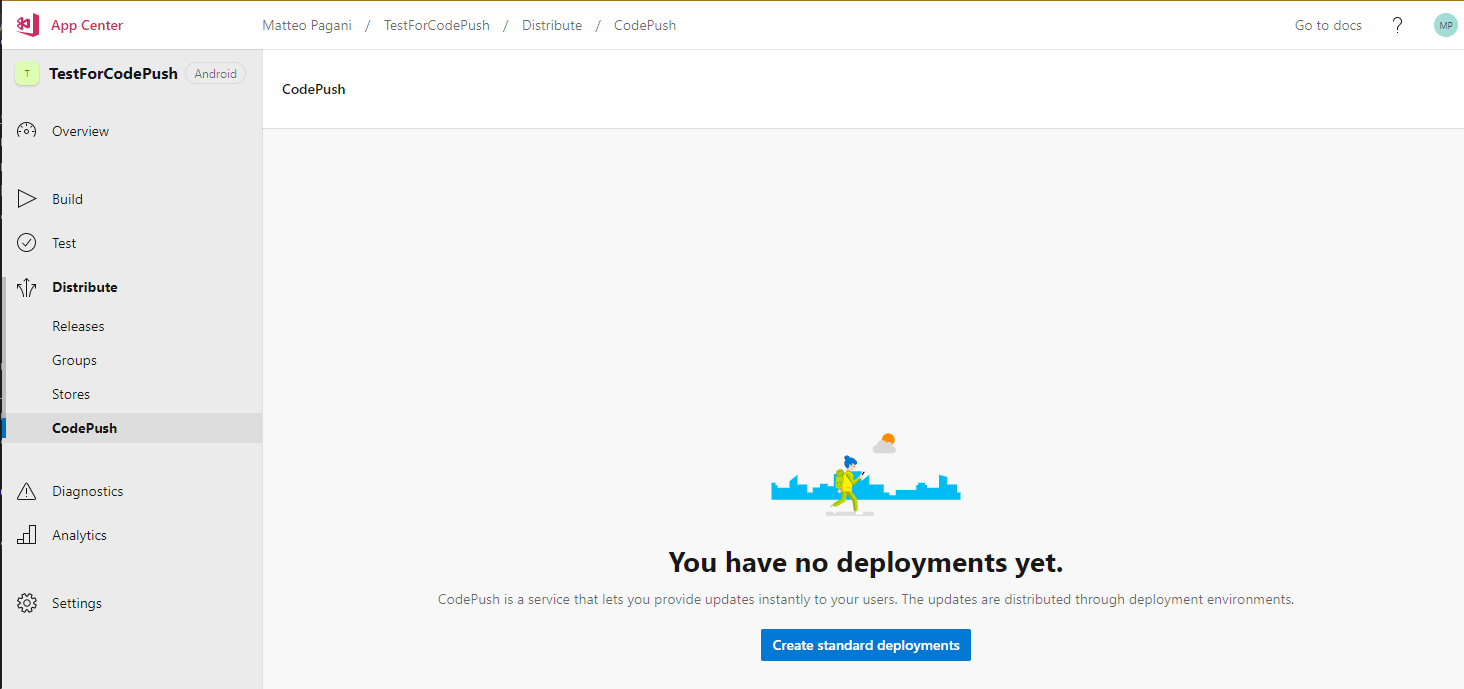
In CodePush you can configure multiple deployments slot, to manage different versions of the application (production, staging, etc.). By clicking on Create standard deployments App Center will create by defaults two environments: Staging and Production. By clicking on the wrench icon at the top, you will be able to add new ones. Each environment has a dedicated key, which is required to setup CodePush in the application. For the moment, let’s assume that we’re going to work with the staging version of the app, so copy the key for that environment and keep it for the next steps.

The last step is to install the App Center CLI, which provides the commands you will need to push the bundle updates to the App Center servers. To install it, open a prompt on your machine and run the following command:
npm install -g appcenter-cliBefore moving to the next step, run the following command to login with your App Center account and connect the CLI to it:
appcenter loginNow we can start integrating the SDK in our React Native app.
Integrating the SDK
The SDK is available as a React Native native module, which fully supports autolinking on Windows as well. As such, the first step is to install the module. Move to the root of your React Native project and run the following command in a terminal:
yarn add react-native-code-pushThe next step is to perform the autolinking. We have to do it manually because, after the module has been linked, we’ll have to make some manual changes to the app before being able to build and deploy it. As such, from the same root of the project, run the following command:
npx react-native autolink-windowsNow open in Visual Studio the solution in the windows folder (it will have the same name of your project, plus the .sln extension). If you have performed the autolinking properly, the solution will look like this:
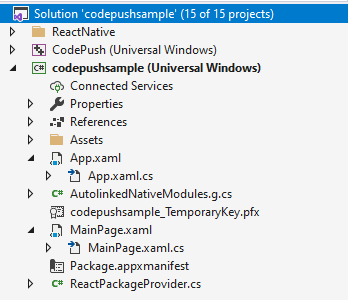
In the previous image, codepushsample is the main application which acts as a React Native host (in this case it’s based on C#, but it can be C++ as well), while CodePush is the SDK referenced by the main app.
The next step is to change the implementation of the OnLaunched event, which takes care of initializing the app. This is a very important step: it won’t be enough to add the code to initialize CodePush, but you have also to make the below changes in the initialization; otherwise, the application won’t behave properly and, most of the times, launching it will result in a blank screen or a frozen app.
If you have opted for an host application based on C# (so you have initialized React Native for Windows with the --language cs parameter), you will find the OnLaunched implementation in the App.xaml.cs file. You will have to replace it with the following code:
protected override void OnLaunched(LaunchActivatedEventArgs e)
{
    Microsoft.CodePush.ReactNative.CodePushConfig.SetHost(Host);
    Dictionary<string, string> configMap = new Dictionary<string, string>();
    configMap.Add("appVersion", "1.0.0");
    configMap.Add("deploymentKey", "<deploymentKey>");
    Microsoft.CodePush.ReactNative.CodePushConfig.Init(configMap);

    Frame rootFrame = null;

    var content = Window.Current.Content;
    if (content != null)
    {
        rootFrame = content as Frame;
    }

    if (rootFrame == null)
    {
        rootFrame = new Frame();
        if (e.PreviousExecutionState == ApplicationExecutionState.Terminated)
        {

        }

        if (!e.PrelaunchActivated)
        {
            if (rootFrame.Content == null)
            {
                rootFrame.Navigate(typeof(MainPage), e.Arguments);
            }

            Window.Current.Content = rootFrame;
            Window.Current.Activate();
        }
    }
    else
    {
        if (!e.PrelaunchActivated)
        {
            if (rootFrame.Content == null)
            {
                rootFrame.Navigate(typeof(MainPage), e.Arguments);
            }

            Window.Current.Activate();
        }
    }
}
If, instead, you’re using a C++ host (the default one), you will find the implementation in the App.cpp file. This is the new implementation you have to provide:
void App::OnLaunched(activation::LaunchActivatedEventArgs const& e)
{
    winrt::Microsoft::CodePush::ReactNative::CodePushConfig::SetHost(Host());
    auto configMap{ winrt::single_threaded_map<hstring, hstring>() };
    configMap.Insert(L"appVersion", L"1.0.0");
    configMap.Insert(L"deploymentKey", L"<deploymentKey>");
    winrt::Microsoft::CodePush::ReactNative::CodePushConfig::Init(configMap);

    Frame rootFrame{ nullptr };
    auto content = Window::Current().Content();
    if (content)
    {
        rootFrame = content.try_as<Frame>();
    }

    // Do not repeat app initialization when the Window already has content,
    // just ensure that the window is active
    if (rootFrame == nullptr)
    {
        // Create a Frame to act as the navigation context and associate it with
        // a SuspensionManager key
        rootFrame = Frame();

        rootFrame.NavigationFailed({ this, &App::OnNavigationFailed });

        if (e.PreviousExecutionState() == ApplicationExecutionState::Terminated)
        {
            // Restore the saved session state only when appropriate, scheduling the
            // final launch steps after the restore is complete
        }

        if (e.PrelaunchActivated() == false)
        {
            if (rootFrame.Content() == nullptr)
            {
                // When the navigation stack isn't restored navigate to the first page,
                // configuring the new page by passing required information as a navigation
                // parameter
                rootFrame.Navigate(xaml_typename<CodePushDemoAppCpp::MainPage>(), box_value(e.Arguments()));
            }
            // Place the frame in the current Window
            Window::Current().Content(rootFrame);
            // Ensure the current window is active
            Window::Current().Activate();
        }
    }
    else
    {
        if (e.PrelaunchActivated() == false)
        {
            if (rootFrame.Content() == nullptr)
            {
                // When the navigation stack isn't restored navigate to the first page,
                // configuring the new page by passing required information as a navigation
                // parameter
                rootFrame.Navigate(xaml_typename<CodePushDemoAppCpp::MainPage>(), box_value(e.Arguments()));
            }
            // Ensure the current window is active
            Window::Current().Activate();
        }
    }
}
You can copy and paste both snippets of code as they are. The only change to apply is in the first lines, where the CodePush initialization happens:
Microsoft.CodePush.ReactNative.CodePushConfig.SetHost(Host);
Dictionary<string, string> configMap = new Dictionary<string, string>();
configMap.Add("appVersion", "1.0.0");
configMap.Add("deploymentKey", "<deploymentKey>");
Microsoft.CodePush.ReactNative.CodePushConfig.Init(configMap);
appVersion is the version number of the application and it’s used to determine if CodePush should deliver an update or not for this version. When you publish a bundle on CodePush, in fact, you can specify which is the version of the application the bundle refers to, so that only users with that version will receive the update. deploymentKey, instead, is the key we have previously retrieved from App Center.
That’s it. Now you can deploy and run the application like a normal React Native for Windows application. You won’t see any changes for the moment. However, be aware that, in order to test the implementation, you won’t be able to use a debug version of the app, but you will have to generate a release AppX / MSIX package and deploy it on your machine. The reason is that, when you’re debugging a React Native application, the Metro packager is always up & running. As such, any change you’re going to make to the JavaScript layer will be automatically pushed to the host app and displayed in real time, without giving you the possibility to push it as an update via CodePush.
To generate a relase version of the package, you can follow this guidance.
Important! Before generating a release package, open the manifest of the app (double click on the Package.appxmanifest file in Visual Studio), move to the Packaging section and change the Package name field to a more friendly name.
By default, the package name assigned to a new UWP app is a GUID, which makes the Package Family Name (the unique identifier of a packaged app) very long. Since the Package Family Name is used also to generate the folder where Windows stores the local data (including the updates downloaded from App Center), a very long name could lead CodePush to break and you might get errors like The filename or extension is too long when the updated bundle is being installed.
Integrating the JavaScript APIs
Now we are ready to start setting up CodePush in the JavaScript layer of the application. The key to enable it is to wrap the main App class or function (based on the approach you’re using) inside the codePush one, like in the following examples:
//class component
import codePush from "react-native-code-push";

class App extends Component {
    // your app component
}

App = codePush(App);

export default App;

//functional component
import codePush from "react-native-code-push";

let App: () => React$Node = () => {
    //your app component
}

App = codePush(App);

export default App;
With this basic configuration you enable the default behavior: CodePush will search for updates when the application starts and, if they’re available, it will download them silently and apply them at the next restart.
Let’s try it. As first step, after you have wrapped your application in the codePush function, you will have to generate, through Visual Studio, a new MSIX / AppX package compiled in Release mode and then install it on your machine.
Once you have it, you can start making changes to your application. Feel free to change anything which involves the JavaScript layer: a text, a style, a component, etc.
Once you have made the change, you will need to create a new bundle and release it on CodePush. If you follow the official guidance, you’ll find that the App Center CLI has a special command called release-react which automatically takes care of generating the bundle and pushing it to CodePush. However, at the time of writing, the App Center CLI doesn’t support Windows as a platform yet. As such, the release-react will generate an incorrect bundle: since, in App Center, you have configured this app as an Android app, it will generate an Android bundle.
The workaround is to manually generate the bundle for Windows and then manually upload it to CodePush, using the release command. Let’s start with the first step. Open a terminal on the root of your project and create a folder called Bundle to store it:
mkdir BundleThen run the following command:
npx --no-install react-native bundle --platform windows --entry-file index.js --bundle-output ./Bundle/index.windows.bundle --assets-dest ./Bundle --dev false --reset-cacheThis is the same command that Visual Studio runs when you generate a release package for the Windows application. Now you can push it to App Center using the App Center CLI with the following command:
appcenter codepush release -a mpagani/CodePushSample -c .\Bundle -t 1.0.0This is the meaning of the various parameters:
-
-ais the identifier of application you have registed on App Center. The parameter is made by the name of your account / the name of the application. You can find them in your URL of your browser, when you have the dashboard opened on the app:
-
-cis the path which contains the bundle you want to publish. In our case, it’s theBundlefolder which we have previously created. -
-tis the version number of the app this bundle refers to.
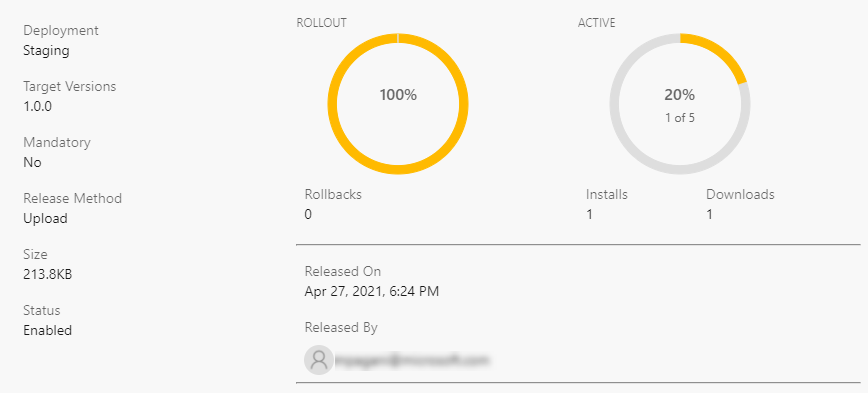
After a few seconds, you should see a confirmation that the bundle has been succesfully uploaded. You can check that the operation was succesfull by logging in to the App Center dashboard of your application. You should see all the releases you have published in the CodePush section:
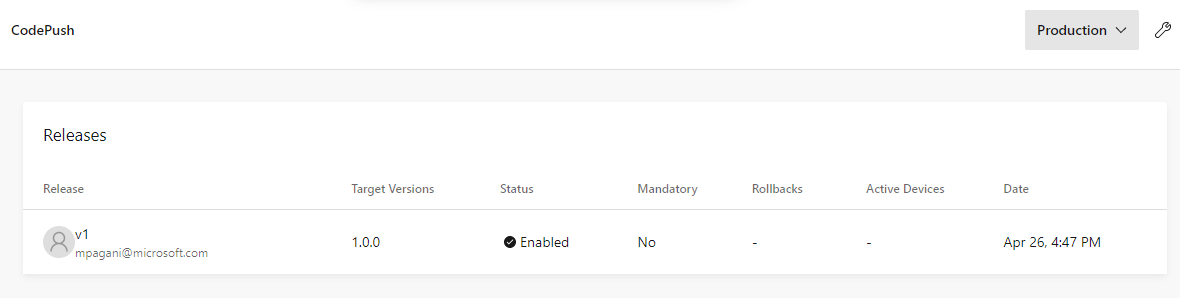
You will be able to see different statistics about each release, like the number of users who have downloaded and installed the update:
Now you should be able to see CodePush in action by following these steps:
- Open the application you have previously packaged and deployed.
- You will see the original version of the application. However, in background, CodePush will have started to download the new bundle.
- Close and reopen the application.
- Now you should see the new version of the application, with the changes you have applied.
Configure the update
When you use the CLI, you can also configure how the update should behave with different parameters. For example, if it’s a mandatory update (so the user can’t ignore it or postpone it), you can use the --mandatory parameter:
appcenter codepush release -a mpagani/CodePushSample -c .\Bundle -t 1.0.0 --mandatoryAlternatively, if you want to enable a gradual rollout, you can use the --rollout parameter with a number between 1 and 100, which represents the percentage of users that will receive the update immediately:
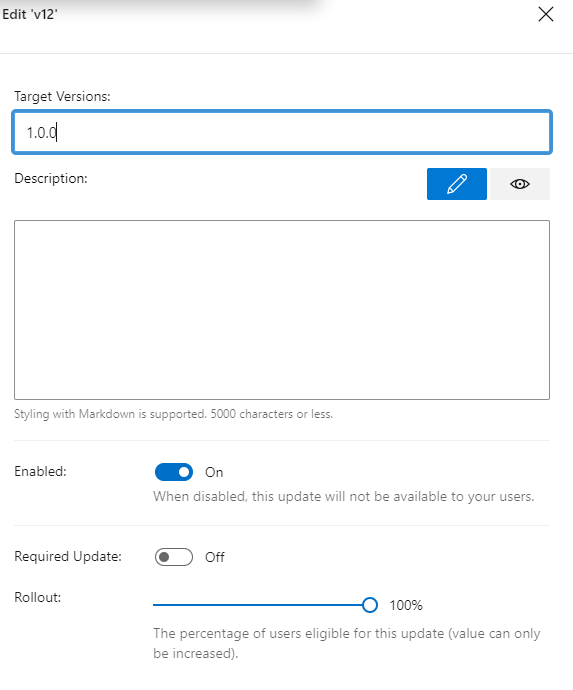
appcenter codepush release -a mpagani/CodePushSample -c .\Bundle -t 1.0.0 --rollout 25You can find all the parameters documented here. In case you have already pushed an update and you want to change its configuration, you can use the App Center dashboard. By clicking on the wrench icon inside a release page, you will be able to customize it:
Customizing the update behavior
The CodePush APIs give you lot of flexibility in deciding how you want to manage updates. The previous implementation you have tested is the default one, but there are other alternatives.
Show a prompt to the user
With this approach, the check for updates still happens when the application starts, but the package won’t be automatically downloaded and installed. The user will be prompted if they want to move on or cancel it (unless it was marked as mandatory when you have published the bundle).
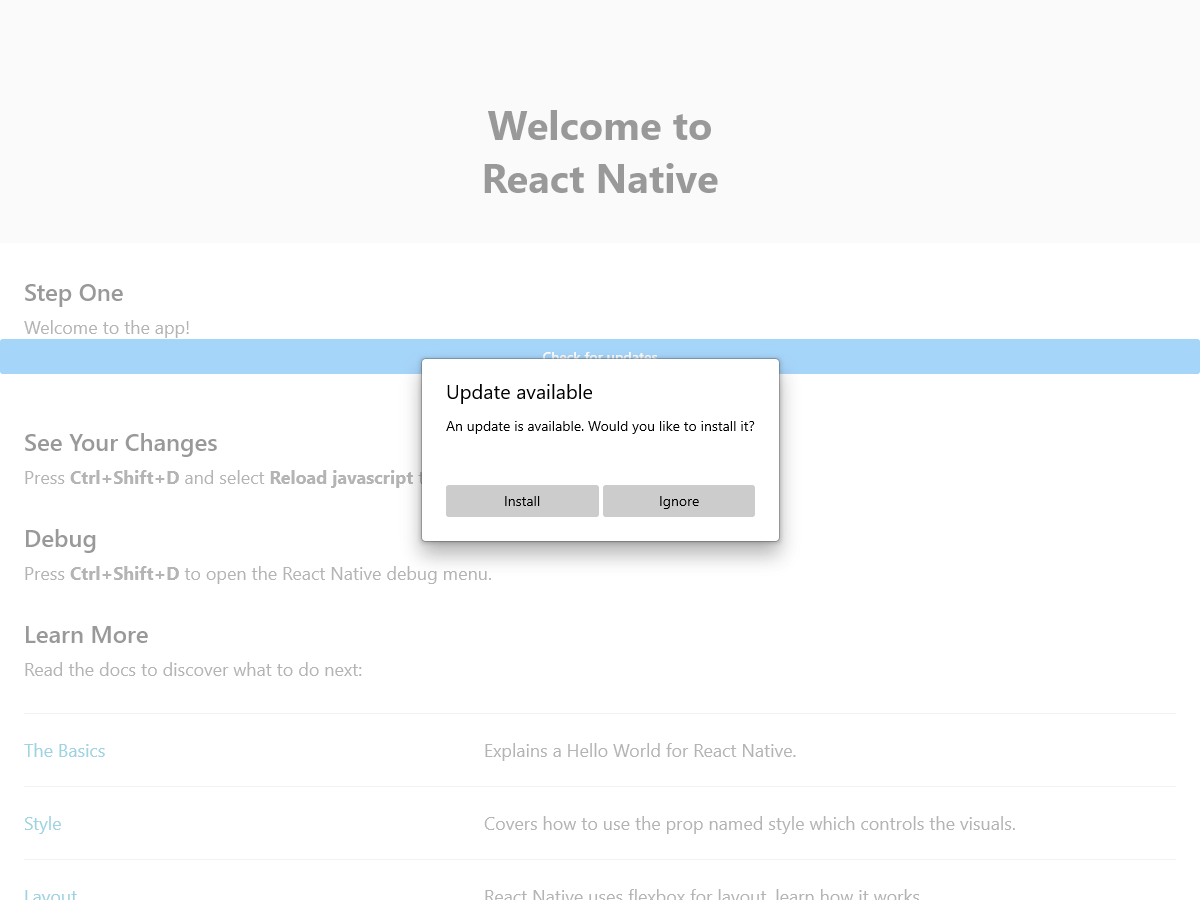
To achieve this goal, you can pass the following options when you initialize the codePush function:
import codePush from "react-native-code-push";

let App: () => React$Node = () => {
  //your app component
};

App = codePush({
  updateDialog: true,
  installMode: codePush.InstallMode.IMMEDIATE,
})(App);

export default App;
Handle updates manually
You can also choose to disable automatic updates and provide a manual way to the user to check and install them, for example via a button. The first step is to pass CheckFrequency.MANUAL as option in the codePush() function to disable automatic updates:
import codePush from "react-native-code-push";

let App: () => React$Node = () => {
  //your app component
};

App = codePush({ checkFrequency: codePush.CheckFrequency.MANUAL })(App);

export default App;
Then you can use use the sync() function provided by the CodePush APIs to manually trigger the update check. You can call this function, for example, when a button is pressed:
const onCheckUpdates = async () => {
  var result = await codePush.sync({
    updateDialog: true,
    installMode: codePush.InstallMode.IMMEDIATE,
  });
};
Track the download progress
CodePush provides a series of events to track the status of the installation. The only caveat is that, at the moment of writing, they are exposed only through class components. This is an example of the implementation:
class App extends React.Component {
  codePushStatusDidChange(status) {
    switch (status) {
      case codePush.SyncStatus.CHECKING_FOR_UPDATE:
        console.log("Checking for updates.");
        break;
      case codePush.SyncStatus.DOWNLOADING_PACKAGE:
        console.log("Downloading update.");
        break;
      case codePush.SyncStatus.INSTALLING_UPDATE:
        console.log("Installing update.");
        break;
      case codePush.SyncStatus.UP_TO_DATE:
        console.log("Your app is up-to-date.");
        break;
      case codePush.SyncStatus.UPDATE_INSTALLED:
        console.log("Update installed.");
        break;
    }
  }

  codePushDownloadDidProgress(progress) {
    console.log(
      progress.receivedBytes + " of " + progress.totalBytes + " received."
    );
  }
}
App = codePush(MyApp);
export default App;
The codePushStatusDidChange() event is raised when the status of the update changes. It can assume one of the values exposed by the SyncStatus enumerator. The codePushDownloadDidProgress() event, instead, is raised when the download has started and, through the progress object, you can get the current status, in case you want to display a progress bar or another similar control.
Wrapping up
Thanks to CodePush, you can be more agile in keeping your application up-to-date and deliver new features without having to redeploy a completely new package. Currently, a few workarounds are needed for App Center to integrate with the React Native for Windows implementation. I highly recommend you to read the whole README of the main repository, since it contains a lot of additional information for advanced scenarios, like how to handle Store policies, how to manage multiple deployment assignments, etc. Here, instead, you can find an overview of the JavaScript APIs, with many details on how to customize the update experience. If you’re looking for an example with a C++ based host app, you can refer to the official one. A C# version of the sample, instead, can be found here.
If you’re interested in getting started with React Native for Windows, check out our website at aka.ms/reactnative.
You can also follow us on Twitter @ReactNativeMSFT to keep up to date on news, feature roadmaps, and more.
0 comments