
This post from Premier Developer consultant Crystal Tenn walks you through customizing Visual Studio to work better for you and your organization.
I like tools that make my development faster and more organized. The small amount of time it takes to invest in installing and learning these tools pays off in the long run! I have listed out the shortcuts that I use in my Visual Studio and how to change your settings if you want to adopt some of my shortcuts or make up your own easy to remember ones. You can share settings across a team so that everyone is more productive and in sync. I like to change my new classes so that by default they are public, instructions are below. Also, I use add-ons to help check my spelling, so it is easy for others to find my work (hard for others to find my class if I spell it wrong) and I have listed a couple of options in this article. I did not go into this topic here as it is lengthy, but I also do recommend using ReSharper which has many tools to help you write code faster and more effectively!
*As a note, all screenshots are taken with Visual Studio 2017.
How to get to edit Visual Studio Shortcuts:
-
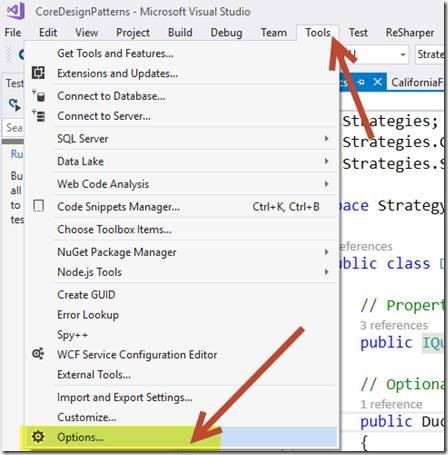
- Click on Tools > Options
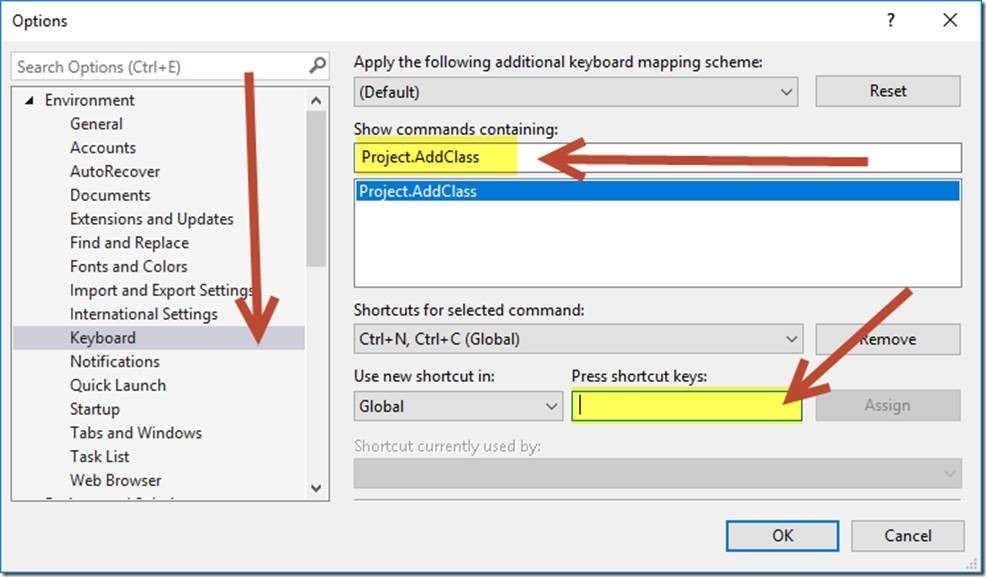
- Under Environment, go to Keyboard. The highlighted section “Show commands containing:” corresponds to the “VS Mapping column” in the table that you will see next. If you press shortcut keys, you can assign a new shortcut to whichever command is selected. You can type in the shortcut keys to find out if it is used by anything currently by checking the box below that is greyed out in the screenshot that reads “Shortcut currently used by”, for example if you need to find the name of a shortcut you use, and you are not sure what it is called.
- Click on Tools > Options
| Action | VS Mapping | Recommended Shortcut | How to remember it: | Default |
| Project / Files / References | ||||
| Add a new class | Project.AddClass | Ctrl + N, Ctrl + C | N for New and C for Class | N |
| Add new Project | File.AddNewProject | Ctrl + N, Ctrl + P | N for New and P for Project | N |
| Add existing Project | File.AddExistingProject | Ctrl + N, Ctrl + E | N for New and E for Existing | N |
| Set current project as startup | Project.SetasStartUpProject | Ctrl + S, Ctrl + P | S Set as Startup and P and Project | N |
| Add Reference to selected project | Project.AddReference | Ctrl + A, Ctrl + R | A for Add and R for Reference | N |
| Code Related | ||||
| Comment out code | Edit.CommentSelection | Ctrl + K, Ctrl + C | Y | |
| Comment in code | Edit.UncommentSelection | Ctrl + K, Ctrl + U | Y | |
| Collapse all methods | Edit.CollapsetoDefinitions | Ctrl + M, Ctrl + O | Y | |
| Collapse all code | Edit.ToggleAllOutlining | Ctrl + M, Ctrl + L | Y | |
| Uncollapse all code | Edit.StopOutlining | Ctrl + M, Ctrl + P | Y | |
| Rename all | Refactor.Rename | Ctrl + R, Ctrl + R | Y | |
| Fix all code alignment | Edit.FormatDocument | Ctrl + K, Ctrl + D | Y | |
| Commenting template | /// the line above what you want to comment, then hit enter | Y | ||
| Navigational | ||||
| Go to Declaration | Edit.GoToDeclaration | F12 | Y | |
| Go to Implementation | Edit.GoToImplementation | Ctrl + F12 | Y | |
| Navigate To | ReSharper VS config default | Ctrl + T | Y | |
| Go to Solution Explorer | View.SolutionExplorer | Ctrl + S, Ctrl + E | S for Solution and E for Explorer | N |
| Go to Team Explorer | View.TfsTeamExplorer | Ctrl + T, Ctrl + E | T for Team and E for Explorer | N |
| Go to Test Explorer | TestExplorer.Show. TestExplorer | Ctrl + U, Ctrl + T | U for Unit and T for Tests | N |
| Previous page | View.NavigateBackward | Ctrl + – | Y | |
| Forward page | View.NavigateForward | Ctrl + Shift + – | Y |
How to export Visual Studio Shortcuts:
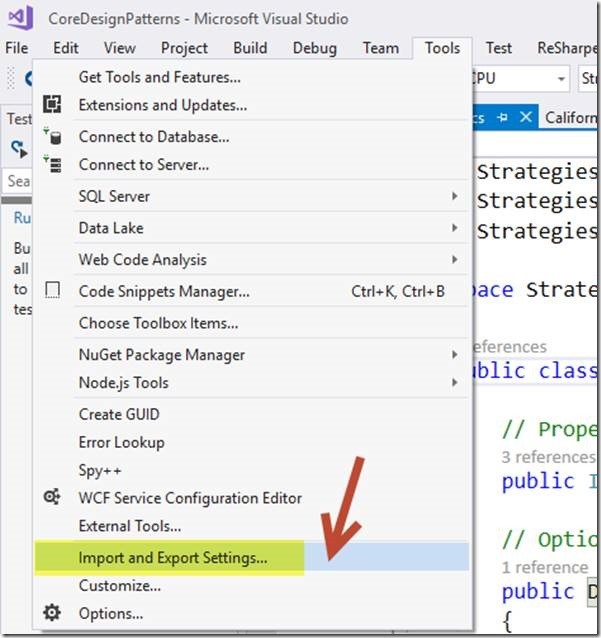
- Click Tools > Import and Export Settings ….
- On the popup, choose Export selected environment settings and hit Next >
- To choose only the keyboard settings, UNCHECK all settings, then go under options, go under environment, and then CHECK keyboard.

How to import Visual Studio Shortcuts:
- Go to the same menu from Tools > Import and Export Settings …
- Choose Import selected environment settings then hit Next >
- Select if you just want certain settings or all the settings, for Keyboard go to the same mapping as the screenshot above in the previous set of instructions.
- Choose the.vssettings file you want to import and where you want it stored.
- Hit Finish
How to set new classes to be public by default:
- Go to one of these locations, depending on which version of VS you own.
- VS2015: C:\Program Files (x86)\Microsoft Visual Studio 14.0\Common7\IDE\ItemTemplates\CSharp\Code\1033\Class
- VS2017(RC): C:\Program Files (x86)\Microsoft Visual Studio\2017\Enterprise\Common7\IDE\ItemTemplates\CSharp\Code\1033\Class
- Edit the template and add the public keyword before class. Add any other changes you would like to a default class or its usings.
Code Commenting Tool:
GhostDoc helps you with filling in as much of your comments as possible ahead of time so that you can go ahead and customize it a little bit more. It saves you time by putting in a default summary and all your parameters into plain English.
*Note Pro/Enterprise come with free spell checking ![]() !
!
GhostDoc Community (free) for VS2017: https://marketplace.visualstudio.com/items?itemName=sergeb.GhostDoc
GhostDoc Pro/Enterprise/Community for VS2015: https://submain.com/download/ghostdoc/pro/
Cost of Pro/Enterprise editions: https://submain.com/order.aspx
Features for different editions: https://submain.com/products/ghostdoc.aspx#features
4-minute kick-starter tutorial: https://submain.com/ghostdoc/GettingStarted/
Spelling Check Tool: ReSpeller (free!)
If you don’t get GhostDoc’s paid versions and you want free spelling tools you can get it from the folks at JetBrains who made ReSharper by downloading this:
https://resharper-plugins.jetbrains.com/packages/EtherealCode.ReSpeller/
0 comments