This post is provided by App Dev Manager Richard Newell who shares his experience building a spectator view rig for HoloLens.
We have been developing holographic apps for several clients and needed a way to allow participants to see what I was viewing using my HoloLens. Microsoft created a hack a few years ago and created a spectators view, the problem is that it covers different types of hardware and multiple setups. The other roadblock being that it was not maintained by the community. What I am doing is to simply the process and to have you up and running with your own spectator view in a couple of days.
Here are the scenarios that would benefit you with such a setup;
- Photo capture You can capture high resolution images of your holograms.
- Live demonstrations Spectator view is a preferred approach for live demonstrations as the camera position remains steady or controlled.
- Video capture You can capture video of your holograms.
First let’s talk about what you need for hardware: I went with the GoPro Hero Black using the Elgato USB game capture card. I found that it was the easiest to setup. You can use your laptop (Any computer will work if you are able to run the HoloLens Emulator ) .
Hardware List
- GoPro Hero Black (Any DSLR that supports 1080p streaming via HDMI will work but for us the GoPro works the best)
- Black CNC Aluminum Alloy Housing
- 1/4-20″ Nuts
- 1/4-20″ x 3/4″ Bolts
- 7/16 Nut Driver
- T7 Torx Screwdriver (Used to remove the headband on the spectator HoloLens)
- Horseshoe Fastener
- Micro HDMI to HDMI cable
- Elgato Game Capture Card
Required Software
- Software downloaded from the GitHub project for spectator view.
- OpenCV 3.1 For calibration or video capture.
- Game Capture SDK.
- Unity 2017.2.1f1 (Supported version for the newest release of the Mixed Reality Toolkit).
- Mixed Reality Toolkit
- Visual Studio 2017 with latest updates.
Next, we want to 3D print the bracket and adapter mount. I have provided the modified STL files to support the GoPro Hero Black Camera.
3D Printing the Rig
Please download the modified files to print the rig pictured above
You will need a printer with a printing bed 12x12x6 or larger I am using the SainSmart InstaRep 3D printer CR-10 and Cura 3.2.1. When printing please set the layer height at .1 and Infill to 50% using PLA. Once printed you want to connect the rig, mount the bracket together with a proxy using the ¼ screws to secure it.
If you do not have a 3D printer, you can open the STL files in 3D builder and order the parts.
Rig Assembly
Assembled spectator view rig with HoloLens and GoPro camera
- Use a T7 screwdriver to remove the headband from the HoloLens. Once the screws are loose, poke them out with a paperclip from the other side.
- Remove the screw cap on the inside front of the HoloLens visor with a small flat head screwdriver.
- Use a T15 screwdriver to remove the small torx bolts from the HoloLens bracket to remove the U and Hook-shaped attachments.
- Place the HoloLens on the bracket, lining up the exposed hole on the inside of the visor with the extrusion on the front of the bracket. The HoloLens’ arms should be kept in place by the pins on the bottom of the bracket.
- Reattach the U and Hook-shaped attachments to secure the HoloLens to the bracket.
- Attach the hotshoe fastener to the hotshoe of your camera.
- Attach the mount adapter to the hotshoe fastener.
- Rotate the adapter so the narrow side is facing forward and parallel to the camera’s lens.
- Secure the adapter in place with a 1/4″ nut using the 7/16 nut driver.
- Position the bracket against the adapter so the front of the HoloLens’ visor is as close as possible to the front of the camera’s lens.
- Attach the bracket with 4 1/4″ nuts and bolts using the 7/16 nut driver.
Camera Set-Up
- Change your camera to Video Mode so it outputs at the full 1920×1080 resolution rather than a cropped 3:4 photo resolution.
- Set output resolution to 1080p
- Turn off live view on screen display
Software Set-Up
Now that the rig is setup lets take a look at the software build and managing the HoloLens setup
Note: Make sure that the computer and HoloLens are on the same network with UDP enabled.
- Install Visual Studio 2017
Select the Universal Windows Platform development workload
Select the Game Development with Unity workload
You may deselect the Unity Editor optional component since you’ll be installing a newer version of Unity from the instructions below. - Install Unity without the standard assets make sure that the following are selected
![clip_image011[6] clip_image011[6]](data:image/png;base64,iVBORw0KGgoAAAANSUhEUgAAAngAAAHkAQMAAACXFcDcAAAAA1BMVEXW1taWrGEgAAAACXBIWXMAAA7EAAAOxAGVKw4bAAAAPElEQVR4nO3BgQAAAADDoPlTH+AKVQEAAAAAAAAAAAAAAAAAAAAAAAAAAAAAAAAAAAAAAAAAAAAAAADAG5dAAAEANgvDAAAAAElFTkSuQmCC)
Once Unity is installed you want to open the Spectator View example up in Unity but prior to doing so, delete the HoloTookKit folder under the Assets folder. Once the example is open go ahead and add the Mixed Reality Unity Package to the assets folder.
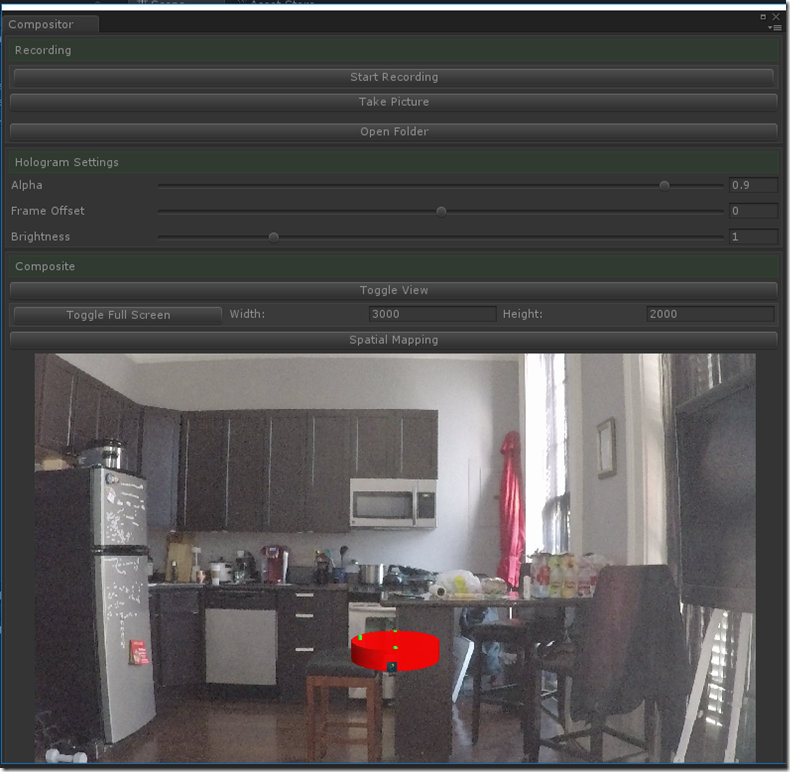
Let’s take a look at the compositor app
NOTE: The default capture card will be a blackmagic capture card, if using a different card, you will need to update Compositor\SharedHeaders\CompositorShared.h
USE_ELGATO is TRUE if using an Elgato card.
For the full setup please follow the directions given to calibrate the camera and the spectator rig (HoloLens)
When satisfied with your calibration, copy CalibrationData.txt to the “Assets” directory in your Unity project.
Next, you want to build the compositor app, please follow the directions given in the readme file on GitHub for the latest
NOTE: Ignore the DecLink capture card section if you are using the GoPro with the game capture card.
Run CopyDLL.cmd to get the Compositor binaries and dependencies into your Unity project. Remember to compile the Perception Helper DLL is compiled in x86 as this component will be deployed to the HoloLens.
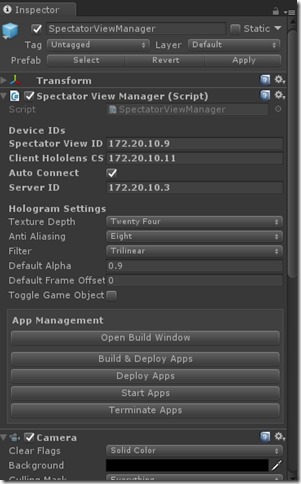
We should be ready to configure the Spectator Viewer Manager Scene in your project
Check that the Spectator View ID is the IP of the HoloLens attached to the camera, the server ID is the IP of the computer hosting Unity. And any additional HoloLens used in the presentation can be added to the Client HoloLens CS . Go ahead and Open the Build Window and build and Deploy the example to all your HoloLens. Start the App and open the Compositor App
You should see the following if everything has been set-up correctly
Take it for a spin in your next presentation I hope that this blog post helped you get set-up quickly and offered troubleshooting and updated instructions.
Premier Support for Developers provides strategic technology guidance, critical support coverage, and a range of essential services to help teams optimize development lifecycles and improve software quality. Contact your Application Development Manager (ADM) or email us to learn more about what we can do for you.

![clip_image002[6] clip_image002[6]](https://devblogs.microsoft.com/wp-content/uploads/sites/31/2019/04/clip_image0026_thumb1.jpg)
![clip_image004[6] clip_image004[6]](https://devblogs.microsoft.com/wp-content/uploads/sites/31/2019/04/clip_image0046_thumb1.jpg)
![clip_image006[6] clip_image006[6]](https://devblogs.microsoft.com/wp-content/uploads/sites/31/2019/04/clip_image0066_thumb.jpg)
![clip_image008[6] clip_image008[6]](https://devblogs.microsoft.com/wp-content/uploads/sites/31/2019/04/clip_image0086_thumb.jpg)
![clip_image009[6] clip_image009[6]](https://devblogs.microsoft.com/wp-content/uploads/sites/31/2019/04/clip_image0096.jpg)
![clip_image011[6] clip_image011[6]](https://devblogs.microsoft.com/wp-content/uploads/sites/31/2019/04/clip_image0116_thumb.jpg)


0 comments