Premier Developer Consultant Adel Ghabboun shares insights with developers looking to update dependencies on Recommendations API.
On February 15, 2018, “Recommendations API is no longer under active development” – as stated in the Recommendations API documentation.
Our product team came up with an alternative new open-source solution called Recommendations Solution Template, which will let you host the recommendation engine within your Azure subscription.
In this blog, will guide you through the steps of creating Recommendations engine, deploy and train your model. But first before doing that, let’s get to know the new additional components.
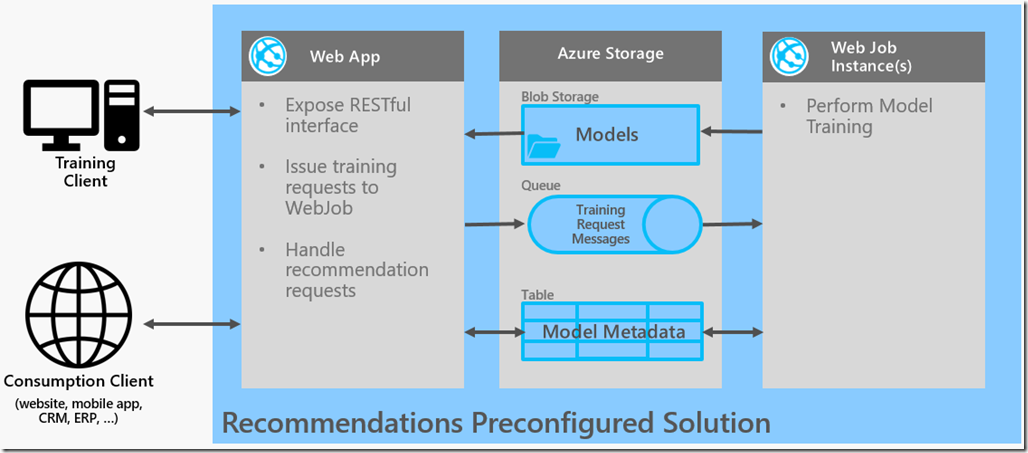
When deploying the Recommendations solution, will create a new Azure Resource Group with two main components:
- An Azure WebApp – It exposes a RESTFUL interface to allow you to train your recommendation model and query those models for product recommendations
- An Azure Storage – It stores models, model’s metadata and WebApp to WebJob communication.
Now, Let’s follow the below steps to build our Recommendations Solution:
- Deploy the Recommendations Solution Click Deploy to Azure to deploy the above resources in Azure Note: clicking on the above link, will redirect you to Azure, so you must have an active Azure subscription to create a custom deployment. The default parameters should suffice. If you wish to change them, you may go ahead and select a different value from the dropdown for the Account Type, Hosting Plan SKU, and the App Insights Location. We recommend leaving the Deploy Package Uri to its default value.
- Post Deployment
The recommendation solution has been deployed! You can use this service to train recommendation models and get product recommendations.
a. Go to your new resource group
b. On the left-hand menu, click on Deployments
 c. Then click on Outputs
 * The Admin Key can be used for all API operations, including model creation and deletion. The Recommender Key can only be used to get recommendations. This is the key you would use on the client or website requesting recommendations.
* Once all the resources have been deployed, you will be provided two keys (adminKey and recommendKey) that can be used to access a newly create RESTful endpoint that you can use to train models, and get product recommendations from those models. Take note of those keys, as you will need them later on.
* The adminKey is the key that can be used for all API operations and gives full error stack on any internal errors, the recommendKey can only be used to get recommendations, so this is the key you would use on the client or website requesting recommendations.Note – Those keys can also be found in the Azure Portal, as Application Settings for the newly create AppService.
 - Collect Data to train your model The solution allows you to create recommendations models by learning from your past transactions. To train a model you will need to provide two pieces of information: a catalog file, and usage data. The catalog schema and usage events schema could be found in the API reference.You can also checkout and use the sample data for next task
- Uploading Catalog and Usage data to a Blob container When you train a model (Next Step), you need to provide the relative paths of the catalog file and usage folder (or file) needed for training.There are multiple ways of creating Azure blob containers (and uploading files to it). One popular option is using Microsoft Azure Storage Explorer. Alternatively, you could create containers and upload files directly from the Azure portal, although the experience may be less comfortable. I. Create a Storage container – To host the Usage and Catalog files II. Upload a Usage Events File(s) III. Upload a Catalog file (Optional) – If you choose to use a catalog file, the file will need to be uploaded to any place under the container created in the previous step
- Train your Recommendations Model Now that you have your data in the blob container, we can train the model!After deploying the service, you will be able to navigate to its API Reference (Swagger definition) at https://<service_name>.azurewebsites.net/swagger/ .Note that you will get the URL upon deploying your service.To train the model, we will call the POST /api/models API to create a new model. See full API spec and examples in the train a new model API reference.
- Wait for Model training completion
- Getting RecommendationsIf you want to get item-to-item recommendations, you can perform a simple GET request like described in the one below:
GET https://<service_name>.azurewebsites.net/api/models/e16198c0-3a72-4f4d-b8ab-e4c07c9bccdb/recommend?itemId=70322

x-api-key: your_api_key

Content-Type: application/json
[{
     "recommendedItemId": "46846",
     "score": 0.45787626504898071
},
{
     "recommendedItemId": "46845",
     "score": 0.12505614757537842
},
...
{
     "recommendedItemId": "41607",
     "score": 0.049780447036027908
}]
References: – API Reference , Model Evaluation, Benchmarks, Troubleshooting, Service Architecture, Sar Algorithm


0 comments