
In this post, Senior Application Development Manager, Chris Tjoumas builds a simple but powerful photo album using .NET Core, Azure Storage, and WebJobs.
Introduction
If you’ve ever wanted to create a simple photo application to display an album of photos for each page, Azure Storage is a great technology to use. It is actually the storage foundation for Azure Virtual machines (and just about everything else), so it’s built to handle load from complex analytics to storage of simple data. It’s highly scalable and allocates the appropriate resources to keep up with demand, if that ever becomes an issue with your ever popular photo album.
To get started, you’ll need to choose which Azure Storage type you want to use. In the case of photo storage, you’ll likely want to use Azure Blob Storage, which acts like file storage in the cloud. Blob storage stores unstructured data such as documents, images, videos, application installers, etc. There are three “types” of blob storage which include: block blobs, append blobs, and page blobs. You’ll need to create a storage account to host the Blobs. For images, you would want to use block blobs, which is built to handle large blobs (each block blob can be up to 4.75 TB in size). Page blobs are used to store things such as disks for VMs – disks used by Azure VMs are backed by page blobs. Append blobs are used for modifying (appending) blobs by adding to the block. You can read more about the types of blobs here.
Finally, to organize your data, you would want to create a container within your storage account. A storage account can contain any number of containers, and a container can contain any number of blobs, up to 500 TB capacity limit of the storage account. It is best practice to create a container for a specific purpose – such as “photos”.
You may be asking, “if I have one container for my photos, can I store them in a folder structure to organize them?” While containers only store blobs and there isn’t a “folder structure” per se, you can create a hierarchy by prepending path names. This short blog post highlights the structure of accessing your blobs through the Blob Service REST API and shows how a hierarchy can be created. The major takeaway is to not use additional containers to do that – you’d keep your one container, but add “folders” in there for each blob.
Setting up storage account
So, let’s get started. The first thing you’ll want to do is to create your Storage Account. When choosing the “Account kind”, you can choose either option. The General purpose will allow you to create any type of storage (blobs, files, tables, and queues) in a single account while the “Blob storage” is just for blobs, but allows you to choose the tier (Cool or Hot) based on access frequency.
Once the storage account is created, you’ll create your containers. Because we don’t want to display full size images on each page that loads, we will scale the images and display those instead for better performance. You can then use any method you like to allow for clicking of an image on the page to display the full image. To set this up, we’ll need two containers: one for full size images and one for the respective scaled images.
Once the two containers are created, you have everything you need to start wiring things up. You’ll need to remember the storage account name, the container names, and the account key. If you ever forget these things, you can easily find them within the Azure Portal. The Overview section will have the storage account name and blob containers, while the Access keys section will have your primary and secondary keys
Configuration
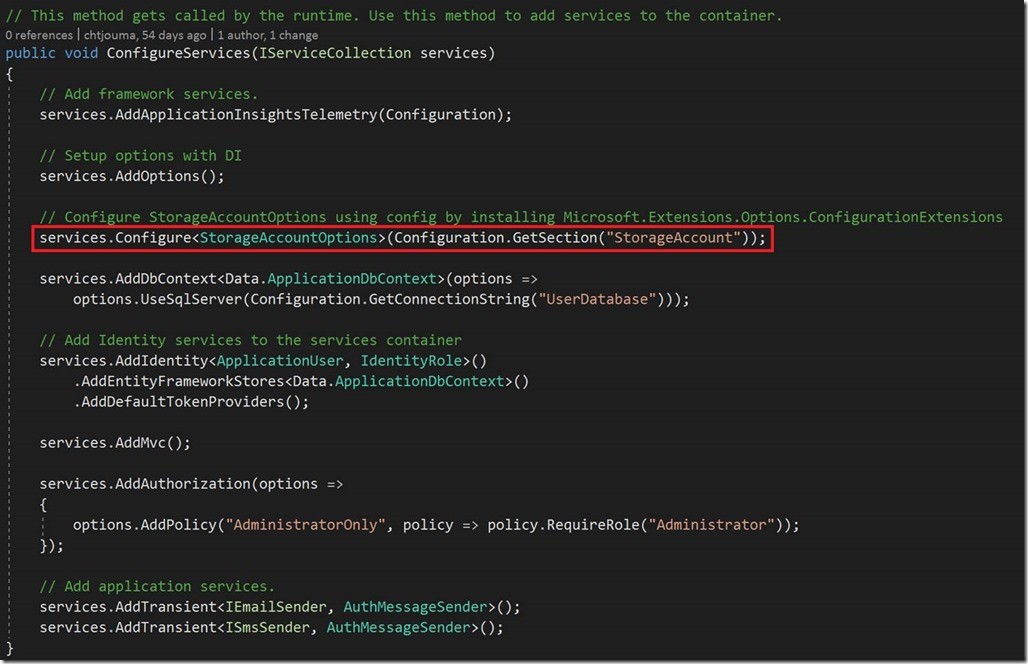
Before jumping into coding our solution, we first need to setup the configuration in order to easily access the storage account items within your code. Using the Configuration API, you can read values at runtime, allowing you to read our storage account values in the configuration settings (appsettings.json). This article provides a great intro on how to set this up. You will first use the JSON configuration provider in the Startup.cs constructor as discussed in the article.
To setup the configuration values, reference the values you captured when creating your storage account and containers in the “Setting up storage account” section earlier. In your appsettings.json file, include the following section:

Then you will use the Options Pattern by creating an options model for the storage account settings:

As discussed in the above article, the StorageAccountOptions class is added to the service container and bound to configuration.
In the controller, you then use dependency injection on IOptions<TOptions> to access the settings. This is stored as a member variable which can be used throughout the controller for ease of access:

We’re now ready to create our logic to insert images to Blob storage!
Creating a utility to interact with Blob storage
As seen in the previous section, the home controller’s constructor creates the BlobUtility which can be used throughout the controller. This will encapsulate actions such as retrieving a list of blobs and blob directories, and uploading blobs.
The BlobUtility constructor takes the account name and key, pulled from the Options configuration, making it easy to simply update the appsettings.json if the key changes or if you decide to use another storage account. Because in this case we’re only using blob storage, the constructor connects to the storage account and creates a CloudBlobClient object which has access to the containers and blobs in the storage account.

Now that the controller has a handle to the blob utility, your different actions on your page can then use the utility for various operations. As an example, I built my page to display house pictures taken from various dates throughout the construction phase. So, if you read the blog on how to create your hierarchy within your container, it will make sense that I’ve stored my blobs as <date>/<image name>.JPG. I can then implement simple operations using the CloudBlobClient to retrieve my blobs and handle them as I see fit. But first, we need a way to get the blobs in the containers.
Uploading Blobs
At the beginning of this post, I mentioned there would be two containers: one for the full images and one for scaled images. It would be pretty tedious to always have to scale an image and upload the original, full size image and the scaled image. So how can I make this more of an automatic process? Sure, you could put the images you’re uploading into a queue and write a worker role to read from the queue, scale and upload the images, then delete the message upon successful completion, but there is a bit of code and maintenance involved. Introducing Azure WebJobs. What are WebJobs? Simply put, they enable you to run scripts or programs in the background and are scaled as part of Azure. Read more about it here and also take a look at this blog post for a bit more information.
So how does a WebJob work? It’s pretty simple actually. You set up a trigger on your container so when something is uploaded, your function is called. Since you will want this process to always monitor the container for uploads, when you create your WebJob you will schedule it as a continuously running task. When you run through the process of creating your WebJob, it will stub out a Functions class where you will create your trigger. As an example:

This is saying, when a blob of {name} is uploaded to the images container, run some logic (SquishImage, which does what you’d think – squishes the image input stream to a smaller scale and saves it to the output stream) and put that into the scaledimages container with the same {name}. You can put anything you want in the new name, but I chose to leave it the same so when a scaled image is clicked on in my page, I know the respective unscaled version is in the other container with the same blob name.
Now we have a WebJob setup for when an image is uploaded, so now let’s upload an image. It’s actually pretty simple. Assuming you use a form to upload the image, you’ll pass an IFormFile to the upload task in your controller along with the directory from the text field of the file selector.


Display images
Now that we have a way to upload images and get them into a scaled and full version format, we can display the scaled images as thumbnails on a page. Then, all that’s left is getting a list of the images from your container to be displayed. So, in your Index action, you’ll retrieve a list using the blob utility:
The one caveat is we have hierarchies, so you’ll need to see if you are looking at a CloudBlobDirectory or a CloudBlockBlob. Even though there are not truly directories, it will read your <date> part of the <date>/<image name>.JPG as a CloudBlobDirectory. In your cshtml file, you’d make a simple check if it’s a CloudBlobDirectory:
![]()
Or a CloudBlockBlob
![]()
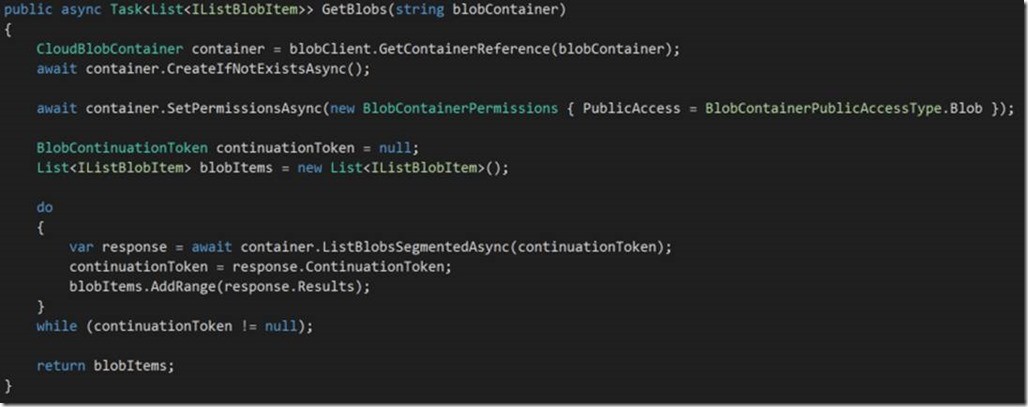
If you determine it’s a CloudBlockBlob, that means you have the image to display, so you would simply display the image using an <img> tag with the source being the items URL. However, if it’s a CloudBlobDirectory, there’s a little more work that needs to be done. Luckily, the SDK makes this pretty easy – you simply need to grab all blobs in that directory. What I did was make a ListDirectoryBlobs action in my controller and in my Index.cshtml, I create an ActionLink which displays the directory name from the CloudBlobDirectory object and clicking that link will pass that directory name to my ListDirectoryBlobs. From there, I can use the BlobUtility to get a list of blobs in that directory. The CloudBlobContainer class you’ve been using allows you to get a reference to that directory:

Then you would use the ListBlobsSegmentedAsync method to initiate an asynchronous operation to return a result segment containing the blob items with this directory name. These blob items would then be passed back to the view and the same logic would execute in either displaying the image (if it’s a CloudBlockBlob) or a link to the directory (if it’s a CloudBlobDirectory).


So that’s it. It’s short and sweet and quick and dirty. This obviously isn’t anything super pretty, but it gets the concept across on how to use Azure Blob Storage to create a photo album, along with some powerful concepts such as WebJobs and how they work. From here, you can put your artistic touch on the front end and add a bit more complexity to make a more robust album.
Premier Support for Developers provides strategic technology guidance, critical support coverage, and a range of essential services to help teams optimize development lifecycles and improve software quality. Contact your Application Development Manager (ADM) or email us to learn more about what we can do for you.
0 comments