
One of the frequently requested MFC features (and by the way, thanks for the feedback and keep it coming!) is the ability to intelligently resize dialogs and their content at runtime.
One approach is to intercept WM_SIZE message of the parent dialog and recalculate the size and position of the child controls accordingly. It works, but is extremely error prone – just imagine doing this for each control in every dialog in your application. It also introduces non-trivial logic in the presentation layer of you application, creating maintenance headaches down the road.
In Visual Studio 2015 RC, we’re introducing a consistent approach to managing the layout of the dialog at runtime – we call it Dynamic Dialog Layout.
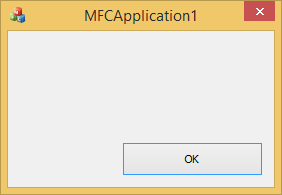
Let’s start with an example that shows what this feature is for. Imagine a dialog with a single button (don’t worry, I’ll get to more realistic examples soon):
If we make this dialog resizable, the user will be able to stretch the window, resulting in something like this:
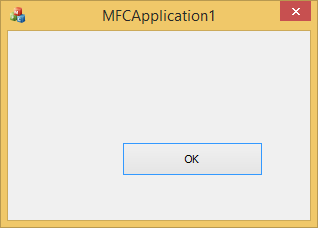
This is not useful at all. For resize to be meaningful, we need to find a better location for that button, and maybe resize it as well. A simple and sensible approach would be to let the button “stick” to the bottom right corner of the dialog. Put another way, as the parent window is resized by X dialog units horizontally and Y units vertically, we want the button to move right and down by the same amount.
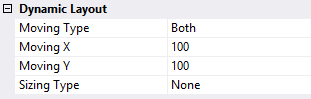
Let’s go ahead and implement this. Open the Properties window in the resource editor and click on the OK button in the dialog. You will see a new property set called “Dynamic Layout”:

Now change the “Moving Type” to “Both” and set “Moving X” and “Moving Y” to 100 (remember, we want the button to move both right and down as the host dialog resizes):
We’re not going to change the ‘Sizing Type” just yet – I’ll get to that in a minute.
Now save and recompile. Run the application and stretch the dialog. Voila:

That’s a lot more useful, isn’t it?
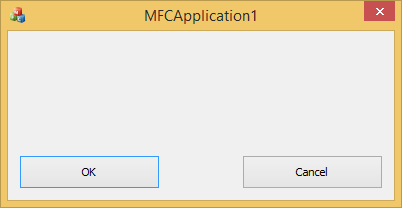
Let’s make it more realistic and add another button, “Cancel”:

We now need to decide how we want the buttons to behave when the host dialog is resized. The simplest way is to let the “OK” button stick to the bottom left corner, and have the “Cancel” button stick to the bottom right corner. We will set the Dynamic Layout for “OK” to “Moving Type = Vertical”, “Moving Y = 100”. The “Cancel” button will have “Vertical, 100, 100” (just like the “OK” button in the last example).
Save, compile, run and resize:
Not bad, huh?
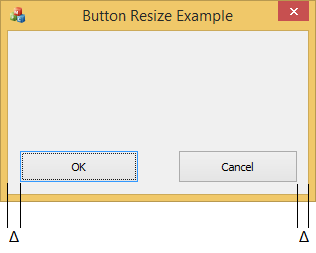
Now, let’s experiment with the “Sizing Type” property. In my next example, I want my buttons to scale proportionately to the size of the dialog. We’ll be doing some math here, so to make it simpler I created a new dialog sized 200×100 dialog units. Each of the buttons will have width set to 80 units (the height is immaterial for this example).
I want the buttons to grow and shrink with the dialog, always maintaining the original proportion – which is 80/200 or 40% of the width of the dialog. Also, I want to maintain constant space between each button and the edge of the dialog, let’s call that Δ:
How do I express that using the Dynamic Layout settings?
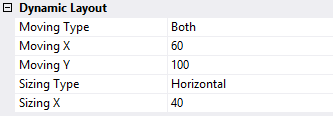
Let’s start with the “OK” button. As far as its movement goes, it will continue to move vertically 100% so it remains anchored to the bottom edge. I also want it to resize dynamically as the host dialog is resized. The button occupies 40% of the width of the dialog, which means that each time the parent dialog’s width grows by 100 units, I want the “OK” button to grow by 40 units. This is how to express it using the Dynamic Layout properties:

The “Cancel” button requires a little bit more work. As the parent dialog grows, this button is going to move both horizontally and vertically. The vertical movement is easy – I want the button to stick to the bottom edge, so that’s 100%. Next, I’m going to copy the “Sizing X” property from the “OK” button – it just makes sense that the two buttons should maintain the same growth ratio, this way they will always have the same size, regardless of the size of the host dialog.
Now, let’s calculate the “Moving X” property. I said we’ll be doing some math here, so here goes. When the dialog’s width grows by 100 units from 200 to 300, the width of each grows accordingly, 80*300/200 = 120. The original X position of the “Cancel” button was 200- Δ-80 = 120- Δ. After the dialog’s width has grown by 100 units, the new X position of the “Cancel” button will be 300- Δ-120 = 180- Δ.
With me so far? Good. As we just determined, the position of the “Cancel” button moves from 120- Δ to 180- Δ, i.e. by 60 units. And that’s our answer – the X position grows by 60% of the growth of the dialog’s width.
There are other ways to calculate this, and sometimes you will need a napkin or a back of an envelope (especially for complex layouts where multiple controls act as a group). A useful mental model I developed is by asking “if the width (height) of the dialog grows by 100 units, by how much should I grow or move the control?”
Here is the full set of Dynamic Layout properties for the “Cancel” button:
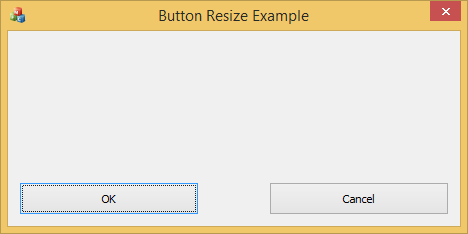
And here is our resized dialog in all its beauty:
Admittedly, resizing buttons is not very interesting – it does make them easier to hit with the mouse but that’s about it. Resize becomes really useful for controls with non-trivial content, such as the list box, tree control etc.
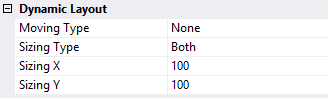
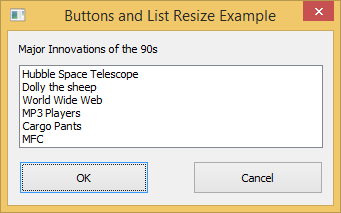
To make this even more useful, I’m going to add a list box to our dialog:
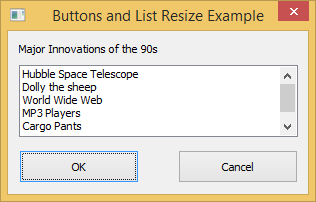
I’m leaving the button properties unchanged. The list box will grow horizontally and vertically with the host dialog, and remain attached to the upper left corner (i.e. not move):
And here is the resized dialog:
All the functionality I described here is of course available programmatically – Dynamic Dialog Layout APIs have been added to MFC. Additionally, and especially if you’re not a mouse-and-click kind of developer, you can edit the Dynamic Dialog Layout properties directly in the RC file. We will document this on MSDN, of course, and I’m not going to describe this here, in order to keep this post short.
As always, we’re interested in your comments. This feature is still a little rough around the edges, so your timely feedback will allow us to address any omissions in the RTM release.
The sample app used in this post is attached below.
What is the correct term or name, for the area of a dialog box, for giving users the option of resizing or stretching the dialog box during runtime, where the mouse pointer (usually an arrow pointing up and left) to change into the "left and right arrows" pointer? Is that called the Horizontal Resize pointer? What is the name for the AREA where the horizontal resize pointer is programmed to appear?
I need to be able to correctly describe the issue I'm having with ONE programmer's product, when the dialog box appears and I want to stretch it, but cannot,...