
This is the first in a ten-part blog series where we’ll demonstrate principles of the Cybersecurity Maturity Model Certification (CMMC) aligned with Microsoft Azure. Subsequent blogs in the series will delve into audit & accountability maturity, asset & configuration management, identification & authentication, incident response, maintenance & media protection, recovery & risk management, security assessment & risk management, system & communications protection and system & information integrity. In this first blog of the series we will explore how to leverage Microsoft Azure for access control management.
Please note that the information cutoff date for this post is October 2020 and that as of the date of this writing, CMMC developments and guidance are in progress. Additionally, as of the date of this writing, the CMMC Accreditation Body (CMMC AB) has not identified nor certified any third-party assessors, nor issued prescriptive guidance on the formal assessment process and criteria. As a result, the information herein, including our CMMC related offerings, may be enhanced to align with future guidance from the DoD and CMMC AB. Microsoft is closely tracking developments related to the CMMC.
What is Cybersecurity Maturity Model Certification (CMMC)?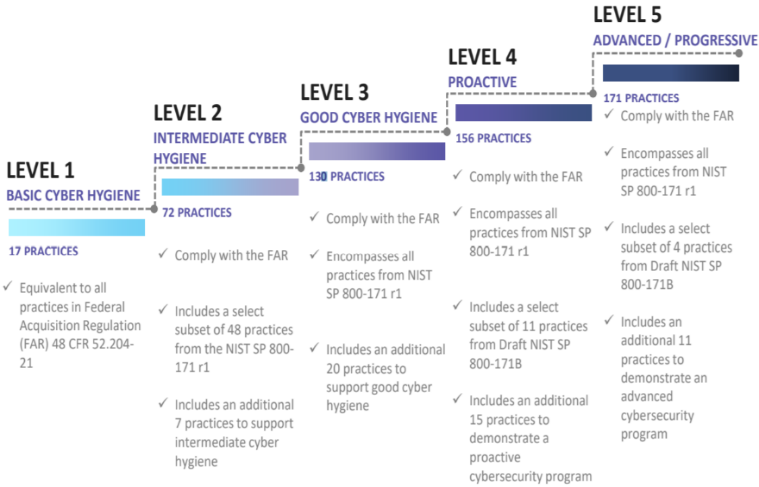
The Defense Industrial Base (DIB) is charged with implementing Defense Federal Acquisition Regulation Supplement (DFARS) 252.204-7012. DFARS requires organizations supporting the Department of Defense (DoD) to implement NIST SP 800-171 and FedRAMP Moderate Impact level controls. DoD has mandated CMMC with periodic assessments in order to strengthen cybersecurity across the DIB. CMMC builds upon DFARS 7012 by verifying an organization’s readiness to protect Federal Contract Information (FCI) and Controlled Unclassified Information (CUI) such as International Traffic in Arms Regulation (ITAR) and Export Administration Regulations (EAR) export-controlled data.
CMMC extends beyond the parent organization into sub-contractors, partners, and suppliers. The framework is intended to enforce critical thinking approaches for comprehensive security. The CMMC framework specifies 5 levels of maturity measurement from Maturity Level 1 (Basic Cyber Hygiene) to Maturity Level 5 (Proactive & Advanced Cyber Practice). The Certification levels will be determined through audits from independent, third-party assessment organizations (C3PAO).
What preparation is required for CMMC alignment to access control management?
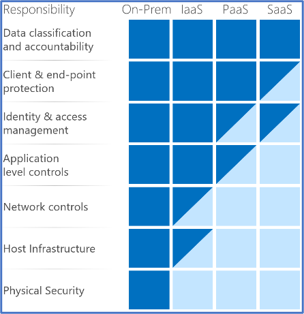
It’s important to understand that compliance is a shared responsibility between the customer and the Cloud Services Provider (CSP). The graphic on the left demonstrates the CSP responsibility in respective cloud models (On-Prem, IaaS, PaaS, SaaS) with dark blue aligning with customer responsibility and light blue aligning with CSP responsibility. For example, CMMC requirements such as Physical Protection (PE) for limiting physical access (C028) is managed by the CSP. Establishment of respective policies and procedures are the customer’s responsibility. It’s important to note that this blog series is aligned with setting the foundation of controls for CMMC Maturity Levels 1 & 2. Once C3PAOs are identified by the CMMC Accreditation Body, customers are advised to work with their respective C3PAO for guidance on comprehensive alignment of controls, audit and certification.
Customer Policy Responsibilities
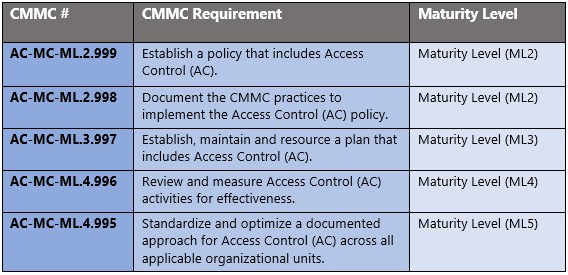
The administrative controls for the CMMC Access Control Maturity Capability (AC-MC) are listed here. These controls fall within the customer’s responsibility. This starts with establishing a policy that includes access control (ML1) and progresses to reviewing and measuring access control activities for effectiveness (ML5). These controls should be formally created, documented in the System Security Plan (SSP) and implemented within the organization.
Microsoft Azure Security Controls Aligned to CMMC: Access Control
Azure Security Controls Aligned to CMMC: Access Control
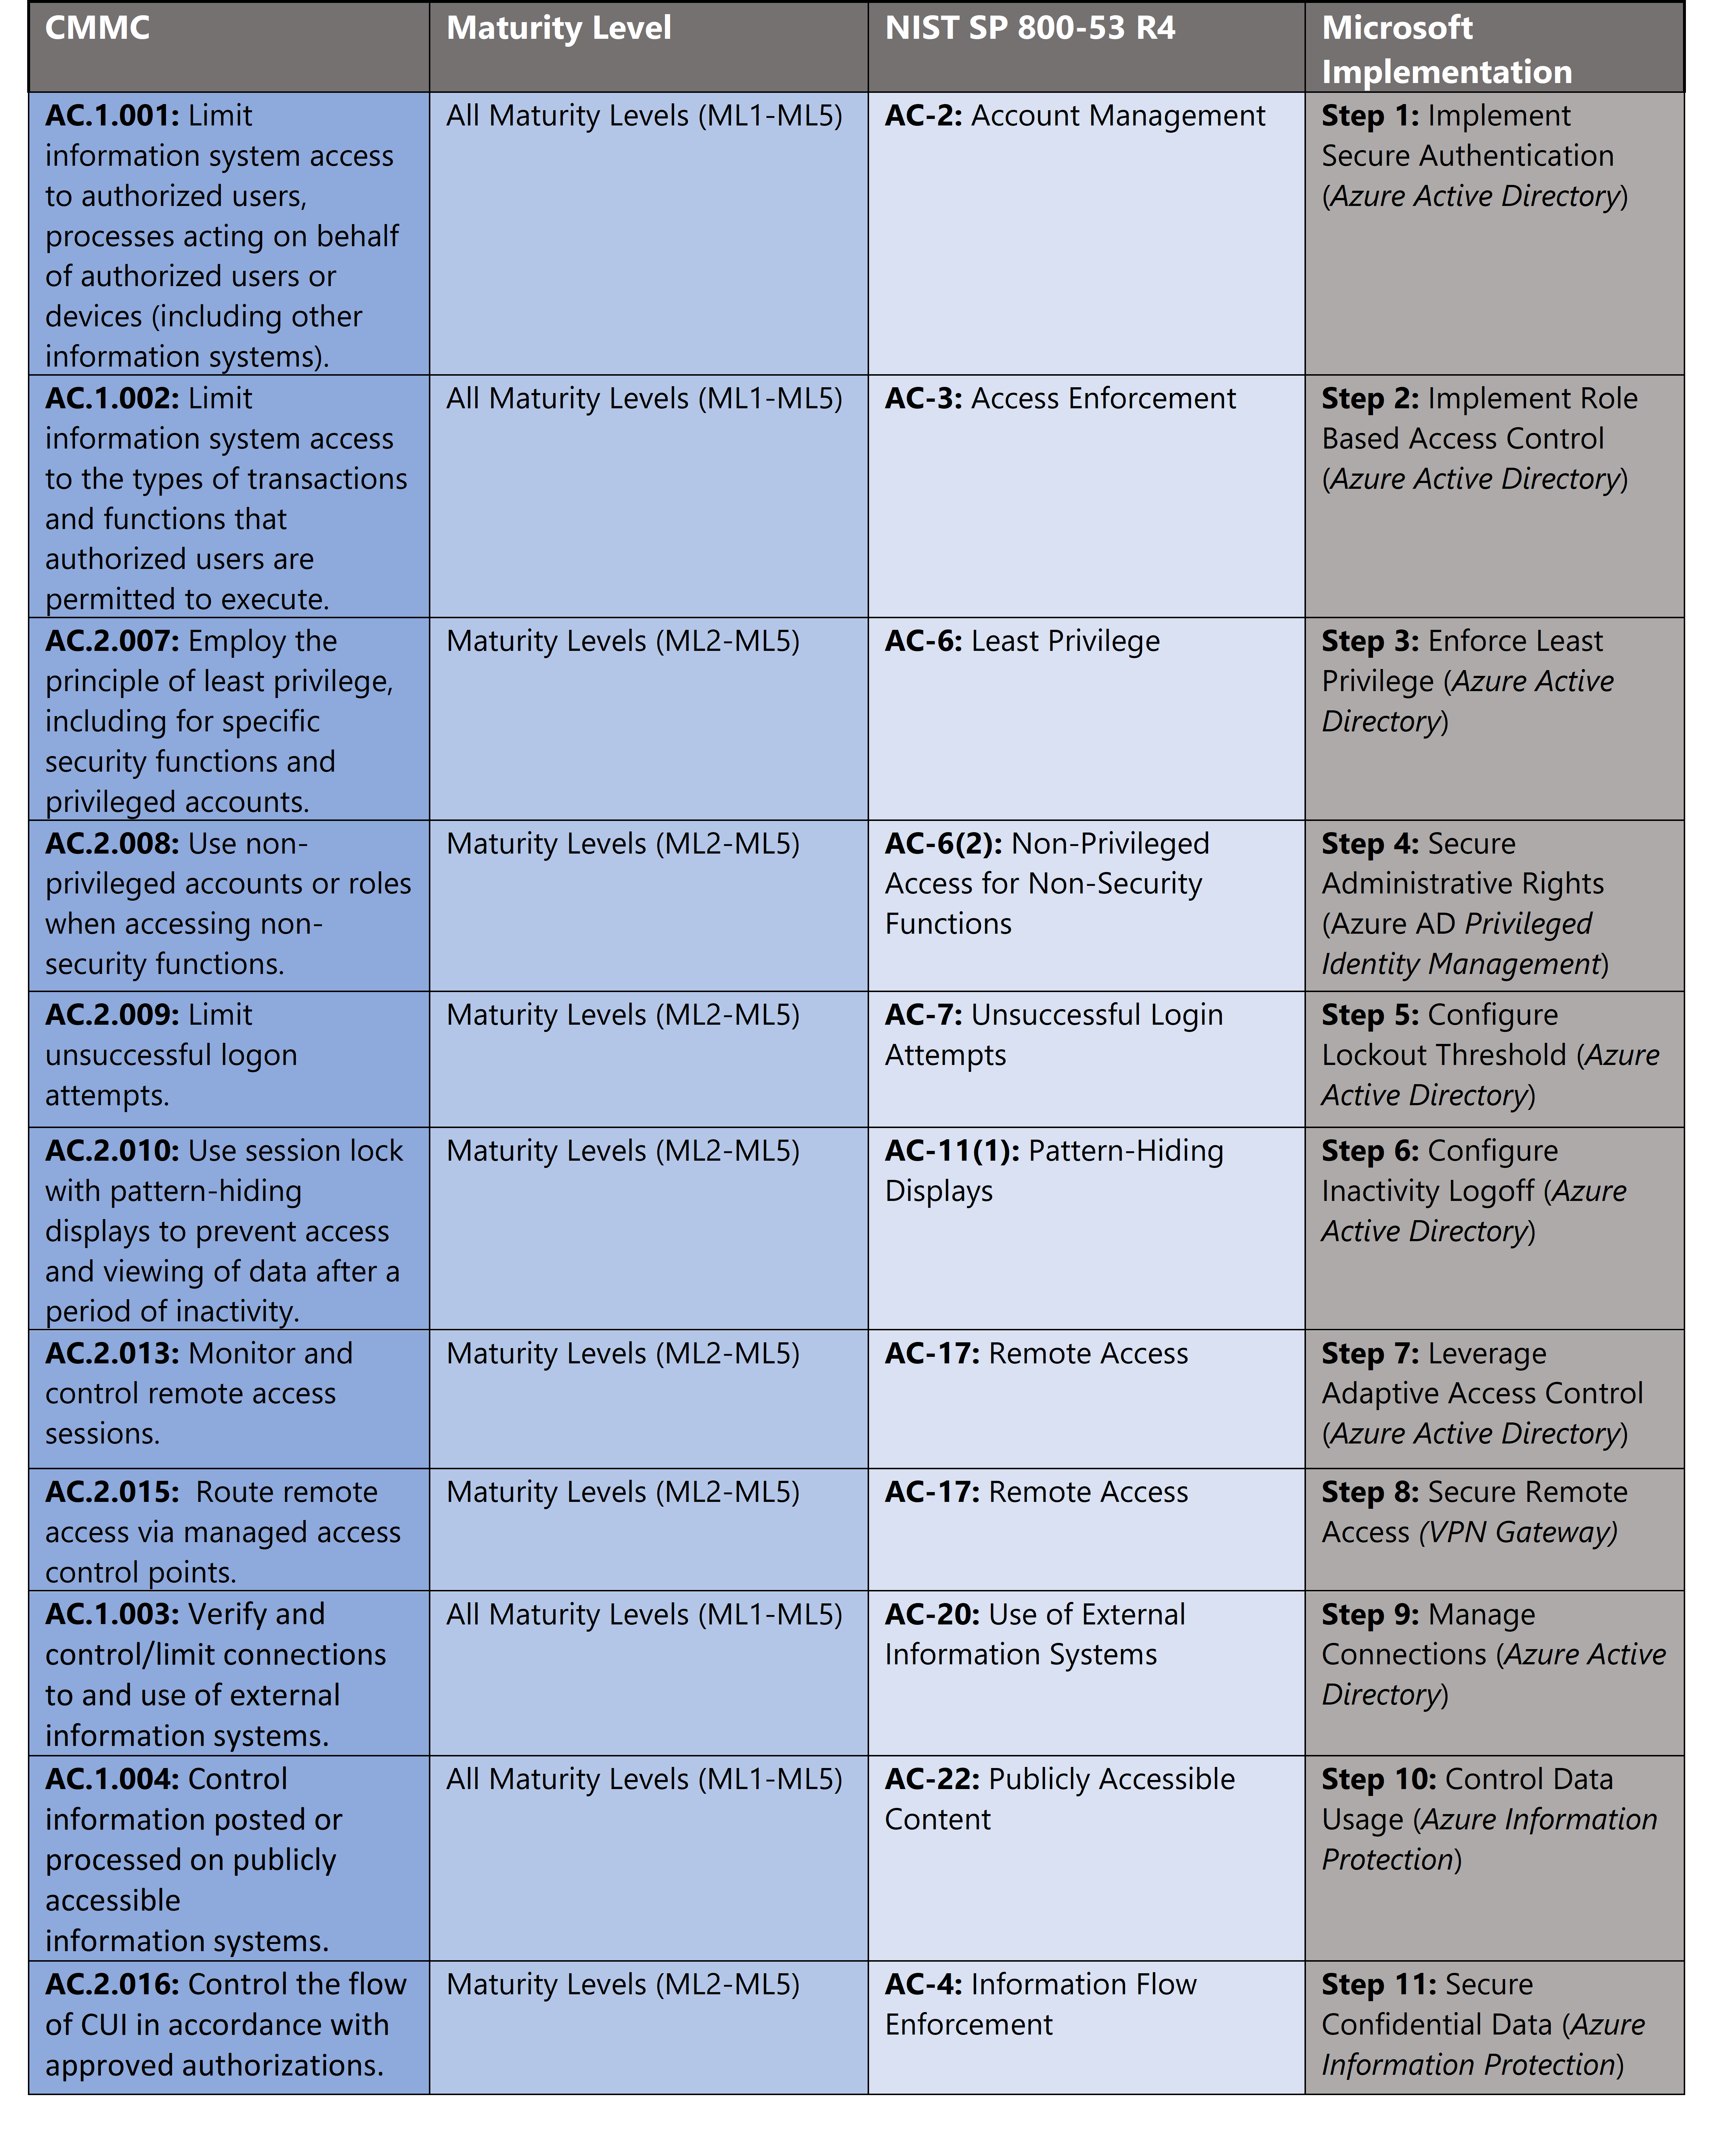
Microsoft Azure Government has developed an 11-step process to facilitate access control with the security principles within CMMC, NIST SP 800-53 R4 and NIST SP 800-171 standards. Note this process is a starting point, as CMMC requires alignment of people, processes, policy and technology so refer to organizational requirements and respective standards for implementation. Azure has several offerings to facilitate access control including Azure Active Directory, Azure AD Privileged Identity Management, Azure Firewall, Azure Policy, Azure Information Protection and VPN Gateway.
- Azure Active Directory is an identity and access management-as-a-service (IDaaS) solution that combines single-on capabilities to any cloud and on-premises application with advanced protection and conditional access controls.
- Azure AD Privileged Identity Management is a service that enables you to manage, control, and monitor access to important resources in your organization. These resources include resources in Azure AD, Azure, and other Microsoft Online Services like Office 365 or Microsoft Intune.
- Azure Firewall is a managed, cloud-based network security service that protects your Azure Virtual Network resources. It’s a fully stateful firewall as a service with built-in high availability and unrestricted cloud scalability.
- Azure Policy helps you manage and prevent IT issues with policy definitions that enforce rules and effects for your resources.
- Azure Information Protection helps secure email, documents, and sensitive data that you share outside your company.
- VPN Gateway is a specific type of virtual network gateway that is used to send encrypted traffic between an Azure virtual network and an on-premises location over the public Internet.
11 Steps to CMMC for Access Control with Microsoft Azure

1) Implement Secure Authentication
Weak authentication is another concern in supply chain risk management. Software generally ships with default credentials, but sometimes hard-coded default credentials are exposed in the code. Azure Active Directory provides the capabilities to set granular authentication controls for users, applications and services. Azure Active Directory provides administrators the flexibility to apply granular user authentication per their requirements. As an administrator, choosing authentication methods for Azure Multi-Factor Authentication and self-service password reset (SSPR) it is recommended that you require users to register multiple authentication methods. When an authentication method is not available for a user, they can choose to authenticate with another method. Authentication methods include password, security questions, email address, Microsoft Authenticator app, OATH Hardware token, SMS, Voice call, and App passwords. For more information, see Authentication methods.
2) Implement Role Based Access Control
Access management for cloud resources is a critical function for any organization that is using the cloud. Role-based access control (RBAC) helps you manage who has access to Azure resources, what they can do with those resources, and what areas they have access to. Using RBAC, you can segregate duties within your team and grant only the amount of access to users that they need to perform their jobs. Instead of giving everybody unrestricted permissions in your Azure subscription or resources, you can allow only certain actions at a particular scope.
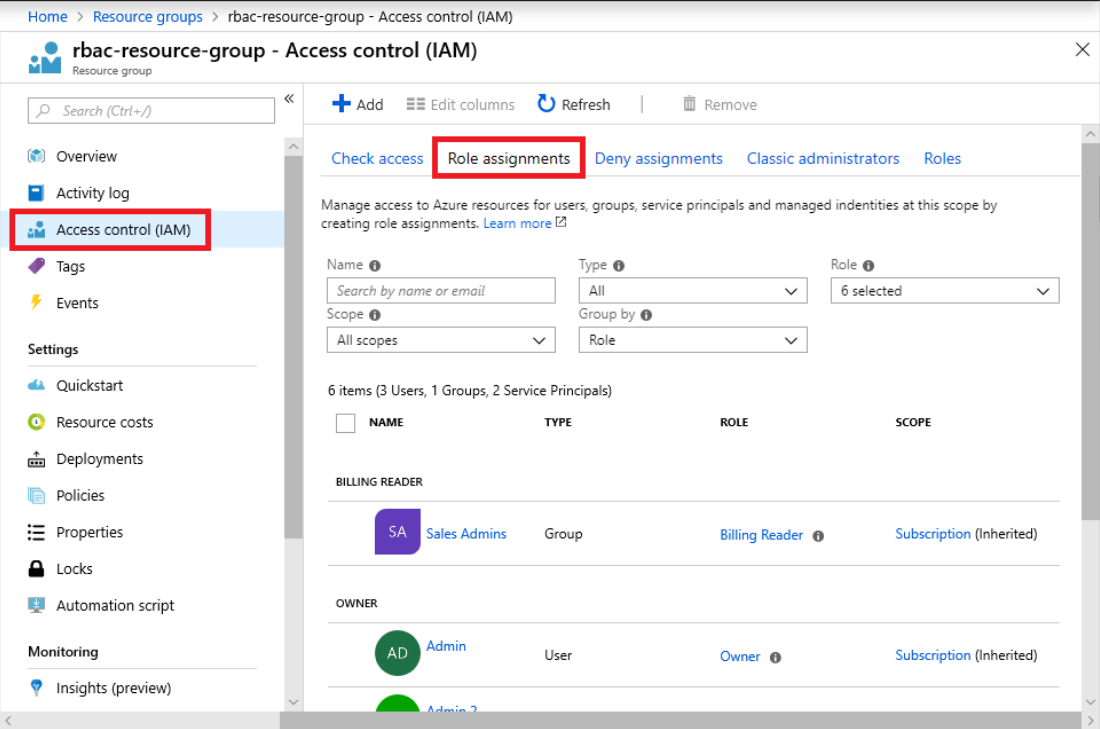
When planning your access control strategy, it’s a best practice to grant users the least privilege to get their work done. The following diagram shows a suggested pattern for using RBAC. In RBAC, to grant access, you create a role assignment via the steps below. For more information, see Grant a user access to Azure resources using RBAC.
- Sign into the Azure Portal as a Global Administrator for the organization.
- In the list of Resource groups, click the new rbac-resource-group resource group.
- Click Access control (IAM).
- Click the Role assignments tab to see the current list of role assignments.

- Click Add > Add role assignment to open the Add role assignment pane.
- In the Role drop-down list, select Virtual Machine Contributor.
- In the Select list, select yourself or another user.
- Click Save to create the role assignment.
3) Enforce Least Privilege
Access management for cloud resources is critical for any organization that uses the cloud. Role-based access control (RBAC) helps you manage who has access to Azure resources, what they can do with those resources, and what areas they have access to. Designating groups or individual roles responsible for specific functions in Azure helps avoid confusion that can lead to human and automation errors that create security risks. Restricting access based on the need to know and least privilege security principles is imperative for organizations that want to enforce security policies for data access.
Your security team needs visibility into your Azure resources to assess and remediate risk. If the security team has operational responsibilities, they need additional permissions to do their jobs. You can use RBAC to assign permissions to users, groups, and applications at a certain scope. The scope of a role assignment can be a subscription, a resource group, or a single resource.
Best practice: Segregate duties within your team and grant only the amount of access to users that they need to perform their jobs. Instead of giving everybody unrestricted permissions in your Azure subscription or resources, allow only certain actions in scope. Use built-in RBAC roles in Azure to assign privileges to users. For more information, see Azure Identity Management and access control security best practices.
You can also enforce and manage least privilege via review of user privileges. Using the Azure portal, you can review who has access to Azure resources and their permissions. This configuration assigns an Azure Policy definition that helps you monitor virtual machines where an application whitelist is recommended but has not yet been configured:
- A maximum of 3 owners should be designated for your subscription
- Audit Windows VMs in which the Administrators group contains any of the specified members
- Audit Windows VMs in which the Administrators group does not contain all of the specified members
- Deploy requirements to audit Windows VMs in which the Administrators group contains any of the specified members
- Deploy requirements to audit Windows VMs in which the Administrators group does not contain all of the specified members
- There should be more than one owner assigned to your subscription
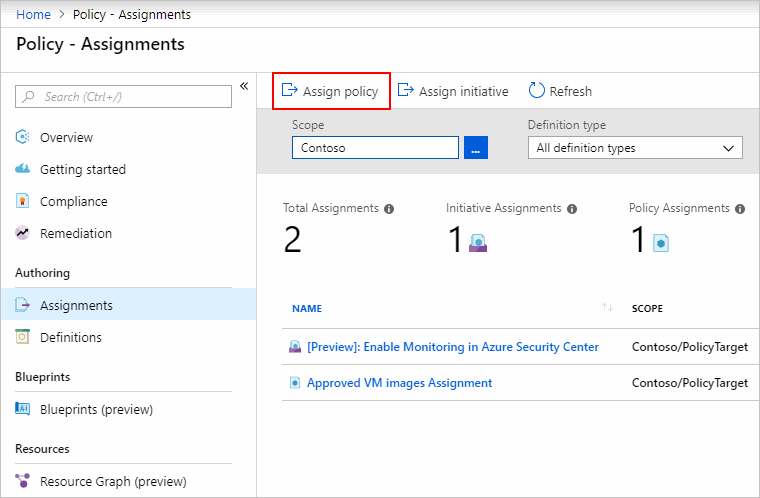
Azure Policy is highly versatile and can be created with the Azure portal, Azure CLI, Powershell and Azure Resource Manager (ARM) templates. Creating an Azure Policy in the portal is accomplished via the following steps:
- In the Policy portal, select Assignments
- Select Assign Policy from the top of the Policy – Assignments page.

- On the Assign Policy page, select the Scope by clicking the ellipsis and selecting either a management group or subscription.
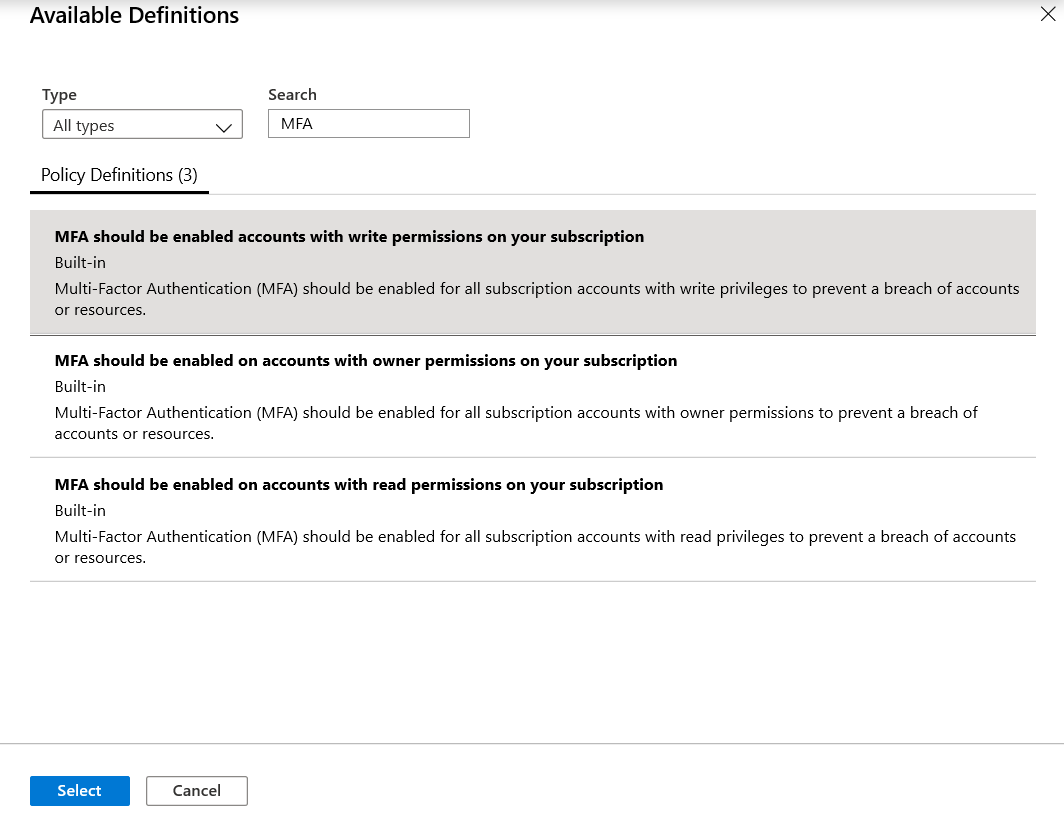
- Select the Policy definition ellipsis, search for the desired policy definition and click Select.

- Set an Assignment name, Description, and set Policy Enforcement to Enabled.
- Click Assign.
It’s important to note that Azure Policies can be active for automated enforcement or passive for auditing requirements. It is recommended to test all policies with the AuditIfNotExists effects prior to moving to automated policy enforcement with the DeployIfNotExists effect. For automated policy enforcement check Create a Managed Identity from the Assign Policy blade and set a DeployIfNotExists Effect in the policy parameters. For more information, see Quickstart: Create a policy assignment to identify non-compliant resources.
4) Secure Administrative Rights
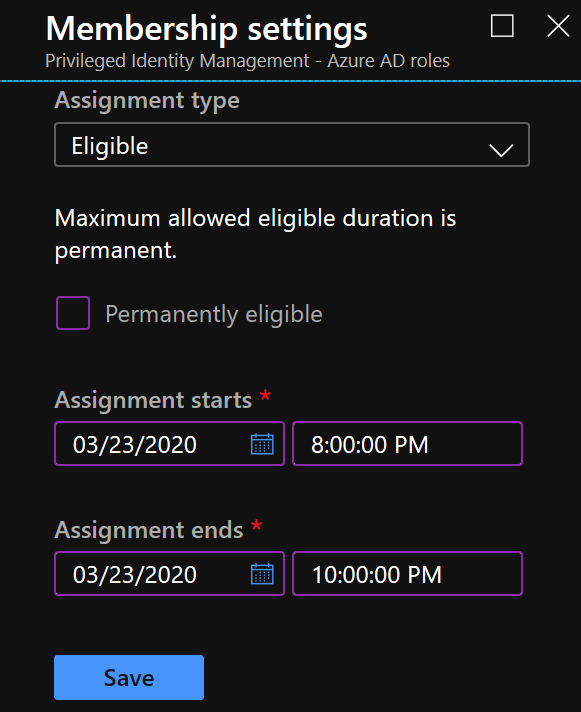
You can secure administrative rights with Azure Active Directory Privileged Identity Management. This feature provides tight control over administrative rights including conditional access, eligibility windows, global admin approvals, admin time windows and logging. Deploy Azure AD Privileged Identity Management via the steps below. For more information, see Deploy Azure AD Privileged Identity Management (PIM).
- Navigate to the Azure Active Directory Blade.
- Select Identity Governance.
- Select Manage Role Assignments under Privileged Identity Management.
- Select Manage under Manage Access.
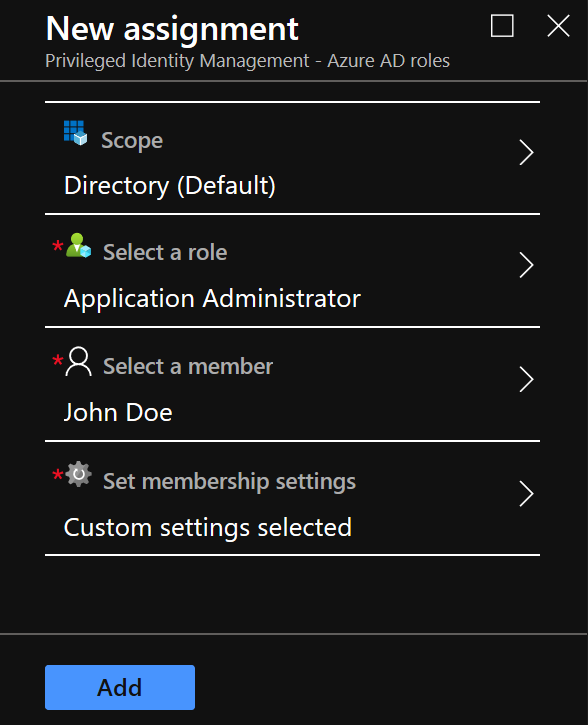
- Select +Add Member.
- Set Scope, this can be tailored to Directory (Default) or more granular to assets based on your requirements.

- Select a role based on RBAC groups. For this example, we’ve selected Application Administrator rights. Under Select a member, we’ve selected user John Doe.
- Select a role based on RBAC groups. For this example, we’ve selected Application Administrator rights. Under Select a member, we’ve selected user John Doe.

- Set membership settings, in this example John Doe will be temporarily eligible to request Application Administrator rights within the notional change window of 8-10PM.
- Click Save to deploy PIM configuration.
5) Configure Lockout Threshold
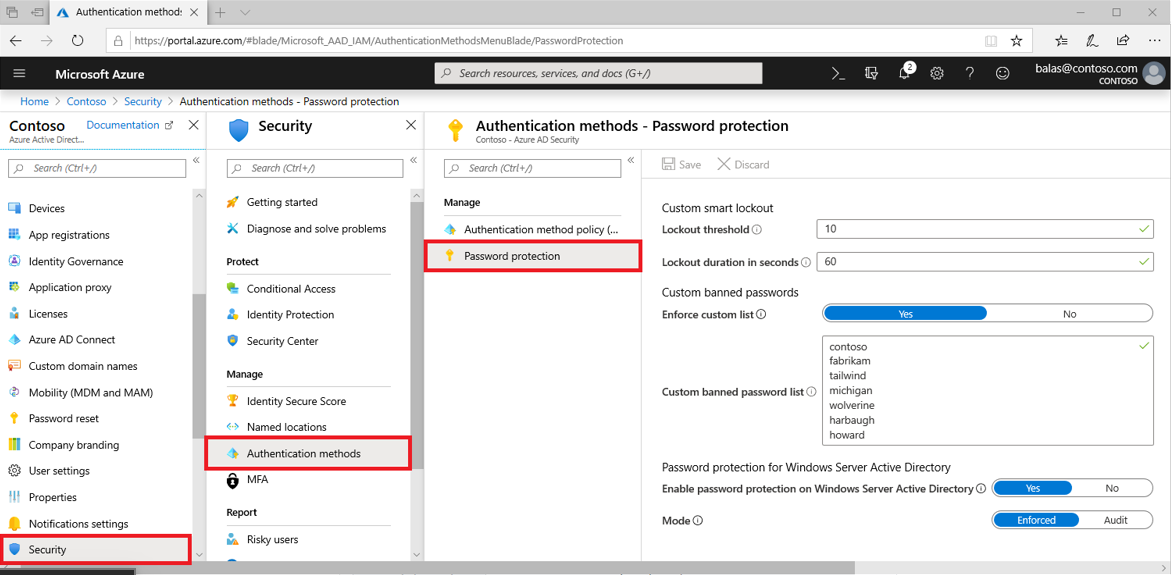
Lockout threshold mitigates brute force attacks against passwords. This limits how many incorrect guesses someone can make before the account locks out. Consider a brute force attack, setting the lockout threshold to 10 within an hour limits guesses to 216 per day (9 X 24) which isn’t effective for password guessing attempts. Note, password controls apply to cloud identities within Azure Active Directory. Federated identities require different approaches. Configure Azure AD smart lockout values via the steps below. For more information, see Azure Active Directory smart lockout.
- Sign into the Azure portal.
- Search for and select Azure Active Directory. Select Security > Authentication methods > Password protection.
- Set the Lockout threshold, based on how many failed sign-ins are allowed on an account before its first lockout. The default is 10.
- Set the Lockout duration in seconds, to the length in seconds of each lockout. The default is 60 seconds (one minute).

6) Configure Inactivity Logoff
Sign-in frequency defines the time-period before a user is asked to sign in again when attempting to access a resource. The Azure Active Directory (Azure AD) default configuration for user sign in frequency is a rolling window of 90 days. Asking users for credentials often seems like a sensible thing to do, but it can backfire: users that are trained to enter their credentials without thinking can unintentionally supply them to a malicious credential prompt.
A persistent browser session allows users to remain signed in after closing and reopening their browser window. The Azure AD default for browser session persistence allows users on personal devices to choose whether to persist the session by showing a “Stay signed in?” prompt after successful authentication. If browser persistence is configured in AD FS using the guidance in the article AD FS Single Sign-On Settings, we will comply with that policy and persist the Azure AD session as well. You can also configure whether users in your tenant see the “Stay signed in?” prompt by changing the appropriate setting in the company branding pane in Azure portal using the guidance in the article Customize your Azure AD sign-in page.
Configure Sign-In Frequency and Persistent Browser Session controls via the steps below. For more information see Configure authentication session management with Conditional Access.
- Sign into the Azure portal.
- Search for and select Azure Active Directory. Select Security > Conditional Access
- Select +New Policy.
- Configure Users and groups, Cloud apps or actions and Conditions for your use case.
- Select Grant Controls which will configure grant or block access based in several conditions including MFA, Device compliance, Hybrid AD joined device, Approved client app, and/or App protection policy.
- Select Session, configure Sign-in frequency and specify a value in days or hours.
- Select Session, configure Persistent browser session to Never persistent.
- Select Create.
7) Leverage Adaptive Access Control
Microsoft Azure leverages adaptive access control through Azure Active Directory (AAD) conditional access. The modern security perimeter now extends beyond an organization’s network to include user and device identity. Organizations can utilize these identity signals as part of their access control decisions. Conditional access policies incorporate Azure AD Identity Protection risk detections and include three default policies:
- Require all users to register for Azure Multi-Factor Authentication.
- Require a password change for users that are high risk.
- Require multi-factor authentication for users with medium or high sign-in risk.

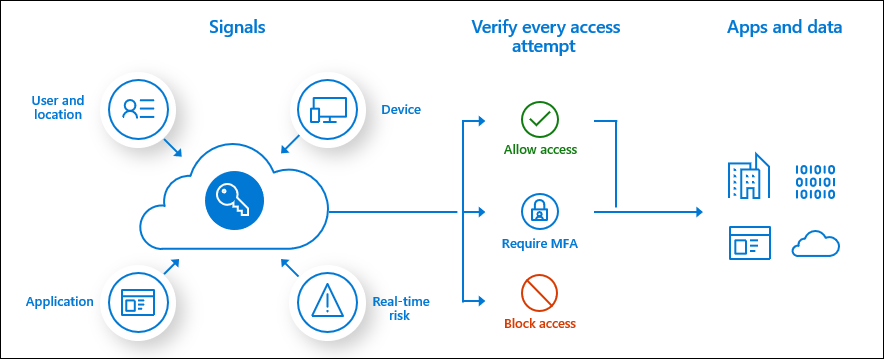
Conditional Access is the tool used by Azure Active Directory to bring signals together, to make decisions, and enforce organizational policies. Conditional Access is at the heart of the new identity driven control plane. Conditional access policies are highly configurable and include several capabilities:
- Require MFA for admins
- End user protection
- Block legacy authentication
- Require MFA for Service Management
- Block access by location
- Require trusted location for MFA registration
- Require compliant devices
For more information, see What is Conditional Access?
8) Secure Remote Access
Partner remote access to a network can introduce vulnerabilities if not properly implemented, secured and controlled. Azure has several options to facilitate remote access including virtual network gateway. A virtual network gateway is composed of two or more VMs that are deployed to a specific subnet you create called the gateway subnet. Virtual network gateway VMs contain routing tables and run specific gateway services.
VPN gateways can be deployed in Azure Availability Zones. This brings resiliency, scalability, and higher availability to virtual network gateways. Deploying gateways in Azure Availability Zones physically and logically separates gateways within a region, while protecting your on-premises network connectivity to Azure from zone-level failures.
Creating a virtual network gateway can take up to 45 minutes to complete. When you create a virtual network gateway, gateway VMs are deployed to the gateway subnet and configured with the settings that you specify. After you create a VPN gateway, you can create an IPsec/IKE VPN tunnel connection between that VPN gateway and another VPN gateway (VNet-to-VNet), or create a cross-premises IPsec/IKE VPN tunnel connection between the VPN gateway and an on-premises VPN device (Site-to-Site). You can also create a Point-to-Site VPN connection (VPN over OpenVPN, IKEv2, or SSTP), which lets you connect to your virtual network from a remote location, such as from a conference or from home. For more information, see What is VPN Gateway?
9) Manage Connections
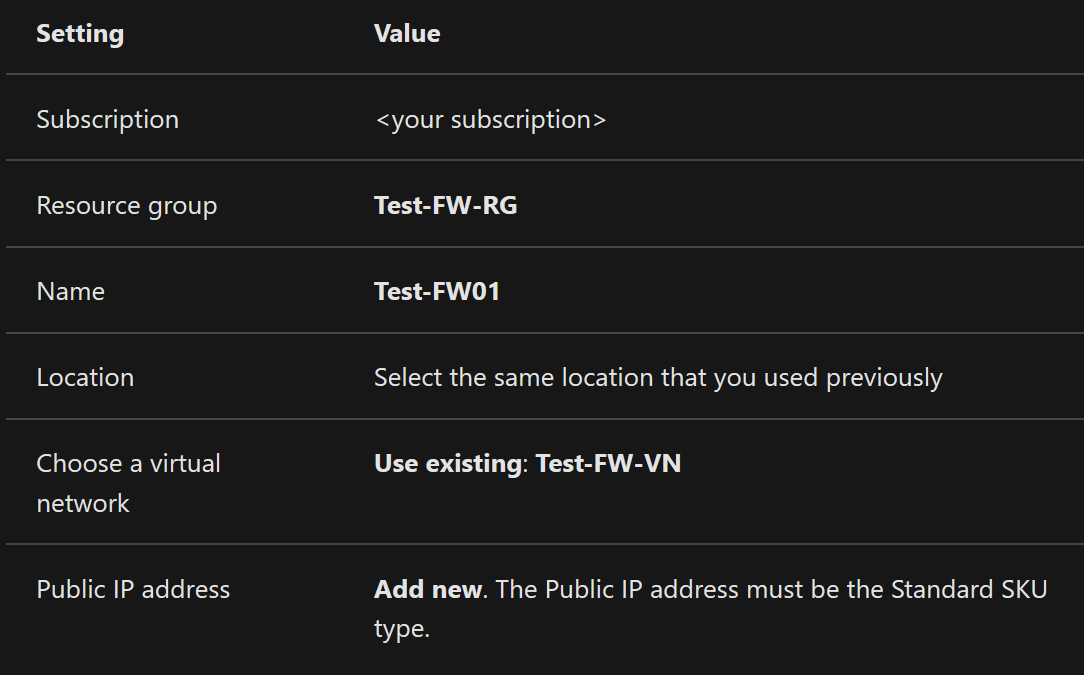
Azure Firewall is a managed, cloud-based network security service that protects your Azure Virtual Network resources. It’s a fully stateful firewall as a service with built-in high availability and unrestricted cloud scalability. You can centrally create, enforce, and log application and network connectivity policies across subscriptions and virtual networks. Azure Firewall uses a static public IP address for your virtual network resources allowing outside firewalls to identify traffic originating from your virtual network. The service is fully integrated with Azure Monitor for logging and analytics. You can manage connections and block access to external resources by creating an Azure Firewall and configuring respective policies. Deploy Azure Firewall via the steps below. For more information, see Deploy and configure Azure Firewall.
- On the Azure portal menu or from the Home page, select Create a resource.
- Type firewall in the search box and press Enter.
- Select Firewall and then select Create.
- On the Create a Firewall page, use the following table to configure the firewall:

- Select Review + create.
- Review the summary, and then select Create to create the firewall.
- Select the Network rule collection tab to establish respective external resource blocking policies.
10) Control Data Usage
Controlling data usage and posting information to publicly accessible systems requires information discovery, classification and labeling. Azure Information Protection (AIP) provides a Scanner feature with policy to scan and identity target information within your on-premises and cloud resources. You can classify sensitive information via the steps outlined in the next section. AIP provides the protections outlined below to protect your information from unauthorized disclosure or storage. For more information, see How to configure a label for Rights Management protection.
- Only users within your organization can open the company-confidential document or email.
- Only users in a specific department can edit and print the document or email, while all other users in your organization can only read this document or email.
- Users cannot forward an email or copy information from it that contains sensitive data.
- A document cannot be opened after a specified date.
11) Secure Confidential Data
You can secure confidential data and control information flows with Azure Information Protection. Azure Information Protection (AIP) is a cloud-based solution that helps an organization to classify and optionally, protect its documents and emails by applying labels. Labels can be applied automatically by administrators who define rules and conditions, manually by users, or a combination where users are given recommendations. Configure an AIP policy via the steps below. For more information, see How to configure the policy settings for Azure Information Protection.
- Sign into the Azure portal.
- Navigate to the Azure Information Protection pane.
- From the Classifications > Policies menu option: On the Azure Information Protection – Policies pane, select Global if the settings that you want to configure will apply to all users.
- On the Policy pane, configure the settings:

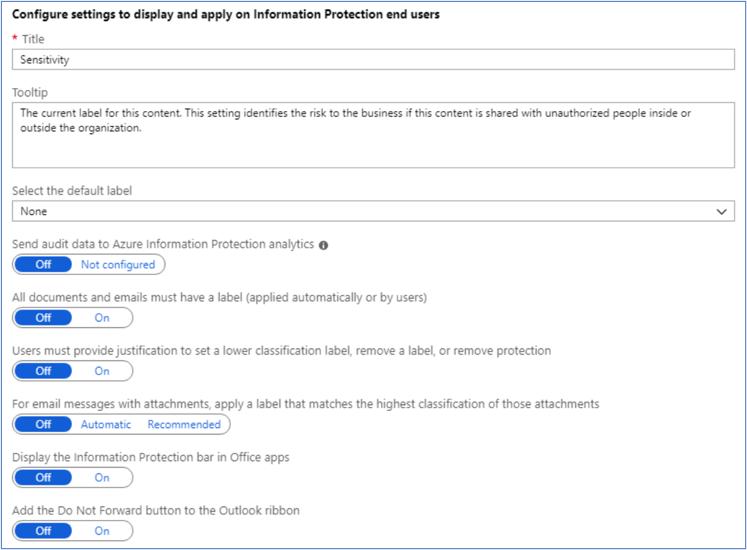
-
- Select the default label: When you set this option, select the label to assign to documents and emails that do not have a label. You cannot set a label as the default if it has sublabels.
- Send audit data to Azure Information Protection analytics: Before you create an Azure Log Analytics workspace for Azure Information analytics, the values for this setting display Off and Not configured. When you create the workspace, the values change to Off and On.
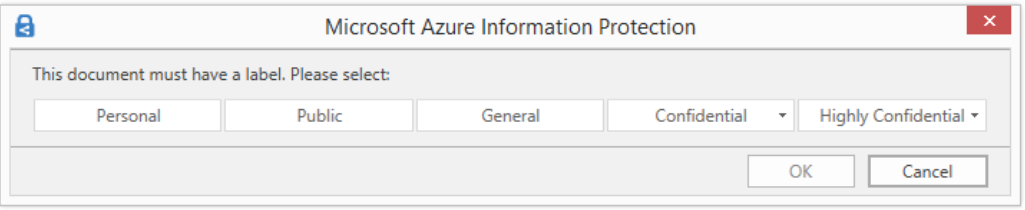
- All documents and emails must have a label: When you set this option to On, all saved documents and sent emails must have a label applied. The labeling might be manually assigned by a user, automatically as a result of a condition, or be assigned by default (by setting the Select the default label option). In this example we’ll select Confidential.

- Select additional policy settings based on use case and select Save to implement.
Stay tuned for the published and upcoming CMMC blogs in the series:
- Access Control Maturity – this blog
- Audit & Accountability Maturity – live
- Asset & Configuration Management Maturity – live
- Identification & Authentication Maturity – live
- Incident Response Maturity – live
- Maintenance & Media Protection Maturity – live
- Recovery & Risk Management Maturity – live
- Security Assessment & Situational Awareness Maturity – live
- System & Communications Protection Maturity – live
- System & Information Integrity Maturity (5/28)
Learn more about CMMC with Microsoft
Here are some of the best resource to learn more about CMMC in the cloud with Microsoft:
- Accelerating CMMC compliance for Microsoft cloud (in depth review)
- CMMC-AB Standards with Regan Edens – National Conversation
- The Office of the Under Secretary of Defense for Acquisition and Sustainment CMMC Website
- The CMMC Accreditation Body Website
- Defense Federal Acquisition Regulation Supplement (DFARS)
- NIST SP 800-171 Compliance
Bookmark the Security blog to keep up with our expert coverage on security matters and follow us at @MSFTSecurity or visit our website for the latest news and updates on cybersecurity.
Are you a federal government agency that needs help with cybersecurity? Reach out to TJ Banasik or Mark McIntyre for additional details on the content above, or if you have any other questions about Microsoft’s cybersecurity investments for the federal government.
0 comments