Using Local Notifications in Xamarin.Mac
At Xamarin, we strive to empower you to create beautiful, practical, native mobile apps, but we also have a love of desktop applications. Xamarin.Mac and, more recently, Xamarin.Forms for Mac, give you everything you need to produce the same high quality app for the macOS desktop as you can for mobile devices.
Like mobile apps, a desktop app may not always be at the forefront of the user’s display. Sometimes we want to alert a user of something that’s happening, and local notifications are a great way to keep users engaged. Setting up local notifications with Xamarin.Mac takes just a few lines of code and is very similar to Xamarin.iOS. Today, we’re going to take another look at native Xamarin.Mac and add local notifications to our Pomodoro project, an app designed to help users segregate their workloads into 25 minute chunks.
Be sure to check out my Building Your First macOS App and Displaying Data with macOS Table Views blog posts if you haven’t already. You can also download today’s starting point here.
A Background On Notifications
The purpose of adding notifications to this app is to alert the user when 25 minutes has elapsed, even if the app is not in focus. As it stands, the dock icon bounces when the time has elapsed, since we’re displaying a modal alert; this is standard behavior on macOS and doesn’t require any extra coding from us. However, a bouncing dock icon does not provide any context as to what the alert is for (and can be quite annoying)!
Local notifications are different to push notifications in that you don’t need a web service such as Azure to push a notification to the app. The notification is set up in code locally and displayed when triggered manually in code. This is perfectly suited for our Pomodoro app, as we know exactly when we need to trigger the notification.
Adding the Code
The code for the notification is just a few lines. This needs to be added after we stop the timer; it doesn’t need be invoked on the main (UI) thread:
// Trigger a local notification after the time has elapsed
var notification = new NSUserNotification();

// Add text and sound to the notification
notification.Title = "25 Minutes is up!";
notification.InformativeText = "Add your task to your activity log";
notification.SoundName = NSUserNotification.NSUserNotificationDefaultSoundName;
notification.HasActionButton = true;
NSUserNotificationCenter.DefaultUserNotificationCenter.DeliverNotification(notification);
As you can see, we’re creating a notification in the code and then setting the title and text. We also have the opportunity to select a sound to be played. In this instance, we’ll just go with the default notification sound.
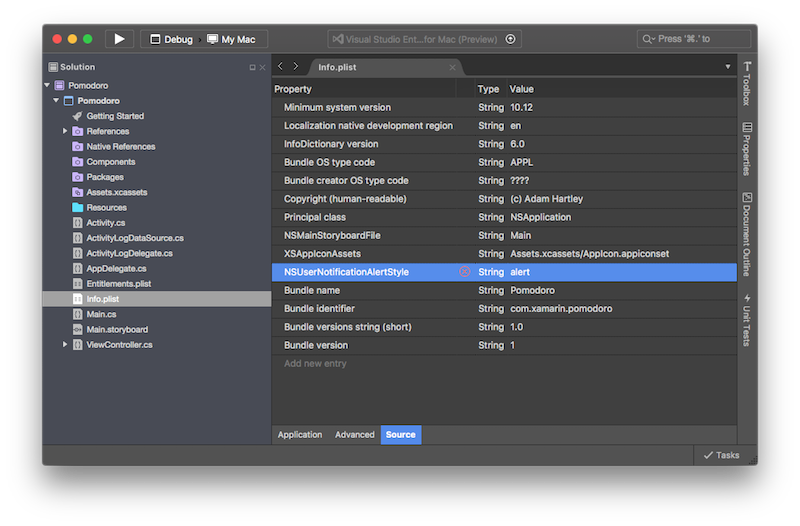
We’re also setting HasActionButton, which gives the notification two buttons by default: “close” and “show”. macOS also sets the app notifications to a “Banner” style notification by default, which doesn’t allow buttons. We can change this in System Preferences to an “Alert,” which will show buttons. There is, however, a way to force an Alert style notification by setting the following string value in Info.plist
NSUserNotificationAlertStyle
alert
Note: It’s important to note a quirk in macOS here. This setting will only affect the notification when the app is signed for release. During debugging this setting is ignored, so we need to set the alert type in System Preferences for now.
Trying it out
So, all we need to do now is test our new notification. Run the app, let the timer expire, and hopefully you’ll see the following notification:

Having the notification as an alert improves the user experience, as the user can chooses to either close the notification or hit “show” to bring our app into focus.
Wrapping Up
Notifications are a powerful way to keep users interacting with your app, while also being able to display relevant information when needed. Setting up local notifications is simple and effective and doesn’t require any extra infrastructure. These notifications can also be extended in various ways by customizing the alert sound, buttons, and more advanced techniques such as providing a text field.
To view the completed project for this blog post, check out my Pomodoro GitHub repository here.

 Light
Light Dark
Dark
0 comments