

This is a guest blog post by Charlin Agramonte. Charlin is a Microsoft MVP. She writes Xamarin articles in her blog xamgirl.com and you can find her on Twitter at @Chard003.
Multilingual support is one of the most common requirements for mobile apps. One of the great parts of building mobile apps with Xamarin is that handling multiple languages is super simple. It may seem like a difficult task, but it is relatively easy if you leverage built in .NET capabilities to add multilingual support to your apps. A while back I wrote an article on how to do add multilingual support with my plugin. In this article, I will talk about some typical problems that you might face when adding multilingual support and how to solve them. Let’s start!
Setting App Culture
When multiple languages are handled in our application, a typical use case is to support that the user can change the language within the application. The problem can come up because we often bind our XAML strings to the AppResources class directly. This means we don’t have a mechanism to observe when the language changes and we would need to restart the application to get those strings updated.
The code to set the Culture is usually set in the App startup code:
Thread.CurrentThread.CurrentUICulture = language;
AppResources.Culture = language;
App.Current.MainPage = new NavigationPage(new MainPage());
While this works, restarting our entire application could be painful and isn’t a good user experience.
Improving Runtime Changes
As I mentioned, the main problem with this is approach is that we bind to the AppResources class;s strings directly in the XAML. Or the app is using code behind and a translate class that returns a string with the text changed.
When I was looking for a solution I found this great idea on StackOverflow with a localization manager.
I created a LocalizationResourceManager class that handles language changes and also will have a property with the translation. When the language changes it will invalidate that string so it will force the property to change.
 public class LocalizationResourceManager : INotifyPropertyChanged
    {
        public static LocalizationResourceManager Instance { get; } = new LocalizationResourceManager();

        public string this[string text]
        {
            get
            {
                return AppResources.ResourceManager.GetString(text, AppResources.Culture);
            }
        }

        public void SetCulture(CultureInfo language)
        {
            Thread.CurrentThread.CurrentUICulture = language;
            AppResources.Culture = language;

            Invalidate();
        }

        public event PropertyChangedEventHandler PropertyChanged;

        public void Invalidate()
        {
            PropertyChanged?.Invoke(this, new PropertyChangedEventArgs(null));
        }
    }
Instead of binding our strings directly to the AppResources class, a Translate Extension that returns a BindingProperty is used and binds to our new LocalizationResourceManager.
[ContentProperty("Text")]
public class TranslateExtension : IMarkupExtension<bindingbase>
{
    public string Text { get; set; }
    object IMarkupExtension.ProvideValue(IServiceProvider serviceProvider)
    {
        return ProvideValue(serviceProvider);
    }

    public BindingBase ProvideValue(IServiceProvider serviceProvider)
    {
        var binding = new Binding
        {
            Mode = BindingMode.OneWay,
            Path = $"[{Text}]",
            Source = ResourceManagerHelper.Instance,
        };
        return binding;
    }
}
</bindingbase>
Finally, in our XAML we just have to use that translate extension.
<?xml version="1.0" encoding="UTF-8"?>
<ContentPage xmlns="http://xamarin.com/schemas/2014/forms"
             xmlns:x="http://schemas.microsoft.com/winfx/2009/xaml"
             x:Class="MultilingualXFSample.Views.ChangeLanguagePage"
             xmlns:helpers="clr-namespace:MultilingualXFSample.Helpers">

         <Label  Text="{helpers:Translate SelectLanguage}" />
</ContentPage>

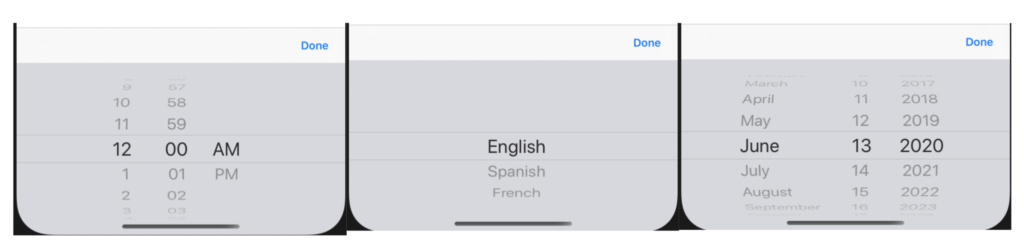
Platform Control Localization
Since native platforms don’t give us enough flexibility to change the control’s locale in runtime we have to do a bit of custom work. After checking all the Xamarin.Forms controls, I only found 3 that we need to localize (Picker, DatePicker, and TimePicker). Let’s first start with the “Done” button text that is common on Pickers.
iOS
For iOS, I created an effect that can be applied to all of these controls. I added it as a general style so I don’t have to add it each control when I use them in my UI.
Effect
[assembly:ResolutionGroupName("MyCompany")]
[assembly:ExportEffect(typeof(iOSPickerDoneButtonEffect), nameof(PickerDoneButton))]
namespace MultilingualXFSample.iOS
{
   public class iOSPickerDoneButtonEffect : PlatformEffect
   {
    UIButton _doneBtn;
    UIBarButtonItem _originalDoneBarButtonItem;


    protected override void OnAttached()
    {
        var effect = (PickerDoneButton)Element.Effects.FirstOrDefault(e => e is PickerDoneButton);

        if (effect != null && Control?.InputAccessoryView is UIToolbar toolbar && toolbar.Items?.Count() > 0)
        {
            _originalDoneBarButtonItem = toolbar.Items[1];

            _doneBtn = new UIButton(UIButtonType.System);
            _doneBtn.SetTitle(effect.ButtonTitle, UIControlState.Normal);
            _doneBtn.Font = UIFont.BoldSystemFontOfSize(UIFont.SystemFontSize);
            _doneBtn.TouchUpInside += HandleButtonClicked;

            _originalDoneBarButtonItem.CustomView = _doneBtn;

            if (Control.InputView is UIDatePicker picker)
            {
                picker.Locale = new Foundation.NSLocale(LocalizationResourceManager.Instance.CurrentCulture.TwoLetterISOLanguageName);
            }
        }
    }


    protected override void OnDetached()
    {
        if(_doneBtn !=null)
        {
            _doneBtn.TouchUpInside -= HandleButtonClicked;
            _doneBtn = null;
            _originalDoneBarButtonItem.CustomView = null;
        }
    }

    void HandleButtonClicked(object sender, EventArgs e)
    {
        UIApplication.SharedApplication.SendAction(_originalDoneBarButtonItem.Action, _originalDoneBarButtonItem.Target, sender: null, forEvent: null);
    }
  }
}
Style
<?xml version="1.0" encoding="utf-8"?>
<Application xmlns="http://xamarin.com/schemas/2014/forms"
             xmlns:x="http://schemas.microsoft.com/winfx/2009/xaml"
             xmlns:d="http://xamarin.com/schemas/2014/forms/design"
             xmlns:mc="http://schemas.openxmlformats.org/markup-compatibility/2006"
             xmlns:helpers="clr-namespace:MultilingualXFSample.Helpers"
             xmlns:effects="clr-namespace:MultilingualXFSample.Effects"
             mc:Ignorable="d"
             x:Class="MultilingualXFSample.App">
    <Application.Resources>
        <ResourceDictionary>
            <Style TargetType="Picker" ApplyToDerivedTypes="True">
                  <Style.Setters>
                    <Setter Property="effects:PickerDoneButtonEffect.DoneButtonText" Value="{helpers:Translate Done}" />
                  </Style.Setters>
            </Style>

             <Style TargetType="DatePicker" ApplyToDerivedTypes="True">
                  <Style.Setters>
                    <Setter Property="effects:PickerDoneButtonEffect.DoneButtonText" Value="{helpers:Translate Done}" />
                  </Style.Setters>
            </Style>

             <Style TargetType="TimePicker" ApplyToDerivedTypes="True">
                  <Style.Setters>
                    <Setter Property="effects:PickerDoneButtonEffect.DoneButtonText" Value="{helpers:Translate Done}" />
                  </Style.Setters>
            </Style>
        </ResourceDictionary>
    </Application.Resources>
</Application>
Android
On Android, I created an effect for the Picker and for DatePicker/TimePicker I used a platform renderer. Since they have a Cancel/Done button, there’s not much flexibility to customize those buttons.
You can check the full implementation for both platforms here.
Localized C# Text
Since the AppResources class is a static class, we can access it directly in C# code with just a few steps:
Add the string to the Resource file.
<data name="WelcomeText" xml:space="preserve">
    <value>Welcome to my App</value>
</data>
Use it!
var text = AppResources.WelcomeText;
Remembering the Language
Thanks to Xamarin.Essentials this is pretty easy to achieve. We only have to persist the latest language code in the Preferences and load that persisted language code when opening the application.
I added this logic to the actual LocalizationResourceManager.
namespace MultilingualXFSample.Helpers
{
    public class LocalizationResourceManager : INotifyPropertyChanged
    {
        private const string LanguageKey = nameof(LanguageKey);

        private LocalizationResourceManager()
        {
            SetCulture(new CultureInfo(Preferences.Get(LanguageKey, CurrentCulture.TwoLetterISOLanguageName)));
        }
        //...
        public void SetCulture(CultureInfo language)
        {
            //...
            Preferences.Set(LanguageKey, language.TwoLetterISOLanguageName);
        }
    }
}
Handle small text modifications
There are some cases where we want to use translated text with a minor string modification. For example, we have the text “Select Language” and “Select Language:”. For these use cases we have a few options, we can add both texts in our AppResources file or add the text with the : in our viewmodel. The disadvantage of using the first one is that you will have repeatable texts in your AppResource file and using the second one you will be handling presentation logic in the ViewModel.
A better approach is to use a FormattedText:
  <Label>
    <Label.FormattedText>
        <FormattedString>
            <Span Text="{helpers:Translate SelectLanguage}" />
            <Span Text=":" />
        </FormattedString>
    </Label.FormattedText>
</Label>
This approach works very well when you are using a Label, since it supports FormattedText, but what happens when you have simple string? Since we bind to the AppResources class or use a TranslateExtension returning a simple text you can’t use StringFormat.
Workaround Modify our actual TranslateExtension file to support StringFormat.
[ContentProperty("Text")]
    public class TranslateExtension : IMarkupExtension<BindingBase>
    {
        public string Text { get; set; }
        public string StringFormat { get; set; }
        object IMarkupExtension.ProvideValue(IServiceProvider serviceProvider)
        {
            return ProvideValue(serviceProvider);
        }

        public BindingBase ProvideValue(IServiceProvider serviceProvider)
        {
            var binding = new Binding
            {
                Mode = BindingMode.OneWay,
                Path = $"[{Text}]",
                Source = ResourceManagerHelper.Instance,
                StringFormat= StringFormat

            };
            return binding;
        }
    }
And the XAML:
<Label Text="{helpers:Translate SelectLanguage, StringFormat='{0}:'}" />
Final thoughts
As you see, handling Multilingual in Xamarin.Forms is quite easy even in the most complex scenarios there are easy ways to get it working for your needs. As an extra recommendation, I encourage you to check these great tips in the Xamarin documentation about Localization best practices that will help you to have more consistent code. Additionally, for simplicity is to use the Multilingual Toolkit if you are using Visual Studio for Windows and MFractor if you are using Visual Studio for Mac. Both are really useful tools when it comes to localization related tasks. That’s all for now. You can check the full source code used here.
Happy coding!
Any chance we could get few tips on how to do this using our favorite prism views/viewmodels…I’m stuck on adding localizedresource property to a viewmodelbase, as it seems that prism initializes a view(model) without calling any of the base constructrors first in which I try to fill the localizedresource from the app.currentlanguage value