
Android Support Libraries are an essential part to every Android application and you’ll find them absolutely everywhere. The Support Libraries offer developers the ability to add the latest and greatest features of Android to their application while maintaining backward compatibility with older versions of Android. As new versions of the Android SDK continue to roll out, so do updates to the Support Libraries; keeping them up-to-date and installing the correct versions is an important (and sometimes frustrating) part of Android development. This blog post will help demystify the Support Libraries and help you upgrade to the latest versions.

Versioning
The first thing to understand is how Support Libraries are versioned. I discussed this topic on the Xamarin Podcast with Jon Dick a few weeks back, but here’s a quick breakdown: every Support Library NuGet has a semantic version number (Major.Minor.Patch) that matches the revision of their java counterparts, so you can always see what’s in each release by browsing the revision history. Sometimes you’ll see an additional fourth patch number at the end signifying bug fixes to the NuGet. As of this blog, version 25.3.1 is the latest stable NuGet that Xamarin developers have access to. The most important number to take away is the Major version number of 25. This number signifies that it was built against Android SDK API Level 25 and means that to install this NuGet and use it properly, you must choose API 25 or higher to compile against inside of Visual Studio, otherwise you may see this error:
Could not install package ‘Xamarin.Android.Support.Compat 25.3.1’. You are trying to install this package into a project that targets ‘MonoAndroid,Version=v7.0’, but the package does not contain any assembly references or content files that are compatible with that framework.
Updating Support Libraries
Now that we have a full grasp on Support Library versioning, we can update our existing libraries to the latest versions. At this point you may be wondering why you need to update your libraries. As time goes on, the Support Libraries add new features, but also offer several bug fixes that apps need. In addition, you may be taking dependencies on other libraries such as Google Play services or Plugins for Xamarin, which may have been built against the latest support packages. In fact, recognizing that now is the time to update, I recently updated all of my Plugins to target .NET Standard and the latest support libraries.
Step 1: Install Android SDK 25
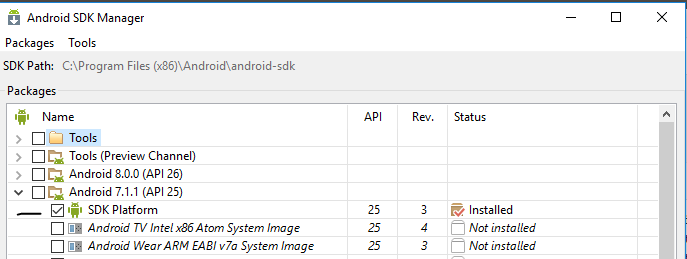
To be able to compile against API 25 as I showed above, you’ll need to install the Android SDK for API 25. Under Tools->Android->Android SDK Manager… you’;l find the SDK Manager to update to API 25. The first thing to do is make sure you “deselect all” and find the SDK Platform 25 under Android 7.1.1. You should have one package to install. (If using Visual Studio for Mac, read through our guide on the new SDK Manager).
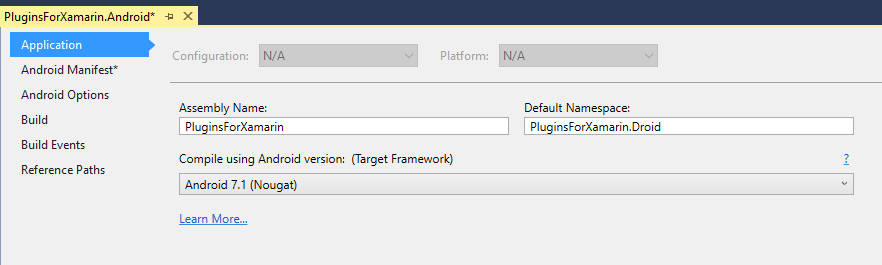
After installation we’ll need to select to compile against this SDK:
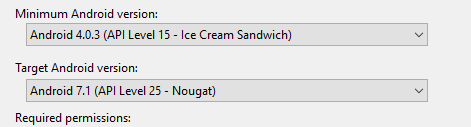
Additionally, it’s best practice to also set our target to the same version as the compile version.
At this point, it’s highly recommended to close and re-open your solution. This ensures that all of your settings are synced and ready for NuGet to kick into action. You’ll see an error when upgrading that you aren’t targeting the correct version of Android if you don’t set the compile targets correctly and they haven’t taken effect.
Step 2: Updating NuGets
Now it’s time to update the Support NuGets. It’s extremely important to update ALL of the support libraries that you have installed. Failure to do so will lead to mismatched versions and compilation errors. Right-click on your Android project and select “Manage NuGet Packages…” In the update tab you’ll see a list of Support Libraries to target. Simply select all packages and hit “Update”.

This ensures that all NuGets and dependencies get updates. You may be prompted to close and re-start Visual Studio; ensure that you do this so the projects are fully updated.
If you’re using Visual Studio for Mac, you’ll see updates for the NuGets in the Packages node of your project. You can update them one at a time or right-click on the Packages node and update all.
After updating, I always like to double check that ALL of the packages have been updated by closing the solution and opening it again and repeating Step 2. After this is done, make sure you perform a full Clean and then Rebuild of your project.
There you have it, your Support Libraries are up to date and ready to go!
Video Walkthrough
Want to see it in action? I recently walked through the upgrade path on The Xamarin Show on Channel 9 with plenty of tips and tricks along the way: